1
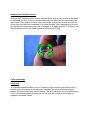
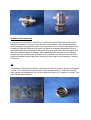
Taifun GT – User Guide
Congratulations, you have purchased a first class repairable atomizer. To keep you
atomizer always in good functionality and to use your atomizer correctly please read
this manual carefully.
Notice
The Taifun GT will be delivered in a clean condition and does not need to be cleaned
before first use. The O-rings are already applied with Glycerine (VG). The atomizer
chamber sleeve has a slight resistance when being moved. This is designed to
prevent the sleeve from moving while the base is screwed into the tank.
Maintenance and cleaning
All parts of the Taifun GT except the combo tank can be cleaned with hot or boiled
water. To maintain a good functionality we recommend applying Glycerine or e-liquid
to the O-rings after cleaning. To avoid deformation of the Plexiglas part of the Tank
please do not exposure the tank to temperatures above 60 degree Celsius i.e. hot
water or leaving it in a car at high temperatures. The Plexiglas part and the Stainless
steel part of the tank are pressed together without glue.
Handling the chamber sleeve
The atomizer chamber sleeve can be lowered down to give easy access to the posts
to assemble the coil. To do so hold the base with one hand and the sleeve with the
other hand. Then push the sleeve down with slight circular movements from the left
to the right until the sleeve engages in its lower position. After assembling of the coil
pull up the sleeve the same way until it engages in its upper position. The sleeve can
also be pulled out fully for cleaning and to maintain the O-ring
.
Coils and setups
Silica coil
It is recommended to make a coil of 3 strands of 2mm silica or glass fibre wick to
fully fill up the wick holes of the atomizer chamber. The recommended length is
approx 23mm less wick may cause leaking. The wick has to be cut short with approx
2 to 3 mm overhang after screwing on the cap onto the sleeve to avoid getting
trapped in the base thread.
Stainless steel mesh coil
Cut a piece of mesh 400 to 40x100 mm. Oxidize as normal. Roll the mesh to get a
diameter of approx 2.5mm to fit into the slots of the sleeve. After attaching the coil
and screwing on the cap both ends of the wick have to be cut short with approx 2mm
overhang. Both the Silica and the mesh coil have to be placed diagonally with the
wire ends below the coil between the posts. One wire end has to point forwards and
the other end backwards (Z-shape). After assembling the coil pull up the chamber
sleeve carefully and bring the wick slots in line with the coil. Screw on the cap after.
Hold the chamber sleeve tight while screwing on the cap to avoid twisting or tearing
off the coil.
Tip
Cut a piece of SS-mesh to 100mm x 40mm long. Roll the mesh to get a roll of approx
2.5 mm. The roll should fit into the slots of the chamber sleeve. Then torch the roll
until it glows red completely. Do not cool down the mesh roll in water or e-liquid. This
will keep the mesh flexible.
Filler Wick
Replace the O-ring on the centre pole of the top cap with a thicker O-ring to give the
filler a better hold. Leave the chamber open (without cap) and place the slots of the
chamber sleeve in an angle of 90 degree to the wick ends. After pulling up the sleeve
the ends of the wick will be in the right position. Cut a piece of Polyester wool filler to
14cm long x 1.7cm wide and wrap it around the centre pole of the top cap. The coil is
recommended to be made of 3 strands of 2mm silica or glass fibre wick at a length of
4 cm.
Filling up the tank
To fill up the tank simply turn the tank upside-down with the drip tip being removed
and fill up with e-liquid up to level with the O-ring of the centre pole. Screw the base
in after.
Flooding, leaking and the possible causes
Drawing to hard on the drip tip.
Chamber sleeve not fully engaged in the upper position.
O-ring of the centre pole is broken.
Not enough silica wick in the wick holes.
Silica wick is to long and therefore get trapped in the base thread.
SmokerStore GmbH
www.smokerstore.de