1
iPhone Developer Program
Standard Program Portal User Guide for OS X iPhone 2.0
iPhone Developer Program User Guide
Welcome
3
Getting Started
Development
4
Setting up your iPhone Development Team (if applicable)
Obtaining your iPhone Development Certificate
Assigning Apple Devices to your Team
Installing OS X iPhone
Creating your App ID
Creating and Downloading Development Provisioning Profiles
Running your Development Application on a Provisioned Device
Distribution
24
Preparing your Application for Distribution
Submitting your application via iTunes Connect
Distributing your application with Ad Hoc Distribution
Glossary
50
iPhone Developer Program User Guide 1
Welcome
Getting Started
Welcome to the iPhone Developer Program, your destination for all the resources you need to develop, test and distribute
your OS X iPhone applications. The iPhone Dev Center and Program Portal are designed to walk you through each step
necessary to get your application from code to customer.
In order to install and test your application on an Apple device, you’ll need to complete the following tasks
in the Program Portal:
•
•
•
•
•
Set up your Development Team (for those enrolled as a Company)
Designate Apple Devices for your Development Team
Request and Authorize iPhone Development Certificates
Create a unique App ID for your Application
Create and Download a Development Provisioning Profile
When you are ready to distribute your application, your Team Agent will need to complete the following
additional tasks in the Portal:
•
•
•
•
Create and Download an iPhone Distribution Certificate
Create and Download a Distribution Provisioning Profile
Build your application with Xcode
Submit your application for Distribution
The user guide contains detailed information regarding each of the above steps.
© 2008 Apple Inc. All rights reserved. - Apple Confidential
iPhone Developer Program User Guide 2
Development
The following topics will inform you about the required steps for installing your code on an Apple device (iPhone or iPod
touch) for development and debugging purposes.
Setting up your iPhone Development Team (if applicable)
If you have enrolled your company in the iPhone Developer Program, you first need to set up your iPhone Development
Team in the ‘Team’ section of the Program Portal.
If you have enrolled as an Individual in the iPhone Developer Program, you are designated the Team Agent and therefore
have access to all Program Portal capabilities. You can not add any additional team members.
Team Member Roles and Responsibilities
A development team consists of individuals with the following roles:
• Team Agent
The Team Agent (the original enrollee accepted into the iPhone Developer Program) can invite Team Admins and Team
Members, approve digital certificate requests, enter devices into the Program Portal, create App IDs, obtain an iPhone
Distribution Certificate, and create Development and Distribution Provisioning Profiles. The Team Agent is the primary contact
for the Development Team and is responsible for accepting all iPhone Developer Program agreements.
• Team Admin
Team Admins can invite new Team Admins and Team Members, approve digital certificate requests, enter devices into the
Program Portal, and create Development Provisioning Profiles. All teams with multiple members require a minimum of two
Team Admins (including the Team Agent). There is no maximum for the number of Team Admins that can be on a team with
multiple members.
• Team Member
Team Members can request digital certificates and download Development Provisioning Profiles. All three types of members
have the ability to test applications on Apple devices.
© 2008 Apple Inc. All rights reserved. - Apple Confidential
iPhone Developer Program User Guide 3
Adding Team Admins and Team Members
Team Agents and Team Admins can add new Team Members, who can have either an Admin or Member role, by navigating
to the ‘Invitations’ tab in the ‘Team’ section of the Program Portal. Click ‘Add’ to invite new people to join your team. After
hitting ‘Send’, the Program Portal will generate and deliver an email to the invitee. Team Admins will be notified via a separate
email when an invitation has been accepted.
If you need to designate a new Team Agent, please contact the ADC Support Team.
© 2008 Apple Inc. All rights reserved. - Apple Confidential
iPhone Developer Program User Guide 4
Obtaining your iPhone Development Certificate
In the ‘Certificates’ section of the iPhone Developer Program Portal, you can request individual iPhone Development
Certificates. All iPhone applications must be signed by a valid certificate before they can be run on an Apple device. In order
to sign applications for testing purposes, Team Members need an iPhone Development Certificate.
A digital identity is an electronic means of identification consisting of a secret "private key" and a shared "public key". This
private key allows Xcode to sign your OS X iPhone application binary.
The digital certificates you request and download are electronic documents that associate your digital identity with other
information, including your name, email address, or business. An iPhone Development Certificate is restricted to application
development only and is valid for a limited amount of time. The Apple Certification Authority can also invalidate ("revoke") a
certificate before it expires.
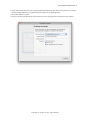
Generating a Certificate Signing Request
To request an iPhone Development Certificate, you first need to generate a Certificate Signing Request (CSR) utilizing the
Keychain Access application in Mac OS X Leopard. The creation of a CSR will prompt Keychain Access to simultaneously
generate your public and private key pair establishing your iPhone Developer identity. Your private key is stored in the login
Keychain by default and can be viewed in the Keychain Access application under the ‘Keys’ category. To generate a CSR:
1. In your Applications folder, open the Utilities folder and launch Keychain Access.
2. Choose Keychain Access -> Certificate Assistant -> Request a Certificate from a Certificate Authority. Note: If you have a
private key highlighted in the Keychain during this process, the resulting Certificate Request will not be accepted by the
Program Portal. Confirm that you are selecting “Request a Certificate From a Certificate Authority...” and not selecting “Request
a Certificate From a Certificate Authority with <Private Key>...”
3. In the User Email Address field, enter your email address. Please ensure that the email address entered matches the
information that was submitted when you registered as an iPhone Developer.
4. In the Common Name field enter your name. Please ensure that the name entered matches the information that was
submitted when you registered as an iPhone Developer.
5. No CA (Certificate Authority) Email Address is required. The ‘Required’ message will be removed after completing the
following step.
© 2008 Apple Inc. All rights reserved. - Apple Confidential
iPhone Developer Program User Guide 5
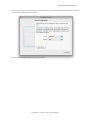
6. Select the ‘Saved to Disk’ radio button and if prompted, select ‘Let me specify key pair information’ and click ‘Continue’.
7. If ‘Let me specify key pair’ was selected, specify a file name and click ‘Save’. In the following screen select ‘2048 bits’ for the Key
Size and ‘RSA’ for the Algorithm. Click ‘Continue’.
8. The Certificate Assistant will create a CSR file on your desktop
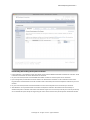
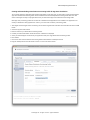
Submitting a Certificate Signing Request for Approval
1. After creating a CSR, log in to the iPhone Developer Program Portal and navigate to ‘Certificates’ -> ‘Development’ and click
‘Add Certificate’.
2. On your local system, open the saved CSR file using a text editor and copy the entire contents, including the “BEGIN” and
“END” tags.
3. Paste the entire contents of the CSR into the blank text field and click ‘Submit’. Note: If the Key Size was not set to 2048 bits
during the CSR creation process, the Portal will reject the CSR.
4. Upon submission, Team Admins will be notified via email of the certificate request.
5. Once your CSR is approved or rejected by a Team Admin, you will be notified via email of the change in your certificate
status.
© 2008 Apple Inc. All rights reserved. - Apple Confidential
iPhone Developer Program User Guide 6
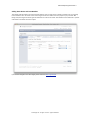
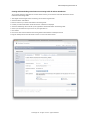
Approving Certificate Signing Requests
Team Agents and Team Admins have the authority and responsibility to approve or reject all iPhone Development Certificate
requests. In order to approve/reject Team Members’ requests, all Team Admins should first submit their own CSR for approval.
1. After submitting a CSR for approval, Team Admins will be directed to the ‘Development’ tab of the ‘Certificates’ section. Here,
CSRs can be approved or rejected by clicking the corresponding action next to each request.
2. Once a CSR is approved or rejected, the requesting Team Member is notified via email of the change in their certificate
status. Each iPhone Development Certificate is available to both the Team Member who submitted the CSR for approval and
to the Team Admin(s).
© 2008 Apple Inc. All rights reserved. - Apple Confidential
iPhone Developer Program User Guide 7
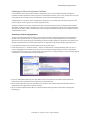
Downloading and Installing Development Certificates
1. In the ‘Certificates’-->’Distribution’ section of the Portal, control-click the WWDR Intermediate Certificate link and select “Saved
Linked File to Downloads” to initiate download of the certificate.
2. On your local machine, double-click the WWDR Intermediate certificate to launch Keychain Access and install.
3. Upon CSR approval, Team Members and Team Admins can download their certificates via the ‘Certificates’ section of the
Program Portal. Click ‘Download’ next to the certificate name to download your iPhone Development Certificate to your local
machine.
4. On your local machine, double-click the downloaded .cer file to launch Keychain Access and install your certificate.
5. Team Members can only download their own iPhone Development Certificates. Team Admins have the authority to
download the public certificates of all of their Team Members. Apple never receives the private key for a CSR. The private keys
are not available to anyone except the original key pair creator and are stored in the system keychain of that Team Member.
© 2008 Apple Inc. All rights reserved. - Apple Confidential
iPhone Developer Program User Guide 8
Saving your Private Key and Transferring to other Systems
It is critical that you save your private key somewhere safe in the event that you need to develop on multiple computers or
decide to reinstall your system OS. Without your private key, you will be unable to sign binaries in Xcode and test your
application on any Apple device. When a CSR is generated, the Keychain Access application creates a private key on your
login keychain. This private key is tied to your user account and cannot be reproduced if lost due to an OS reinstall. If you
plan to do development and testing work on multiple systems, you will need to import your private key onto all of the
systems you’ll be doing work on.
1. To export your private key and certificate for safe-keeping and for enabling development on multiple systems, open up the
Keychain Access Application and select the ‘Keys’ category.
2. Control–Click on the private key associated with your iPhone Development Certificate and click ‘Export Items’ in the menu.
The private key is identified by the iPhone Developer: <First Name> <Last Name> public certificate that is paired with it.
3. Save your key in the Personal Information Exchange (.p12) file format.
4. You will be prompted to create a password which is used when you attempt to import this key on another computer.
5. You can now transfer this .p12 file between systems. Double-click on the .p12 to install it on a system. You will be prompted
for the password you entered in Step 4.
© 2008 Apple Inc. All rights reserved. - Apple Confidential
iPhone Developer Program User Guide 9
Assigning Apple Devices to your Team
In order to debug your OS X iPhone application on an Apple device, a Team Agent or Team Admin must first enter the Unique
Device Identifier (UDID) for each iPhone and iPod touch into the Program Portal. The UDID is a 40 hex character string that is
tied to a single device, similar to a serial number. These UDIDs are included in the provisioning profiles created later. You can
input up to 100 devices on your development team.
Locating a Unique Device ID with Xcode
To find out your device’s UDID, simply connect your device to your Mac and open Xcode. In Xcode, navigate to the ‘Window’
drop down menu and select ‘Organizer’. The 40 hex character string in the Identifier field is your device’s UDID. Team
Members should send this string to their Team Admins for input into the Program Portal.
© 2008 Apple Inc. All rights reserved. - Apple Confidential
iPhone Developer Program User Guide 10
Locating a Unique Device ID with iTunes 7.7
Alternatively, you can also find out your device’s UDID using iTunes 7.7. or later. To do this, connect your device to your Mac
and launch iTunes. In iTunes, select your device in the ‘Devices’ section and navigate to the Summary tab. Click on the Serial
Number label to reveal the Identifier field and the 40 character UDID.
© 2008 Apple Inc. All rights reserved. - Apple Confidential
iPhone Developer Program User Guide 11
Adding Devices
Upon receiving a UDID, Team Admins should navigate to the ‘Devices’ section of the Program Portal and click ‘Add’. Admins
will enter a Device Name as well as the UDID and click ‘Submit’.
Removing Devices from your Development Team
To remove a device from your development team, navigate to the ‘Devices’ area of the Program Portal and click the ‘Remove’
link to the right of the desired device. Removing a device from your development team will invalidate provisioning profiles
containing that device. Affected provisioning profiles will need to be modified in order be downloaded again.
Editing Devices on your Development Team
To edit a device on your development team, navigate to the ‘Devices’ area of the Program Portal and click the ‘Modify’ link to
the right of the desired device. You may change the device name without affecting any existing provisioning profile(s)
associated with the device. However, if you change the device ID, you will invalidate any existing provisioning profile(s)
associated with the device. Affected provisioning profiles will need to be modified in order be downloaded again
© 2008 Apple Inc. All rights reserved. - Apple Confidential
iPhone Developer Program User Guide 12
Installing OS X iPhone
To run your code on an Apple device, you will need to install OS X iPhone onto each development device and "restore" each
device to a development state. Note: Once a pre-release version of OS X iPhone is installed on the device you cannot restore
the device to an earlier version of OS X iPhone. The device may only be used for development and testing purposes until that
version of OS X iPhone is publicly released. Please DO NOT install the iPhone OS before registering device UDIDs, as
installation on non-registered devices will render them inoperable.
1. Download the OS X iPhone Disk Image (.dmg) from the iPhone Dev Center for the Apple device you are using.
2. Connect your device to your Mac, close iTunes and launch Xcode.
3. Once the device is detected by Xcode, select ‘Use for Development’ when prompted.
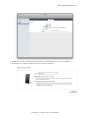
4. In Xcode, Navigate to ‘Window’->’Organizer’. There you should see your device and current software version.
5. In the ‘Software Version’ drop-down menu, select ‘Other Version’ and navigate in Finder to the OS X iPhone 2.0 .ipsw file
downloaded from the iPhone Dev Center. Click ‘Restore iPod’.
© 2008 Apple Inc. All rights reserved. - Apple Confidential
iPhone Developer Program User Guide 13
6. In Xcode, the restore proceeds. This process should NOT be interrupted; it will take approximately 5 minutes. Close any
prompts that iTunes may present during the restore process.
© 2008 Apple Inc. All rights reserved. - Apple Confidential
iPhone Developer Program User Guide 14
7. After the device reboots, Xcode again displays the ‘New Device Detected’ dialog. Click ‘Use for Development’.
8. To complete the OS X iPhone installation, launch iTunes and set up the device.
© 2008 Apple Inc. All rights reserved. - Apple Confidential
iPhone Developer Program User Guide 15
Creating your App ID
An App ID is a unique digital fingerprint that OS X iPhone uses to grant your application access to a portion of the Keychain
and is one part of your Development and Distribution Provisioning Profiles. In order to install your application on an OS X
iPhone based device, you will need to create an App ID.
Each App ID consists of a universally unique 10 character “Bundle Seed ID” prefix generated by Apple and a “Bundle Identifier”
suffix that is determined by a Team Admin. If you plan to develop and distribute more than one application, the Bundle
Identifier needs to be an asterisk at this time.
Generating an App ID
1. Team Agents or Team Admins should navigate to the ‘App ID’ section of the Program Portal.
2. Click ‘Add ID’.
3. Enter a common name for your App ID. This is a name for easy reference and identification within the Program Portal.
4. Enter an asterisk (*) character in the Bundle Identifier free-form text field to create your wildcard App ID to be used for all of
your applications.
5. Click ‘Submit’. At this time, the 10 character Bundle Seed ID is generated and concatenated with the Bundle Identifier you
entered. This resulting string is your App ID.
© 2008 Apple Inc. All rights reserved. - Apple Confidential
iPhone Developer Program User Guide 16
Creating and Downloading Development Provisioning Profiles
A Provisioning Profile is a collection of digital entities that uniquely ties developers and devices to an authorized iPhone
Development Team and enables a device to be used for testing. A Development Provisioning Profile must be installed on
each device on which you wish to run your application code. Each Development Provisioning Profile will contain a set of
iPhone Development Certificates, Unique Device Identifiers and an App ID.
Devices specified within the provisioning profile can be used for testing only by those individuals whose iPhone
Development Certificates are included in the profile. A single device can contain multiple provisioning profiles.
Creating a Development Provisioning Profile
1. In the ‘Provisioning’ section of the Portal, Team Admins should click 'Add' on the Development tab.
2. Enter a name for the provisioning profile.
3. Specify which devices will be associated with the provisioning profile. You must specify a device in order for that device to
utilize the provisioning profile. You can install a provisioning profile on any of your devices, however, if a device's UDID is not
included in the provisioning profile, the device cannot run that profile.
4. Specify which iPhone Development Certificates will be associated with the provisioning profile. You must specify an iPhone
Development Certificate in order for the application code signed with that same certificate to run on the device.
5. Specify a single App ID for the Development Provisioning Profile. Each Development Provisioning Profile can specify only ONE
App ID. Use the App ID containing the wildcard asterisk character to build all of your applications.
© 2008 Apple Inc. All rights reserved. - Apple Confidential
iPhone Developer Program User Guide 17
Installing a Development Provisioning Profile
All Team Agents, Admins and Members can download a Development Provisioning Profile from the ‘Provisioning’ section of
the Portal after it has been created. Only those developers whose Apple device IDs and iPhone Development Certificates are
included in the provisioning profile will be able to install and test applications on their device.
1. In the ‘Provisioning’ section of the Program Portal, click the download button next to the desired provisioning profile.
2. Drag the downloaded file into the ‘Organizer’ window within Xcode or onto the Xcode application icon in the dock. This will
automatically install the .mobileprovision file and create the proper directory. Alternatively, you can drag the .mobileprovision
file onto the iTunes 7.7 icon in the dock or copy the file to ‘home/Library/MobileDevice/Provisioning Profiles’. If the directory
does not exist you will need to create it.
© 2008 Apple Inc. All rights reserved. - Apple Confidential
iPhone Developer Program User Guide 18
Running your Development Application on a Provisioned Device
Now that you have an approved iPhone Development Certificate, an assigned Apple device and a properly installed
Development Provisioning Profile, Xcode can now build your application and install it on your development device. If you
have a single iPhone Development Certificate and iPhone Development Provisioning Profile, you don’t need to change any
settings in Xcode to start running your applications. Step-by-step instructions are:
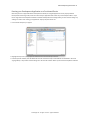
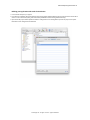
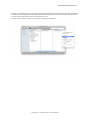
1. Launch Xcode and open your project.
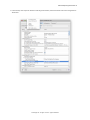
2. Highlight the top-level of your project and select the ‘Info’ icon from the top menu bar.
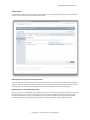
3. In the Project Info window, select the ‘Build’ tab and enter “iPhone Developer: YourFirstName YourLastName in the ‘Code
Signing Identity’->’Any iPhone OS’ field setting. This is the also the Common Name of your iPhone Development Certificate.
© 2008 Apple Inc. All rights reserved. - Apple Confidential
iPhone Developer Program User Guide 19
© 2008 Apple Inc. All rights reserved. - Apple Confidential
iPhone Developer Program User Guide 20
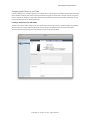
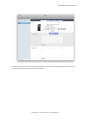
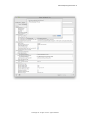
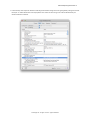
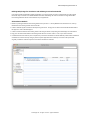
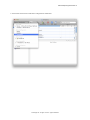
4. Select your Development Provisioning Profile from the ‘Code Signing Provisioning Profile’ setting.
© 2008 Apple Inc. All rights reserved. - Apple Confidential
iPhone Developer Program User Guide 21
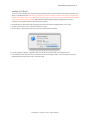
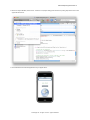
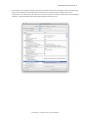
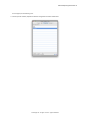
5. Back in the Project Window, select ‘Device - iPhone OS 2.0 (Project Setting)’ from the ‘Device | Debug’ drop down menu in the
upper-left hand corner.
6. Click ‘Build and Go’ to install the application on your Apple device.
© 2008 Apple Inc. All rights reserved. - Apple Confidential
iPhone Developer Program User Guide 22
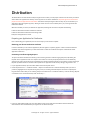
Distribution
The distribution area of the iPhone Developer Program Portal is where you will prepare and learn how to submit your iPhone
and/or iPod touch application for delivery via the App Store or for Ad Hoc distribution. Only Team Agents are authorized to
prepare and submit applications for distribution. The iPhone Developer Program offers two ways for you to Distribute your
application; either through the App Store, utilizing an iTunes Connect account created just for you, or through the Ad Hoc
Distribution method.
Whichever method you choose, to distribute an application, Team Agents will need to complete the following:
• Create and Download an iPhone Distribution Certificate
• Create and Download a Distribution Provisioning Profile
• Build your final application in Xcode
Preparing your Application for Distribution
Prior to distributing your application, there are several steps you will need to complete.
Obtaining your iPhone Distribution Certificate
In order to distribute your OS X iPhone application, the Team Agent is required by Apple to create an iPhone Distribution
Certificate. Only the Team Agent for your team will be able to create this certificate and only this certificate will enable
application submission.
Generating a Certificate Signing Request
To request an iPhone Distribution Certificate, you first need to generate a Certificate Signing Request (CSR) utilizing the
Keychain Access application in Mac OS X Leopard. The creation of a CSR will prompt Keychain Access to simultaneously
generate your public and private key pair establishing your iPhone Distribution identity. Your private key is stored in the login
Keychain by default and can be viewed in the Keychain Access application under the ‘Keys’ category. To generate a CSR:
1. In your Applications folder, open the Utilities folder and launch Keychain Access.
2. Choose Keychain Access -> Certificate Assistant -> Request a Certificate from a Certificate Authority. Note: If you have a
private key highlighted in the Keychain during this process, the resulting Certificate Request will not be accepted by the
Program Portal. Confirm that you are selecting “Request a Certificate From a Certificate Authority...” and not selecting “Request
a Certificate From a Certificate Authority with <Private Key>...”
3. In the User Email Address field, enter your email address. Please ensure that the email address entered matches the
information that was submitted when you registered as an iPhone Developer.
© 2008 Apple Inc. All rights reserved. - Apple Confidential
iPhone Developer Program User Guide 23
4. In the Common Name field enter your Company/Organization/Department name. Please ensure that the name entered
matches the information that was submitted when you registered as an iPhone Developer.
5. No CA Email Address is required.
6. Select the ‘Saved to Disk’ radio button and if present, select ‘Let me specify key pair information’ and click ‘Continue’.
© 2008 Apple Inc. All rights reserved. - Apple Confidential
iPhone Developer Program User Guide 24
7. If ‘Let me specify key pair’ was selected, specify a file name and click ‘Save’. In the following screen select ‘2048 bits’ for the Key
Size and ‘RSA’ for the Algorithm. Click ‘Continue’.
8. The Certificate Assistant will create a CSR file on your desktop.
© 2008 Apple Inc. All rights reserved. - Apple Confidential
iPhone Developer Program User Guide 25
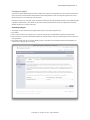
Submitting a Certificate Signing Request for Approval
1. After creating a CSR, log in to the iPhone Developer Program Portal and navigate to ‘Certificates’ -> ‘Distribution’ and click the
‘Add Certificate’ button.
2. On your local system, open the saved CSR file using a text editor and copy the entire contents, including the "BEGIN" and
"END" tags.
3. Paste the entire contents of the CSR into the blank text field and click ‘Submit’.
4. Approve your iPhone Distribution Certificate.
© 2008 Apple Inc. All rights reserved. - Apple Confidential
iPhone Developer Program User Guide 26
Downloading and Installing iPhone Distribution Certificates
1. In the ‘Certificates’-->’Distribution’ section of the Portal, Control-Click the WWDR Intermediate Certificate link and select
“Saved Linked File to Downloads” to initiate download of the certificate. After downloading, double-click the certificate to
launch Keychain Access and install.
2. In the same area of the Program Portal, click on the name of the iPhone Distribution Certificate to download.
3. On your local machine, double-click the downloaded .cer file to launch Keychain Access and install your certificate.
Saving your Private Key and Transferring to Other Systems
It is critical that you save your private key somewhere safe in the event that you need to build your application on multiple
Macs or decide to reinstall your system OS. Without your private key, you cannot sign binaries in Xcode and there you will be
unable to upload your application to the App Store or install your application on any Apple device. When a CSR is generated,
the Keychain Access application creates a private key on your login keychain. This private key is tied to your user account and
cannot be reproduced if lost due to an OS reinstall. If you plan to do development and testing work on multiple systems, you
will need to import your private key onto all of the systems you’ll be doing work on.
1. To export your private key and certificate for safe-keeping, open up the Keychain Access Application and select the “Keys”
category.
2. Highlight the private key associated with your iPhone Distribution Certificate and select “Export Items” from the ‘File’ menu.
Save your key in the Personal Information Exchange (.p12) file format.
3. You will be prompted to create a password which will be used when you attempt to import this key on another computer.
4. You can now transfer this .p12 file between systems. Double-click on the .p12 to install on a system. You will be prompted for
the password you first entered above.
© 2008 Apple Inc. All rights reserved. - Apple Confidential
iPhone Developer Program User Guide 27
Creating and Downloading a Distribution Provisioning Profile for App Store Distribution
To successfully build your application with Xcode for distribution via the App Store, you first need to create and download an
App Store Distribution Provisioning Profile. These are different than the Development Provisioning Profiles that were used
earlier in that Apple will only accept applications if they are built with an App Store Distribution Provisioning Profile.
Note: App Store provisioning profiles do not allow for a distribution built application to be installed on an Apple device. To
install your distribution ready application on a device, you must create an Ad Hoc provisioning profile.
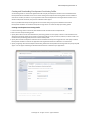
1. Team Agents should navigate to the ‘Provisioning’ section of the Program Portal and select the ‘Distribution’ tab and click ‘Add
Profile’.
2. Select the App Store radio button.
3. Enter the name for your Distribution Provisioning Profile.
4. Confirm your iPhone Distribution Certificate has been created and is displayed.
5. Select your wildcard App ID to build all of your applications with your single Distribution Provisioning Profile.
6. Click ‘Submit’.
7. Click on the name of the Distribution Provisioning Profile to download the .mobileprovision file.
8. Drag the .mobileprovision onto the Xcode or iTunes 7.7 icon in the dock to install.
© 2008 Apple Inc. All rights reserved. - Apple Confidential
iPhone Developer Program User Guide 28
Creating and Downloading a Distribution Provisioning Profile for Ad Hoc Distribution
To successfully build your application in Xcode for Ad Hoc release, you will need to create and download an Ad Hoc
Distribution Provisioning Profile.
1. Team Agents should navigate to the ‘Provisioning’ section of the Program Portal.
2. Select the ‘Ad Hoc’ radio button.
3. Enter the name for your Ad Hoc Distribution Provisioning Profile.
4. Confirm your iPhone Distribution Certificate has been created and is displayed.
5. Select the wildcard App ID to build all of your applications with the Distribution Provisioning Profile.
6. Select up to 100 UDIDs which you wish to run your application on.
7. Click ‘Submit’.
8. Click on the name of the Distribution Provisioning Profile to download the .mobileprovision file.
9. Drag the .mobileprovision onto the Xcode or iTunes 7.7 icon in the dock to install.
© 2008 Apple Inc. All rights reserved. - Apple Confidential
iPhone Developer Program User Guide 29
Building your Application with Xcode for Distribution
1. Launch Xcode and open your project.
2. If not already completed, drag the Distribution Provisioning Profile downloaded from the Program Portal onto the Xcode or
iTunes 7.7 icon in the dock (or, drag into ‘home/Library/MobileDevice/Provisioning Profiles’ directory.)
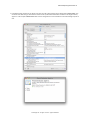
3. Open the Xcode project and Duplicate the “Release” configuration in the Configurations pane of the project's Info panel.
Rename this new configuration “Distribution”.
© 2008 Apple Inc. All rights reserved. - Apple Confidential
iPhone Developer Program User Guide 30
4. In both the Top Level Project Info window and the Target Info window, select the ‘Build’ tab and set the ‘Configuration’ to
‘Distribution’
© 2008 Apple Inc. All rights reserved. - Apple Confidential
iPhone Developer Program User Guide 31
5. In both the Top Level Project Info window and the Target Info window change the Code Signing Identity setting from "iPhone
Developer" to "iPhone Distribution: YourCompanyName". This will be the exact string in the Common Name field of your
iPhone Distribution Certificate.
© 2008 Apple Inc. All rights reserved. - Apple Confidential
iPhone Developer Program User Guide 32
6. In both the Top Level Project Info window and the Target Info window change the Code Signing Provisioning Profile setting
to the desired Distribution Provisioning Profile. If no Distribution Provisioning Profile is selectable, make sure your
Configuration is set to Distribution, your Active SDK is set to Device iPhone OS 2.0 and your Distribution Provisioning Profile is
installed in ~/Library/MobileDevice/Provisioning Profile. Relaunch Xcode and resume.
© 2008 Apple Inc. All rights reserved. - Apple Confidential
iPhone Developer Program User Guide 33
7. In the project window, select the Distribution Active Configuration from the overview popup and set the Active SDK to
Device - iPhone OS 2.0.
8. Click ‘Build’. (Note: Your binary must contain a flattened, square-image icon that is 57x57 pixels. This icon is displayed on the
iPhone or iPod touch home screen.)
9. Highlight the app located within the "Products" sub-folder and select ‘Reveal in Finder’ from the Action popup.
© 2008 Apple Inc. All rights reserved. - Apple Confidential
iPhone Developer Program User Guide 34
10. To verify your application was built successfully, Control-Click on the application bundle in Finder and select ‘Show Package
Contents’. Ensure a CodeSignature folder and an embedded.mobileprovision file exist in the package. If these files are not
present, Clean all Xcode builds, relaunch Xcode and return to Step 1.
11.Use the compress option in Finder to create a .zip file containing your application
© 2008 Apple Inc. All rights reserved. - Apple Confidential
iPhone Developer Program User Guide 35
Building Multiple Apps for Distribution and Validating Your Distribution Builds
If you wish to build and distribute multiple applications, it is necessary that you create a wildcard App ID in the Program
Portal with only an asterisk in the Bundle Identifier field. This wildcard App ID must be included in a single Distribution
Provisioning Profile that will be used to build all of your applications.
All Distribution Methods
1. Delete any existing Distribution Provisioning Profiles from your Mac in ~/Library/MobileDevice/Provisions and ~/Library/
MobileDevice/Provisioning Profiles and close Xcode.
2. Create a wildcard App ID in the iPhone Developer Program Portal - Simply place an asterisk in the Bundle Identifier field of
the App ID to create a wildcard App ID.
3. Create an iPhone Distribution Provisioning Profile in the Program Portal incorporating the wildcard App ID created above.
4. Drag your new iPhone Distribution Provisioning Profile onto the Xcode or iTunes 7.7 icon in your dock to install it.
5. Confirm that both the Private Key the corresponds to your iPhone Distribution Certificate AND the public iPhone Distribution
Certificate are located in the Keys category of the Keychain application. The Private Key is housed on the system that
originally created the certificate request for the iPhone Distribution Certificate.
© 2008 Apple Inc. All rights reserved. - Apple Confidential
iPhone Developer Program User Guide 36
For each project, do the following once
1. In the Project Info window, duplicate the ‘Release’ configuration and title it ‘Distribution’.
© 2008 Apple Inc. All rights reserved. - Apple Confidential
iPhone Developer Program User Guide 37
2. Set the Active SDK to ‘Device and the Active Configuration to ‘Distribution’
© 2008 Apple Inc. All rights reserved. - Apple Confidential
iPhone Developer Program User Guide 38
3. At the Project level, delete the code signing identity in the build pane and set the provisioning profile the the "default"
setting. Ensure the Configuration in this window is set to Distribution.
© 2008 Apple Inc. All rights reserved. - Apple Confidential
iPhone Developer Program User Guide 39
4. In the Build Settings Inspector at the Target level, enter the code signing identity: “iPhone Distribution: COMPANYNAME”. This
will be the exact same string as found in the common name of your iPhone Distribution Certificate. In the diagrams below,
Apple Inc. is the example COMPANYNAME. Make sure the Configuration is set to Distribution in the Build Settings Inspector as
well.
© 2008 Apple Inc. All rights reserved. - Apple Confidential
iPhone Developer Program User Guide 40
5. Select your iPhone Distribution Profile (which includes the wildcard App ID) from the Code Signing Provisioning Profile drop
down menu.
After setting all the projects up correctly with the Code Signing Identity and Provisioning Profile set
only at the target level, do the following each time you build to ensure a successful build process.
1. Open the Project.
2. Select the Target and open the Build Settings Inspector. Confirm you are in the Distribution Configuration.
3. Delete the Code Signing Identity: iPhone Distribution: COMPANYNAME
4. In the Xcode Build Menu, select Clean all Targets.
5. Re-enter the code-signing identity iPhone Distribution: COMPANYNAME in the Target Build Settings Inspector.
6. Build your Project.
7. Open the Build Log detail view.
8. Search and Confirm the presence of the word "embedded" - this will take you to the line in the build log that shows the
provisioning profile was successfully called. © 2008 Apple Inc. All rights reserved. - Apple Confidential
iPhone Developer Program User Guide 41
9. Confirm that the destination path (at the very end of the build message) is the app you are building. For example:
ProcessingProductPackaging "/Volumes/Data/user/Library/MobileDevice/Provisioning Profiles/
My_Distribution_Provisioning_Profile.mobileprovision" /Volumes/Data/user/projects/Distribution-iphoneos/HelloWorld.app/
embedded.mobileprovision cd /Volumes/Data/user/projects/HelloWorld <com.apple.compilers.product-pkg-utility> "/
Volumes/Data/user/Library/MobileDevice/Provisioning Profiles/972DCBC8-5FB7-4970-B079-6A9141738355.mobileprovision" o /Volumes/Data/user/projects/Distribution-iphoneos/HelloWorld.app/embedded.mobileprovision
10.Search for the term “CodeSign” - this will take you to the line in the build log that confirms your application was signed by
your iPhone Distribution Certificate.
11.For Ad Hoc distribution, share your App bundles and iPhone Distribution Provisioning Profile with the owners of the devices
specified in the provisioning profile. Recipients of the .app and .mobileprovision files can drag them onto iTunes 7.7 and sync
their devices to install.
© 2008 Apple Inc. All rights reserved. - Apple Confidential
iPhone Developer Program User Guide 42
Submitting your application via iTunes Connect
iTunes Connect is a suite of web-based tools created for developers to submit and manage their applications for sale via the
App Store. In iTunes Connect you will be able to check the status of your contract, manage users, submit your binary,
metadata, and assets.
Team Agents will find a link to iTunes Connect in the ‘Distribution’ section of the Program Portal. Clicking this link will take
you directly to the login page of iTunes Connect. Enter the same AppleID and password you use to log in to the iPhone
Developer Program Portal to access iTunes Connect.
Prior to uploading your application to iTunes Connect, you will be asked to review iTunes Distribution Terms & Conditions as
well as gather metadata pertinent to your application.
Distribution Terms & Conditions
Before beginning the application submission process, it is critical that you read and review the distribution Terms and
Conditions. If your company has a legal department, it is recommended that you provide this document to them for review. If
you plan to sell your application, you need to have your paid commercial agreement in place, so that it can be posted to the
App Store. If not, your application will not be posted to the App Store until your commercial agreement is signed. If your
application is free, you’ve already entered into the freeware distribution agreement by being accepted into the iPhone
Developer Program.
Gathering your Application Metadata
Prior to submitting your application, it will be helpful for you to collect all the information about your application that will be
displayed on the App Store. Some data that you will want to gather are:
•
•
•
•
•
•
•
•
•
•
•
•
•
•
•
•
Application Name (Must conform to guidelines for using Apple trademarks and copyrights)
Application Description (up to 4000 characters)
Device type(s) the Application can be run on (iPhone and/or iPod touch)
Unique Stock Keeping Unit (SKU) for each major version of your application
Primary Category
Secondary Category (Optional)
Game Rating (Optional)
Unique Version #
Application copyright holder
Support URL for the Company
Support Email Address (for use by Apple only)
End User License Agreement (Optional) If a EULA is not provided, standard iTunes App Store EULA will be applied.
Territories application to be distributed in
Application Availability Date
Application Price
Localization desired (English, Dutch, French, German, Italian, Spanish, Japanese)
© 2008 Apple Inc. All rights reserved. - Apple Confidential
iPhone Developer Program User Guide 43
Preparing your Application Artwork
You have the ability to provide several pieces of artwork that will be visible to customers visiting the App Store. Some of the
assets you may wish to submit with your application are:
• iPhone/iPod touch Home Screen Icon - Your application binary must contain a flattened, square-image icon that is 57x57
pixels. This icon is what will be displayed on the iPod touch or iPhone home screen.
• Large Application Icon - This will be used to feature your application on the App Storefront. To be featured prominently on
the App Store we recommend you provide an attractive, original icon that meets the following requirements:
- 512 x 512 pixels (flattened, square image)
- 72 DPI
- .jpg, .jpeg, or .tiff format
© 2008 Apple Inc. All rights reserved. - Apple Confidential
iPhone Developer Program User Guide 44
• Primary Screenshot - The primary screenshot will be used as the main screenshot visible on your application product page
on the App Store, and the one that will also be displayed on the device. For best results, don’t include the iPhone status bar in
your screenshots and follow these requirements:
- 320x460 portrait (without status bar) minimum
- 480x300 landscape (without status bar) minimum
- 320x480 portrait (full screen)
Uploading your Application
After completing the above steps, iTunes will present an upload mechanism for you to submit your .zip file to Apple.
© 2008 Apple Inc. All rights reserved. - Apple Confidential
iPhone Developer Program User Guide 45
Distributing your application with Ad Hoc Distribution
In addition to distributing applications through the App Store, iPhone Developers enrolled in the Standard program have the
opportunity to distribute their application outside of the App Store on up to 100 different devices.
To distribute your application for Ad Hoc Distribution:
1. Create and Download an Ad-hoc Distribution Provisioning Profile in the ‘Provisioning’->’Distribution’ tab as described in the
‘Creating and Downloading a Distribution Provisioning Profile for Ad-hoc Distribution’ section above.
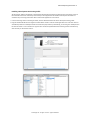
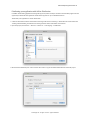
2. Open the project, and select File -> New File -> iPhone OS -> Code Signing -> Entitlements.
3. Name the file “Entitlements.plist". and click ‘Finish’. This creates a copy of the default entitlements file within the project.
© 2008 Apple Inc. All rights reserved. - Apple Confidential
iPhone Developer Program User Guide 46
4. Select the new Entitlments.plist file and uncheck the “get-task-allow” property. Save the Entitlements.plist file.
5. Select the Target, and open the Build settings inspector. In the ‘Code Signing Entitlements’ build setting, type in the filename
of the new Entitlements.plist file including the extension. There is no need to specify a path unless you have put the
Entitlements.plist file somewhere other than the top level of the project.
© 2008 Apple Inc. All rights reserved. - Apple Confidential
iPhone Developer Program User Guide 47
6. Build your application in Xcode using the build process described in the ‘Building your Application with Xcode for
Distribution’ section.
7. To share your application, provide both the compiled application binary AND the Ad Hoc Distribution Provisioning profile to
the owners of the devices specified in the Ad Hoc Distribution Provisioning Profile.
8. Recipients of the .app bundle and .mobileprovision file can drag both files onto the iTunes icon in the dock and sync their
device to install. Both the application and the Ad Hoc Distribution Provisioning Profile will be installed on the device.
9. If you have multiple applications to build, make sure to relaunch Xcode each time you build a new application and refer to
the Distributing Multiple Applications section above.
© 2008 Apple Inc. All rights reserved. - Apple Confidential
iPhone Developer Program User Guide 48
Glossary
Below are a list of commonly used terms in the iPhone Developer Program:
App ID - A unique digital fingerprint that OS X iPhone uses to grant your application access to a portion of the Keychain and
one part of a Development and Distribution Provisioning Profile.
Apple device - An iPhone or iPod touch
Development Team - A Development team is a either a single person enrolled in the Individual Program or a Team Agent
and group of Team Admins and Team Members in the Standard Program.
iPhone - A combination mobile phone, multimedia player, and wireless Internet device from Apple Inc.
iPhone Development Certificate - An electronic document that associates a digital identity with other information,
including a name, email address, or business. An iPhone Development Certificate is restricted to application development
only and is valid for a limited amount of time.
iPhone Distribution Certificate - An electronic document that associates a digital identity with other information, including
a name, email address, or business. An iPhone Distribution Certificate is restricted to application distribution only and is valid
for a limited amount of time.
iPod touch - A portable multimedia player and wireless Internet device from Apple Inc.
iTunes Connect - A suite of web-based tools created for developers to submit and manage their applications for sale via the
App Store.
OS X iPhone - OS X iPhone comprises the operating system and technologies that you use to run applications natively on
iPhone and iPod touch devices. Although it shares a common heritage and many underlying technologies with Mac OS X,
iPhone OS was designed to meet the needs of a mobile environment, where user’s needs are slightly different.
Provisioning Profile - A set of entities and entitlements allowing applications to be installed and run on an Apple device.
Team Agent - The original person accepted into the iPhone Developer Program for all membership types. The Team Agent
has access to all functionality in the iPhone Developer Program Portal and is the sole person capable of Distributing an
application.
Team Admin - A person on an iPhone Development Team designated by the Team Agent or another Team Admin who has
the capability to approve iPhone Development Certificate requests, invite Team Members, add Apple devices and create App
IDs and Development Provisioning Profiles.
Team Member - A person on an iPhone Development Team who can request iPhone Development Certificates and install
OS X iPhone applications on an Apple device.
Unique Device Identifier (UDID) - A 40 character string used to identify a specific Apple device.
Xcode - Apple's premiere development environment for Mac OS X and OS X iPhone and includes all the tools needed to
create, debug, and optimize Mac OS X and OS X iPhone applications.
© 2008 Apple Inc. All rights reserved. - Apple Confidential