1
GEIGER-Funk
Sunshade controls
Clock-controlled
radio transmitter
with astronomy function
GF0021
GF0027
EN
Installation and Operating
Instructions
d
e
d
o
c s
e m
r
p te
r
fo sys
EN
Table of Contents
1
2
3
4
5
6
Introduction........................................................................................................................................3
Safety information..............................................................................................................................3
Specified application..........................................................................................................................3
Installation .........................................................................................................................................4
General description ...........................................................................................................................4
The programming mode ....................................................................................................................6
6.1
Change-over from manual to automatic mode ......................................................................6
6.2
Activation / deactivation of the holiday mode.........................................................................6
6.4
Displaying of codings or selecting them for operation in manual mode ................................7
6.3
6.5
Returning to the initial settings by making a reset .................................................................6
6.4.1
6.4.2
6.5.1
EN
FR
7
8
Setting of the closing offset time (max. ± 1:59h) ......................................................9
Setting of the degree of latitude................................................................................9
6.6.1
Programming of the switching times.......................................................................10
Programming menu................................................................................................................9
6.6.3
6.7
Setting of the opening offset time (max. ± 1:59h).....................................................8
6.5.3
6.6.2
DE
Selection of the codings required for operation in manual mode .............................7
Astronomy function ................................................................................................................8
6.5.2
6.6
Displaying of learned codings...................................................................................7
6.6.4
Storing of radio coding(s)........................................................................................10
6.6.2.1
6.6.2.2
Learning of radio coding(s) from a hand-held transmitter .......................10
Manual entry of radio coding(s) ...............................................................11
Setting of the date ...................................................................................................11
Setting of the time...................................................................................................12
Activation / deactivation and displaying of switching times .................................................12
Disposal...........................................................................................................................................12
7.1 General......................................................................................................................................12
7.2 Disposal of spent batteries and/or accumulators ......................................................................12
Declaration of conformity.................................................................................................................12
ES
IT
2
1 Introduction
By deciding to buy the GEIGER clock-controlled radio transmitter GF0021/GF0027 you have made a
good choice. The device you have acquired is a high quality product made by GEIGER.
The clock-controlled radio transmitter GF0021/GF0027 enables the automatic operation of your rolling
shutters and sunshade installations. Based on the special ASTRONOMY FUNCTION the device is
equipped with, all selected switching times can comfortably be adapted individually according to your
personal needs in line with related season.
The additional HOLIDAY PROGRAM holds the features to make your house or home look inhabited and
helps thus to protect you against unbidden guests.
No labour-intensive and time-consuming laying of control lines is needed as all switching signals are
transmitted via radio.
The removable upper section of the clock-controlled radio transmitter GF0021/GF0027 enables to make
all settings comfortably while sitting.
The following radio receivers with integrated motor control do form one operating unit if operated
along with the GEIGER clock-controlled radio transmitter GF0021/GF0027:
•
•
All GEIGER motors with built-in radio receivers
All external GEIGER radio receivers
The GEIGER clock-controlled radio transmitter GF0021/GF0027 can be assigned to the individual radio
receivers as a single-, group- or central control.
2 Safety information
•
•
•
•
The control is determined for use within the limits of the specified application described in chapter 3
hereafter. If any unauthorised changes or modifications to the control are made, all warranty claims
with regard to this product become extinct.
Immediately after unwrapping of the control, it must be checked for damages. In the event of
damages, the device must in no case be put into operation. Should damages have occurred,
the supplier must be informed thereof immediately.
If it is to be assumed that a safe operation of the control cannot be guaranteed, the control must
immediately be taken out of operation and be protected against any unintentional or unauthorised
operation. This assumption becomes real in the event the housing shows damages or if the device
doesn't work any more.
The responsibility for the compliance with the relevant regulations established by the power
supply companies or the Union of German Electrical Engineers (VDE) is, according to VDE 0022,
incumbent on the user and the related fitting firm.
3 Specified application
•
•
The wall-mounted radio transmitter GF0021/GF0027 may only be used to drive rolling shutters of
sunshade installations (blinds, window blinds, etc.).
Use the GF0021/GF0027 with no other than the radio receivers authorised by GEIGER.
3
DE
EN
FR
ES
IT
4 Installation
The clock-controlled radio transmitter GF0021 suits for the installation in under plaster- or surface
type switch boxes.
The clock-controlled radio transmitter GF0027 requires no switch box for operation.
Select the place of installation according to the following criteria:
•
•
•
•
•
The distance between the GF0021/GF0027 and the next radio receiver (e.g. GFJ007) should come
to a least 1 metre.
The place of installation should be in the centre of all radio receivers to be controlled.
Before installing the device / connecting it to the mains supply finally, make a test as of the place
envisaged for installation first. If all receivers can be controlled from this place, the place suits for
the final installation of the device.
Install the device now in compliance with the related terminal allocation (see point 5).
Prior to executing any installation works, always make sure the line to be connected
is completely voltage-free and make sure to protect it against an unintentional
power on! Beyond that, always make sure to comply with the instructions specified
in point 2: Safety information
Ready! The pre-coded system can now be operated radio-controlled!
The clock-controlled three-channel radio transmitter is delivered pre-programmed with three
different codings. The following switching times have been preset:
Opening at 7 o'clock a.m. and closing at 8.00 o'clock p.m..
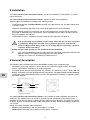
5 General description
DE
EN
FR
ES
The GEIGER clock-controlled radio transmitter GF0021 consists of two component parts:
• The bottom section that enables to connect the device to the power supply system. The bottom
section is provided for installation in an under plaster box.
• The upper section along with programming key ("PROG"), the control keys ("BTA" / "BTZ") and the
display. To facilitate and ease the programming of the device, the upper section can be removed.
Thanks to the integrated floating battery it remains also operational if no power is supplied to it from
the bottom section.
„PROG“
Display
„BTA“
„BTZ“
Rear view GF0021
Front view GF0021/GF0027
IT
The clock-controlled radio transmitter GF0027 is only suitable for battery operation and needs no
switch box. The supplied frame can be either screwed or glued. Compared to conventional mains
operation the transmission power is slightly reduced. Without transmit operation, the battery life comes
to approx. 5 years. In transmit operation mode (8 emissions per day), the life of the battery ranges from
2 to 3 years.
Range of the clock-controlled radio transmitters:
• GF0021 (mains operation) inside the house approx. 15 meters
• GF0027(battery operation only) inside the house approx. 10 meters
4
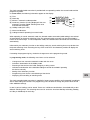
The clock-controlled radio transmitter is provided with two operating modes: the normal mode and the
programming mode.
In normal mode, the following information appear on the display:
(a) Time
(b)
(b) Week-day
(c)
(a)
(c) Manual- / automatic mode operation
(d)
(d) Astronomy function (is being displayed if the next
(g)
astronomy function related switching time to be
(e)
executed was released).
(f)
(e) Holiday mode (ON / OFF)
(f) Next travel direction
(g) Codings emitted if operating in manual mode
When operating in normal automatic mode, the learned motion commands (radio codings) are emitted
all automatically at the preset switching times.The selected motion command can also be emitted by
means of the control keys. In manual operation mode, the related motion commands are not emitted all
automatically.
Influenced by the astronomy function or the holiday mode, the actual switching times may deviate from
the preset switching times. Actuating the keys "BTA" and "BTZ" simultaneously enables to display the
actual switching times.
If actuating the programming key, the device changes over to the programming mode.
In programming mode, the following menu items can be selected:
•
•
•
•
•
•
•
Change-over from manual to automatic mode and vice versa
Activation / deactivation of the holiday mode
Returning of the device to the initial settings by making a reset
Indication and selection of the individual codings that shall be emitted if operating
the device manually
Setting of the astronomy function
Programming menu for the commissioning of the device
Displaying and cancelling of switching times
The clock-controlled radio transmitter is supplied in factory-preset condition and is operable immediately
after a radio coding was learned. The programming menu enables to change the preset values and to
make additional settings.
In total, 3 pairs of codings can be stored. These can, in different combinations, be emitted daily at four
different switching times. The switching times can be set for the time from Monday to Sunday, Monday
to Friday or individually for each day.
DE
EN
FR
ES
IT
5
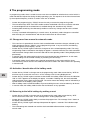
6 The programming mode
In programming mode, there is a total of seven menu items available for selection that, each of which is
used with different frequencies during the daily operating cycle. The sequence of the menu items orients
by the expected frequency at which a certain menu item is needed.
•
•
•
•
Actuate the programming key "PROG" for one time only to access the programming mode.
The two control keys "BTA" and "BTZ" enable to select the desired menu items, while the activation
or acknowledgement of the related items is realised through the actuation of key "PROG".
Actuating both control keys simultaneously enables to cancel any changes and to exit the related
menu item.
If no key is actuated while operating in a certain menu, all previously made changes are cancelled
after the expiry of a 40 second time and the clock returns back to normal mode.
6.1 Change-over from manual to automatic mode
•
•
•
•
DE
This menu item is opened each time the clock-controlled radio transmitter changes, effected by the
single actuation of the key "PROG", over to programming mode. In any such event, the following
indication appears on the display: "Au:Ha".
Actuate the key "PROG" again to effect the change-over of the related operating mode. The newly
set operating mode is indicated on the display for approx. 2 seconds. After that, the clock-controlled
radio transmitter changes back to normal mode and the new operating mode is being displayed now
permanently.
In manual mode, the preset switching times are not executed and are skipped over. In this mode,
selected codings can be emitted manually by actuating the control keys.
In automatic mode, the all codings are emitted all automatically at the preset switching times.
The control keys remain active in this mode too and can be used in the same manner as if operating
in manual mode.
6.2 Activation / deactivation of the holiday mode
•
Actuate the key "PROG" to change over to the programming mode. Now actuate the key "BTZ" for
one time only to access this menu item. The message "Urlb" is being displayed now.
Actuate the key "PROG" again to activate or deactivation the holiday mode. After that, the indication
"ON" or "OFF" appears on the display for approx. 2 seconds. Following this, the clock-controlled
radio transmitter returns back to normal mode. The active state of the holiday mode is indicated by a
symbol shown on the display (cube symbol).
With the holiday mode in activated condition, the preset switching times are varied at random by 30 minutes.
In manual mode, the holiday mode function has no influence on any operation.
EN
•
FR
•
•
ES
6.3 Returning to the initial settings by making a reset
IT
•
•
•
•
Actuate the key "PROG" to change over to the programming mode. Now actuate the key "BTZ"
twice to access this menu item. The message "Grun" is being displayed now.
Actuate the key "PROG" again shortly to activate the program item. The message "Grun" shown on
the display now starts flashing.
Actuate the key "PROG" again and keep it depressed for approx. 3 seconds. The indication stops
flashing.
The initial settings are restored now and the clock-controlled radio transmitter changes over to
normal mode.
6
6.4 Displaying of codings or selecting them for operation in manual mode
•
•
•
Actuate the key "PROG" to change over to the programming mode. After that, actuate the key "BTZ"
for three times to access this menu item. The message "Code" is being displayed now.
Actuate the key "PROG" again shortly to activate the menu item. The message "AnZ" shown on the
display now starts flashing.
You can now either view all codings learned by the clock-controlled radio transmitter (after that,
proceed as described in sub-chapter 6.4.1 herein) or select the codings set for the operation in
manual mode (after that, proceed as described in sub-chapter 6.4.2 herein).
6.4.1 Displaying of learned codings
The indication "AnZ" on the display is flashing. To view the codings learned by the clock-controlled radio
transmitter, please proceed as follows:
• Actuate the key "PROG" to activate this menu item. The number of the coding to be indicated starts
flashing on the display (at the bottom left).
• Actuate the key "BTA" or "BTZ" to select the desired coding (1, 2 or 3) and acknowledge by means
of the key "PROG". The direction of the travel to be triggered by the coding to be displayed starts
flashing on the display.
• Actuate the key "BTA" or "BTZ" to select the desired travel direction and acknowledge by means of
the key "PROG". One after the other, the nine coding positions are displayed now.
• The coding shown in the illustration right hand would be displayed as follows:
•
•
Picture of a coding switch
After that, you are free to view further codings or to return to normal mode by actuating the keys
"BTA" and "BTZ" both simultaneously.
If no entries are made within a time of approx. 40 seconds after that, the clock-controlled radio
transmitter returns all automatically back to normal mode.
6.4.2 Selection of the codings required for operation in manual mode
The indication "AnZ" is flashing. To view the codings that shall be emitted when actuating the key "BTA"
or "BTZ" in normal mode, please proceed as follows:
• Actuate the key "BTA". ‘ The message "Code" shown on the display starts flashing.
•
•
•
Actuate the key "PROG". The coding actually selected for use in manual operating mode starts
flashing on the display (at the bottom left).
The keys "BTA" or "BTZ" enable you to select a new combination of codings that can be emitted if
operating in manual mode. The following combinations can be realised: 1 only / 2 only / 1 and 2 / 3
only / 1 and 3 / 2 and k k 3 / 1, 2 and 3.
Actuate the key "PROG" again to acknowledge the newly selected combination. After that, the clockcontrolled radio transmitter returns back to normal mode . The actually selected combination of
codings is indicated now on the display.
7
DE
EN
FR
ES
IT
6.5 Astronomy function
The menu item "astronomy function" is needed for the specification of the related degree of latitude and
the specification of the offset times required for the execution of the opening and closing operations to
be performed.
Any such offset time is equivalent to the time by which the opening of the rolling shutter to be controlled
shall deviate from the actual sunrise time. Thus, the setting 0:00h means that the rolling shutter will
open exactly at sunrise; -0:45h means that the rolling shutter will open 45 minutes prior to actual sunrise
time and 1:30h means that the rolling shutter will open only 90 minutes after sunrise. The same also
applies in regard to the offset times to be set in relation with the sunset time and the closing of the
rolling shutter to be controlled.
Note 1: The astronomy function will be considered only with respect to the switching times that
have been released for this particular function (see also sub-chapter 6.6.1, "Programming of
switching times")
Note 2: With the astronomy function in activated condition, the rolling shutter is never opened
any earlier than as defined by the related switching time. The sunrise time or sunrise ± offset
time are left out of consideration if they, in terms of time, are equivalent to a point before the
actual switching time.
Note 3: With the astronomy function in activated condition, the rolling shutter is never closed
any later than as defined by the related switching time. The sunset time or sunset ± offset time
are left out of consideration if they, in terms of time, are equivalent to a point after the actual
switching time.
6.5.1 Setting of the opening offset time (max. ± 1:59 h)
•
•
DE
EN
FR
•
•
•
•
•
•
Actuate the key "PROG" to change over to the programming mode. Now actuate the key "BTZ" four
times to access this menu item. The message "AStr" is being displayed now.
Actuate the key "PROG" again to activate this menu item. The opening offset time actually
adjusted is being displayed now (the travel direction symbol points upwards).
Actuate the key "PROG" for another time. The related signum starts flashing.
Use the keys "BTA" or "BTZ" to select the desired signum and use the "PROG" key to acknowledge.
The hour indication starts flashing.
Use the keys "BTA" or "BTZ" to select the desired hour and actuate the "PROG" key to acknowledge. The first digit of the minute indication starts flashing.
Use the keys "BTA" or "BTZ" to select the desired first digit of the minute indication and actuate the
"PROG" key to acknowledge. The second digit of the minute indication starts flashing.
Use the keys "BTA" or "BTZ" to select the desired second digit of the minute indication and use the
"PROG" key to acknowledge. The setting procedure is over. The newly set opening offset time is
being displayed now.
The keys "BTA" or "BTZ" also enable to make all further astronomy function related selections.
If actuating both keys simultaneously, the clock-controlled radio transmitter returns back to normal
operating mode.
ES
IT
8
6.5.2 Setting of the closing offset time (max. ± 1:59 h)
•
•
•
•
•
•
•
•
•
Actuate the key "PROG" to change over to the programming mode. Now actuate the key "BTZ"
four times to access this menu item. The message "AStr" is being displayed now.
Actuate the key "PROG" again to activate this menu item. The opening offset time actually
adjusted is being displayed now (the travel direction symbol points upwards).
Actuate the key "BTA" now. The closing offset time actually adjusted is being displayed now
(the travel direction symbol points downwards).
Actuate the key "PROG" for another time. The signum starts flashing.
Use the keys "BTA" or "BTZ" to select the desired signum and actuate the "PROG" key to
acknowledge. The hour indication starts flashing.
Use the keys "BTA" or "BTZ" to select the desired hour and actuate the "PROG" key to
acknowledge. The first digit of the minute indication starts flashing.
Use the keys "BTA" or "BTZ" to select the desired first digit of the minute indication and actuate the
"PROG" key to acknowledge. The second digit of the minute indication starts flashing.
Use the keys "BTA" or "BTZ" to select the desired second digit of the minute indication and actuate
the "PROG" key to acknowledge. The opening offset time actually adjusted is being displayed
again.
The keys "BTA" or "BTZ" also enable to make all further astronomy function related selections.
If actuating both keys simultaneously, the clock-controlled radio transmitter returns back to normal
operating mode.
6.5.3 Setting of the degree of latitude
•
•
•
•
•
•
Actuate the key "PROG" to change over to programming mode. Actuate the key "BTZ" to access
this menu item. The message "AStr" is being displayed now.
Actuate the key "PROG" again to activate this menu item. The opening offset time actually adjusted
is being displayed now (the travel direction symbol points upwards).
Actuate the key "BTA" twice. The actually adjusted degree of latitude is being displayed now
(initial setting: 50°).
DE
Use the keys "BTA" or "BTZ" to adjust the degree of latitude.
The following values are possible: 44°, 47°, 50°, 52°, 54°, 56°, 57°, 58°, 59°, 60°.
EN
Actuate the key "PROG" again. The latitude degree indication starts flashing.
Actuate the "PROG" key again to acknowledge the degree of latitude actually entered.
The opening offset time actually adjusted is being displayed again.
•
The keys "BTA" or "BTZ" also enable to make all further astronomy function related selections.
If actuating both keys simultaneously, the clock-controlled radio transmitter returns back to normal
operating mode.
6.6 Programming menu
The programming menu is needed for first start-up and commissioning or is needed to change the
parameters set by the factory. The menu includes and provides the following functions: programming
of switching times, the learning of radio codings and the entry of both time and date.
•
•
•
•
Actuate the key "PROG" to change over to the programming mode. After that, actuate the key "BTZ"
five times to access the programming menu. The message "Prog" is being displayed now.
Actuate the "PROG" key again to activate the programming menu.
The menu item "Programmieren der Schaltzeiten" (programming of switching times) is opened.
The message "Pr SZ" is being displayed.
Actuating the key "BTZ" enables to access other menu items.
9
FR
ES
IT
6.6.1 Programming of the switching times
This menu item provides the functions needed for the entry of automatic mode related switching times.
•
After activation of the programming menu, the message "Pr SZ" is present on the display.
•
Actuate the keys "BTA" or "BTZ" to select the day (the days) for which the desired switching time
shall be programmed. Use the "PROG" key to acknowledge the actually selected day. The memory
location used for the storage of the first switching time programmed appears on the display now
(message shown at the top right on the display: 01).
•
•
•
•
•
•
•
DE
EN
FR
ES
IT
Actuate the key "PROG" to activate the menu item "Programmieren der Schaltzeiten" (programming
of switching times). The week-days indicated at the upper edge of the display start flashing.
Actuate the keys "BTA" or "BTZ" to select the memory location to be used for the programming of
the new switching time. Use the "PROG" key to acknowledge the selected memory location.
The first digit of the time indications starts flashing on the display.
Actuate the keys "BTA" or "BTZ" to set the related digits. After that, actuate the "PROG" key to
proceed to the next digit. After the acknowledgement of the fourth digit, the codings indication starts
flashing (digits indicated at the lower edge on the display).
Actuate the keys "BTA" or "BTZ" to select a new coding / new codings that shall be emitted at the
preset switching time. Use the "PROG" key to acknowledge the selected coding / codings.
The travel direction arrows start flashing on the display.
Actuate the keys "BTA" or "BTZ" to select the travel direction to be followed at the preset switching
time. Use the "PROG" key to acknowledge the selected travel direction.
The astronomy function symbol starts flashing on the display.
Actuating the key "BTA" enables to release the switching time set with regard to the astronomy
function, while actuating the key "BTZ" disables it. Use the "PROG" to acknowledge the related entry.
The special function symbol "evening twilight" starts flashing on the display.
Actuating the key "BTA" enables to release the special function "evening twilight", while actuating
the key "BTZ" disables it. Use the "PROG" key to acknowledge the related entry. After that, the
system jumps back to the menu item "programming of switching times". Further switching times can
be entered now.
Note: The special function "evening twilight" cannot be processed by all GEIGER-Funk controls.
Please pay attention to the corresponding operating instructions. In the event your GEIGERFunk control was not suited for the processing of this function, the special function "evening
twilight" must be disabled.
6.6.2 Storing of radio coding(s)
This menu item provides the functions needed for the storage of up to three radio codings with, in each
case, two separated commands for both travel directions, i.e. UP (opening) and DOWN (closing).
The related codings can be imported from a hand-held radio transmitter or can be entered by means of
the keys "BTA" and "BTZ".
6.6.2.1 Learning of radio coding(s) from a hand-held transmitter
•
•
After the activation of the programming menu, actuate the key "BTZ" once only.
The message "Lern" (learn) appears on the display.
Actuate the key "PROG" to activate the menu item "Speichern der Funkcodierungen"
(storing of radio codings), (message shown on the display: "Lern").
The message "Auto" shown on the display now starts flashing.
10
•
•
•
•
To learn the radio coding(s) from a hand-held transmitter, actuate the key "PROG" again.
The number "1" shown on the display (at the bottom left) starts flashing.
Actuate the keys "BTA" or "BTZ" to select the memory location to be used for the assignment of the
new radio coding. Use the "PROG" key to acknowledge the selected memory location.
The travel direction arrows shown on the display start flashing.
Actuate the keys "BTA" or "BTZ" to select the travel direction to be assigned to the learned radio
coding. Use the "PROG" key to acknowledge the selected travel direction. The message "Lern"
shown on the display starts flashing.
Hold the hand-held radio transmitter the coding of which shall be learned close to the left upper
edge of the clock-controlled radio transmitter and actuate the keys the coding assigned to which
shall be learned. After completion of each learning procedure, the clock-controlled radio transmitter
returns back to the function that enables to select the desired memory location.
Further codings can be learned now.
6.6.2.2 Manual entry of radio coding(s)
•
•
•
•
•
•
•
•
After activation of the programming menu, actuate the key "BTZ" once only.
The message "Lern" (learn) appears on the display.
Actuate the key "PROG" to activate the menu item "Speichern der Funkcodierungen" (storing of
radio codings) (message indicated on the display: "Lern"). The message "Auto" shown on the
display starts flashing.
To enter the radio coding manually, actuate the key "BTZ" once only. The message "Hand"
(manual) shown on the display now starts flashing.
Actuate the key "PROG" to activate the display fields provided for the manual entry of the radio
codings. The number "1" shown on the display (at the bottom left) starts blinking.
Actuate the keys "BTA" or "BTZ" to select the memory location to be assigned to the new radio
coding. Use the "PROG" key to acknowledge the selected memory location. The travel direction
arrows shown on the display start flashing.
Actuate the keys "BTA" or "BTZ" to select the travel direction to be assigned to the newly learned
radio code. Use the "PROG" key to acknowledge the selected travel direction. The DIP switch
setting symbol shown on the display starts flashing. The corresponding position of the 9 digit
coding is being displayed.
Enter the 9 digit coding by using the keys "BTA" or "BTZ" in order to make desired DIP switch
settings and by actuating the key "PROG" to change over to the next digit to be set.
After the ninth coding digit, the number "1" shown on the display starts flashing again.
Further codings can now be entered. If actuating the keys "BTA" and "BTZ" both simultaneously,
the system returns back to normal mode operation.
6.6.3 Setting of the date
•
•
EN
FR
ES
This menu item provides the functions needed for the setting of the date. As for standard, the device is
delivered preset to the actual date of the day.
•
DE
Actuate the key "PROG" to activate the menu item "setting of the date" (message indicated on the
display: "Datum" (date)). The first digit of the date indication starts flashing.
Actuate the key "BTA" or "BTZ" to set the desired digit and actuate the "PROG" key to acknowledge.
The next digit of the date indication starts flashing.
After the acknowledgement of the fifth digit actually set, the device jumps back to the menu item
"Programmieren der Schaltzeiten" (programming of switching times).
11
IT
6.6.4 Setting of the time
This menu item provides the functions needed for the setting of the time. As for standard, the device is
delivered preset to Central European Time (CET).
•
•
•
Actuate the key "PROG" to activate the menu item "time setting" (message indicated on the display:
"Zeit" (time)). The first digit of the time indication starts flashing.
Actuate the keys "BTA" or "BTZ" to set the desired digit and actuate the "PROG" key to acknowledge.
The next digit of the time indication starts flashing.
After the acknowledgement of the fourth digit actually set, the device jumps back to the menu item
"Programmieren der Schaltzeiten" (programming of switching times).
6.7 Activation / deactivation and displaying of switching times
This menu item provides the functions to view the actually adjusted switching times and to activate or
deactivate them.
•
•
•
•
•
•
Actuate the key "PROG" again to activate the menu item. The first switching time programmed
for execution on Monday is being displayed.
Actuating the key "BTZ" enables to display all other switching times programmed for this particular
day.
Actuating the key "BTA" enables to display the switching times programmed for the next week-day.
Actuating the "PROG" key enables to activate or deactivate the actually indicated switching time.
The active state of a switching time is indicated by the corresponding travel direction symbol.
If actuating the keys "BTA" and "BTZ" simultaneously, the transmitter returns to normal mode.
Note: The battery compartment is located on the rear of the upper section of the clock-controlled radio
transmitter GF0021/GF0027. For battery replacement, the cover of the battery compartment can be
opened by means of a coin or similar object.
The short removal of the battery effects a reset of the clock-controlled radio transmitter!
After any such reset, both date and time must be adjusted anew.
EN
If no power is supplied to the clock-controlled radio transmitter GF0021/GF0027 over a time of
more than 30 minutes, all settings need to be made anew.
FR
7 Disposal
ES
IT
7.1.1 General
In the event the device should have become useless, always make sure to dispose it of in compliance
with the relevant legal rules and regulations currently operative and in force.
7.1.2 Disposal of spent batteries and/or accumulators
Consumers are, according to the Battery Directive, obliged by law to return all spent batteries and/or
accumulators. The disposal of spent batteries and accumulators via the normal household refuse is
prohibited!
8 Declaration of conformity
We hereby state and declare that the device described in these operating instruction complies with the
basic requirements and relevant prescriptions established and laid down in the EC directive 1999/5/EG
and that it is authorised for use in all member states of the EU and in Switzerland without the need of
any prior registration. To learn more about the Declaration of Conformity pertaining to this device,
please visit our website at: www.geiger-antriebstechnik.de
Gerhard GEIGER GmbH & Co. KG • Schleifmühle 6 • 74321 Bietigheim-Bissingen
Phone +49(0)7142/ 9 38-0 • Fax +49(0)7142/ 9 38-230 • [email protected] • www.geiger-antriebstechnik.de
12
100W0607 en 1011
DE
Actuate the key "PROG" to change over to programming mode. Actuate the key "BTZ" six times to
access this menu item. The message "A-SZ" is being displayed.