1
This technical note provides the
steps to configure and troubleshoot
a Lantronix ETS8P 8 port terminal
server for use in the TotalChrom
CDS environment, using existing
programs included with the
operating system.
w w w. p e r k i n e l m e r. c o m
These applications are generally
available on your desktop.
Before you start, make certain
you have the following:
• HyperTerminal
Hardware:
• Notepad
• Desktop/Laptop with Windows
XP/2000, or NT 4.0.
®
• Network patch cables appropriate
for your network environment.
If the terminal server is to be
connected directly to your
desktop/laptop then you will
need a cross-over patch cable.
These are generally available
from you local network administrator or your local computer
or office supply store.
• A serial connector and cable.
These can be home-made or
purchased directly from
PerkinElmer®. These cables are
available in various lengths.
For purposes of this technical
note, a 7’ cable (p/n S5001-0033)
will suffice.
• Telnet
Networking Parameters:
These are generally obtained from
your local network administrator.
• IPADDRESS for each server to
be configured
• SUBNET MASK
• GATEWAY
• Text file containing the list
of parameters specific to the
Lantronix terminal server.
The text file can be obtained
from your TotalChrom Support
Specialist if you do not already
have one.
N O T E
There are a number of ways the
Lantronix® terminal server can
be configured for use with
TotalChrom® Chromatography
Data Systems. You could use
the software that is shipped with
each terminal server; however,
this requires installing the
software on either a server or
workstation machine. In many
locations under regulatory
compliance locks, this may be
restricted by internal SOPs.
Another option is to use existing
programs included with the
operating system.
Software:
Hardware and software
requirements
T E C H N I C A L
Introduction
C H R O M AT O G R A P H Y D ATA S Y S T E M S
Lantronix ETS8P Terminal Server
Configuration and Troubleshooting
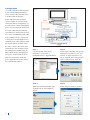
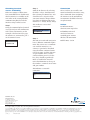
Configuration
As stated earlier we will be referring
to the Lantronix ETS8P terminal
server. Connect the terminal server
as indicated in the Figure 1.
Figure 1
Some older Lantronix terminal
servers require an active network
connection before configuration, so
we will need to connect the Ethernet
port to an active network connection.
If we are connecting the terminal
sever directly to the PC, then we will
use a cross-over Ethernet patch cable.
If the terminal server is connected
to the wall or a network hub, then a
standard patch cable will be needed
for the PC and the terminal server.
Be sure to connect the serial cable
(S501-0033) to the serial port on the
PC configured as COM1 using the
DB9 to RJ45 adapter and plugging
into port 1 on the terminal server.
Step 1
Step 2
Log into the PC, select Start |
Programs | Accessories |
Communications | HyperTerminal.
At this point a window will pop-up
and request a name for a new connection. A single character is all
that is required, but for the purpose
of this technical note, enter TS.
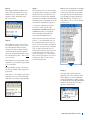
Step 3
Step 4
When the following window pops
up make sure to select COM1 as
shown.
Select the port setting as shown.
With all connections made and
power applied you can now begin
the configuration process.
2
Step 5
Step 7
The HyperTerminal window will
open. Select the {Enter} key. The
terminal server will respond and
request a name. Continue using
TS as the name.
The terminal server is now ready to
accept parameter changes. To make
changes the text file will be used.
The text file contains the standard
parameters needed for the Lantronix
terminal server to communicate on the
network for TotalChrom purposes.
Note: If you are planning to configure
a 16 or 32 port Lantronix terminal
server, this same file can be used.
Just open the file in Notepad and
use the Replace option under the
Edit drop down, to replace “2-8”
with either “2-16” or “2-32” instead.
It is that easy.
A couple of adjustments will be
necessary to the text file. The
IPADDRESS, SUBNET MASK, and
GATEWAY values are required;
these should be obtained from
your network administrator.
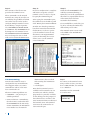
Step 6
The terminal server is now in the
local mode, meaning you can view
the configuration but not make
changes. In order to make changes
you will need to put the terminal
server in the privileged mode. Type
the command: Set Priv – this is not
case sensitive.
The terminal server responds with a
request for a password, the password
is case sensitive.
The password is system – the characters are not visible when typing the
password.
Notice the >>; this indicates that the
terminal server is in the privileged
mode thus it is ready to accept changes.
You will notice using this file that
ports 2 – 8 are configured, port 1 is
not configured for several reasons.
First, in case one of the configured
ports fails, you can easily configure
port 1, and you will not have to
replace the terminal server because
of one dead port. Second, it may
need to be used as a “console port.”
The console port allows for a local
connection. This is how we are
connected presently.
Step 8
Now that the text file has been
updated, select the contents of the
file and place it on the clipboard,
using the quick keys, Ctrl-A, Ctrl-C.
To change focus to the HyperTerminal
window select the Paste to Host
option as shown here.
w w w. p e r k i n e l m e r. c o m
3
Step 9
Step 10
Step 11
The contents of the file are now
pasted to the terminal server.
Now that configuration is complete
and before you power cycle the
terminal server, it is best to log out
by typing the command Logout.
Verify that the IPADDRESS is the
value that you entered in Step 9.
Generally you can be assured that if
this value is as expected then the rest
of the entries have also been
retained in flash memory.
These commands can be entered
manually. By using the text file you
are reducing the possibility of human
error. This text file can be used to
configure multiple terminal servers
by modifying a couple of parameters: IPADDRESS, SUBNET MASK,
& GATEWAY. The IPADDRESS must
be unique for each terminal server.
The SUBNET MASK and GATEWAY
may not change, be sure to check
with your local network administrator.
Troubleshooting
Now that the terminal server is
configured for use in TotalChrom,
what happens when you cannot
communicate with it or the interfaces connected to it?
The more common problems are:
• GATEWAY – you just forgot to
add the parameter.
• Name resolution – remembering
that the name is used rather than
the IPADDRESS in the TC configuration. Sometimes the information
never makes it to the network
4
After typing the command Logout,
the terminal server should respond
with “Exiting the Lantronix ETS8P.”
To make sure that the parameters
have been entered and retained in
flash memory, it is best to power
cycle the terminal server. Do not
disconnect your HyperTerminal
session, maintaining the session
allows you to see the terminal
server reinitialize.
administrators that are tasked
with entering this information
in DNS.
• A locked port.
Now that the terminal server is
available on the network you can
use Telnet.exe which is another
program that is generally available
on the desktop. For the purpose of
the technical note, use TS1 as the
entry in DNS for name resolution of
the terminal server. The terminal
server must be connected to an
active network port.
If you would like to verify this, just
log in by selecting the {Enter} key
and entering a user name.
The terminal server is now ready
to be added to the TotalChrom’s
configuration.
Step 1
To connect to the terminal server
using a Telnet session, you must
be in a CMD window, also referred
to as a DOS box.
From here use the command:
C:\>Telnet TS1
Step 2
Step 3
From here you will see the logon
screen to communicate with the
terminal server. Log on as a user
(any name will do). The following
steps may help determine the cause
of the problem.
Type in the command Sho Server; from here the server parameters
can be viewed.
Step 4
Type in the command Sho Port #;
shows port characteristics.
Example: Sho port 2
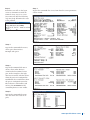
Step 5
Type in the command Sho Port #
Status; shows what device is
connected to the terminal server
port. In the example to the right,
there are two entries. The first shows
when the port is not configured in
TotalChrom, the second shows when
the port is configured. Notice the
Physical Port is either Idle or Job
Service; the IPADDRESS of the
controlling device is now visible.
Step 6
Type in the command Sho Ports
All; this shows the status of all
ports.
w w w. p e r k i n e l m e r. c o m
5
Checking terminal
server availability
Step 2
Conclusion
Before we attempt to add an interface in TotalChrom we should verify
that the interface is available on the
wire. This can be accomplished by
communicating directly with the
interface using a Telnet session.
Send the @ character by selecting
the Shift + 2 keys simultaneously
then selecting the {Enter} key. You
should receive a response from
your 970a interface. Expect different values for different 900 series
interfaces i.e. 950(a), 960(a), 970(a).
Once you have successfully communicated with the interfaces using
these commands then configuring
the interfaces in the TotalChrom
environment should be relatively
straight forward.
Step 1
This indicates a successful
connection.
Author
Using the command Telnet [terminal
server] [Port #] we will communicate
with a 970a A/D interface. In the
example at the bottom of the page,
the interface is connected to port 3
on the terminal server.
Step 3
The 600 series D/D and 941(a) A/D
have a different command requirement. The easiest way to communicate with the interfaces is to
connect as previously described
using the Telnet command, terminal server name, and the appropriate port number. Once you are
connected then power cycle the
box, they should respond with
Hello as listed below. You will
notice the information at the top of
the window – terminal server name
and port number.
By Robert Santerre,
Senior Systems Specialist
PerkinElmer Life and
Analytical Sciences
710 Bridgeport Avenue
Shelton, CT 06484 USA
Publish Date: 3/2/04
This indicates a successful
connection.
PerkinElmer Life and
Analytical Sciences
710 Bridgeport Avenue
Shelton, CT 06484-4794 USA
Phone: (800) 762-4000 or
(+1) 203-925-4602
www.perkinelmer.com
For a complete listing of our global offices, visit www.perkinelmer.com/lasoffices
©2004 PerkinElmer, Inc. All rights reserved. The PerkinElmer logo and design are registered trademarks of PerkinElmer, Inc. PerkinElmer, TotalChrom and TC Publisher are registered
trademarks of PerkinElmer, Inc. or its subsidiaries, in the United States and other countries. Windows, NT, Word, Excel, and Windows 2000 are registered trademarks of Microsoft
Corporation. Lantronix is a registered trademark of Lantronix Corporation. All other trademarks not owned by PerkinElmer, Inc. or its subsidiaries that are depicted herein are the
property of their respective owners. PerkinElmer reserves the right to change this document at any time without notice and disclaims liability for editorial, pictorial or typographical errors.
007146_03
Printed in USA