1
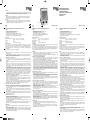
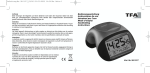
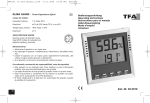
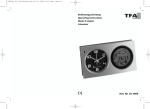
TFA Anl. No. 30.1032 11.05.2007 10:07 Uhr Seite 1
(Schwarz/Process Black Bogen)
Bedienungsanleitung
Operating Instructions
Gebruiksaanwijzing
Instrucciones para el manejo
Mode d’emploi
Istruzioni
Achtung:
• Bitte entsorgen Sie Altgeräte und leere Batterien nicht über den Hausmüll. Geben Sie
diese bitte zur umweltgerechten Entsorgung beim Handel oder entsprechenden Sammelstellen gemäß nationaler oder lokaler Bestimmungen ab.
Attention:
• Please do not dispose of old electronic devices and used batteries in household waste. To
protect the environment, take them to your retail store or to nearest civic amenity site to
be disposed of according to national or local regulations.
Attention:
• Les vieux appareils électroniques et piles usagées ne doivent pas être jetées avec les ordures
ménagères. Dans le souci de protéger l'environnement veuillez les emmener dans un site
approprié de récupération ou chez votre revendeur selon les spécifications nationales et
locales.
Kat. Nr. 30.1032
Digitalthermometer mit Funkuhr
Digital thermometer with radio controlled clock
Kat. Nr. 30.1032
Thermomètre digital avec horloge radio pilotée
Funktionen:
• Funkuhr mit Datumsanzeige
• Anzeige von Innen- und Außentemperatur
• Außentemperatur über Kabel (ca. 3 m)
• Speicher für Höchst- und Tiefstwerte
• Zeitzone ±12 Std., manuelle Zeiteinstellung möglich
• Zum Aufstellen oder an die Wand hängen
Features:
• Radio controlled clock with date
• Indication of indoor and outdoor temperature
• Outdoor temperature via cable (about 3 m)
• Memory for highest and lowest temperature
• Time zone ±12 hours, manual time setting possible
• For wall mounting or table standing
Fonctions:
• Horloge radio pilotée avec date
• Indication de la température intérieure et extérieure
• Température extérieure par câble (d´env. 3 m)
• Mémoire de la température maximale et minimale
• Fuseau horaire ±12 heures, réglage de l’heure manuel possible
• A poser ou à fixer au mur
Technische Daten:
Messbereich:
Specification:
Measuring range:
Spécifications:
Plage de mesure:
Genauigkeit:
Kabellänge:
Batterien:
innen -10°C bis +60°C (-14..+140°F)
außen -40°C bis +65°C (-40..+149°F)
±1°C
ca. 3 m
2 x 1,5 V AA (nicht inklusive)
Anbringung:
Das Thermometer in Fensternähe an dem Aufhänger mit einem Nagel oder Schraube befestigen oder mit dem ausklappbaren Ständer aufstellen.
Das Kabel mit dem Sensor einfach bei geöffnetem Fenster nach außen führen. Das Kabel
passt sich der Form der Fensterdichtung an. (Vorsicht bei scharfkantigen Fensterrahmen –
häufiges Öffnen und Schließen des Fensters vermeiden.)
Vermeiden Sie die Nähe von Heizkörpern und direkte Sonneneinstrahlung.
Inbetriebnahme:
• Öffnen Sie das Batteriefach und legen Sie 2 x 1.5 V AA Batterien ein. Achten Sie auf die
richtige Polarität beim Einlegen der Batterien.
• Ziehen Sie die Schutzfolie vom Display ab. Das Gerät ist jetzt betriebsbereit.
• Das obere Display zeigt Ihnen die Uhrzeit, das mittlere Display die Innentemperatur und
das untere Display die Außentemperatur an.
Empfang der Funkzeit:
• Das Gerät startet für 70 Sekunden den Empfang des Funksignals für die Uhrzeit. Das DCFEmpfangszeichen “ ” blinkt und die Funkzeit wird bei erfolgreichem Empfang nach
spätestens 10 min. ständig im LCD angezeigt.
• Sollte kein Zeitcode empfangen worden sein, wird der Empfang nach jeder Stunde erneut
aktiviert.
• Falls die Funkuhr kein DCF-Signal empfangen kann (z.B. wegen Störungen, Übertragungsdistanz, etc.), kann die Zeit manuell eingestellt werden. Die Uhr arbeitet dann wie eine
normale Quarz-Uhr (siehe „Einstellung von Zeitzone, Uhrzeit und Kalender“).
• Die Zeitübertragung erfolgt von einer Cäsium Atom-Funkuhr, die von der Physikalisch
Technischen Bundesanstalt in Braunschweig betrieben wird. Die Abweichung beträgt
weniger als 1 Sekunde in einer Million Jahren. Die Zeit ist kodiert und wird von Mainflingen in der Nähe von Frankfurt am Main durch ein DCF-77 (77.5 kHz) Frequenzsignal übertragen mit einer Reichweite von ca. 1.500 km. Ihre Funkuhr empfängt das Signal, wandelt
es um und zeigt immer die exakte Zeit an. Auch die Umstellung von Sommer- und Winterzeit erfolgt automatisch. Der Empfang hängt hauptsächlich von der geographischen Lage
ab. Im Normalfall sollten innerhalb des Radius von 1.500 km ausgehend von Frankfurt bei
der Übertragung keine Probleme auftauchen.
Bitte beachten Sie folgende Hinweise:
• Es wird empfohlen, einen Abstand von mindestens 1,5 – 2 Metern zu eventuell störenden
Geräten wie Computerbildschirmen und Fernsehgeräten einzuhalten.
• In Stahlbetonbauten (Kellern, Aufbauten) ist das empfangene Signal natürlicherweise
schwächer. In Extremfällen wird empfohlen, durch Drehen das Funksignal besser zu empfangen.
• Nachts sind die atmosphärischen Störungen meist geringer und ein Empfang ist in den
meisten Fällen möglich. Ein einziger Empfang pro Tag genügt, um die Genauigkeit zu
gewährleisten und Abweichungen unter 1 Sekunde zu halten.
Einstellung von Zeitzone, Uhrzeit und Kalender:
• Drücken Sie die “MODE” Taste und halten Sie diese für zwei Sekunden gedrückt. Die Zeitzoneneinstellung fängt an zu blinken. Die Zeitzoneneinstellung wird benötigt, wenn das
DCF Signal empfangen werden kann, die Zeitzone sich aber von der deutschen Zeit unterscheidet. Sie können mit der ”MIN/MAX“ Taste die Zeitzone einstellen (z.B. +1=eine Stunde später).
• Mit der “MODE” Taste können Sie nun nacheinander das 12- oder 24-Stunden-Zeitsystem,
Stunden, Minuten, Jahr, Monat, Datum und Temperatureinheit °C/°F einstellen.
• Halten Sie die ”MIN/MAX“ Taste im Einstellmodus gedrückt, gelangen Sie in den Schnelllauf.
• Das Gerät verlässt automatisch den Einstellmodus, wenn länger als 30 Sekunden keine
Taste gedrückt wird.
Höchst- und Tiefsttemperaturen:
• Drücken Sie die ”MIN/MAX“ Taste erscheint die tiefste Innen- und Außentemperatur seit
der letzten Rückstellung.
• Durch nochmaliges Drücken der ”MIN/MAX“ Taste wird höchste Innen- und Außentemperatur seit der letzten Rückstellung angezeigt.
• Um wieder die Anzeige mit den aktuellen Temperaturwerten zu erhalten, betätigen Sie
nochmals die ”MIN/MAX“ Taste.
• Drücken Sie die ”MIN/MAX“ Taste für 2 sec., während auf dem Display die maximalen
oder minimalen Temperaturen erscheinen, werden die jeweiligen Werte auf die momentane Temperatur zurückgestellt.
Instandhaltung:
• Setzen Sie das Gerät keinen extremen Temperaturen, Vibrationen und Erschütterungen aus.
• Reinigen Sie das Gerät mit einem weichen, leicht feuchten Tuch. Keine Scheuer- oder
Lösungsmittel verwenden!
• Bitte unternehmen Sie keine eigenen Reparaturversuche. Bei Reklamationen wenden Sie
sich an Ihren Händler. Vor der Reklamation bitte Batterien austauschen. Bei Öffnung oder
unsachgemäßer Behandlung erlischt die Garantie.
Precision:
Cable length:
Batteries
indoor
-10°C to + 60°C (14..+140°F)
outdoor - 40°C to + 65°C (-40..+149°F)
±1°C
ca. 3 m
2 x 1.5 V AA (not included)
Precision:
Câble:
Batteries:
intérieur -10°C à + 60°C (14..+140°F)
extérieur -40°C à + 65°C (-40..+149°F)
±1°C
env. 3 m
2 x 1.5 V AA (ne sont pas inclus)
Installation:
Position the thermometer near a window using the built-in hanging slot with a nail or a
screw or the table stand. Lead the cable with the sensing element through the open window
to the outside. The cable adapts to the window sealing shape. (Take care of sharp-edged
window frames – avoid frequent opening and closing the window). Avoid radiators and
direct sunshine.
Fixation:
Accrocher le thermomètre près d’une fenêtre à l’aide d’une clou ou d’une vis ou poser le
thermomètre en sortant le pied repliable. Simplement guider le câble avec le palpeur vers
l’extérieur par la fenêtre ouverte. Le câble s’adapte à la forme du bourrage de fenêtre.
(Attention aux châssis à vives arrêtes – éviter d’ouvrir et de fermer le fenêtre fréquemment).
Eviter les appareils de chauffage et le rayonnement solaire direct.
Use:
• Open the battery compartment and insert 2 x 1.5 V AA batteries, polarity as illustrated.
• Pull off the protection foil on the display. The unit is now ready to use.
• The upper display shows the time. The middle display shows the indoor temperature. The
lower display shows the outdoor temperature.
Opération:
• Ouvrir le compartiment de la pile et insérer des batteries 2 x 1.5 V AA dans le logement de
batterie. Faire attention à la polarisation correcte. Tirer la feuille de protection de l’affichage.
L’instrument est maintenant prêt à fonctionner.
• L’affichage supérieur vous indique l’heure momentanée, l’affichage du milieu vous indique
la température intérieure, l’affichage inférieur vous indique la température extérieure.
Radio controlled time reception:
• The unit automatically starts scanning the DCF (radio controlled clock) frequency signal
for 70 seconds. The DCF reception symbol “ ” flashes on the LCD. The radio controlled
time appears permanently after 10 minutes at the latest when the signal is received
successfully.
• If the reception fails, scanning repeats again every hour.
• In case the clock cannot detect the DCF-signal (for example due to disturbances, transmitting distance, etc.), the time can be set manually. The clock will then work as a normal
quartz clock. (see “Setting of time zone, clock and calendar“).
• The time base for the radio controlled time is a Caesium Atomic Clock operated by the
Physikalisch Technische Bundesanstalt Braunschweig which has a time deviation of less
than one second in one million years. The time is coded and transmitted from Mainflingen near Frankfurt via frequency signal DCF-77 (77.5 kHz) and has a transmitting
range of approximately 1,500 km. Your radio-controlled clock receives this signal and
converts it to show the precise time in summer or wintertime.
The quality of the reception depends greatly on the geographic location. In normal cases,
there should be no reception problems within a 1,500 km radius around Frankfurt.
Please take note of the following:
• Recommended distance to any interfering sources like computer monitors or TV sets is a
minimum of 1.5 - 2 metres.
• Within ferro-concrete rooms (basements, superstructures), the received signal is naturally
weakened. In extreme cases, please point its front or back towards the Frankfurt transmitter.
• During night-time, the atmospheric disturbances are usually less severe and reception is
possible in most cases. A single daily reception is adequate to keep the accuracy deviation
below 1 second.
Setting of time zone, clock and calendar:
• Hold “MODE” button for 2 seconds to enter setting mode. The time zone indicator is
flashing. The time zone is used for the countries where the DCF signal can be received but
the time zone is different from the German time. Press ”MIN/MAX” button to adjust the
time zone (e.g. + 1=one hour later). Press “MODE” button to confirm each setting. The
setting sequence is shown as follow:
• Time zone, 12 or 24 hours mode, Hours, Minutes, Year, Month, Day, °C or °F as temperature unit.
• Holding ”MIN/MAX” button in setting mode, you will enter fast mode.
• The instrument will quit the setting mode, if there is no button used within 30 seconds.
MIN/MAX temperatures:
• Press the ”MIN/MAX” button and the lowest indoor and outdoor temperature are displayed since the last reset.
• Press the ”MIN/MAX” button again, the display shows the highest indoor and outdoor
temperature since the last reset.
• To go back to the present temperature display, press the ”MIN/MAX” button once more .
• Press the ”MIN/MAX” button for 2 seconds while the maximum and minimum temperatures are displayed to reset the values to the present temperature.
Maintenance:
• Do not expose the instrument to extreme temperatures, vibration or shock
• Clean it with a soft damp cloth. Do not use solvents or scouring agents.
• Please do not try to repair the unit. Contact the original point of purchase. Please change
the batteries before complaining. No guarantee if the instrument is handled or opened
improperly.
Réception de l’heure radio:
• L’horloge tente de capter le signal radio pour 70 secondes. Le symbole de réception DCF
« » clignote, et en cas de réception correcte l'heure reste présent en continu sur l'affichage à CL après 10 minutes au plus tard.
• Si la réception du signal radio de l'heure est impossible, la tentative de réception recommence chaque heure.
• Si votre horloge radio pilotée ne peut pas recevoir le signal DCF (p. ex. en raison de la
présence de perturbations, d’une distance de transmission excessive etc.), vous pouvez
procéder à un paramétrage manuel. Dans ce cas, l’horloge fonctionne comme une horloge à quartz normale (voir « Réglage du fuseau horaire, heure et calendrier »).
• La transmission de l’heure radio s’effectue selon une horloge atomique au césium,
exploitée par la Physikalisch Technische Bundesanstalt de Braunschweig (Institut Fédéral
Physico-Technique de Braunschweig). L’écart de précision de cette horloge est de 1 seconde
pour un million d’années seulement. L’heure est distribuée à partir de Mainfingen, près
de Francfort sur le Main, par un signal DCF-77 (77,5 kHz), avec une portée d’environ 1.500
km. Votre horloge radio pilotée reçoit ce signal, le convertit et affichera ainsi toujours
l’heure exacte. Le passage de l’heure d’hiver à l’heure d’été et vice-versa s’effectue également en mode automatique. La réception est essentiellement fonction de votre position
géographique. En règle générale, dans un rayon de 1.500 km autour de Francfort, aucun
problème de transmission ne devrait apparaître.
Nous vous prions de respecter les consignes ci-après:
• Nous vous recommandons de ménager une distance de 1,5 à 2 m entre l’appareil et
d’éventuelles sources de signaux parasites, comme les écrans d’ordinateur et les postes de
télévision.
• Dans les bâtiments en béton armé (caves, greniers aménagés), le signal reçu est affaibli.
Dans les cas extrêmes, nous vous conseillons de tourner l’appareil pour améliorer la réception du signal radio.
• La nuit, les perturbations s’affaiblissent en règle générale, et la réception est possible en
plupart des cas. Un seul créneau de réception par jour suffit, pour garantir la précision de
l’affichage de l’heure, et pour maintenir d’éventuels écart en dessous de 1 seconde.
Réglage du fuseau horaire, heure et calendrier:
• Appuyer la touche « MODE » pour deux secondes. L’indicateur du fuseau horaire commence
à clignoter. Pour paramétrer un autre fuseau horaire, divergeant de l’heure DCF, régler le
fuseau horaire à l’aide de la touche « MIN/MAX » (p. ex. + 1 = une heure plus tard).
• En utilisant la touche « MODE » on peut régler successivement le système de temps à
12 heures ou 24 heures, l’heure, les minutes, l’ année, mois, date, °C ou °F.
• Si l'on maintient appuyée la touche « MIN/MAX » dans le mode de réglage, on parvient à
l'affichage rapide.
• Le mode de réglage est toujours automatiquement terminé après 30 secondes sans
qu'aucune action de touche ne se produise.
Températures maximales et minimales:
• En pressant la touche « MIN/MAX » apparaît la température intérieure et extérieure minimale depuis la dernière réactualisation.
• En pressant encore une fois la touche « MIN/MAX » apparaît la température intérieure et
extérieure maximale depuis la dernière réactualisation.
• En pressant la touche « MIN/MAX » une troisième fois apparaît la température momentanée.
• En pressant la touche « MIN/MAX » pour deux secondes en même temps les températures
maximales et minimales sont affichées, la mémoire « MIN/MAX » est remise à la température actuelle.
Entretien:
• Evitez d’exposer l’appareil à des températures extrêmes, vibrations ou chocs.
• Pour le nettoyage du display et du boîtier, utilisez un chiffon doux humide. N’utilisez pas
de dissolvants ou d´agents abrasifs
• N’effectuez en aucun cas des réparations par vos propres moyens. Rapportez l’appareil au
point de vente. Avant tout réclamation, veuillez échanger les piles. Nous déclinons toute
responsabilité en cas de manipulation incompétente ou d´ouverture de l’appareil.
TFA Anl. No. 30.1032 11.05.2007 10:08 Uhr Seite 2
(Schwarz/Process Black Bogen)
Bedienungsanleitung
Operating Instructions
Gebruiksaanwijzing
Instrucciones para el manejo
Mode d’emploi
Istruzioni
Attenzione:
• Le batterie scariche e apparecchi elettrici smessi non devono essere smaltiti insieme all'immondizia domestica, bensì dovranno essere riconsegnate al negoziante o ad altri enti
preposti per il riciclo in conformità alle vigenti disposizioni nazionali o locali.
Opgepast:
• Batterijen en technische apparaten mogen niet met het huisvuil worden weggegooid.
Breng ze naar de inzamelplaatsen of bij uw detaillist naar de daarvoor bestemde containers volgens de nationale of lokale bepalingen.
Atención:
• El aparato y las baterías usadas no deben ser depositadas con los residuos normales de la
casa. Por favor deposítelas en el comercio especializado o bien en los centros de recogida y
reciclaje previstos para ello según el reglamento nacional o local.
Kat. Nr. 30.1032
Termometro digitale con orologio radio controllato
Digitale thermometer met radiografische tijd
Kat. Nr. 30.1032
Termómetro digital con reloj radio controlado
Funzioni:
• Orologio radio controllato con data
• Display con temperatura interna ed esterna
• Temperatura esterna via cavo (ca. 3 m)
• Memorizzazione della temperatura massima e minima
• Fuso orario ±12 ore, possibilità di impostare l'ora in modo manuale
• Montaggio a muro o sistemazione su piano d’appoggio
Functie:
• Radiografische tijd met datum
• Aanwijzing van binnen- en buitentemperatuur
• Buitentemperatuur via kabel (ca. 3 m)
• Geheugen voor maximum- en minimumwaarden
• Tijdzone ±12 uren, handmatige tijdinstelling mogelijk
• Om op te hangen of neer te zetten
Funciones:
• Reloj radio controlado con fecha
• Indicación de temperatura interior y exterior
• Temperatura exterior vía cable (unos 3 m.)
• Memoria para valores mayores y menores
• Zona de tiempo ±12 horas, posibilidad de ajustar el tiempo manualmente
• Montaje de pared o sobremesa
Dati tecnici:
Ambito della misurazione: interna: da -10°C a + 60°C (14..+140°F)
esterna: da -40°C a + 65°C (-40..+149°F)
Precisione:
±1°C
Cavo:
ca. 3 m
Batterie:
2 x 1.5 V AA (non comprese)
Technische gegevens:
Meetgebied:
binnen: -10°C tot + 60°C (14..+140°F)
buiten: -40°C tot +65°C (-40..+149°F)
Nauwkeurigheid:
±1°C
Kabellengte:
ca. 3 m
Batterijen:
2 x 1,5 V AA (niet inclusief)
Características técnicas:
Campo de medida: interior: -10°C hasta + 60°C (14..+140°F)
exterior: -40°C hasta +65°C (-40..+149°F)
Precisión:
±1°C
Longitud del cable: aproximadamente 3 m
Baterías:
2 x 1,5 V AA (no incluidas)
Posizionamento:
Fissare il termometro vicino alla finestra agganciando l’apposito laccio di sospensione
oppure estrarre il dispositivo di appoggio e sistemarlo. Con la finestra aperta, portare
semplicemente il cavo con il sensore all’esterno. Il cavo si adatta alla guarnizione della
finestra. (Attenzione nel caso di telai a spigoli vivi, evitare aperture e chiusure frequenti
della finestra)
Evitare fonti di calore ed esposizione diretta al sole.
Aanbrenging:
De thermometer in de buurt van het raam aan het haakje met een spijker of schroef bevestigen of met de uitklapbare standaard opstellen.
De kabel met de sensor gewoon bij geopend raam naar buiten leiden. De kabel past zich
aan de vorm van het beglazingsrubber aan. (Pas op bij scherpkantige raamkozijnen– vaak
openen en sluiten van het raam voorkomen.) De nabijheid van verwarmingselementen en
direct binnenvallende zonnestralen voorkomen.
Fijación:
Fije el termómetro cerca de la ventana en el colgador con un clavo o tornillo o colóquelo
con el soporte plegable.
Conduzca el cable con el órgano sensorial por la ventana abierta hacia fuera. El cable se
adapta a la forma de la juntura de la ventana. (Atención en el caso de bastidores de ventanas cortantes – evite la apertura y el cierre frecuentes de la ventana.)
Evite la cercanía de caloríferos y la radiación solar directa.
Uso:
• Aprire il vano batterie e inserire le batterie 2 x 1.5 V AA rispettando attentamente le
polarità indicate.
• Levare il foglio protettivo dal display. Ora l’apparecchio è pronto per il funzionamento.
• Il display superiore indica l ‘ora attuale, il display in mezzo indica la temperatura interna,
il display inferiore indica la temperatura esterna.
Bediening:
• Open het batterijvak en plaats de batterijen 2 x 1,5 V AA. Let op de juiste polariteit. Trek
de schermfolie van de display af. Het apparaat is nu bedrijfsklaar.
• De bovenste display geeft u de tijd, de middelste display de binnentemperatuur en de
onderste display de buitentemperatuur aan.
Manejo:
• Abra el compartimiento de las pilas y introduzca las pilas 2 x 1,5 V AA. Compruebe que la
polaridad sea la correcta. Saque la película de protección del display. Ahora el aparato
está dispuesto para el funcionamiento.
• El display superior le indica la hora, el display medio la temperatura interior y el display
inferior la temperatura exterior.
Ricezione dell'ora a controllo radio:
• L'orologio inizia a ricevere il segnale radio per 70 secondi. Il simbolo di ricezione DCF
“ ” lampeggia, dopo 10 minuti al più tardi l'ora apparire sull'LCD quando la ricezione è
corretta.
• Nel caso in cui non si dovesse ricevere il codice dell'ora, la ricezione viene riattivata dopo
un'ora.
• Nel caso in cui l’ orologio non riesca a ricevere il segnale DCF (a causa di disturbi, distanza
di trasmissione ecc.), l'ora può essere impostata manualmente. In questo caso l'orologio
funziona come un normale orologio al quarzo (Vedi “Impostazione del fuso orario, della
ora e calendario”)
• L'orario di base della ricezione dell'ora a controllo radio è fornito dall'orologio atomico
al cesio della Physikalisch Technische Bundesanstalt Braunschweig, che presenta una
deviazione di meno di un secondo in un milione di anni. L'ora è codificata e trasmessa da
Mainflingen vicino Francoforte con un segnale a frequenza DCF-77 (77.5 Khz), ed ha un
raggio di trasmissione di circa 1.500 km. L’orologio radio controllato riceve il segnale, lo
converte per visualizzare l'ora precisa sia con l'ora legale sia con l'ora solare. La qualità
della ricezione dipende molto dalla posizione geografica. In condizioni normali, non ci
sono problemi di ricezione entro un raggio di trasmissione di 1.500 km da Francoforte.
Le norme elencate qui di seguito siano rispettate:
• La distanza raccomandata da qualsiasi fonte di inerferenza come schermi di computer o di
televisioni deve essere almeno di 1.5 - 2m.
• All'interno di strutture in ferro-cemento (seminterrati, sovrastrutture), la ricezione del
segnale è naturalmente più debole. In casi estremi, puntarne la parte frontale o la parte
posteriore verso il trasmettitore di Francoforte.
• Durante le ore notturne, le interferenze dovute ad agenti atmosferici sono normalmente
meno influenti, e la ricezione è possibile nella maggior parte die casi. Una singola ricezione
giornaliera è sufficiente per mantenere la deviazione dell'ora sotto un secondo.
Impostazione del fuso orario, della ora e calendario:
• Premere il tasto ”MODE” per 2 sec.: il simbolo del fuso orario lampeggia. L'impostazione
del fuso orario è necessaria quando è possibile ricevere il segnale DCF, tuttavia il fuso orario è diverso dall'ora tedesca. Impostare con il tasto “MIN/MAX” il fuso orario (ad es.,
+1=un'ora più tardi).
• Sempre con il tasto ”MODE” è possibile modificare uno dopo l'altro le impostazioni per il
sistema orario di 12 o 24 ore, ora, minuti, anno, mese, data, gradi °C (gradi Celsius) o °F
(gradi Fahrenheit).
• Tenere premuto il tasto “MIN/MAX” in modalità impostazione per procedere velocemente.
• L'apparecchio esce automaticamente dalla modalità impostazione se non si preme alcun
tasto per più di 30 secondi.
Temperature massime e minime:
• Premendo sul tasto “MIN/MAX” viene visualizzata la temperatura interna ed esterna minima raggiunta dopo l’ultimo azzeramento.
• Premendo di nuovo il tasto “MIN/MAX” viene visualizzata la temperatura interna ed
esterna massima raggiunta dopo l’ultimo azzeramento.
• Per richiamare la visualizzazione del valori di temperatura attuali, attivare ancora una
volta il tasto “MIN/MAX”.
• Per cancellare i valori di temperatura massima e di minima memorizzati, premere il tasto
“MIN/MAX” per 2 sec. mentre la temperatura massima e minima viene visualizzata.
Manutenzione:
• Evitare di posizionare gli apparecchi in zone soggette a temperatura estrema, a vibrazioni e
a urti
• Quando si pulisce il display e l'involucro, usare solo un panno soffice inumidito con acqua.
Non usare solventi o abrasivi.
• Non effettuare riparazioni sugli apparecchi. Per favore riportarli al punto vendita originale.
Prima del reclamo, cambiare le batterie. Nel caso di uso scorretto o di apertura dell'apparecchio non assumiamo alcuna garanzia.
Ontvangen van het radiografisch tijdsignaal:
• Het horloge begint met de ontvangst van het radiosignaal voor de tijd gedurende
70 seconden. DCF-ontvangstteken “ ” knippert en de tijd wordt bij succesvolle ontvangst na uiterlijk 10 minuten permanent in de LCD weergegeven.
• Indien geen tijdcode werd ontvangen, wordt na 1 uur de ontvangst opnieuw geactiveerd.
• Als het weerstation geen DCF-signaal ontvangt (wegens storingen, afstand, enz.), kan u
de tijd ook per hand instellen. (Zie “Instellen van de tijdzone, tijd en kalender”)
• De tijdbasis voor de radiografisch bestuurde tijd is een Cesium Atoom Klok van het
Physikalisch Technische Bundesanstalt Braunschweig met een afwijking van minder dan
een seconde in een miljoen jaar. De tijd wordt gecodeerd uitgezonden vanuit Mainflingen bij Frankfurt via het frequentiesignaal DCF-77 (77.5 kHz) en heeft een zendbereik
van ongeveer 1500 km. Het horloge ontvangt dit signaal en zet het om in de preciese
zomer- of wintertijd. De kwaliteit van de ontvangst hangt in belangrijke mate af van de
geografische ligging. Normaliter zouden er binnen een straal van 1500 km rondom Frankfurt geen ontvangstproblemen mogen zijn.
Let alstublieft op het volgende:
• Aanbevolen afstand van mogelijke storingsbronnen zoals computermonitoren of Tv-toestellen dient tenminste 1,5-2 meter te zijn.
• In ruimten met gewapend beton (kelders, torenflats) wordt het signaal uiteraard verzwakt ontvangen. In extreme gevallen het toestel dichter bij het raam zetten met de
voor- of achterkant in de richting van de Frankfurt-zender.
• 's Nachts zijn atmosferische storingen over het algemeen minder ernstig en is ontvangst
in de meeste gevallen wel mogelijk. Een enkele ontvangst per dag is voldoende om de
tijdsafwijking onder 1 seconde te houden.
Instellen van de tijdzone, tijd en kalender:
• Druk op de “MODE” toets en houd deze twee seconden lang ingedrukt. De tijdzone
begint te knipperen. De instelling van de tijdzone is vereist indien het DCF-signaal kan
worden ontvangen, maar de tijdzone van de Duitse tijd afwijkt. U kunt met de
“MIN/MAX” toets de tijdzone instellen (bijv. +1 = één uur later).
• Met de “MODE” toets kunt u nu achter elkaar het 12- of 24-uurs-tijdsysteem, uren, minuten, jaar, maand, datum, °C / °F wisselen.
• Als u de “MIN/MAX” toets in de instelmodus ingedrukt houdt, komt u de snelloop.
• Het apparaat verlaat automatisch de instelmodus, als er langer dan 30 seconden geen
toets wordt ingedrukt.
Maximum- en minimumtemperaturen:
• Drukt u op de “MIN/MAX” toets, dan verschijnt de laagste binnen- en buitentemperatuur
sinds de laatste terugstelling.
• Door nogmaals drukken op de “MIN/MAX” toets wordt de hoogste binnen- en buitentemperatuur sinds de laatste terugstelling aangewezen.
• Om weer de indicatie met de actuele temperatuurwaarden te verkrijgen nogmaals op de
“MIN/MAX” toets drukken.
• Druk op de “MIN/MAX” toets en houd deze twee seconden lang ingedrukt, terwijl op de
display de maximum- en minimum temperaturen verschijnen, worden de desbetreffende
waarden op de temperatuur van dit ogenblik teruggezet.
Instandhouding:
• Stel het apparaat niet aan extreme temperaturen, trillingen en schokken bloot.
• Maak het apparaat met een zachte, enigszins vochtige doek schoon. Geen schuur- of
oplosmiddelen gebruiken!
• Voer geen eigen reparatiepogingen uit. Bij reclamaties dient u zich tot uw dealer te
richten. Alvorens te reclameren a.u.b. de batterijen vervangen. Bij het openen of onvakkundige behandeling vervalt de garantie.
Recepción de la hora radio controlada:
• El reloj inicia la recepción de la señal de radio para la hora. El símbolo de recepción DCF
“ ” parpadea y si la recepción es satisfactoria la hora se muestra fija en el LCD después
de 10 min. a más tardar.
• Si no se recibe ningún código de tiempo, la recepción se activa de nuevo después de
1 hora.
• Si su reloj radio controlado no es capaz de recibir ninguna señal DCF (p. ej, debido a interferencias, distancia de transmisión, etc.), puede ajustar asimismo la hora manualmente. En
tal caso el reloj funciona como un reloj normal de cuarzo. (Veja: “Ajuste de la zona de
tiempo, hora y calendario”)
• La transmisión de la hora se realiza por medio de un reloj atómico de cesio radioeléctrico,
por el instituto técnico físico de Braunschweig. La desviación es menor a 1 segundo en un
millón de años. La hora viene codificada y es transmitida desde Mainflingen en las
proximidades de Frankfurt am Main por una señal de frecuencia DCF-77 (77.5 kHz) con
un alcance de aprox. 1.500 km. Su reloj radio controlado recibe la señal, la convierte y
muestra siempre la hora exacta. Incluso el cambio de horario de verano e invierno se produce automáticamente. La recepción depende básicamente de la situación geográfica.
Normalmente en un radio de unos 1.500 km desde Frankfurt la transmisión no debería
suponer ningún problema.
Siga por favor las indicaciones siguientes:
• Es recomendable mantener una distancia de como mínimo 1,5 – 2 metros de posibles
aparatos perturbadores tales como pantallas de ordenadores y televisores.
• En construcciones de hormigón de acero (Sótanos, edificación suplementaria), la señal
recibida es evidentemente más débil. En casos extremos se aconseja de emplazar el
aparato próximo a una ventana y/o girando intentar una mejor recepción.
• Por las noches las perturbaciones atmosféricas suelen ser reducidas y disponer de recepción en la mayoría de los casos. Si además se recibe como mínimo una vez al día, es
suficiente para garantizar la precisión y mantener desviaciones inferiores a 1 segundo.
Ajuste de la zona horaria, hora y calendario:
• Pulse la tecla “MODE” y manténgala pulsada durante dos segundos. La zona horaria
empieza a parpadear. El ajuste de la zona horaria es necesario cuando puede recibirse la
señal DCF, la zona horaria es diferente de la alemana. Puede ajustar con la tecla
”MIN/MAX“ (p. ej. +1=una hora más tarde).
• Con la tecla “MODE” puede cambiar sucesivamente al ajuste de: el sistema de horario de
12 o de 24 horas, las horas, los minutos, el año, el mes, la fecha y indicación de temperatura en °C/°F.
• Si mantiene pulsada la tecla ”MIN/MAX“ en el modo de ajuste, se modificará rápidamente.
• El aparato sale automáticamente del modo de ajuste si no se pulsa ninguna tecla durante
más de 30 segundos.
Temperaturas máximas y mínimas:
• Si pulsa usted la tecla “MIN/MAX” se indica el valor de temperatura interior y exterior
mínima desde la última reposición.
• Pulsando de nuevo la tecla “MIN/MAX” se indica el valor de temperatura interior y exterior
máxima desde la última reposición.
• Para indicar de nuevo los valores de temperatura actuales, pulse otra vez la tecla
“MIN/MAX”.
• Si pulsa usted la tecla “MIN/MAX” y manténgala pulsada durante dos segundos mientras
que se indican en el display los valores de temperatura máximas y mínimas, los valores
correspondientes se atrasan a la temperatura momentánea.
Conservación:
• No exponga el aparato a temperaturas, vibraciones y sacudidas extremas.
• Limpie el aparato con un trapo suave, ligeramente humectado. ¡No utilizar ningún medio
abrasivo o disolvente!
• Por favor, no emprenda ningún intento propio de reparaciones. En caso de reclamaciones
diríjase a su comerciante. Antes de la reclamación, por favor, cambiar las pilas. En caso de
abertura o trato inadecuado expirará la garantía.