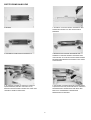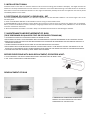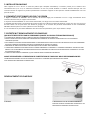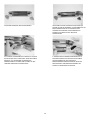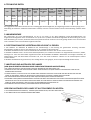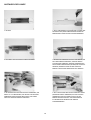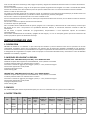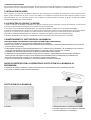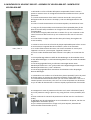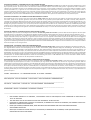
1
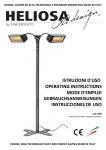
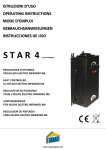
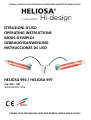
DESIGN, CALORE AD ALTA TECNOLOGIA E RISPARMIO ENERGETICO MADE IN ITALY
ISTRUZIONI D'USO
OPERATING INSTRUCTIONS
MODE D'EMPLOI
GEBRAUCHSANWEISUNG
INSTRUCCIONES DE USO
HELIOSA 996 / HELIOSA 997
cod. 996 – 997
WATERPROOF IPX5
DESIGN, HIGH TECHNOLOGY HEAT AND ENERGY SAVING MADE IN ITALY
Informazione importante per lo smaltimento ambientalmente compatibile
IN ALCUNI PAESI DELL'UNIONE EUROPEA QUESTO PRODOTTO NON RICADE NEL CAMPO DI APPLICAZIONE DELLA LEGGE NAZIONALE DI RECEPIMENTO DELLA
DIRETTIVA RAEE E QUINDI NON È IN ESSI VIGENTE ALCUN OBBLIGO DI RACCOLTA DIFFERENZIATA A FINE VITA.
Questo prodotto è conforme alla Direttiva EU2002/96/EC. Il simbolo del bidone barrato riportato sull’apparecchio indica che il prodotto, alla fine della propria vita
utile, dovendo essere trattato separatamente dai rifiuti domestici, deve essere conferito in un centro di raccolta differenziata per apparecchiature elettriche ed
elettroniche oppure riconsegnato al rivenditore al momento dell’acquisto di una nuova apparecchiatura equivalente. L’utente è responsabile del conferimento
dell’apparecchio a fine vita alle appropriate strutture di raccolta, pena le sanzioni previste dalla vigente legislazione sui rifiuti. L’adeguata raccolta differenziata per
l’avvio successivo dell’apparecchio dismesso al riciclaggio, al trattamento e allo smaltimento ambientalmente compatibile contribuisce ad evitare possibili effetti
negativi sull’ambiente e sulla salute e favorisce il riciclo dei materiali di cui è composto il prodotto. Per informazioni più dettagliate inerenti i sistemi di raccolta
disponibili, rivolgersi al servizio locale di smaltimento rifiuti o al negozio in cui è stato effettuato l’acquisto. I produttori e gli importatori ottemperano alla loro
responsabilità per il riciclaggio, il trattamento e lo smaltimento ambientalmente compatibile sia direttamente sia partecipando ad un sistema collettivo.
Important information for environmentally friendly disposal
IN SOME EU COUNTRIES THIS PRODUCT DOES NOT FALL INTO THE SCOPE OF APPLICATION OF THE ITALIAN DOMESTIC LAW ACKNOWLEDGING THE RAEE
DIRECTIVE AND THEREFORE THERE IS NO OBLIGATION IN FORCE TO SEPARATE MATERIALS AT THE END OF THEIR USEFUL LIFE.
This product complies with Directive ED2002/96/EC.The symbol of a dustbin with a cross, which is shown on the appliance, indicates that the product, because it must
be treated separately from household waste, must be taken, at the end of its useful life, to a collection centre for electrical and electronic equipment or redelivered to
the retailer on purchase of a new equivalent appliance.The user is responsible for delivering the appliance to the appropriate collection structure at the end of its life,
on penalty of the measures provided for by current legislation on waste. The proper separate collection for subsequent transfer of the appliance for recycling,
treatment and environmentally friendly disposal contributes to avoiding any possible harmful effects on the environment and health and promotes recycling of the
materials that make up the product. For more detailed information on the available collection systems, contact the local refuse disposal service or the shop where the
purchase was made. The producers and importers meet their responsibilities for recycling, treatment and environmentally friendly disposal either directly or through
participating in a collective system.
Information importante pour une élimination compatible avec l’environnement.
DANS CERTAINS PAYS DE L’UNION EUROPEENNE, CE PRODUIT NE TOMBE PAS SOUS LE COUP DE L’APPLICATION DE LA LOI NATIONALE D’ACCEPTATION DE LA
DIRECTIVE RAEE ET N’EST DONC SOUMIS A AUCUNE OBLIGATION DE TRI SELECTIF EN FIN DE VIE.
Ce produit est conforme à la Directive EU2002/96/EC.Le symbole de la poubelle barrée reporté sur l’appareil indique que le produit, arrivé en fin de vie, doit faire
l’objet d’un traitement spécial et doit donc être confié à un centre de tri pour appareillages électriques et électroniques, ou bien ramené au vendeur à l’achat d’un
nouvel appareil équivalent. L’utilisateur est responsable du transfert de l’appareil en fin de vie aux structures de tri appropriées, sous peine des sanctions prévues par
la législation en vigueur sur les déchets. Le tri prévu pour l’envoi de l’appareil démantelé à la phase de recyclage, de traitement et d’élimination compatible avec
l’environnement contribue à éviter d’éventuels effets négatifs sur l’environnement et sur la santé et favorise le recyclage des matériaux dont le produit se compose.
Pour des informations plus détaillées concernant les systèmes de collecte disponibles, s’adresser au service local d’élimination des déchets ou au magasin où l’achat a
été effectué. Les producteurs et les importateurs assument leurs responsabilités quant au recyclage, au traitement et à l’élimination compatible avec l’environnement
soit directement, soit en participant à un système collectif.
Wichtiger Hinweis für die umweltverträgliche Entsorgung
IN EINIGEN LÄNDERN DER EUROPÄISCHEN UNION FÄLLT DIESES GERÄT NICHT IN DEN ANWENDUNGSBEREICH DES NATIONALEN GESETZES FÜR DIE
UMSETZUNG DER WEEE-RICHTLINIE UND DORT BESTEHT DAHER KEINE PFLICHT ZUR MÜLLTRENNUNG AM ENDE DER LEBENSDAUER DES GERÄTS.
Dieses Gerät erfüllt die EU-Richtlinie 2002/96/EG. Das auf dem Gerät enthaltene Symbol der durchkreuzten Mülltonne weist darauf hin, dass es am Ende seiner
Lebensdauer vom Hausmüll getrennt zu entsorgen ist und daher zu einem Sammelzentrum für elektrische und elektronische Altgeräte gebracht oder im Moment des
Kaufs eines neuen, gleichwertigen Geräts an den Händler zurückgegeben werden muss. Der Benutzer ist dafür verantwortlich, das Gerät am Ende seiner Lebensdauer
einer geeigneten Sammelstelle zu übergeben, andernfalls riskiert er die von den gültigen Abfallentsorgungsbestimmungen vorgesehenen Sanktionen. Eine
ordnungsgemäße Mülltrennung mit anschließender Zuführung des Altgeräts zur Wiederverwertung, Müllbehandlung und umweltverträglichen Entsorgung trägt dazu
bei, mögliche negative Auswirkungen auf die Umwelt und die Gesundheit zu vermeiden und fördert die Wiederverwendung der Materialien, aus denen das Gerät
besteht. Für nähere Informationen zu den zur Verfügung stehenden Sammelsystemen wenden Sie sich bitte an die örtliche Abfallentsorgungsbehörde oder an das
Geschäft, in dem Sie das Gerät gekauft haben. Die Hersteller und Importeure kommen ihrer Verantwortung für die Wiederverwertung, Müllbehandlung und
umweltverträgliche Entsorgung sowohl direkt als auch durch Teilnahme an einem kollektiven System nach.
Información importante para el desecho ambiental compatible
EN ALGUNOS PAÍSES DE LA UNIÓN EUROPEA, EST PRODUCTO NO ENTRA EN EL CAMPO DE APLICACIÓN DE LA LEY NACIONAL DE ACEPTACIÓN DE LA
DIRECTIVA RAEE Y, POR LO TANTO, EN DICHOS PAÍSES NO HAY VIGENTE NINGUNA OBLIGACIÓN DE RECOGIDA SELECTIVA DE RESIDUOS DE APARATOS
CUANDO TERMINA SU VIDA ÚTIL.Este producto guarda conformidad con la Directiva EU2002/96/EC. El símbolo del recipiente con una cruz que se encuentra sobre
el aparato indica que, a los fines de su propia vida útil, el producto se debe tratar en forma separada de los residuos domésticos y, por lo tanto, se debe entregar a un
centro de recogida selectiva de aparatos eléctricos y electrónicos, o bien entregar al distribuidor en el momento de la adquisición de un nuevo aparato equivalente.El
usuario es responsable de entregar el aparato cuando termina su vida útil a las estructuras de recogida apropiadas, bajo pena de aplicación de las sanciones previstas
por las legislaciones vigentes sobre residuos. La adecuada recogida selectiva para la entrega sucesiva del aparato desechado para reciclado, tratamiento y eliminación
ambientalmente compatible contribuye a evitar posibles efectos negativos en el ambiente y la salud, y favorece el reciclado de los materiales con los cuales está
compuesto el producto. Para obtener información más detallada inherente a los sistemas de recogida disponibles, dirigirse al servicio local de eliminación de
desechos o al negocio donde se ha realizado la compra. Los fabricantes y los importadores se ajustarán a su responsabilidad en cuanto al reciclado, el tratamiento y la
eliminación ambientalmente compatible ya sea en forma directa o participando en un sistema colectivo.
2
ITALIANO
AVVERTENZE
PRIMA DI UTILIZZARE IL PRODOTTO SI PREGA DI LEGGERE ATTENTAMENTE LE AVVERTENZE. STAR
PROGETTI NON POTRÀ ESSERE RITENUTA RESPONSABILE PER EVENTUALI DANNI A PERSONE O COSE
CAUSATI DAL MANCATO RISPETTO DELLE INDICAZIONI DI SEGUITO ELENCATE, LA CUI OSSERVANZA
ASSICURERÀ INVECE LA DURATA E L’AFFIDABILITÀ ELETTRICA E MECCANICA DELL’APPARECCHIO.
CONSERVARE SEMPRE QUESTO LIBRETTO D’ISTRUZIONI.
NON USARE QUESTO PRODOTTO PER UNA FUNZIONE DIFFERENTE DA QUELLA ESPOSTA NEL PRESENTE LIBRETTO.
1. Dopo aver tolto il prodotto dall’imballo, assicurarsi della sua integrità; nel dubbio rivolgersi subito a Star Progetti oppure al
Rivenditore autorizzato.
2. Non lasciare parti dell’imballo alla portata di bambini o persone diversamente abili.
3. Non sedersi né appoggiare oggetti sull’apparecchio.
4. Non utilizzare l’apparecchio in presenza di sostanze o vapori infiammabili come alcool, insetticidi, benzina, ecc.
5. Non utilizzare l’apparecchio nelle immediate vicinanze di una vasca da bagno, di una doccia o di una piscina, ma attenersi sempre
alle distanza di sicurezza prescritte dalle norme CEE-CEI.
6. Per evitare il rischio di incendi fare attenzione che l’apparecchio non vada inavvertitamente in contatto con gli stessi e non
installare l’apparecchio con l'elemento radiante in prossimità o comunque orientati verso tende, ombrelloni, letti o altri oggetti o
materiali facilmente combustibili; dovrà in ogni caso essere garantita una distanza minima adeguata ad evitare rischi di danni o
incendi.
7. Non toccare l'apparecchio con le mani bagnate o umide, non toccare l'apparecchio a piedi nudi.
8. Collegare HELIOSA® ad un’alimentazione di 220-240V monofase (in base al paese).L'apparecchio deve essere correttamente
collegato ad un impianto elettrico conforme alle normative vigenti e munito di efficace sistema di messa a terra. In caso di dubbi
richiedere un controllo accurato da parte di personale professionale qualificato o da tecnico specialista. Collegare il riscaldatore alla
rete di alimentazione elettrica solo se la tensione e portata dell’impianto sono adeguati ai suoi dati di targa e segnatamente alla sua
potenza massima.
9. L’apparecchio non deve essere posto immediatamente sotto una presa di corrente fissa.
10. L’apparecchio deve essere sempre installato in posizione orizzontale.
11.L’installazione del prodotto deve essere effettuata, nel rispetto delle istruzioni riportate nel presente libretto, da personale
professionalmente qualificato. L’errato montaggio e/o collegamento elettrico possono causare danni a persone, animali o cose, dei
quali Star Progetti non potrà essere considerata responsabile.
12. Questo apparecchio non è da intendersi adatto all'uso da parte di persone (incluso bambini) con ridotte capacità fisiche,
sensoriali o mentali, o prive di esperienza e conoscenza a meno che siano state supervisionate o istruite riguardo all'uso
dell'apparecchio da una persona responsabile della loro sicurezza. I bambini dovono essere supervisionati per assicurarsi che non
giochino con l'apparecchio .ATTENZIONE: Questo apparecchio di riscaldamento non è dotato di un dispositivo di controllo della
temperatura ambientale . Non utilizzare in stanze piccole quando queste sono occupate da persone non in grado di lasciare la stanza
da soli , a meno che non siano sotto costante sorveglianza.
13. La temperatura dell’apparecchio, durante il suo funzionamento, è particolarmente elevata; evitare dunque il contatto delle
superfici calde con la pelle nuda. Prima di ogni intervento si raccomanda di spegnere il prodotto ed attendere per almeno 5 minuti.
14. Non apportare modifiche di alcun genere all’apparecchio.
15. Prestare particolare attenzione nei casi di impiego in ambienti non presidiati.
16. Ispezionare visivamente e periodicamente l’integrità del prodotto. In caso di imperfezioni evitarne l’utilizzo e contattare subito il
costruttore oppure un Rivenditore autorizzato autorizzato.
17.Prima di effettuare qualsiasi intervento di pulizia o manutenzione spegnere il prodotto e scollegarlo dalla rete elettrica aprendo
l’interruttore dell’impianto.
18. Se il prodotto cade o riceve forti colpi farlo verificare subito dal costruttore oppure presso un Centro Assistenza Tecnica
autorizzato.
19.Durante gli interventi di manutenzione non toccare direttamente i bulbi ma agire unicamente sulle calotte terminali. Il bulbo
viene danneggiato dal contatto con le mani nude; in questo caso la garanzia di copertura del prodotto decade. Nel caso di contatto
accidentale con la superficie del bulbo, pulire quest’ultima immediatamente,strofinandola con un panno inumidito di alcool
denaturato.
3
21. In caso di cattivo funzionamento e/o guasto spegnere l’apparecchio e rivolgersi subito al costruttore oppure ad un Centro
Assistenza Tecnica autorizzato.
22. Per l’eventuale riparazione esigere l’utilizzo di ricambi originali Star Progetti. In caso di danneggiamento del cavo, o della relativa
spina, provvedere tempestivamente alla sostituzione, che dovrà essere effettuata esclusivamente dal costruttore o dal servizio di
assistenza o da tecnico specialista. Utilizzare un cavo con caratteristiche analoghe a quello fornito.
23. Spegnere l’interruttore generale dell’impianto quando:
a) si rileva un’anomalia di funzionamento;
b) si decide di eseguire una manutenzione di pulizia esterna;
c) si decide di non utilizzare per lunghi periodi l'apparecchio.
24. Non coprire né ostruire la griglia frontale dalla quale viene irraggiato il calore.
25. All’atto dell’installazione prevedere un interruttore omnipolare opportunamente dimensionato con distanza fra i contatti uguale
o superiore a 3 mm.
26. Non coprire né ostruire l’apparecchio durante il funzionamento.
27. Mantenere pulita la griglia frontale.
28. Se si decide di eliminare definitivamente l’apparecchio spegnerne l’interruttore e scollegarlo dalla rete elettrica, riponendolo
lontano da bambini o persone diversamente abili. Si raccomanda inoltre di renderlo inutilizzabile tagliandone il cavo di
alimentazione.
29. Non utilizzare l’apparecchio in abbinamento a programmatori, temporizzatori o altri dispositivi in grado di accenderlo
automaticamente senza la presenza di una persona.
30. Procedere singolarmente alla accensione ed allo spegnimento di ogni apparecchiatura e non con interruttore generale per
evitare sbalzi di tensione che possano bruciare i bulbi a infrarossi.
ISTRUZIONI D'USO
1. DESCRIZIONE
HELIOSA® HI DESIGN è un riscaldatore a raggi infrarossi dalle forme esclusive e di tendenza. Questa linea si presenta con forme
arrotondate, gradevoli,morbide che si inseriscono in qualsiasi tipo di arredamento. HELIOSA® HI DESIGN è stato progettato e
costruito con una buona tecnica ed assemblato con i migliori componenti conformi alle normative e/o certificati per la salvaguardia
della sicurezza nell’impiego. Tutti gli apparecchi sono collaudati singolarmente e certificati. Il calore di HELIOSA® HI DESIGN è
immediato e regolabile.
2. MODELLI DI HELIOSA® HI DESIGN
HELIOSA® 996 - 3000 WATT IPX5 (cod. 996) - colore BIANCO RAL 9016
• Modello completo di due apparecchi mod.HELIOSA 11, bracci ,flessibili e orientabili
• Indice di protezione IPX5 - Per ambienti interni o esterni
• Accessori in dotazione: aggancio per fissaggio a parete, n. 2 cavi, accensione singola
• Dimensioni apparecchio cm 45,5x13x9
• Sporgenza da parete cm 40
• Peso netto kg 3,80
HELIOSA® 997 - 3000 WATT IPX5 (cod. 997) - colore FERRO MICACEO
• Modello completo di due apparecchi mod.HELIOSA 11, bracci, flessibili e orientabili
• Indice di protezione IPX5 - Per ambienti interni o esterni
• Accessori in dotazione: aggancio per fissaggio a parete, n. 2 cavi, accensione singola
• Dimensioni apparecchio cm 45,5x13x9
• Sporgenza da parete cm 40
• Peso netto kg 3,80
3. IMPIEGO
I modelli 996 e 997 risultano particolarmente adatti per l'utilizzo in ambienti interni o esterni. Ideale per riscaldare a zone e solo per
il tempo necessario.
4
4. DATI TECNICI HELIOSA® HI DESIGN 996 e 997
MOD.
COD.
COLORE
996
BIANCO
CARRARA
RAL 9016
220-240
997
FERRO
MICACEO
220-240
HERTZ
(Hz)
AREA
RISCALDATA
(mq)*
ALTEZZA
MIN.DA
PAVIMENTO
(mt)
ALTEZZA
MIN. DA
SOFFITTO
(cm)
3000
50/60
22/24
2,00-2,30
30
60
3000
50/60
22/24
2,00-2,30
30
60
VOLTAGGIO POTENZA
(V)
(kW)
DISTANZA
MIN. DA
DIMENSIONE
LATO MURO
(cm)
(cm)
PESO
NETTO
(kg)
INDICE DI
PROTEZIONE
(IP)
45,5X13X9
3,80
X5
45,5X13X9
3,80
X5
* SUPERFICIE RISCALDATA
Le superfici riscaldate indicate possono variare in funzione all'altezza di installazione, alla situazione ambientale ed alla sinergia che si
realizza con più riscaldatori installati. In questo ultimo caso i risultati possono essere notevolmente superiori.
5. INSTALLAZIONE A PARETE
Fissare l’apparecchio a parete con una distanza minima di 30 cm dal soffitto. (vedi esempi di installazione). L’altezza prevista per il
fissaggio varia normalmente da Mt. 2.0 a Mt. 2.3 massimo. L’installazione a parete risulta il posizionamento ideale per ottenere il
migliore risultato calorico con una inclinazione di 45° e con l’apparecchio perfettamente in posizione orizzontale. L’apparecchio non
deve essere installato immediatamente sotto una presa di corrente.
6. POSIZIONAMENTO DI HELIOSA® HI DESIGN 996-997
1. Regolare il riflettore di HELIOSA® HI DESIGN nella direzione del fascio richiesto con l’installazione a parete. Si tratta normalmente
di un’inclinazione di circa 45 gradi rispetto all’orizzonte.
2. Non installare mai HELIOSA® HI DESIGN su una superficie infiammabile, ne rivolgerlo verso una superficie infiammabile.
3. HELIOSA® HI DESIGN deve essere posto ad una distanza libera (linea visiva) non inferiore a Mt. 2.0 da oggetti come il cartone,
tessuti, tende ecc. così pure in caso di vetrate. Se collocato in officine e garages, dove sono presenti vernici infiammabili o
combustibili, HELIOSA® HI DESIGN deve essere posto a una distanza non inferiore a Mt. 4.0 dalla fonte di pericolo.
4. In ambiente molto polverosi chiusi, HELIOSA® HI DESIGN non è indicato per non danneggiare il bulbo.
7. MANUTENZIONE E SOSTITUZIONE DEL BULBO
(DA EFFETTUARSI A CURA DI PERSONALE QUALIFICATO O DA TECNICO SPECIALISTA)
• LA GARANZIA NON PREVEDE LA SOSTITUZIONE O RIPARAZIONE DEL BULBO.
• PER LA SOSTITUZIONE DEL BULBO RIVOLGERSI ESCLUSIVAMENTE A PERSONALE PROFESSIONALMENTE QUALIFICATO O AD UN
CENTRO ASSISTENZA.
• SI CONSIGLIA DI TOGLIERE LA POLVERE SALTUARIAMENTE SULLA PARABOLA E SUL BULBO CON UN PENNELLO O CON ARIA
COMPRESSA IN MODO DA OTTENERE SEMPRE L’EFFICIENZA CALORICA DI HELIOSA® HI DESIGN.
• IL BULBO DI RICAMBIO DEVE ESSERE UGUALE A QUELLO FORNITO CON L'APPARECCHIO.
• IL MONTAGGIO DI ALTRI BULBI POTREBBE CAUSARE DANNI ALL'APPARECCHIO E RENDERLO NON SICURO. CONTATTARE STAR
PROGETTI OPPURE IL RIVENDITORE AUTORIZZATO PER LA FORNITURA DEL BULBO DI RICAMBIO SPECIFICANDO IL MODELLO ED IL
CODICE DEL RISCALDATORE ACQUISTATO.
• IL PUNTO DI INIEZIONE DEL BULBO (c) DEVE ESSERE SEMPRE ESTERNO AL BULBO
PRIMA DI PROCEDERE CON L'OPERAZIONE DI SOSTITUZIONE BULBO SI RACCOMANDA DI:
1. SCOLLEGARE COMPLETAMENTE L’ ALIMENTAZIONE ELETTRICA ED ASSICURARSI CHE IL BULBO SIA FREDDO
2. NON TOCCARE IL BULBO A MANI NUDE
5
SOSTITUZIONE BULBO IPX5
1. HELIOSA
2. SVITARE LE 4 VITI DEL RETRO E TOGLIERE LE DUE
COPERTURE LATERALI E LE DUE TESTATE DELLA
PARABOLA
3. ESTRARRE IL BULBO DALLE DUE MOLLETTE
4. SFILARE LE DUE CAPSULE SILICONICHE CHE
COPRONO LA FINE DEL BULBO E DISCONNETTERE
I DUE FASTON. SE LE CAPSULE USATE SONO USURATE
DEVONO ESSERE RIMOSSE TAGLIANDO I CAVI VICINO
AI DUE FASTON.
5. SE USURATE, INFILARE LE CAPSULE AL POSTO DI
QUELLE RIMOSSE, SPELARE I CAVI PER 5-6 mm,
INFILARE I NUOVI FASTON E FISSARLI SUL CAVO. NON
TOCCARE IL BULBO A MANI NUDE.
6. COLLEGARE I FASTON MASCHI DEL NUOVO BULBO
A QUELLI DEI DUE CAVI, RIVESTIRLI CON LE CAPSULE E
RIPOSIZIONARE IL BULBO NELLA SEDE DELLE DUE
MOLLETTE. RICOMPORRE L'APPARECCHIO
PROCEDENDO ALL'INVERSO.
6
ENGLISH
WARNING
READ THE INSTRUCTIONS CONTAINED IN THIS BOOKLET CAREFULLY BEFORE USING THE APPLIANCE.
STAR PROGETTI CANNOT ASSUME ANY RESPONSIBILITY FOR DAMAGE TO PROPERTY OR PERSONAL
INJURY RESULTING FROM FAILURE TO ABIDE BY THE INSTRUCTIONS GIVEN IN THIS BOOKLET.
FOLLOWING THESE INSTRUCTIONS WILL ENSURE A LONG SERVICE LIFE AND OVERALL ELECTRICAL
AND MECHANICAL RELIABILITY. KEEP THIS INSTRUCTION BOOKLET IN A SAFE PLACE. DO NOT USE
THIS PRODUCT FOR ANY PURPOSE OTHER THAN SHOWN IN THIS BOOKLET.
1. After unpacking the product, check that everything is there; if in doubt contact the manufacturer or an authorized Technical
Assistance Centre.
2. Do not leave any packaging in the reach of children or the handicapped.
3. Do not sit or rest objects on the appliance.
4. Do not use the appliance where there are inflammable substances or vapours such as alcohol, insecticides, petrol, etc.
5. Do not use the appliance in the immediate vicinity of a bath, shower or swimming pool, but keep it at a safe distance as set out by
the CEE-CEI standards.
6. To prevent the risk of fire, do not install the appliance and its heating elements near to or directed towards curtains, beds or other
objects or easily inflammable materials; there must be an adequate minimum distance ensured to avoid the risk of damage or fire.
7. Do not touch it with wet and damp hands,do not touch it with wet feet.
8. Connect Heliosa to a single-phase 220-240V supply (varies from country to country).The product must be connected correctly to
an electrical power supply that complies with current legislation and has an effective earthing system. In case of doubt ask for a
careful check by professionally qualified staff.Connect the product to the electricity supply network only if the plant voltage and
capacity meet the requirements on the plate, especially maximum power.
9. The appliance must not be placed immediately below a mains socket.
10. The appliance must always be installed in an upright position.
11. Installation of the product must be carried out by professionally qualified staff, in compliance with the instructions in this
booklet. Incorrect mounting and/or electrical connection can cause damage to persons, animals and things, and Star Progetti cannot
be held liable for this.
12. If using this appliance where there are children, supervision by an adult is necessary; this appliance must not be used, without
assistance, by children or persons whose physical, sensory or mental capacities prevent them from applying the necessary safety
precautions.Do not leave any packaging in the reach of children or the handicapped.
13. The temperature of the appliance is particularly high when in operation; therefore avoid touching the red-hot surfaces with bare
skin. Turn the product off and wait at least 5 minutes before carrying out any repairs.
14. Do not modify the appliance in any way.
15. Pay particular attention when used in unmanned environments.
16. Periodically inspect the completeness of the appliance by eye. In the event of any imperfection do not use it and immediately
contact the manufacturer or an authorized Technical Assistance Centre.
17. Before cleaning or doing any maintenance turn the product off and disconnect it from the electricity network by switching the
plant off.
18. If the product falls or receives a hard knock get it checked by the manufacturer or an authorized Technical Assistance Centre.
19. During maintenance do not touch the bulbs directly but handle only by the end caps. The bulb can be damaged by contact with
bare hands; in this case the covering warranty is no longer valid.
20. Should you accidently touch the surface of the bulb, clean it immediately with a soft cloth moistened with alcohol.
21. In the event of malfunction and/or breakdown turn the appliance off and immediately contact the manufacturer or an
Authorized Technical Assistance Centre.
22. Original Star Progetti spare parts must be used in any repairs. In the event of damage to the lead or its plug immediately replace
it, this should be carried out at the premises of the manufacturer or an authorized Technical Assistance Centre. Use a lead with
similar characteristics.
23. Switch the main plant supply off when:
a) there is a malfunction; b) you decide to clean the outside; c) you decide not to use the appliance for a long period of time.
24. Do not cover or obstruct the front grille when in use.
7
25. Use a multi-polar switch with minimum contact gaps of 3 mm when installing the appliance.
26. Do not cover or obstruct the appliance whilst it is on.
27. Keep the front grille clean.
28. If you decide to permanently remove the appliance, switch it off and disconnect it from the mains, and then keep it well out of
the reach of children and the handicapped. It is also recommended to make it unusable by cutting its supply cable off.
29. Do not use the appliance in conjunction with programmers, timers or other tools capable of turning it on automatically.
30. Heaters must be switched on and switched off one by one. Do not use the main switchboard for switching on or switching off the
units, to avoid voltage surges which could burn out the bulb.
OPERATING INSTRUCTIONS
1. DESCRIPTION
The HELIOSA® HI DESIGN line has a soft, charming,rounded shape, which suits any type of furnishing. HELIOSA® HI DESIGN is very
modern and completes the irresistible charm of these models. Each heater has been designed to provide different heat
requirements, in order to be suitable for all room types and compliments the most elaborate types of furnishing.It provides
immediate heat, has low energy consumption and is compact while able to heat large areas. HELIOSA® HI DESIGN is designed and
manufactured to the highest technical standards and assembled using high quality components compliant with safety standards
and/or certificates. The appliance has been designed for outdoor and indoor use.
2. HELIOSA® HI DESIGN MODELS
HELIOSA® 996 -3000 WATTS IPX5 (code 996) - WHITE CARRARA RAL 9016
• Model complete with 2 HELIOSA®11 heaters and revolving,flexible arms
• IPX5 - For inside areas or outside areas
• Accessories provided:- wall bracket, 2 electric cables
• Dimensions cm 45,5x13x9
• Projecting from wall cm 43
• Net weight kg 3,80
HELIOSA® 997 -3000 WATTS IPX5 (code 997) - CAST IRON
• Model complete with 2 HELIOSA 11 heaters and revolving,flexible arms
• IPX5 - For inside areas or outside areas
• Accessories provided:- wall bracket, 2 electric cables
• Dimensions cm 45,5x13x9
• Projecting from wall cm 43
• Net weight kg 3,80
3. USES
Heliosa Hi Design 996 and 997 models are particularly suitable for uses for inside areas or outside areas.
4. TECHNICAL DATAS
HERTZ
HEATED
(Hz) AREA (mq)*
MINIMUM
DISTANCE
FROM FLOOR
(mt)
MINIMUM
DISTANCE
FROM CEILING
(cm)
MINIMUM
DISTANCE
FROM WALL
(cm)
CODE
COLOUR
VOLTAGE POWER
(V)
(Watts)
DIMENSIONS
NET
(cm)
WEIGHT
(kg)
PROTECTION
INDEX (IP)
996
WHITE
CARRARA
RAL 9016
220-240
3000
50/60
22/24
2,00-2,30
30
60
45,5X13X9
3,80
X5
997
CAST
IRON
220-240
3000
50/60
22/24
2,00-2,30
30
60
45,5X13X9
3,80
X5
*HEATED AREAS
The heated areas indicated can vary according to the installation height, the environmental conditions and the synergy produced
when several heaters installed. In the latter case results can be significantly higher.
8
5. INSTALLATION TO WALL
Install the heater on the wall at a minimum distance of 30 cm from the ceiling (see installation examples). The height at which the
heaters are normally installed varies from 2.0 metres to a maximum of 2.3 metres.Wall mounting is the ideal solution to achieve the
best results in terms of heat with the reflector at a 45° angle and the heater perfectly horizontal. The appliance must not be placed
immediately below a mains socket.
6. POSITIONING OF HELIOSA® HI DESIGN 996 - 997
1.Aim the HELIOSA® 996-997 reflector in the direction required for the wall-mounted installation. The normal angle is 45° to the
horizontal plane.
2. Never install HELIOSA® 996-997 an inflammable surface or facing an inflammable surface.
3. HELIOSA®996-997 must be placed at a clear distance (line of vision) of not less than 2.0 metres from objects such as cardboard,
fabrics, curtains and windows. If used in workshops and garages where there are inflammable paints, HELIOSA® 11 must be located
more than metres from the hazard.
4. We recommend that the heater is not used in dusty non-ventilated environments to avoid damage to the bulb.
7. MAINTENANCE AND REPLACEMENT OF BULB
(TO BE PERFORMED BY QUALIFIED STAFF OR SPECIALIZED TECHNICIAN)
• THE GUARANTEE DOES NOT COVER REPLACEMENT OR REPAIR OF BULB.
• REPLACEMENT OF BULB IS TO BE PERFORMED ONLY BY PROFESSIONALLY QUALIFIED PERSONNNEL OR BY A SERVICING CENTRE.
• REMOVE DUST FROM THE REFLECTOR AND BULB PERIODICALLY WITH BRUSH OR COMPRESSED AIR FOR CONSTANT HELIOSA® HI
DESIGN HEAT EFFICIENCY.
• THE REPLACEMENT BULB MUST BE THE SAME AS THE BULB SUPPLIED WITH THE DEVICE.
• REPLACEMENT WITH OTHER BULBS MAY DAMAGE THE DEVICE AND CAUSE IT TO BE UNSAFE. CONTACT STAR PROGETTI OR THE
RETAIL OUTLET AUTHORIZED TO SELL THE REPLACEMENT BULB, SPECIFYING THE MODEL AND CODE OF THE PURCHASED HEATER.
• THE INJECTION POINT ON THE BULB (c) MUST ALWAYS FACE OUTWARD.
BEFORE PROCEEDING WITH BULB REPLACEMENT, OPERATORS MUST:
1. FULLY DISCONNECT THE DEVICE FROM POWER SUPPLY AND MAKE SURE THE BULB IS COLD
2. NOT TOUCH THE BULB WITH THEIR BARE HANDS.
REMPLACEMENT OF BULB
1. HELIOSA
2. UNSCREW THE 4 SCREWS ON THE BACK AND
REMOVE THE 2 SIDE COVERS AND THE 2 FRONT
COMPONENTS OF THE REFLECTOR.
9
3. ESTRACT THE BULB FROM THE SPRING CLIPS
4. REMOVE THE 2 BULB EXTREMITY HEAT-ELASTIC
CAPS AND DISCONNECT THE TWO FASTONS
CONNECTING CORDS TO THE BULB. IF THE CAPS USED
DISPLAY SIGNS OF WEAR AND TEAR, THESE MUST BE
REMOVED BY CUTTING THE CORDS NEXT TO THE 2
FASTONS.
5. IF WORN, APPLY THE SPARE HEAT-ELASTIC CAPS TO
REPLACE THOSE WHICH HAVE BEEN REMOVED. STRIP
THE CORDS (5-6 mm), APPLY THE NEW SPARE FASTONS
AND FASTEN THEM TO THE CORD.
6. CONNECT THE MALE FASTONS TO THE NEW BULB
TO THOSE OF THE TWO CORDS. COVER THEM WITH
THE CAPS AND REPOSITION THE BULB IN THE SEAT
OF THE TWO SPRING CLIP. DO NOT TOUCH THE BULB
WITH YOUR BARE HANDS. REASSEMBLE THE DEVICE
BY PERFORMING THE ABOVE TASKS IN REVERSE
ORDER.
10
FRANÇAIS
AVVERTISSEMENT
AVANT D'UTILISER LE PRODUIT, LIRE ATTENTIVEMENT LES INSTRUCTIONS CONTENUES DANS
CETTE NOTICE. LA SOCIÉTÉ STAR PROGETTI NE POURRA ÊTRE TENUE POUR RESPONSABLE
DES DOMMAGES ÉVENTUELS CAUSÉS AUX PERSONNES OU AUX CHOSES PAR SUITE DU
NONRESPECT DESINSTRUCTIONS CI-DESSOUS.LE RESPECT DE TOUTES LES INDICATIONS
REPORTÉES DANS CE LIVRET GARANTIRA UNE LONGUE DURÉE DE VIE AINSI QUE LA FIABILITÉ
ÉLECTRIQUE ET MÉCANIQUE DE L'APPAREIL.CONSERVER TOUJOURS CE LIVRET
D'INSTRUCTIONS.
1. Ne pas utiliser ce produit dans des buts différents de ceux qui sont exposés dans le présent manuel.
2. Après avoir ôté le produit de son emballage, s’assurer de son intégrité ; en cas de doute, adressez-vous immédiatement au
constructeur ou bien à un Centre d’Assistance Technique autorisé.
3. Ne pas laisser des parties de l’emballage à la portée d’enfants ou de personnes non autonomes.
4. Ne pas s’asseoir et ne pas poser d’objets sur l’appareil.
5. Ne pas utiliser l’appareil en présence de substances ou de vapeurs inflammables comme de alcool, insecticide, essence, etc.
6. Afin d’éviter tout risque d’incendie, ne pas installer l’appareil et ses éléments irradiants à proximité ou en direction de rideaux, lits
ou autres objets facilement inflammables ; dans tous les cas, assurez-vous que l’appareil soit positionné à une distance suffisante
pour éviter les risques de dommages ou d’incendie.
7. Ne pas toucher l’appareil avec les mains mouillées ou humides.Ne pas toucher l’appareil avec des pieds nus.
8. Raccorder HELIOSA à une alimentation 220-240V monophasé (selon les pays).L’appareil doit être correctement branché à un
circuit électrique conforme aux normes en vigueur et muni d’un système de masse efficace. En cas de doutes, faites effectuer un
contrôle par un personnel professionnellement qualifié.Ne connecter l’appareil au circuit d’alimentation électrique que si la tension
et la portée de l’installation correspondent aux données reportées sur la plaque de l’appareil et n’excèdent pas sa puissance
maximale.
9. L’appareil ne doit pas être placé directement sous une prise de courant fixe.
10. L’appareil doit toujours être installé en position horizontale.
11. L’installation du produit doit être effectuée en respectant les instructions reportées dans le présent manuel, par un personnel
professionnellement qualifié.Tout montage et/ou branchement électrique erroné peuvent causer des dommages aux personnes, aux
animaux et aux objets dont Star Progetti ne pourra être jugée responsable.
12. Cet appareil n’est pas adapté pour être utilisé par des personnes (y compris des enfants) ayant des capacités physiques,
sensorielles ou mentales réduites,ou bien sans expérience ni connaissance du fonctionnement, à moins qu’elles aient été instruites
ou formées pour l’utilisation de l’appareil par une personne responsable de leur sécurité. Les enfants devraient être surveillés pour
s’assurer qu’ils ne jouent pas avec l’appareil.
13. La température de l’appareil, durant son fonctionnement, est particulièrement élevée ; il convient donc d’éviter tout contact des
urfaces brûlantes avec la peau nue. Avant toute intervention, il est conseillé d’éteindre l’appareil et d’attendre au moins 5 minutes.
14. N’apporter aucune modification de quelque type que ce soit à l’appareil.
15. Redoubler d’attention en cas d’emploi dans des lieux non surveillés.
16. Inspecter visuellement et périodiquement l’appareil pour s’assurer de son intégrité. En cas d’imperfection, éviter de l’utiliser et
contacter immédiatement le constructeur ou bien un Centre d’Assistance Technique autorisé.
17. Avant d’effectuer toute intervention de nettoyage ou de manutention, éteindre l’appareil et le débrancher du circuit électrique
en ouvrant l’interrupteur.
18. Si le produit chute ou reçoit des coups, demandez immédiatement un contrôle de la part du constructeur ou d’un Centre
d’Assistance Technique autorisé.
19. Pendant les interventions de manutention, ne pas toucher directement les lampes mais agir uniquement sur les calottes
terminales. La lampe est endommagée par le contact avec les mains nues ; dans ce cas, la garantie de couverture du produit est
invalidée.
20. En cas de contact accidentel avec la surface de la lampe, procédez à son nettoyage immédiat avec un linge imbibé d’alcool.
21. En cas de mauvais fonctionnement et/ou de panne, éteignez l’appareil et adressez-vous immédiatement au constructeur ou à un
Centre d’Assistance Technique autorisé.
11
22. Pour toute réparation éventuelle, exigez l’utilisation de pièces de rechange originales Star Progetti. En cas d’endommagement du
câble ou de la prise,effectuez immédiatement un remplacement de la pièce qui devra être effectué par le constructeur ou par un
Centre d’Assistance Technique autorisé. Utilisez un câble ayant des caractéristiques similaire.
23. Eteignez l’interrupteur général de l’appareil quand:a) vous relevez une anomalie de fonctionnement; b) vous décidez d’effectuer
une manutention ou un nettoyage externe ; c) vous décidez de ne pas utiliser l’appareil pendant une longue période.
24. Ne pas couvrir ni obstruer la grille antérieure d’où émane la chaleur.
25. Lors de l’installation, prévoir un interrupteur omnipolaire aux dimensions appropriées avec un écart supérieur ou égal à 3mm
entre les contacts.
26. Ne pas couvrir ou obstruer l’appareil pendant son fonctionnement.
27. Assurez-vous de la propreté de la grille frontale.
28. Si l’on décide d’éliminer définitivement l’appareil, placer l’interrupteur en position éteinte et débrancher l’appareil avant de le
ranger hors de portée des enfants et des personnes non autonomes. Par ailleurs nous conseillons de le rendre inutilisable en
coupant son câble d’alimentation.
29. Ne pas utiliser l’appareil en en parallèle avec des minuteurs ou d’autres dispositifs en mesure de l’allumer automatiquement.
30. Les appareils doivent être allumés ou éteints un par un « singulièrement » et non pas avec l’interrupteur général afin d’éviter les
bonds de tension qui peuvent brûler les lampes.
MODE D'EMPLOI
1. DESCRIPTION-EMPLOI
HELIOSA HI DESIGN est un radiateur à rayons infrarouges extrêmement polyvalent. Il peut être utilisé dans différentes situations et
surtout c'est un appoint calorique pour toutes vos activités. Sa chaleur est immédiate et il consomme peu d'énergie électrique, il
occupe peu de place mais il peut chauffer de grands espaces.HELIOSA HI DESIGN a été conçu et construit avec une bonne technique
et assemblé avec les meilleurs composants conformes aux normes et/ou certificats concernant la sécurité d'utilisation.
2. MODELES DE HELIOSA® HI DESIGN
HELIOSA® 996 - 3000 WATT IPX5 (cod. 996) - BLANC CARRARA RAL 9016
• Modél avec deux chauffages HELIOSA 11, bras , flexibles et orientables
• IPX5 - Pour les espaces intérieurs et extérieurs
• Accessoires fournis: fixation mural, n.2cables electriques, allumage individuel
• Dimensions cm 45,5x13x9
• Poids net kg 3,80
HELIOSA® 997 - 3000 WATT IPX5 (cod. 997) - FER FORGE
• Modél avec deux chauffages HELIOSA 11, bras , flexibles et orientables
• IPX5 - Pour les espaces intérieurs et extérieurs
• Accessoires fournis: fixation mural, n.2 cables electriques, allumage individuel
• Dimensions cm 45,5x13x9
• Poids net kg 3,80
3. EMPLOI
Les modéles 996 et 997 sont l'idéal pour les espaces intérieurs et extérieurs
4. DONNES TECHNIQUES
COULEUR
VOLTAGE
(V)
996
BLANC
CARRARA
RAL 9016
220-240
3000
50/60
22/24
2,00-2,30
997
FER
FORGE
220-240
3000
50/60
22/24
2,00-2,30
* ZONE CHAUFFEE
DISTANCE
MINIMUM
DES MURS
(cm)
DIMENSIONS
(cm)
POIDS
NET
(kg)
30
60
45,5X13X9
3,80
X5
30
60
45,5X13X9
3,80
X5
PUISSANC
ZONE
DISTANCE
DISTANCE
HERTZ
E
CHAUFFÉE MINIMUM MINIMUM DU
(Hz)
(Watts)
(mq)*
DU SOL (mt) PLAFOND (cm)
COD.
INDEX DE
PROTECTION
(IP)
Les données de couverture peuvent varieren fonction de la hauteur de l'installation, de la situation de l'environnement et de la
synergie entre plusieurs appareils installés. Dans ce dernier cas les résultats de chaleur obtenus sont considérablement améliorés.
12
5. INSTALLATION MURALE
Fixer l'appareil au mur à 30 cm au moins du plafond (voir exemples d'installation). La hauteur prévue pour la fixation varie
normalement de 2,0 m à 2,3 m maximum.L'installation au mur est permet d'obtenir le meilleur résultat calorique avec une
inclinaison de 45° et l'appareil en position parfaitement horizontale. L’appareil ne doit pas être installé immédiatement sous une
prise de courant.
6. COMMENT POSITIONNER HELIOSA® HI DESIGN
1. Régler le réflecteur de HELIOSA® dans la direction du faisceau exigé pour l'installation au mur. Il s'agit normalement d'une
inclinaison d'environ 45° par rapport à l'horizontale.
2. Ne jamais installer HELIOSA® sur une surface inflammable, ni le diriger vers une surface inflammable.
3. HELIOSA® doit être placé à une distance libre (ligne visuelle) non inférieure à 2,00m des objets en carton, tissu etc. ainsi qu'en cas
de baies vitrées. S'il est placé dans des ateliers et garages, où se trouvent des peintures inflammables ou des combustibles,
HELIOSA® doit être placé à au moins 4,0m de la source de danger.
4. Il est conseillé de ne pas installer HELIOSA® dans des locaux très poussiéreux, pour ne pas abîmer la lampe.
7. ENTRETIEN ET REMPLACEMENT DE L’AMPOULE
(QUI DOIT ETRE EFFECTUE PAR DU PERSONNEL QUALIFIE OU PAR UN TECHNICIEN SPECIALISE)
• LA GARANTIE NE PREVOIT PAS NI LA SUBSTITUTION NI LA REPARATION DE L’AMPOULE.
• POUR LA SUBSTITUTION DE L’AMPOULE S’ADRESSER EXCLUSIVEMENT AU SERVICE D’ASSISTANCE OU A UN TECHNICIEN
SPECIALISE QUALIFIE.
• ON CONSEILLE D’ENLEVER OCCASIONNELLEMENT LA POUSSIERE SUR LE REFLECTEUR AVEC UN PINCEAU OU DE L’AIR COMPRIMEE
DE FAÇON A OBTENIR TOUJOURS L’EFFICACITE CALORIFIQUE DE HELIOSA® HI DESIGN
• L’AMPOULE DE SUBSTITUTION DOIT ETRE IDENTIQUE A CELLE LIVREE AVEC L’APPAREIL.
• LE MONTAGE D’AMPOULES DIFFERENTES PEUT CAUSER DOMMAGES A L’APPAREIL ET LE RENDRE DANGEREUX. CONTACTER STAR
PROGETTI OU LE REVENDEUR AUTORISE POUR L’ACHAT DE L’AMPOULE DE SUBSTITUTION EN SPECIFIANT LE MODELE ET LE CODE
DU CHAUFFAGE ACHETE.
• LE POINT D’INJECTION DE L’AMPOULE (C) DOIT POINTER VERS L’EXTERIEUR VOIR IMAGE C
AVANT DE PROCEDERE A L’OPERATION DE SUBSTITUTION DE L’AMPOULE NOUS RECOMMANDONS DE :
1.DEBRANCHER L’APPAREIL DE TOUTE SOURCE DE COURANT ET S’ASSURER QUE L’AMPOULE SOIT FROIDE.
2.NE TOUCHER PAS L’AMPOULE LES MAINS NUES
REMPLACEMENT DE L’AMPOULE
1. HELIOSA
2. DEVISSER LES 4 VIS DE LA PARTIE ARRIERE ET
ENLEVER LES DEUX COUVERTURES LATERALES ET LES
DEUX PARTIES LATERALES DU REFLECTEUR
13
3.EXTRAIRE L’AMPOULE DES DEUX RESSORTS
4.EXTRAIRE LES DEUX CAPSULES EN SILICONE QUI
COUVRE LA PARTIE TERMINALE ET DECONNECTER LES
DEUX CONNECTEURS. SI LES CAPSULES SONT
USAGEES ELLES DOIVENT ETRES ENLEVEES EN
COUPANT LES CABLES A COTE DES DEUX
CONNECTEURS.
5.SI USAGEES, INTRODUIRE LES CAPSULES A LA PLACE
DE CELLES QUI ONT ETE ENLEVEES, PELER LES CABLES
POUR 5-6 mm, INTRODUIRE LES NOUVEAUX
CONNECTEURS ET LES FIXER SUR LE CABLE. NE PAS
TOUCHER L’AMPOULE LES MAINS NUES.
6. CONNECTER LES CONNECTEURS MALES DE LA
NOUVELLE AMPOULE A CEUX DES DEUX CABLES
LES RECOUVRIR AVEC LES CAPSULES ET
REPOSITIONNER L’AMPOULE DANS LE SIEGE DES
DEUX RESSORTS. RECOMPOSER L’APPAREIL EN
SUIVANT LA PROCEDURE A L’ENVERS.
14
DEUTSCH
HINWEISE
VOR DER VERWENDUNG DES GERÄTS BITTEN WIR SIE, DIE HINWEISE AUFMERKSAM ZU
LESEN. DIE FIRMA STAR PROGETTI KANN NICHT FÜR EVENTUELLE PERSONEN- ODER
SACHSCHÄDEN HAFTBAR GEMACHT WERDEN, DIE DURCH DIE NICHTBEACHTUNG DER IM
FOLGENDEN AUFGEFÜHRTEN ANGABEN ENTSTEHEN. DIE BEACHTUNG DIESER ANGABEN
STELLT STATTDESSEN EINE LANGE LEBENSDAUER SOWIE DIE ELEKTRISCHE UND
MECHANISCHE ZUVERLÄSSIGKEIT DES GERÄTS SICHER. DIESE GEBRAUCHSANWEISUNG
IMMER GUT AUFBEWAHREN.
DIESES GERÄT NICHT FÜR EINEN ANDEREN ALS DEN IN DIESER GEBRAUCHSANWEISUNG ANGEGEBENEN ZWECK VERWENDEN.
1. Das Gerät nach dem Auspacken auf seine Unversehrtheit prüfen. Wenden Sie sich im Zweifelsfall sofort an Star Progetti oder an
einen autorisierten Händler.
2. Teile der Verpackung nicht in Reichweite von Kindern oder Behinderten lassen.
3. Sich nicht auf das Gerät setzen und keine Gegenstände darauf ablegen.
4. Das Gerät nicht bei Vorhandensein von entzündlichen Stoffen oder Dämpfen wie Alkohol, Insektiziden, Benzin, etc. verwenden.
5. Das Gerät nicht in unmittelbarer Nähe einer Badewanne, einer Dusche oder eines Schwimmbads verwenden, sondern immer den
von den CEE-CEI Normen vorgeschriebenen Sicherheitsabstand einhalten.
6. Um Brandgefahr zu vermeiden, das Gerät nicht mit dem Heizelement in der Nähe von oder ausgerichtet auf Vorhänge, Schirme,
Betten oder andere leicht brennbare Gegenstände oder Materialien installieren bzw. darauf achten, dass das Gerät nicht
versehentlich damit in Berührung kommt; es muss auf jeden Fall eine angemessener Mindestabstand garantiert sein, um Schadensoder Brandrisiken zu vermeiden.
7. Das Gerät weder mit nassen oder feuchten Händen noch mit bloßen Füßen berühren.
8. HELIOSA® an eine einphasige 220-240V Versorgung anschließen (je nach Land). Das Gerät muss korrekt an eine elektrische Anlage
angeschlossen werden, die die gültigen Vorschriften erfüllt und mit einem leistungsfähigen Erdungssystem ausgestattet ist. Lassen
Sie die Anlage im Zweifelsfall von einem qualifiziertem Elektrofachmann oder von einem Fachtechniker sorgfältig überprüfen. Den
Heizstrahler nur an das Stromversorgungsnetz anschließen, wenn die Spannung und der Stromdurchfluss der Anlage den Werten auf
dem Kennschild entsprechen, insbesondere der maximalen Leistung.
9. Das Gerät darf nicht direkt unter einer festen Steckdose installiert werden.
10. Das Gerät muss immer in horizontaler Position installiert werden.
11. Die Installation des Geräts muss unter Beachtung der in dieser Gebrauchsanweisung enthaltenen Angaben von qualifiziertem
Fachpersonal ausgeführt werden. Fehler bei der Montage und/oder beim elektrischen Anschluss können Personen-, Tier- und
Sachschäden zur Folge haben, für die Star Progetti nicht haftbar gemacht werden kann.
12. Dieses Gerät ist nicht geeignet, um von Personen (einschließlich Kindern) mit eingeschränkten körperlichen, sensorischen oder
geistigen Fähigkeiten oder ohne Erfahrung und Kenntnisse verwendet zu werden, es sei denn, sie wurden bezüglich der Bedienung
des Geräts von einer für ihre Sicherheit verantwortlichen Person beaufsichtigt oder eingewiesen. Kinder sind zu beaufsichtigen, um
sicherzustellen, dass sie nicht mit dem Gerät spielen.
13. Die Temperatur des Geräts ist während des Betriebs sehr hoch. Daher unbedingt vermeiden, die heißen Oberflächen mit bloßer
Haut zu berühren. Das Gerät ausschalten und mindestens 5 Minuten warten, bevor Eingriffe vorgenommen werden.
14. Keinerlei Änderungen am Gerät vornehmen.
15. Besondere Vorsicht walten lassen, wenn das Gerät in unbeaufsichtigten Räumen betrieben wird.
16. Die Unversehrtheit des Geräts periodisch sichtprüfen. Im Falle von Mängeln die Verwendung vermeiden und sofort mit dem
Hersteller oder einem autorisierten Händler Kontakt aufnehmen.
17. Das Gerät ausschalten und durch Umlegen des Schalters der Anlage vom Stromnetz trennen, bevor Reinigungs- oder
Wartungsarbeiten durchgeführt werden.
18. Das Gerät sofort vom Hersteller oder bei einem autorisierten Kundendienstzentrum überprüfen lassen, wenn es herunterfällt
oder starke Stößeerleidet.
19. Bei Wartungsarbeiten die Lampen nicht direkt berühren, sondern nur an den Endkappen handhaben. Die Lampe wird durch die
Berührung mit bloßen Händen beschädigt; in diesem Fall verfällt die Garantie des Geräts.
15
20. Bei unabsichtlichem Kontakt mit der Lampenoberfläche, diese sofort mit einem mit denaturiertem Alkohol befeuchteten Lappen
reinigen.
21. Im Falle von Betriebsstörungen und/oder eines Defekts das Gerät ausschalten und sofort mit dem Hersteller oder einem
autorisierten Kundendienstzentrum Kontakt aufnehmen.
22. Für eine eventuelle Reparatur müssen Original-Ersatzteile von Star Progetti verwendet werden. Bei Beschädigung des Kabels
oder des Steckers muss das entsprechende Teil sofort ausgewechselt werden. Dieser Vorgang darf ausschließlich vom Hersteller, vom
Kundendienst oder von einem Fachtechniker durchgeführt werden. Ein Kabel mit den gleichen Eigenschaften des mitgelieferten
Kabels verwenden.
23. Den Hauptschalter der Anlage ausschalten, wenn: a) eine Betriebsstörung auftritt; b) die Außenseite gereinigt werden soll; c) das
Gerät längere Zeit nicht verwendet wird.
24. Das vordere Gitter, über das die Wärme abgestrahlt wird, nicht bedecken oder verstopfen.
25. Im Moment der Installation einen entsprechend dimensionierten, mehrpoligen Schalter vorsehen, dessen Kontakte mindestens 3
mm voneinander entfernt sein müssen.
26. Das Gerät während des Betriebs nicht bedecken oder beeinträchtigen.
27. Das vordere Gitter sauber halten.
28. Wird beschlossen, das Gerät endgültig außer Betrieb zu setzen, den Schalter ausschalten und vom Stromnetz trennen und das
Gerät außerhalb der Reichweite von Kindern oder behinderten Personen lagern. Es wird außerdem empfohlen, das Gerät
unbenutzbar zu machen, indem das Versorgungskabel abgeschnitten wird.
29. Das Gerät nicht in Verbindung mit Programmschaltern, Timern oder anderen Vorrichtungen verwenden, die in der Lage sind, es
ohne Anwesenheit einer Person automatisch einzuschalten.
30. Jedes Gerät einzeln und nicht über den Hauptschalter ein- und ausschalten, um Spannungsstöße zu vermeiden, die ein
Durchbrennen der Infrarotlampen bewirken können.
GEBRAUCHSANWEISUNG
1. BESCHREIBUNG
HELIOSA® ist ein Infrarot-Heizstrahler mit exklusivem, trendigem Design. Diese Linie weist abgerundete, ansprechende, weiche
Formen auf, die sich harmonisch in jede Einrichtung einfügen. HELIOSA® HI DESIGN 11 wurde mit fortschrittlichster Technik
entwickelt und hergestellt und besteht aus hochwertigen Komponenten, die die Vorschriften erfüllen und/oder für die Sicherheit bei
der Verwendung zertifiziert sind. Alle Geräte werden einzeln geprüft und zertifiziert. Die Wärme von HELIOSA® ist sofort verfügbar
und regelbar.
2. HELIOSA® HI DESIGN MODELLE
HELIOSA® 996 - 3000 WATT IPX5 (cod. 996) - Carrara Weiss RAL 9016
• Modell mit zwei Heizstrahlern Mod. HELIOSA 11 und verchromten, biegsamen und ausrichtbaren Armen
• Schutzart IPX5 REGEN- UND SPRITZWASSERGESCHÜTZT - Fur geschutzten Innen- oder Außenbereich
• Im Lieferumfang enthaltenes Zubehör:Halterung fur Wandmontage, Einfachzundung, zwei Kabel
• Abmessungen heizstrahler cm 45,5x13x9
• Wandtiefe cm 40
• Nettogewicht kg 3,80
HELIOSA® 997 - 3000 WATT IPX5 (cod. 997) - Glimmergrau
• Modell mit zwei Heizstrahlern Mod. HELIOSA 11 und verchromten, biegsamen und ausrichtbaren Armen
• Schutzart IPX5 REGEN- UND SPRITZWASSERGESCHÜTZT - Fur geschutzten Innen- oder Außenbereich
• Im Lieferumfang enthaltenes Zubehör:Halterung fur Wandmontage, Einfachzundung, zwei Kabel
• Abmessungen heizstrahler cm 45,5x13x9
• Wandtiefe cm 40
• Nettogewicht kg 3,80
3. VERWENDUNG
Das Modell HELIOSA 997/998 ist für die Verwendung im Außenbereich.
16
4. TECHNISCHE DATEN
LEISTUN
BEHEIZBARE MIN. ABSTAND
MIN.
HERTZ
G
FLÄCHE
VOM BODEN ABSTAND VON
(Hz)
(W)
(qm)*
(m)
DER DECKE
MIN.
ABSTAND
VON DER
WAND
NETTO
ABMESSUNG GEWICH
EN (cm)
T
(kg)
MOD.
FARBE
SPANNU
NG
SCHUTZART
(IP)
996
WEISS
CARRARA
RAL 9016
220-240
3000
50/60
22/24
2,00-2,30
30
60
45,5X13X9
3,80
X5
997
GLIMMER
220-240
3000
50/60
22/24
2,00-2,30
30
60
45,5X13X9
3,80
X5
* BEHEIZBARE FLÄCHE
Die angegebenen beheizbaren Flächen können in Abhängigkeit der Montagehöhe, der Umgebungssituation und der Synergie, die in
Verbindung mit mehreren installierten Heizstrahlern entsteht, variieren. In diesem letzten Fall kann die Heizleistung erheblich höher
sein.
5. WANDMONTAGE
Den Heizstrahler mit einem Mindestabstand von 20 cm zur Decke an der Wand befestigen (siehe Montagebeispiele). Die
vorgesehene Montagehöhe reicht normalerweise von 2,0 bis max. 2,3 Meter. Die Wandmontage stellt die ideale Lösung dar, um die
beste Heizleistung zu erreichen, wobei der Heizstrahler perfekt horizontal montiert und um 45° geneigt werden muss. Das Gerät darf
nicht unmittelbar unter einer Steckdose angebracht werden.
6. POSITIONIERUNG DES HEIZSTRAHLERS HELIOSA® HI DESIGN
1. Den Reflektor von HELIOSA® HI DESIGN bei der Wandmontage in die Richtung der gewünschten Strahlung ausrichten.
Normalerweise handelt es sich um eine Neigung von ca. 45° in Bezug auf die Horizontale.
2. HELIOSA® HI DESIGN niemals auf einer entflammbaren Oberfläche montieren oder auf eine solche ausrichten.
3. HELIOSA® HI DESIGN muss in einem lichten Abstand (Blicklinie) von mindestens 2 Metern von Gegenständen wie Karton, Stoffen,
Vorhängen etc. sowie von Glasscheiben angebracht werden. Wird HELIOSA® HI DESIGN in Werkstätten und Garagen verwendet, wo
entflammbare Lacke oder Brennstoffe vorhanden sind, muss das Gerät mindestens 4 Meter von der Gefahrenquelle entfernt
montiert werden.
4. HELIOSA® HI DESIGN ist für geschlossene, sehr staubige Räume nicht geeignet, da die Lampe beschädigt werden könnte.
7. WARTUNG UND AUSTAUSCH DER LAMPE
(VON QUALIFIZIERTEM PERSONAL ODER EINEM FACHTECHNIKER AUSZUFÜHREN)
• DIE GARANTIE SCHLIESST DEN AUSTAUSCH ODER DIE REPARATUR DER LAMPE NICHT EIN.
• WENDEN SIE SICH FÜR DEN AUSTAUSCH DER LAMPE AUSSCHLIESSLICH AN QUALIFIZIERTES FACHPERSONAL ODER AN EIN
KUNDENDIENSTZENTRUM.
• ES WIRD GERATEN, VON ZEIT ZU ZEIT MIT EINEM PINSEL ODER MIT DRUCKLUFT DEN STAUB VOM REFLEKTOR UND VON DER
LAMPE ZU ENTFERNEN, DAMIT DIE HEIZLEISTUNG VON HELIOSA® HI DESIGN 11 IMMER ERHALTEN BLEIBT.
• DIE ERSATZLAMPE MUSS GENAU DER MIT DEM GERÄT MITGELIEFERTEN LAMPE ENTSPRECHEN.
• DER EINBAU VON ANDEREN LAMPEN KÖNNTE SCHÄDEN AM GERÄT VERURSACHEN UND DESSEN SICHERHEIT BEEINTRÄCHTIGEN.
WENDEN SIE SICH FÜR DIE LIEFERUNG DER ERSATZLAMPE AN STAR PROGETTI ODER AN EINEN AUTORISIERTEN HÄNDLER UND
GEBEN SIE DABEI DAS MODELL UND DEN CODE DES ERWORBENEN HEIZSTRAHLERS AN.
• DER PUMPSTUTZEN DER LAMPE (c) MUSS IMMER NACH AUSSEN ZEIGEN.
VOR DEM AUSTAUSCH DER LAMPE IST AUF FOLGENDES ZU ACHTEN:
1. DIE STROMVERSORGUNG KOMPLETT TRENNEN UND SICHERSTELLEN, DASS DIE LAMPE KALT IST.
2. DIE LAMPE NICHT MIT BLOSSEN HÄNDEN BERÜHREN.
17
AUSTAUSCH DER LAMPE
1. HELIOSA
2. DIE 4 SCHRAUBEN AUF DER RÜCKSEITE LÖSEN UND
DIE BEIDEN SEITLICHEN ABDECKUNGEN SOWIE DIE
BEIDEN KOPFSTÜCKE DES REFLEKTORS ABNEHMEN
3. DIE LAMPE AUS DEN BEIDEN FEDERN NEHMEN.
4. DIE BEIDEN SILIKONDICHTUNGEN ABSTREIFEN, DIE
DIE LAMPENENDEN BEDECKEN, UND DIE BEIDEN
FLACHSTECKER ABZIEHEN. SIND DIE VERWENDETEN
DICHTUNGEN VERSCHLISSEN, MÜSSEN SIE ENTFERNT
WERDEN, INDEM DIE KABEL IN DER NÄHE DER
BEIDEN FLACHSTECKER ABGESCHNITTEN WERDEN.
5. BEI VERSCHLEISS NEUE DICHTUNGEN ANBRINGEN, DIE
KABEL 5-6 mm ABISOLIEREN, DIE NEUEN FLACHSTECKER
ANBRINGEN UND AM KABEL BEFESTIGEN. DIE LAMPE
NICHT MIT BLOSSEN HÄNDEN ANFASSEN.
6. DIE FLACHSTECKER DER NEUEN LAMPE MIT JENEN
DER BEIDEN KABEL VERBINDEN, DIE DICHTUNGEN
ÜBERZIEHEN UND DIE LAMPE IN DEN SITZ DER
BEIDEN FEDERN EINSETZEN. DEN HEIZSTRAHLER
IN UMGEKEHRTER REIHENFOLGE WIEDER
ZUSAMMENBAUEN.
18
ESPAÑOL
ADVERTENCIAS
ANTES DE UTILIZAR EL PRODUCTO, LEER ATENTAMENTE LAS INSTRUCCIONES DEL PRESENTE
MANUAL. STAR PROGETTI NO PODRÁ SER CONSIDERADA RESPONSABLE POR EVENTUALES
DAÑOS A COSAS O PERSONAS DEBIDOS A LA NO OBSERVACIÓN DE LAS INDICACIONES
PRESENTADAS A CONTINUACIÓN, EL RESPETO DE LAS MISMAS ASEGURARÁ, EN CAMBIO, LA
DURACIÓN Y FIABILIDAD ELÉCTRICA Y MECÁNICA DEL EQUIPO. CONSERVAR SIEMPRE ESTE
MANUAL DE INSTRUCCIONES.
NO USAR ESTE PRODUCTO PARA UNA FUNCIÓN QUE NO SEA LA QUE SE INDICA EN EL PRESENTE FOLLETO.
1. Después de haber sacado el producto del embalaje, verificar su integridad; ante cualquier duda, dirigirse de inmediato al
fabricante o bien a un Centro de Asistencia Técnica autorizado.
2. No dejar partes del embalaje al alcance de los niños o de personas con capacidades diferentes.
3. No sentarse ni apoyar objetos sobre el aparato
4. No utilizar el aparato en presencia de sustancias o vapores inflamables, tales como alcohol, insecticidas, bencina, etc.
5. No utilizar el aparato cerca de una tina de baño, de una ducha o piscina. Atenerse siempre a las distancias de seguridad prescritas
por las normas
CEE-CEI
6. Al fin de evitar riesgo de incendio, no instalar el aparato con los elementos radiantes próximos u orientados hacia cortinas, camas,
u otros objetos o materiales fácilmente combustibles. En todos los casos, se deberá garantizar una distancia mínima adecuada para
evitar riesgos de daños o incendios.
7. No tocar el aparato con las manos mojadas o húmedas.
8. Conectar Heliosa a una fuente de alimentación de 220-240V monofásica (según el país).El producto debe conectarse
correctamente a una instalación eléctrica conforme a las normativas vigentes y tener un sistema eficaz de conexión a tierra. En caso
de dudas, solicitar un control adecuado a personal profesionalmente calificado. Conectar el producto a la red de alimentación
eléctrica sólo si la tensión y la capacidad de la instalación se adecuan a los datos que figuran en la placa y especialmente, a su
potencia máxima.
9. El aparato no se debe colocar inmediatamente debajo de una toma de corriente fija.
10. El aparato debe ser siempre instalado en posición horizontal.
11. La instalación del producto debe realizarse conforme a las instrucciones que contiene el presente folleto, por personal
profesionalmente calificado. El montaje y/o la conexión eléctrica errados pueden causar daños a personas, animales o cosas, por los
cuales Star Progetti no podrá ser considerada responsable de forma alguna.
12. Si este producto se utiliza en presencia de niños, debe estar presente un adulto. Este aparato no puede ser utilizado, sin
supervisión, por niños ni personas con discapacidades sensoriales o mentales que impidan la aplicación de las medidas de seguridad
necesarias.
13. Durante el funcionamiento, la temperatura del aparato es particularmente elevada. Evitar el contacto de las superficies
incandescentes con la piel descubierta. Antes de cada intervención, se recomienda apagar el producto y esperar como mínimo 5
minutos.
14. No realizar modificaciones de ningún tipo al aparato.
15. Prestar particular atención en los casos de uso en ambientes sin custodiar.
16. Realizar una inspección visual periódica de la integridad del producto. En caso de imperfecciones, evitar el uso y comunicarse de
inmediato con el fabricante o bien con un Centro de Asistencia Técnica autorizado
17. Antes de realizar cualquier intervención de limpieza o mantenimiento, apagar el producto y desconectarlo de la red eléctrica
abriendo el interruptor de la instalación.
18. Si el producto se cae o recibe un golpe fuerte, hacerlo verificar de inmediato por el fabricante o bien en un Centro de Asistencia
Técnica autorizado.
19. Durante las intervenciones de mantenimiento, no tocar directamente los bulbos sino actuar únicamente sobre los casquetes
terminales. El bulbo se daña con el contacto con las manos descubiertas. En este caso, la garantía del producto pierde su validez.
20. En el caso de contacto accidental con la superficie del bulbo, limpiar esta última inmediatamente frotándola con un paño
humedecido en alcohol.
19
21.En caso de mal funcionamiento y/o fallo, apagar el aparato y dirigirse de inmediato al fabricante o bien a un Centro de Asistencia
Técnica autorizado.
22. Para la eventual reparación, exigir el uso de piezas de repuesto originales de Star Progetti. Si el cable o el enchufe está dañado,
sustituir de inmediato. Para dicha sustitución, llevar el aparato al fabricante o bien a un Centro de Asistencia Técnica autorizado.
Utilizar un cable con del mismo tipo.
23. Apagar el interruptor general de la instalación cuando: a) se detecta una anomalía de funcionamiento;b) se decide realizar una
limpieza externa de mantenimiento; c) se decide no utilizar el aparato por períodos prolongados.
24. No cubrir ni obstruir la rejilla frontal de la cual viene irradiado el calor.
25. En el momento de la instalación, prever un interruptor onnipolar de dimensiones correctas, con una distancia entre los contactos
de 3 mm o superior.
26. No cubrir ni obstruir el aparato durante el funcionamiento.
27. Mantener limpia la rejilla frontal.
28. Si se decide eliminar definitivamente el aparato, apagarlo con el interruptor y desconectarlo de la red eléctrica, colocarlo lejos
del alcance de los niños o de personas con capacidades diferentes. Además, se recomienda inutilizarlo cortando el cable de
alimentación.
29. No utilizar el aparato combinado con programadores, temporizadores u otros dispositivos capaces de encenderlo
automáticamente.
30. Proceder individualmente al encendido y apagado de cada equipo y no con un interruptor general para evitar oscilaciones de
tensión que podrían quemar las bombillas infrarrojas.
INSTRUCCIONES DE USO
1. DESCRIPCIÓN
HELIOSA® HI DESIGN es un calefactor a rayos infrarrojos de tendencia y formas exclusivas. Esta línea se presenta con formas
redondeadas, agradables, suaves que se amalgaman con cualquier tipo de decoración. HELIOSA® HI DESIGN ha sido diseñado y
construido con una buena técnica y ensamblado con los mejores componentes de conformidad con las normas y/o certificados para
la salvaguarda de la seguridad en el empleo. Todos los equipos son verificados individualmente y certificados. El calor de HELIOSA®
HI DESIGN es inmediato y regulable.
2. MODELOS DE HELIOSA® HI DESIGN
HELIOSA® 996 - 3000 WATT IPX5 (cod. 996) - colore BIANCO RAL 9016
• Modello completo di due apparecchi mod.HELIOSA 11, bracci ,flessibili e orientabili
• Indice di protezione IPX5 - Per ambienti interni o esterni
• Accessori in dotazione: aggancio per fissaggio a parete, n. 2 cavi, accensione singola
• Dimensioni apparecchio cm 45,5x13x9
• Sporgenza da parete cm 40
• Peso netto kg 3,80
HELIOSA® 997 - 3000 WATT IPX5 (cod. 997) - colore FERRO MICACEO
• Modello completo di due apparecchi mod.HELIOSA 11, bracci, flessibili e orientabili
• Indice di protezione IPX5 - Per ambienti interni o esterni
• Accessori in dotazione: aggancio per fissaggio a parete, n. 2 cavi, accensione singola
• Dimensioni apparecchio cm 45,5x13x9
• Sporgenza da parete cm 40
• Peso netto kg 3,80
3. EMPLEO
Los modelos 996 y 997 resultan especialmente aptos para el uso en ambientes internos y para el uso en exteriores.
4. DATOS TÉCNICOS
SUPERFICIE
POTENCI
HERTZ CALEFACCIO
A
(Hz)
NADA
(W)
(mq)*
COD.
COLOR
V
996
BLANCO
CARRARA
RAL 9016
220-240
3000
50/60
997
ANTRACIT
A
220-240
3000
50/60
DISTANCIA
MINIMA DEL
PISO (m)
DISTANCIA
MINIMA DEL
TECHO (m)
DISTANCIA
MINIMA DE
LA PARED
MEDIDAS
(cm)
PESO
NETO
(kg)
INDICE DE
PROTECCIÓN
(IP)
22/24
2,00-2,30
30
60
45,5X13X9
3,80
X5
22/24
2,00-2,30
30
60
45,5X13X9
3,80
X5
20
* SUPERFICIE CALEFACCIONADA
Las superficies calefaccionadas indicadas pueden variar en función de la altura de instalación, la situación ambiental y la sinergía
que tiene lugar con varios calefactores instalados. En este último caso los resultados pueden ser notablemente superiores.
5. INSTALACIÓN EN PARED
Fijar el equipo a la pared con una distancia mínima de 30 cm del techo (ver ejemplos de instalación). La altura prevista para la
fijación cambia normalmente de 2,0 m a 2,3 m como máximo. La instalación en pared es la colocación ideal para obtener el mejor
resultado calórico con una inclinación de 45° y con el equipo en perfecta posición horizontal. El equipo no debe ser instalado
inmediatamente debajo de un tomacorriente.
6. COLOCACIÓN DE HELIOSA® HI DESIGN
1. Ajustar el reflector de HELIOSA® HI DESIGN en la dirección requerida con la instalación en pared. Normalmente, se trata de una
inclinación de aproximadamente 45 grados con respecto a la línea del horizonte.
2. No instalar nunca un HELIOSA® HI DESIGN sobre una superficie inflamable, ni dirigirlo hacia una superficie inflamable.
3. HELIOSA® HI DESIGN debe ser colocado a una distancia libre (línea visual) no inferior a 2,0 m de objetos tales como cartón, tejidos,
cortinas, etc., lo mismo en caso cristales. Si se coloca en talleres mecánicos o garajes, en presencia de pinturas inflamables o
combustibles, HELIOSA® HI DESIGN debe ser colocado a una distancia no inferior a 4,0 m de la fuente de peligro.
4. HELIOSA® HI DESIGN no es indicado para ambientes cerrados muy polvorientos para evitar daños a la bombilla.
7.MANTENIMIENTO Y SUSTITUCIÓN DE LA BOMBILLA
(A SER EFECTUADA POR PERSONAL CALIFICADO O POR UN TÉCNICO ESPECIALISTA)
• LA GARANTÍA NO PREVÉ LA SUSTITUCIÓN O REPARACIÓN DE LA BOMBILLA.
• PARA LA SUSTITUCIÓN DE LA BOMBILLA HACER REFERENCIA EXCLUSIVAMENTE A PERSONAL PROFESIONALMENTE CALIFICADO O
A UN CENTRO DE ASISTENCIA.
• SE RECOMIENDA QUITAR EL POLVO ESPORÁDICAMENTE DE LA SUPERFICIE DE LA PARÁBOLA Y DE LA BOMBILLA CON UN PINCEL
O CON AIRE COMPRIMIDO PARA ASÍ OBTENER SIEMPRE LA EFICIENCIA CALÓRICA DE HELIOSA® HI DESIGN.
• LA BOMBILLA DE REPUESTO DEBE SER IGUAL A AQUELLA SUMINISTRADA CON EL EQUIPO.
• EL MONTAJE DE OTRAS BOMBILLAS PODRÍA CAUSAR DAÑOS AL EQUIPO Y TRANSFORMARLO EN NO SEGURO. PONERSE EN
CONTACTO CON STAR PROGETTI O BIEN CON EL REVENDEDOR AUTORIZADO PARA EL SUMINISTRO DE LA BOMBILLA DE
REPUESTO, ESPECIFICANDO EL MODELO Y EL CÓDIGO DEL CALEFACTOR ADQUIRIDO.
• EL PUNTO DE INYECCIÓN DE LA BOMBILLA (c) DEBE SER SIEMPRE EXTERNO A LA BOMBILLA
ANTES DE PROCEDER CON LA OPERACIÓN DE SUSTITUCIÓN DE LA BOMBILLA SE
RECOMIENDA:
1. DESCONECTAR COMPLETAMENTE LA ALIMENTACIÓN ELÉCTRICA Y ASEGURARSE DE QUE LA BOMBILLA ESTÉ FRÍA
2. NO TOCAR LA BOMBILLA CON LAS MANOS DESNUDAS
SUSTITUCIÓN DE LA BOMBILLA
1. HELIOSA
2. DESATORNILLAR LOS 4 TORNILLOS DE LA PARTE
POSTERIOR Y QUITAR LAS DOS CUBIERTAS LATERALES
Y LOS DOS CABEZALES DE LA PARÁBOLA
21
3.EXTRAER LA BOMBILLA DE LOS DOS RESORTES
4.SOLTAR LAS DOS CÁPSULAS DE SILICONA QUE
CUBREN LA TERMINACIÓN DE LA BOMBILLA Y
DESCONECTAR LOS DOS FASTON. SI LAS CÁPSULAS
USADAS ESTÁN GASTADAS DEBERÁN SER QUITADAS
CORTANDO LOS CABLES CERCA DE LOS DOS FASTON.
5.DE ESTAR GASTADAS, COLOCAR LAS CÁPSULAS EN EL
LUGAR DE AQUELLAS QUITADAS, PELAR LOS CABLES
POR 5-6 mm, INTRODUCIR LOS NUEVOS FASTON Y
VOLVER A FIJARLOS EN EL CABLE. NO TOCAR LA
BOMBILLA CON LAS MANOS DESNUDAS.
6. CONECTAR LOS FASTON MACHOS DE LA NUEVA
BOMBILLA A LOS DE LOS DOS CABLES, RECUBRIRLOS
CON LAS CÁPSULAS Y VOLVER A COLOCAR LA BOMBILLA EN LA SEDE DE LOS DOS RESORTES. VOLVER
A MONTAR EL EQUIPO PROCEDIENDO EN SENTIDO
INVERSO.
22
8. MONTAGGIO DI HELIOSA® 996-997 - ASSEMBLY OF HELIOSA 996-997 - MONTAGE DE
HELIOSA 996-997
1.Utilizzando i tre fori sul fondo della piastra trapezoidale fissare la stessa a
parete in maniera sicura. E' consigliata un'altezza di installazione di mt 2,20 dal
pavimento.
2. Il cavo di alimentazione deve avere la sezione minima di 1 mmq nel caso
dell'apparecchio ad un braccio e di mmq 1,5 nel caso dell'apparecchio a due
braccia.
3. Fissare il cavo di alimentazione nel morsetto tripolare, serrando bene le viti.
1. Using one of the three holes on the bottom of the trapezoidal plate, fix the
plate to the wall safely. Installation at a height of 2.2 metres from the floor is
recommended.
2. The electrical supply cable must have a section of 1 sq. mm. minimum in the
case of a one-arm device and 1.5 sq. mm. minimum in the case of a two-arm
device.
3. Fix the electrical supply cable into the three-pole clamp, then tighten the
screws carefully.
FIG.1 / FIG. 2
1. Utiliser les trois trous sur le fond de la plaque trapézoïdale pour la fixer au mur
en toute sécurité. L’appareil doit être installé à 2,20 m du sol minimum
2. Le cordon d’alimentation doit avoir une section minimum de 1 mm2 pour
l’appareil à un bras et 1,5 mm2 pour l’appareil à deux bras.
3. Fixer le cordon d’alimentation dans la borne à trois pôles, en serrant bien les
vis.
1. Die trapezförmige Platte mit Hilfe der drei Bohrungen an ihrem Boden sicher
an der Wand befestigen. Es wird eine Montagehöhe von 2,20 m über dem Boden
empfohlen.
2. Das Versorgungskabel muss im Falle eines einarmigen Geräts einen
Mindestquerschnitt von 1 mm2 und im Falle eines doppelarmigen Geräts einen
Mindestquerschnitt von 1,5 mm2 aufweisen.
3. Das Versorgungskabel durch Festziehen der Schrauben in der dreipoligen
Klemme befestigen.
1. Utilizando los tres orificios en el fondo de la placa trapezoidal, fijarla a la pared
de forma segura. Se aconseja una altura de instalación a 2,20 m del suelo.
2. El cable de alimentación debe contar con una sección mínima de 1 mm² en el
caso del aparato con un brazo y de 1 mm² en el caso del aparato con dos brazos.
3. Fijar el cable de alimentación en el borne tripolar, apretando bien los tornillos.
4. Sovrapporre il carter di protezione e fissarlo con le 4 viti in dotazione (A-B-C)
4. Fix the protective casing in place on top, using the four screws provided. (A-BC)
4. Placer au-dessus le couvercle de protection et le fixer avec les 4 vis fournies
(A-B-C)
4. Befestigen Sie das Schutzgehäuse an Ort und Stelle an der Spitze, mit den vier
mitgelieferten Schrauben. (A-B-C)
4. Fije la cubierta protectora en su lugar en la parte superior, utilizando los
cuatro tornillos suministrados. (A-B- C)
FIG. 4
23
9. SCHEMI ELETTRICI / DIAGRAM / SCHEMA / SCHALTPLAN / DIAGRAMMA
HELIOSA 996 -997 3000 Watt IPX5
24
CERTIFICATO DI GARANZIA - LA GARANZIA ESCLUDE LA SOSTITUZIONE DEL BULBO
Ci complimentiamo con Lei per l’acquisto dei nostri riscaldatori Heliosa. La durata della garanzia è di 2 anni, decorre dalla data di acquisto dell’apparecchio e cessa
dopo il periodo prescritto. La ricevuta fiscale o altro documento valido fiscalmente comprova la decorrenza della garanzia. Si garantiscono tutte le sostituzioni o
riparazioni che si rendessero necessarie a causa di difetti di materiale o di costruzione. E’ esclusa quindi la sostituzione o la riparazione delle parti soggette a normale
consumo (vedi bulbo ecc.). La garanzia non viene riconosciuta qualora l’apparecchio venga manomesso o qualora sia danneggiato a causa d incuria, durante il
trasporto, manutenzione operata da personale non autorizzato, mancata osservanza delle istruzioni d’uso, errata installazione o non conforme alle norme vigenti nel
paese di utilizzo. La garanzia non prevede in nessun caso la sostituzione dell’apparecchiatura. Le riparazioni eventuali riconosciute in garanzia saranno effettuate
gratuitamente per merce resa Franco STAR PROGETTI o presso il distributore autorizzato. Sono quindi a carico dell’utilizzatore le sole spese di trasporto.
CERTIFICATE OF GUARANTEE - THE GUARANTEE EXCLUDE REPLACEMENTS OF THE BULB
We congratulate you on the purchase of our patio heaters Heliosa. Validity 2 years from date of purchase of the appliance: the guarantee expires after this period.
The invoice, receipt or hire purchase agreement shall prove the duration of the guarantee period. Replacements and repairs caused by faulty materials or
manufacture are guaranteed. Replacements and repairs to those parts of the appliance subject to normal wear are excluded form this guarantee (see bulb etc.). The
guarantee shall immediately cease and become void should the appliance be dismantled or repaired by unauthorized people, or in case of negligence, or accidental
damage during transport or elsewhere, or in case of misuse, failure to comply with the instructions for use, maintenance carried out by unauthorized people, faulty
installation not in conformity with the laws in force. Replacement of the appliance is excluded from this guarantee. The eventual repairs recognized in guarantee will
be carried out free of charge for those appliances returned free STAR PROGETTI’s factory or to one of the authorized distributor. All transport costs are to be paid by
the customer.
CERTIFICAT DE GARANTIE - LA GARANTIE EXCLUE LA SUBSTITUTION DE LA LAMPE
Nos compliments pour l’achat de nos chauffages de terrasseHeliosa. La durée de la garantie est de 24 mois à partir de la date d’achat de l’appareil et elle cesse après
la période prescrite. Le ticket d’achat ou autre document, obligatoire fiscalement prouve la date de début de la garantie. On garantie toutes les substitutions ou les
réparations qui sont nécessaires à cause de défauts des matériaux ou de la construction. La substitution ou la réparation des parties assujetties à un usage normal
sont par conséquent exclues (à voire lampe etc.). La garantie n’est pas reconnue au cas ou l’appareil ait été malmené ou quand il a été abîmé à cause de la négligence
de l’utilisateur, maintient fait par personnel pas autorisé, à cause du transport, lorsque les instructions d’utilisation n’ont pas été respectées ou encore lorsqu’il a été
mal installé sans tenir compte des normes en vigueur. La garantie ne prévoit absolument pas la substitution de l’appareil. Les réparations prises en considération par
la garantie sont effectuées gratuitement pour les marchandises rendues franco atelier STAR PROGETTI ou auprès d’un de nos distributeurs. Par conséquent seulement
les frais de transport sont à la charge du client.
GARANTIESCHEIN – DIE GARANTIE SCHLIESST DEN LAMPENWECHSEL AUS
Wir beglückwünschen Sie zum Kauf unserer Heliosa Heizstrahler. Die Dauer der Garantie beträgt 2 Jahre, sie beginnt mit dem Kaufdatum des Geräts und endet nach
dem vorgeschriebenen Zeitraum. Die Steuerquittung oder ein anderes, steuerrechtlich gültiges Dokument belegt den Garantiebeginn. Die Garantie gilt für alle
aufgrund von Material- oder Baufehlern nötig werdenden Austausch- oder Reparaturarbeiten. Ausgeschlossen sind daher der Austausch und die Reparatur von
normalen Verbrauchsteilen (wie Lampen, etc.). Die Garantie wird nicht anerkannt, wenn am Gerät manipuliert wurde oder wenn das Gerät Schäden aufweist, die auf
Nachlässigkeit, den Transport, eine von nicht autorisiertem Personal durchgeführte Wartung, die Nichtbeachtung der Gebrauchsanweisung sowie eine fehlerhafte
oder nicht den im Einsatzland gültigen Vorschriften entsprechende Installation zurückzuführen sind. Die Garantie sieht keinesfalls vor, dass das Gerät ersetzt wird.
Eventuelle,unter die Garantie fallende Reparaturen werden bei Zurücksendung des Geräts an STAR PROGETTI oder an einen autorisierten Händler kostenlos
durchgeführt. Der Benutzer hat daher nur die Transportkosten zu übernehmen.
CERTIFICADO DE GARANTIA - LA GARANTIA EXCLUIDA LA SUBSTITUCION DE LAS LAMPARA
Nos complimentamos con Usted por la compra de nuestros calefactores Heliosa. La duración de la garantía es 2 años, a partír de la fecha de la compra del aparejo y
se acaba despues del periodo prescrito. El recibo u otro documento que tenga validez fiscal comprueba el transcurso de la garantía.Se garantizan todas las
substituciones o reparaciones che sean necesarias a causa de defectos del material o de construcción. Queda excluida, entonces, la substitución o la reparación de las
partes sujetas a normal consumo (por ejemplo: lampara ...).La garantía no viene econocida si el aparejo viene manumiso o si viene dañado a causa de incuria, durante
el transporte, manutención hecha por personal no autorizado, falta en la observancia de las instrucciones de utilización, errata installación o no conforme con las
normas en vigor en el pais de utilización.La garantía no prevée en ningun caso la substitución del aparejo. Las reparaciones eventuales reconocidas en garantía serán
realizadas gratuitamente por ercancia entregada Franco de transporte Star Progetti o a la oficina del distribuidor autorizado. Son, entonces, a cargo del utilizador los
gastos de transporte.
N.SERIE - APPLIANCE No. – N° D’IMMATRICOLATION - N. DE SERIE - SERIENNR.
_______________________________________________________________________
DATA ACQUISTO - DATE OF PURCHASE – DATE D’ACHAT - FECHA DE COMPRA - ERWERBSDATUM
_______________________________________________________________________
FATTURA N. - INVOICE NO. – FACTURE NO. - FACTURA NUMERO - RECHNUNGSNR.
_______________________________________________________________________
RIVENDITORE - DEALER – REVENDEUR – REVENDOR - HÄNDLER
________________________________________________________________________________
•
•
•
•
•
PER RENDERE OPERANTE LA GARANZIA, L’UTILIZZATORE ALL’ATTO DELL’ACQUISTO DEVE COMPILARE IL CERTIFICATO IN
TUTTE LE SUE PARTI.
THE USER MUST FILL IN THE CERTIFICATE FOR THE GUARANTEE TO BE EFFECTIVE.
POUR QUE LA GARANTIE SOIT VALABLE, L’UTILISATEUR, AU MOMENT DE L’ACHAT DE L’APPAREIL, DOIT REMPLIR TOUTES LES
PARTIES DU CERTIFICAT DE GARANTIE.
DAMIT DIE GARANTIE WIRKSAM WIRD, MUSS DER BENUTZER IM MOMENT DES KAUFS DEN GARANTIESCHEIN
VOLLSTÄNDIG AUSFÜLLEN.
PARA QUE LA GARANTIA TENGA VALIDEZ, EL UTILIZADOR, AL MOMENTO DE LA COMPRA, TIENE QUE RALLENAR EL
CERTIFICADO EN TODAS SUS PARTES.
25
SEDE CENTRALE/HEADQUARTER:
STAR PROGETTI Tecnologie Applicate SpA
Via Pasubio 4/D 20067 TRIBIANO (MI) ITALY Tel +39 02 90 63 92 61 Fax +39 02 90 63 92 59
[email protected] www.starprogetti.com
STAR PROGETTI FRANCE S.A.R.L.
345, Rue du Bois Bernoux - 71290 CUISERY FRANCE Tel. 03 85 40 12 62 Fax 03 85 40 06 91
[email protected] www.starprogetti.com
ed.1214