1
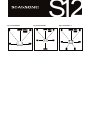
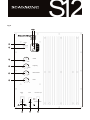
H I F I
L O U D S P E A K E R S
S12
02 OWNER’S MANUAL
06 TROUBLESHOOTING
08 LIMITED WARRANTY
H I F I
L O U D S P E A K E R S
Own e r ’s m a n u a l
Introduction
Thank you for choosing Scansonic loudspeakers, we hope they
will bring you many years of enjoyment.
Please read this manual fully before unpacking and installing
the product.
Carton contents
During production and packing we have carefully checked and
inspected this subwoofer.
After unpacking please check for any damage from transport.
We recommend that you keep the original cartonbox and
packing material for any future shipping.
In the cartonbox you will find:
1 Input cable, RCA phono type
Loudspeaker installation
The subwoofer requires connection to the mains power supply,
so for your safety it is important that you read both this manual
and the amplifier manual before connecting.
Subwoofer positioning
Variations in placement of your loudspeakers can produce
dramatic differences in the way music sounds. No listening
rooms are the same and therefore we encourage you to spend
some time experimenting with which placements work best in
your listening room. Position of subwoofers are however less
critical compared with full-range loudspeakers because the low
frequencies reproduced by a subwoofer are difficult to locate
in the room. Trust your ears and be willing to experiment freely.
You can start with our basic recommendations.
To begin with, the subwoofer should be positioned between the
TV and one of your front loudspeakers. Fig. 1 - 3.
Connecting your subwoofer
We recommend that you read the manual of your amplifier or
AV-receiver carefully before connecting your subwoofer.
First switch off amplifier and all equipment when connecting
your subwoofer.
Connect the subwoofer input IN (5) and your amplifiers SUB out
with the enclosed RCA phono cable.
Connect the subwoofer net cable (3) to the mains voltage ,
and push the POWER ON/OFF button (1) to ON position, the
S12
indicator lamp POWER LED (6) will now glow green and the
subwoofer is active and ready to be used. Fig. 4.
The Scansonic S12 subwoofer has a built-in AUTO STANDBY
function and after approximately 5 minuttes without any input
signal the subwoofer will automatically switch off, and the
indicator lamp POWER LED (6) will glow red. When an input
signal is detected the subwoofer will become active and the
indicator lamp POWER LED (6) will glow green.
Setting volume, frequency, bass extension and phase
The volume, frequency, bass extension and phase (controls
8, 9, 10 and 11) can be adjusted on the rearpannel, and we
recommend that you adjust the setting of these controls to
your liking – try with different music and films. If you want more
detailed informations on these control functions, we invite you to
visit our homepage www.scansonic.dk.
Running-in period
We recommend a running-in time of your new Scansonic S12
subwoofer of approximately 15-20 hours at normal listening
level before you decide on the final positioning and controls
settings of the subwoofer . During the running-in time the drive
units will settle in and perform as intended.
Care and cleaning
We don’t recommend use of any solvents or cleaners on
Scansonic S12 lacquered cabinets, the cabinet surface usually
only requires dusting or cleaning with a soft cloth (do not use
water).
The grille fabric may be cleaned with a normal clothes brush or
vacuumed carefully with the grille detached from the cabinet.
Avoid touching the woofer drive unit, and do not use the
subwoofer as a coffee or drinks table (risk of water being spilled
into the subwoofer).
Disconnect the subwoofer from the mains supply if taken out of
use for a longer period.
Environmental information
Scansonic S12 subwoofer comply with international directives
on the Restriction of Hazardous Substances (RoHS) in
electrical and electronic equipment and the disposal of Waste
Electrical and Electronic Equipment (WEEE) - the crossed bin
symbol indicates compliance and that the products must be
appropriately recycled or processed in accordance with these
directives.
H I F I
L O U D S P E A K E R S
fig. 1 surround 5.1
fig. 2 surround 6.1
sub
S12
fig. 3 surround 7.1
sub
sub
H I F I
L O U D S P E A K E R S
fig. 4
5
A C T I V E
4
S12
S U B W O O F E R
Power
6
IN
On Auto Off
7
SUB
OUT
Volume
8
min
max
Frequency
9
40Hz
200Hz
Bass extension
10
0dB
6dB
0
180
Phase
11
Power
Fuse
~230V/50Hz input
on
T
off
�������
����������������������
�����������
Double insulated
1.6A 250V
POWERED SUBWOOFER
!
WARNING: SHOCK HAZARD DO NOT OPEN
AVIS: RISQUE DE CHOC ELECTRIQUE NE PAS OUVRIR
1
2
3
S12
H I F I
L O U D S P E A K E R S
01Power switch
02Fuseholder, if fuse needs to be replaced only use same type
and value, IMPORTANT; remember to unpluck the powercable
from mains socket before opening the fuse holder.
03Power cable, the power cable should be pulled from socket if
not used for a longer period
04Sound output
05Sound input
06Power LED lamp
07Standby selector
08Volume adjustment
09Frequency adjustment
10Bass extension
11Phase adjustment
S12
H I F I
L O U D S P E A K E R S
Trou b l e s h o o t i n g
Basic troubleshooting
If the LED indicator lamp does not light up, check...
• that the power cord (2) is firmly plugged into the wall
outlet
S12
If no sound, check...
• that the subwoofer is turned on (indicator LED lamp
glows green)
• that the POWER switch (1) on the rear panel is ON
• that the VOLUME control (6) on the rear panel is not all
the way down
• that the mains voltage is correct and matching the
subwoofer
• that the input cable (4) is firmly plugged in both
subwoofer and amplifier
• the fuse, if fuse (3) need to be replaced only use same
type and value
• that the subwoofer gets a signal from the amplifier
– checktone on most av-receivers
H I F I
L O U D S P E A K E R S
SAF ET Y IN ST RUCT ION S
CAUTION
RISK OF ELECTRIC SHOCK
DO NOT OPEN
!
The lightning flash with arrowhead symbol
within an equilateral triangle, is intended to
alert the user to the presence of uninsulated
“dangerous voltage“ within the product’s enclosure that may be
of sufficient magnitude to constitute a risk of electric shock to
persons.
The exclamation point within an equilateral
triangle is intended to alert the user to the
presence of important operating and maintenance
(servicing) instructions in the literature accompanying the
product.
!
IMPORTANT SAFETY INSTRUCTIONS
01READ, FOLLOW, HEED, AND KEEP ALL
INSTRUCTIONS AND WARNINGS.
02DO NOT OPERATE NEAR ANY HEAT SOURCE
AND DO NOT BLOCK ANY VENTILATION
OPENINGS ON THIS APPARATUS. FOR PROPER
OPERATION, THIS UNIT REQUIRES 3” (75mm) OF
WELL VENTILATED SPACE AROUND HEATSINKS
AND OTHER AIR FLOW PROVISIONS IN THE
CABINET.
03DO NOT USE THIS APPARATUS NEAR
SPLASHING, FALLING, SPRAYING, OR STANDING
LIQUIDS.
04CLEAN ONLY WITH LINT-FREE DAMP CLOTH
AND DO NOT USE CLEANING AGENTS.
05ONLY CONNECT POWER CORD TO A
POLARIZED, SAFETY GROUNDED OUTLET
WIRED TO CURRENT ELECTRICAL CODES
ANDCOMPATIBLE WITH VOLTAGE, POWER, AND
FREQUENCY REQUIREMENTS STATED ON THE
REAR PANEL OF THE APPARATUS.
06PROTECT THE POWER CORD FROM DAMAGE
DUE TO BEING WALKED ON, PINCHED, OR
STRAINED.
07UNPLUG THE APPARATUS DURING LIGHTNING
S12
STORMS OR WHEN UNUSED FOR LONG
PERIODS OF TIME.
08ONLY USE ATTACHMENTS, ACCESSORIES,
STANDS, OR BRACKETS SPECIFIED BY THE
MANUFACTURER FOR SAFE OPERATION AND
TO AVOID INJURY.
09WARNING: TO REDUCE THE RISK OF
ELECTRIC SHOCK OR FIRE, DO NOT EXPOSE
THIS UNIT TO RAIN OR MOISTURE.
10SERVICE MUST BE PERFORMED BY
QUALIFIED PERSONNEL.
H I F I
L O U D S P E A K E R S
Limi t e d Wa r r a n t y
Dear Customer,
This product has been designed and manufactured to the
highest quality standards, however if something goes wrong
with this product, Scansonic and the country distributor warrants
free replacement parts or repair by the official Scansonic
distributor.
This limited warranty is valid for the original owner for a period of
two years from the date of purchase, it is not transferable.
What is covered by the limited warranty:
• The limited warranty covers all production and material
defects of the product, except for the damages stated
below.
What is not covered by the limited warranty:
• Damages caused by packing and transport
• Defects caused by accidents, misuse, normal wear and
tear, mis-maintenance, voltage variation and overloading.
S12
How to claim parts or repair under warranty:
To have your product serviced under warranty, you must
contact the dealer from where you bought the product.
You will need to produce this warranty booklet completed and
stamped by your dealer on the date of purchase. Alternatively,
you will need the original sales invoice or other proof of
ownership and date of purchase.
The supplier is liable only to repair or replace defective parts or
products and the supplier is not responsible for indirect losses or
damages arising from the use of the product.
Transportation costs for servicing are not covered by the
warranty.
A service repair or replacement cannot exceed the value of
the product under warranty,in no event shall the supplier be
responsible or liable for special, incidential, consequential or
indirect damages.
• Damages caused by incorrect installation or operation
• Damages caused by modification or repair by a
nonauthorised service centre and use of non-original
spare parts
• Other damages due to conditions beyond the supplier’s
control such as fire, rain, stroke of lightning, war and
other force majeure events
Date of purchase:
Dealer name and stamp:
www.scansonic.d k


![Solaris LC40 [v04]](http://vs1.manualzilla.com/store/data/006347096_1-050cff7c0b4f91b9fb35d753454c0152-150x150.png)