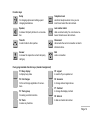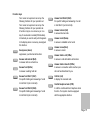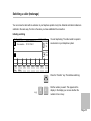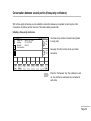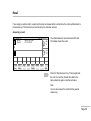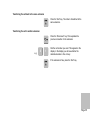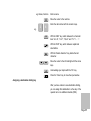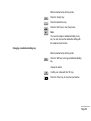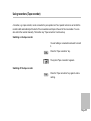
1
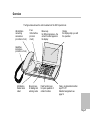
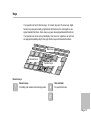
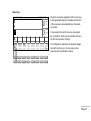
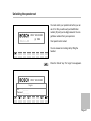
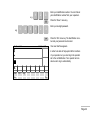
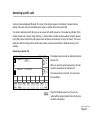
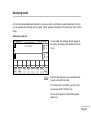
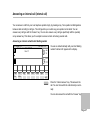
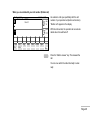
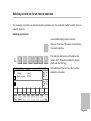
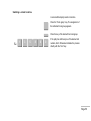
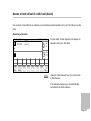
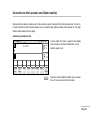
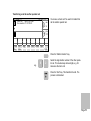
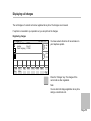
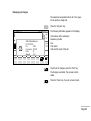
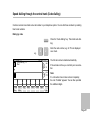
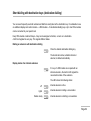
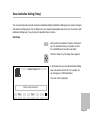
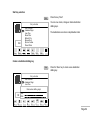
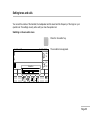
Operating Instructions
Operator Set OS13
Things worth knowing about this manual
This manual helps you to get to know your operator set quickly and reliably. The manual is divided into three
parts.
Getting to know your operator set
In this section you will find basic information on the structure and operation of your
operator set. Read how to unlock your operator set and how to telephone.
Find out by reading pages 5 to 29.
How to use your operator set
All the functions you can use with your operator set are described in detail.
Find out by reading pages 30 to 85
Quick reference
Use this section to look for a particular topic, e.g. a display message. You will find an
index on the final pages.
Find out by reading pages 86 to 97.
Page 2
Contents
Things worth knowing about this manual
Overview . . . . . . . . . . . . . . . . . . . . . . . . . . . . . . . . . . . . . . . . . . . . . . . . . . . . . . . . . . . . . . . .
The features of your operator set . . . . . . . . . . . . . . . . . . . . . . . . . . . . . . . . . . . . . . . . . . .
Structure of the display . . . . . . . . . . . . . . . . . . . . . . . . . . . . . . . . . . . . . . . . . . . . . . . . . . . .
Keys . . . . . . . . . . . . . . . . . . . . . . . . . . . . . . . . . . . . . . . . . . . . . . . . . . . . . . . . . . . . . . . . . . . .
Creating a personal configuration . . . . . . . . . . . . . . . . . . . . . . . . . . . . . . . . . . . . . . . . . . .
Unlocking the operator set . . . . . . . . . . . . . . . . . . . . . . . . . . . . . . . . . . . . . . . . . . . . . . . . .
Locking the operator set . . . . . . . . . . . . . . . . . . . . . . . . . . . . . . . . . . . . . . . . . . . . . . . . . . .
Telephoning with the operator set locked . . . . . . . . . . . . . . . . . . . . . . . . . . . . . . . . . . . .
Taking a break . . . . . . . . . . . . . . . . . . . . . . . . . . . . . . . . . . . . . . . . . . . . . . . . . . . . . . . . . . .
Telephoning normally . . . . . . . . . . . . . . . . . . . . . . . . . . . . . . . . . . . . . . . . . . . . . . . . . . . . .
Finding and seizing a free trunk line (trunk group) . . . . . . . . . . . . . . . . . . . . . . . . . . . . .
5
6
8
13
19
21
23
24
25
26
28
How to use your operator set
Holding a conversation . . . . . . . . . . . . . . . . . . . . . . . . . . . . . . . . . . . . . . . . . . . . . . . . . . . .
Answering specific calls . . . . . . . . . . . . . . . . . . . . . . . . . . . . . . . . . . . . . . . . . . . . . . . . . . .
Switching a caller (brokerage) . . . . . . . . . . . . . . . . . . . . . . . . . . . . . . . . . . . . . . . . . . . . . .
Override do not disturb . . . . . . . . . . . . . . . . . . . . . . . . . . . . . . . . . . . . . . . . . . . . . . . . . . . .
Conversation between several parties (three-party conference) . . . . . . . . . . . . . . . . .
Recall . . . . . . . . . . . . . . . . . . . . . . . . . . . . . . . . . . . . . . . . . . . . . . . . . . . . . . . . . . . . . . . . . .
One external call for several parties (chain call) . . . . . . . . . . . . . . . . . . . . . . . . . . . . . . .
Keeping a caller waiting (hold call) . . . . . . . . . . . . . . . . . . . . . . . . . . . . . . . . . . . . . . . . . .
Keeping a caller waiting specifically . . . . . . . . . . . . . . . . . . . . . . . . . . . . . . . . . . . . . . . . .
Answering recalls . . . . . . . . . . . . . . . . . . . . . . . . . . . . . . . . . . . . . . . . . . . . . . . . . . . . . . . .
30
32
33
35
36
38
40
42
44
46
Page 3
Answering an internal call (internal call) . . . . . . . . . . . . . . . . . . . . . . . . . . . . . . . . . . . . .
Switching a trunk line for an internal extension . . . . . . . . . . . . . . . . . . . . . . . . . . . . . . .
Answer a trunk call out of a refer back (Assist) . . . . . . . . . . . . . . . . . . . . . . . . . . . . . . .
Connection to other operator sets (Station transfer) . . . . . . . . . . . . . . . . . . . . . . . . . . .
Displaying the last callers (Call list) . . . . . . . . . . . . . . . . . . . . . . . . . . . . . . . . . . . . . . . . .
Displaying free extensions (Busy display) . . . . . . . . . . . . . . . . . . . . . . . . . . . . . . . . . . . .
Displaying call charges . . . . . . . . . . . . . . . . . . . . . . . . . . . . . . . . . . . . . . . . . . . . . . . . . . . .
Speed dialling through the central trunk (Code dialling) . . . . . . . . . . . . . . . . . . . . . . . .
Short dialling with destination keys (destination dialling) . . . . . . . . . . . . . . . . . . . . . . .
Save destination dialling (Setup) . . . . . . . . . . . . . . . . . . . . . . . . . . . . . . . . . . . . . . . . . . .
Using the electronic telephone book . . . . . . . . . . . . . . . . . . . . . . . . . . . . . . . . . . . . . . . .
Additional information about connections . . . . . . . . . . . . . . . . . . . . . . . . . . . . . . . . . . . .
Dialling a call number again (Last number redial) . . . . . . . . . . . . . . . . . . . . . . . . . . . . .
Calling someone anonymously . . . . . . . . . . . . . . . . . . . . . . . . . . . . . . . . . . . . . . . . . . . . .
Switching over trunk line COS . . . . . . . . . . . . . . . . . . . . . . . . . . . . . . . . . . . . . . . . . . . . . .
Setting tones and calls . . . . . . . . . . . . . . . . . . . . . . . . . . . . . . . . . . . . . . . . . . . . . . . . . . . .
Switch off the ringer . . . . . . . . . . . . . . . . . . . . . . . . . . . . . . . . . . . . . . . . . . . . . . . . . . . . . .
Transmitting special dialling signals (DTMF dialling) . . . . . . . . . . . . . . . . . . . . . . . . . . .
Using recorders (Tape recorder) . . . . . . . . . . . . . . . . . . . . . . . . . . . . . . . . . . . . . . . . . . . .
47
49
51
52
54
56
59
61
62
63
69
72
74
78
79
80
83
84
85
Quick reference
Tones and calls . . . . . . . . . . . . . . . . . . . . . . . . . . . . . . . . . . . . . . . . . . . . . . . . . . . . . . . . . .
Messages . . . . . . . . . . . . . . . . . . . . . . . . . . . . . . . . . . . . . . . . . . . . . . . . . . . . . . . . . . . . . . .
Help with operation . . . . . . . . . . . . . . . . . . . . . . . . . . . . . . . . . . . . . . . . . . . . . . . . . . . . . . .
Notes on assembly and care . . . . . . . . . . . . . . . . . . . . . . . . . . . . . . . . . . . . . . . . . . . . . . .
Glossary . . . . . . . . . . . . . . . . . . . . . . . . . . . . . . . . . . . . . . . . . . . . . . . . . . . . . . . . . . . . . . . .
Index . . . . . . . . . . . . . . . . . . . . . . . . . . . . . . . . . . . . . . . . . . . . . . . . . . . . . . . . . . . . . . . . . . .
86
88
89
90
92
95
Page 4
Overview
The figure below shows the control elements of the OS13 operator set.
AEI-interface
connecting
accessories
(on bottom of unit)
if nec.
V.24-interface
(on back
of unit)
Menu keys
for different purposes – the
current function appears in
the display
Display
the displays help you with
the operation
Handsfree
microphone
(on bottom of unit)
LED-display
flashes when
called
Numeric keys
for dialling and
entering codes
Fixed function keys
for quick operation of
certain functions
Freely programmable function
keys F1–F8
Standard assignment see
page 14
Page 5
The features of your operator set
Apart from being able to telephone normally with your operator set, the OS13 operator set offers you some very special features.
The following list shows you what possibilities your operator set offers and on what
page in this manual you can find further information about them:
Clear representation of a lot of information in the display, see page 8
Keys on your operator set and their functions, see page 13
Creating a personal configuration, see page 19
Unlocking with an identification number and password, see page 21
Telephoning with a locked operator set, see page 23
Finding and seizing a free trunk line (trunk group display), see page 28
Handsfree, monitoring, see page 31
Answering specific calls, see page 32
Switching a caller, see page 33
Overriding do not disturb, see page 35
Talking to several extensions, see page 36
An external conversation for several extensions (chain call), see page 40
Page 6
Holding conversations, see page 42
Connection to other operator sets, see page 52
Displaying the last calls, see page 54
Displaying busy extensions, see page 56
Displaying call charges, see page 59
Short dialling through the central trunk (code dialling), see page 61
Short dialling (destination dialling), see page 62
Creating destination dialling keys in the Setup menu, see page 63
Using the electronic telephone book, see page 69
Displaying additional information about the connections, see page 72
Extended last number redial, see page 74
Settings tones and calls, see page 80
Switching off tone call, see page 83
Transmitting DTMF dialling signals, see page 84
Using a tape recorder, see page 85
Page 7
Structure of the display
Your operator set is equipped with a window–orientated user interface. The display
always provides you with the latest details of all states. The display is divided into 8
sections. These are explained below. The contrast of the display can be adjusted in
eight stages with the “Contrast” function key. You can set the angle of tilt of the display.
The figure below shows a standard assignment with international times. The user
name, the international times and the menus can be configured individually.
BOSCH Telecom 1996 User line
Answering side
Assignment side
Preview
06. Mar 12:35
am
St
Internat.times
pm
NY
Status line
Number of available calls
Conn
Disc
List
Rng
Menus
Chg.
Page 8
User line
The user line at the top shows your user name with identification number (ID), the
date and the time.
Answering side and assignment side
These two lines show information about an answered or available call. A rectangle
marks whether the operator set is currently active on the answering or assignment
side.
Preview
If the operator set is in the conversation state and is assigned further calls, these are
displayed in the preview. The preview holds up to three calls of any call type. The
calls are listed in order of priority.
Status line
In addition to the different states of the operator set, different basic conditions occur
which are displayed. Graphic symbols indicate these states in the status line. The
following states are indicated by symbols:
Night service
Your operator set does not take part in the call distribution. Only position calls are
received. You can switch on your operator set with the “Connect” key. You can switch
it off with the “Disconnect” key.
If you do not answer an incoming call, your operator set switches to night service
after a time.
Page 9
Pause
Your operator set is temporarily disconnected from the call distribution.
Call list
The call list contains entries.
The call list contains one or more entries. The call list is called with the “List” key.
Ringer
The ringer is switched off. A call is not signalled acoustically. Your operator set can
be set so that the ringer switches back on automatically after 10 seconds. You can
switch the ringer on and off with the “Ringer” key.
Muting the microphone
The microphone is switched off. The conversation partner on the telephone cannot
hear conversations held with other persons in the room. You switch off the microphone with the “Mute” key. The microphone can only be muted in the conversation
state.
Monitoring
Persons in the room can listen to a conversation. You can switch monitoring on or off
with the “Speaker” key.
Page 10
Handsfree
You can hold a conversation without using the handset. Other persons in the room
may participate in the conversation. You can switch handsfree on and off with the
“Handsfree” key.
Anonymous
12..
You have pressed the “Anonymous” key. Your internal call number is suppressed.
DTMF transmitter
You need the DTMF transmitter for special functions, e.g. answering voice mail.
You can switch the DTMF transmitter on and off with the “DTMF” key.
Tape connection
A tape recorder connected to the operator set is switched on. You can switch the
tape recorder on and off with the “Tape” key. Your operator set can be set so that it
switches on a tape recorder automatically at the beginning of a conversation and off
at the end.
Speech equipment
A speech equipment is switched on. The speech equipment is connected with the
AEI-interface of the operator set. You can switch the speech equipment on or off with
the “TM” key.
Page 11
Automatic answering
A call is answered automatically after a set time. A connection is then established
without having to press the “Answer” key. Your system administrator can set the time
and program your operator set accordingly.
International times
Up to two local times are displayed. The analog clocks contain a text for the time
zone and an abbreviation “am” for before noon or “pm” for after noon. The minute
hand changes in a 5 minute rhythm, the hour hand at half hour intervals.
Number of available calls
In addition to the answering side and the preview, the overload display shows the
calls available on the operator set or in the system depending on the type of call
distribution. It sorts the calls according to type and totals the number per type.
The number of calls only appears if one of the top eight menu keys is occupied with
the appropriate answer key (e.g. Extl ans). Then the number of calls for this call type
appears in the corresponding field, in the example the number of external calls.
Menus
There are 16 keys underneath the display. They are labelled in the appropriate
position in the bottom section of the display. The function of these keys may change
during operation. Your system administrator can configure these keys.
Page 12
Keys
Your operator set has 16 function keys, 12 numeric keys and 16 menu keys. Eight
function keys are permanently programmed with functions, the other eight are assigned standard functions. Some menu keys are also assigned standard functions.
Your operator set can be set up individually. Your revisor or supervisor can print out
an appropriate labelling strip for the eight function keys with standard functions.
Menu keys
Numeic keys
Function keys
Numeric keys
1
Numeric keys
for dialling call numbers and entering codes.
Star and Hash
for special functions.
Page 13
Function keys
Setup
for changing options and setting up and
changing destinations.
Telephone book
electronic telephone book. Here you can
look for and select the call numbers.
Speaker,
to allow a third party to listen to a conversation.
Last number redial
dials a number locally, You can choose between the last seven call numbers.
Transfer
to switch calls to other parties.
Disconnect
disconnects the current connection or aborts
initiated actions.
Answer
to answer the respective current call (every
call type).
End
ends a connection.
Freely programmable function keys (standard assignment)
F1: Busy display
to display busy state.
F5: Logout
to switch off your operator set.
F2: Call charges
for the call charge registration of connections.
F6: Acousics
to change call and signal tones.
F3: Trunk group
for seizing a certain trunk line.
F4: Trunk
to seize any trunk line.
F7: Contrast
to change the display contrast.
F8: Internal
to dial an internal call number.
Page 14
Function keys
Your revisor or supervisor can set up the
following functions for your operator set.
Your revisor or supervisor can set up the
following functions for your operator set.
A function may be on a menu key or on a
key of an extension module (DSS-module).
In brackets you see the entry which appears
in the display when a menu key is assigned
this function.
Anonymous (Anon)
suppresses your internal call number.
Answer external call (Extl)
to answer calls via a trunk line.
Answer hold (HLDa)
to answer a waiting hold call.
Answer hold field 1 (Hld1)
for specific holding and answering of a call
in hold field 1 (not a hold call).
Answer hold field 2 (Hld2)
for specific holding and answering of a call
in hold field 2 (not a hold call).
Answer hold field 3 (Hld3)
for specific holding and answering of a call
in hold field 3 (not a hold call).
Answer internal (Intl)
to answer internal calls.
Answer recall (Renw)
to answer a redialled call or recall.
Answer renew (Recl),
to answer a recall.
Answer station call (STAa)
to answer a call with station call number.
Answer station transfer (STRa)
to answer a connection which another operator set has transferred to you.
Call list (List)
to display the received calls.
Central telephone book (CTB)
to call the central electronic telephone book
function. Your system must be equipped
with the appropriate function.
Page 15
Chain call (Chn),
to connect a caller with several extensions
one after the other.
Disconnect (Disc)
disconnects your operator set from the call
distribution.
Change over class of service (COSc)
to change over the class of service of internal extensions.
DTMF transmitter (DTMF)
switches the DTMF transmitter on or off.
Charges answer (Chg.),
to display the registered charges.
Handsfree (Hand)
switches microphone and loudspeaker on or
off.
Code dialling (Code)
for short dialling of a centrally stored call
number.
Hold (Hold),
to put the current connection on hold. A hold
call occurs.
Conference (Conf)
connects several extensions together (threeparty conference).
Identify (Iden),
to display additional information about the
connection.
Connect (Conn)
to connect your operator set to the call
distribution.
Muting the microphone (Mute),
to switch off the microphone.
Cut in (Cut)
to an existing connection to announce a call.
Override (Over)
to cut in to a line when do not disturb is set
up for the party.
Page 16
Pause (Paus),
to disconnect your operator set from the call
distribution.
Ringer (Rng)
switches the ringer on or off.
Speech equipment (HS)
to switch the speech equipment on or off.
Tape connection (Tape)
switches a connected tape recorder on or
off.
Station transfer (Sttr)
to transfer a connection to another operator
set.
Standard assignment
You have the following additional function
keys in the standard assignment:
Connect (Conn)
Disconnection (Disc)
Call list (List)
Ringer (Rng)
Charges answer (Chg.)
These functions are assigned to menu keys.
If you need other function keys, get your
revisor to set them up for you.
The standard assignment is subject to
changes due to technical requirements.
Page 17
Menu keys
U. Glaser 123
06. Mar 11:55
am
St
pm
NY
Conn
Disc
List
Rng
Chg.
The figure shows the assignment of the menu keys
to the appropriate display. The display and function
of the menu keys varies depending on the operating context.
In the example the top left menu key is assigned
the “Connection” function and the bottom left menu
key the “Disconnection” function.
The configuration determines the keyboard assignment with function keys. You can assign a free
menu key with a destination in Setup.
Page 18
Creating a personal configuration
Your operator set can be set individually. You need the appropriate COS. Settings are
possible in the Setup menu or with the Operator Set Manager (OSM) program.
Class of service
Four classes of service are provided for an operator set. These are Revisor, Supervisor, Operator and Assistant.
A revisor can edit all options of your operator set. A supervisor can edit all options
except the AEI and V.24 interfaces. As an operator you can edit destinations and
look at the terminal ID. An assistant cannot use the Setup menu functions at all.
The options and destinations can be edited on the operator set in the Setup menu or
with the OSM program (Operator Set Manager). Function keys can only be set up
with the OSM program.
Setup menu
With the “Setup” function key you call the Setup menu. There you can set up and
change destinations and assign keys as an operator. To find out how to edit destinations in the Setup menu, read page 63. You cannot use this function as an assistant.
The options which can be set for your operator set are described in the Service and
Assembly Manual.
Page 19
Operator Set Manager (OSM)
The OSM program is a comfortable tool for managing and setting up operator sets. It
requires a personal computer. The personal computer is connected to the operator
set.
A configuration determines the key assignment of your operator set. The operator set
requires a configuration. Up to ten users can be set up for every configuration. Revisor and supervisor must be set up. This leaves eight users which can be set up as
operators or assistants. Every user is assigned his own options. The keyboard assignment does not differ within a configuration.
With the OSM program, you or your revisor can:
create and change configurations for an operator set,
load changed configurations on the operator set,
manage and set up a maximum of tens users for a configuration with individual options,
copy a new program version to the operator set,
create macros,
import destinations from data bases
and print labelling strips.
Page 20
Unlocking the operator set
OS13 VXX.XX.XXX
(c) 1996
You must unlock your operator set before you can
use it. For this you will need your identification
number (ID) and your six-digit password. You can
get these numbers from your supervisor.
Your operator set is locked.
You can answer an incoming call by lifting the
handset.
Press the “Unlock” key. The “Login” menu appears.
OS13 VXX.XX.XXX
Log in
ID
:_____
Password : _ _ _ _ _ _
Page 21
e.g.
1
2
3
Enter your identification number. You can find out
your identification number from your supervisor.
Press the “Down” menu key.
Enter your six-digit password.
e.g.
1
2
3
1
2
3
Press the “Ok” menu key. The identification number and your password are checked.
U. Glaser 123
06. Mar 11:55
Your user interface appears.
In order to be able to fully exploit all the functions
of your operator set, you must log in the operator
set to the call distribution. Your operator set can
also be set to log in automatically.
Conn
Disc
List
Rng
Chg.
Page 22
Locking the operator set
Locking
Lock your operator set to prevent unauthorized
persons from using it.
Press the “Logout” key. Your operator set is now
switched off.
Another user can log in with his identification number and password.
Page 23
Telephoning with the operator set locked
OS13 VXX.XX.XXX
(c) 1996
You can answer incoming calls even when your
operator set is locked. If an emergency call key is
set up, you can also call a stored call number. The
emergency call number is set up by your revisor or
supervisor.
Answer call
Your operator set is locked and you are called. Lift
the handset. You are connected with the caller.
Emergency call
Your operator set is locked. An emergency call key
is set up. Press the “Emergency” key.
Press the “Ok” menu key. The stored emergency
call number is dialled automatically.
Page 24
Taking a break
If you want to take a break, you can disconnect your operator set from the call distribution temporarily. Position
calls still reach you.
Taking a break
Press the “Pause” key. Your operator set logs out
from the call distribution. Calls from the call distribution no longer reach you.
The symbol indicates that your operator set is not
participating in the call distribution.
Press the “Connect” key to end the break.
Page 25
Telephoning normally
With the operator set you can telephone normally like with any other telephone. When you want to call extensions
in the public telephone network, you can decide whether you want to telephone on any or on a specific trunk. Your
operator set distinguishes between dialling within your telephone system (Internal) and dialling externally into the
public telephone network (Trunk).
Calling someone (Internal)
Press the “Internal” key. This initiates dialling of an
internal call number.
e.g.
U. Glaser 123
internal
free
Exn 33
LUDWIG H.
3
3
06. Mar 11:55
am
St
pm
NY
Conn
Disc
List
Iden
Rng
Mute
Dial the desired call number. This appears in the
display.
In the display you will see whether the extension is
free. You can then telephone as usual.
If the extension is telephoning, “Busy” appears in
the display.
Free DTMF Tape
Chg.
Page 26
Telephoning on any trunk line (External)
Press the “Trunk” key. This seizes any free trunk
line. You hear the dial tone.
e.g.
1
3
5
U. Glaser 123
Trunk outgoing 135860
free
8
3
6
0
06. Mar 11:55
am
St
Dial the number you want. This appears in the
display.
You will here a ringback or busy signal. You can
hold your trunk call when the extension answers.
pm
NY
Conn
Disc
List
Iden
Rng
Mute Free DTMF Tape
Chg.
Page 27
Finding and seizing a free trunk line (trunk group)
Your telephone system may combine several trunk lines and tie lines in a trunk group. You can seize a line of a
free trunk group. The trunk groups must be set up in your telephone system.
Telephoning on a certain trunk line (External)
Press the “Trunk group” key.
U. Glaser 123
06. Mar 11:55
am
St
The display shows you the status of different trunk
line groups.
The name of the trunk group is given by the trunk
group.
pm
NY
B1
B3
B4
B6
B8
Press the desired trunk group key to seize a free
line in the trunk group.
e.g.
1
3
5
8
3
6
0
Dial the call number. You hear the ringback or busy
signal. Hold your trunk call when the extension
answers
Page 28
Trunk group display
The trunk group display tells you about the status
of the trunk group. You can see whether a trunk
group is, free, busy, barred or off.
The trunk group is free. You can seize a line of the
trunk group.
The trunk group is busy. You cannot use the trunk
group.
The trunk group is barred. You cannot use the
trunk group.
The trunk group is off. You cannot use the trunk
group.
Closing the trunk group display
Press the “Close” key. The window of the trunk
group display is closed.
Note:
The window closes automatically after ten
seconds.
Page 29
Holding a conversation
You can hold a conversation with the handset or a speech equipment. You can also telephone without either of
these devices (handsfree). Your operator set has a built–in microphone and a loudspeaker. In this way other
persons in the same room can take part in the conversation. You can also let other persons in the room just listen
(monitoring).
You use the handset
Press the “Answer” key or lift the handset to
answer a call.
Hold the conversation as normal. The call is disconnected when you place the handset on hook.
You can also press the “End” key to end a conversation.
You are using a speech equipment
Press the “Answer” key to answer a call. Your
operator set can be set up so that it connects a call
automatically after a certain call time.
A speech equipment connected at the AEI–interface can be switched on or off with the “TM” key.
Page 30
The “Speech equipment” symbol appears in the
display.
Hold the conversation as normal with the speech
equipment.
Press the “End” key to end a conversation.
Handsfree
The “Handsfree” key must be set up. Tell your conversation partner that other people are listening.
Press the “Handsfree” key. This switches handsfree on or off.
The symbol indicates that handsfree is switched
on.
Letting others listen (monitoring)
Tell your conversation partner that other people are
listening.
Press the “Speaker” key. This switches monitoring
on or off.
The symbol indicates that monitoring is switched
on.
Page 31
Answering specific calls
Incoming calls are displayed differently. The name of the call type appears in the display. If several calls are
waiting at the same time, the extended preview helps you decide which call to answer first.
Your revisor determines which call type you can answer with which answer key. The answer keys Station (Tran),
Answer internal (Intl) , Answer charge call (Chg.) , Answer station call (Sta.), Answer external call (Extl), Answer
hold (Hlda), Answer recall (Recl) and answer renew call (Renw) can be set up for you by the revisor. The revisor
determines that the call types trunk call and trunk seizure can be answered with the “External answer” key for
example.
Answering a specific call
U. Glaser 123
Internal call Exn 43
HUTT U.
Trunk call
Conn
Disc
List
Iden
06. Mar 11:55
am
St
pm
NY
07111358693
Rng
Mute
Free DTMF
The display shows two calls, an internal call and an
external call.
When you press the general answer key, the internal call is answered by the extension 43.
The preview shows a trunk call. You can answer
this specifically.
Tape
Extl
Press the “External answer” key. You are connected with the external caller (trunk call), the internal caller is still waiting.
Page 32
Switching a caller (brokerage)
You can connect a caller with an extension in your telephone system at any time. External and internal callers are
switched in the same way. Your line is free when you have established the connection.
Initiating switching
U. Glaser 123
Trunk call
Conversation
ISDN–TRUNK 1
07111358612
06. Mar 11:55
am
St
You are telephoning. The caller wants to speak to
an extension in your telephone system.
pm
NY
Conn
Disc
List
Iden
Rng
Mute
Free DTMF Tape
Press the “Transfer” key. This initiates switching.
e.g.
6
0
Dial the number you want. This appears in the
display. In the display you can see whether the
number is free or busy.
Page 33
Note:
You can also switch a caller without pressing the
“Transfer” key.
Whether or not you remain connected with the
caller can be set.
Extension is free
Announce the call when the called extension
answers.
Press the “End” key to connect the two extension.
Extension is busy
Press the “Cut-in” key to announce the call. The
called party and his partner hear the cut-in tone.
Announce the trunk call.
If the call is not answered, press the “Cut-in” key
again. This ends cut in.
Press the “End” key. The caller waits until the extension is free. It is then connected automatically.
If the extension does not answer an external call
within a certain time, you will get a recall.
Page 34
Override do not disturb
You can also switch a caller when the called party has switched on do not disturb. You must override the do not
disturb first before you switch the call.
This function is only possible if your operator set is set up accordingly.
Do not disturb
U. Glaser 123
Trunk call
ISDN–TRUNK 1
Conversation 07111358612
internal
Exn 43
Do not disturb
06. Mar 11:55
am
St
pm
NY
Conn
Disc
List
Iden
Rng
Mute
You attempt to switch a call.
The display shows that do not disturb is switched
on during the assignment.
Decide whether you want to override the do not
disturb.
Free DTMF Tape
Over
Press the “Override” key. This overrides the do not
disturb. You can only switch the call if the extension answers.
Press the “End” key. This ends assignment.
The party is connected with the caller as soon as
he answers.
Page 35
Conversation between several parties (three-party conference)
With a three–party conference you can establish a connection between your operator set and any two other
connections. All parties can then converse. This saves making several calls.
Initiating a three-party conference
U. Glaser 123
Trunk call
ISDN–TRUNK 1
waiting
07111358612
internal
Exn 43
Conversation
06. Mar 11:55
am
St
pm
NY
Conn
Disc
List
Iden
Rng
Mute
You have set up a broker connection and spoken
to every party.
See page 33 to find out how to set up a broker
connection.
Free DTMF Tape
Conf
Press the “Conference” key. The conference is set
up. You and the two extensions are connected to
each other.
Page 36
Ending and brokering three-party conference
Press the “Transfer” key. You are connected to the
first party again.
The other party waits.
Ending three-party conference and connecting
Press the “End” key. The two parties are connected
with each other.
Page 37
Recall
If you assign an external call to a party and he does not answer within a certain time, the call is switched back to
the operator set. The time before a recall is set by the customer services.
Answering a recall
U. Glaser 123
Recall
Exn 93
ISDN–TRUNK 1
07111358612
06. Mar 11:55
am
St
The called extension has not answered the call.
The display shows the recall.
pm
NY
Conn
Disc
List
Iden
Rng
Mute
Free DTMF Tape
Hold
Recl
Press the “Recall answer” key. This accepts back
the call. You can then transfer the caller to the
same extension again or another extension.
Note:
You can also answer the recall with the general
answer key.
Page 38
Transferring the call back to the same extension
Press the “End” key. The caller is transferred to the
same extension.
Transferring the call to another extension
Press the “Disconnect” key. This separates the
previous connection to the extension.
e.g.
6
1
Dial the call number you want. This appears in the
display. In the display you will see whether the
desired extension is free or busy.
If the extension is free, press the “End” key.
Page 39
One external call for several parties (chain call)
If an external party informs you that he wants to speak to several parties, you can connect him to these one after
another. After every conversation, the party is automatically switched back to you. The function key “Chain call”
must be set up.
Initiating a chain call
U. Glaser 123
Trunk call
ISDN–TRUNK 1
Conversation 07111358612
06. Mar 11:55
am
St
You are telephoning. The caller wants to speak to
several parties in your telephone system.
pm
NY
Conn
Disc
List
Iden
Rng
Mute
Free DTMF Tape
Chn
Press the “Chain call” key. This sets up the
connection for a chain call. You can now connect
the external party to the other parties in the normal
way with the “Transfer” key. After the conversation
it is switched back to you.
Page 40
Deleting the chain call
The party informs you that he does not want to
receive any further calls at the end of the
conversation.
Press the “Chain call” key again. The party is not
switched back to you after his last call.
The chain call is deleted automatically when the
party hangs up.
Note:
If several internal parties want to speak to the
same external party one after another, you can
also dial a chain call.
This may be useful if you want to maintain a trunk
call.
Page 41
Keeping a caller waiting (hold call)
If you cannot place a connection immediately, you can keep the caller waiting until the desired extension is free.
You can hold the connection simply by pressing a key. When the desired connection is free, the caller is not
connected automatically. You must answer the hold call and then switch it. The function key “Hold” must be set
up.
Holding a connection
U. Glaser 123
Trunk call
ISDN–TRUNK 1
Conversation 07111358612
06. Mar 11:55
am
St
You cannot place a connection immediately
because, for example, the desired extension is
busy.
pm
NY
Conn
Disc
List
Iden
Rng
Mute
Free DTMF Tape
Hold
Press the “Hold” key. The connection is maintained. As soon as the desired extension is free,
answer the hold call and switch it.
Page 42
Answering a held call
Press the “Answer” key to answer the hold call.
You are reconnected to the caller.
Transfer the caller as usual with the “Transfer” key.
Note:
If the “Hold answer” key (HLDa) is set up, you can
answer the hold call specifically.
Page 43
Keeping a caller waiting specifically
If you are unable to place several calls immediately you can keep up to three callers waiting specifically. The
difference to the hold call (see previous page) is that you can call the three callers specifically irrespective of the
order in which the calls arrived. The functions keys “Hold 1”, “Hold 2” and “Hold 3” must be set up.
Holding several connections
You cannot place several calls immediately.
Press the “Hold 1” key. The caller waits.
U. Glaser 123
06. Mar 11:55
am
St
Hold field 1 07111358645
Hold field 2 06975056757
Conn
Disc
List
Iden
Rng
Mute
Free DTMF Tape
Hld1 Hld2
The hold call appears in the preview. You can keep
up to three callers waiting. The hold field number
and the call number of the extension are displayed.
pm
NY
Hld3
Page 44
Answer hold field
With the appropriate key, “Hold 1” in the example,
you can answer the corresponding call specifically.
You cannot answer a call in the hold field with the
general answer key.
You are reconnected to the caller.
Transfer the caller as usual with the “Transfer” key.
Page 45
Answering recalls
An trunk call is automatically switched back to you when a party in your telephone system refers back the call to
you, for example when he hangs up in an inquiry. “Recall” appears in the display. The function key “Recl” must be
set up.
Answering renew call
U. Glaser 123
Recall
ISDN–TRUNK 1
07111358612
06. Mar 11:55
am
St
You are called. The message “Recall” appears in
the display. An extension has referred back a call
to you.
pm
NY
Conn
Disc
List
Iden
Rng
Mute
Free DTMF Tape
Recl
Press the “Recall answer” key to answer the call.
You are connected to the caller.
If the caller wants a connection, you can conect
him as usual with the “Transfer” key.
You can also answer the recall with the general
answer key.
Page 46
Answering an internal call (internal call)
You can answer a call from your own telephone system simply by pressing a key. Your operator set distinguishes
between calls according to call type. The call type tells you in what way your operator set is called. You can
answer every call type with the “Answer” key. You can also answer every call type specifically with the specially
set up answer key. This allows you for example to answer a trunk call among several calls.
Answering an internal call with short dialling number
U. Glaser 123
Internal call MALDENER
Exn 35
06. Mar 11:55
am
St
You are are called internally with your short dialling
number.“Internal call” appears in the display.
pm
NY
Conn
Disc
List
Iden
Rng
Mute
Free DTMF Tape
Intl
Press the “Internal answer” key. This answers the
call. You can then switch the call internally or externally.
You can also answer the call with the “Answer” key.
Page 47
When you are called with your call number (Station call)
U. Glaser 123
Station call
Conn
Disc
List
Iden
HUTT
Exn 43
Rng
Mute
06. Mar 11:55
am
St
An extension calls you specifically with the call
number of your operator set (station call number).
“Station call” appears in the display.
pm
NY
With the call number, the operator set can also be
called when it is switched off.
Free DTMF Tape
Sta
Press the “Station answer” key. This answers the
call.
You can now switch the caller internally or externally.
Page 48
Switching a trunk line for an internal extension
You can assign a trunk line to an extension simply by pressing a key. You can decide whether to switch via any or
a specific trunk line.
Switching any trunk line
A semi-restricted party wants a trunk line.
Press the “Trunk” key. This seizes a free trunk line.
You hear the dial tone.
if
nec.
1
3
5
U. Glaser 123
Internal call
HUTT
waiting
Exn 43
Trunk outgoing 135860
8
3
6
0
06. Mar 11:55
am
St
If the party has informed you of the desired call
number, dial it. Otherwise terminate the process
directly with the “End” key.
End switching with the “End” key after you have
entered the call number.
pm
NY
Conn
Disc
List
Iden
Rng
Mute
Free DTMF Tape
Chg .
Page 49
Switching a certain trunk line
A semi-restricted party wants a trunk line.
Press the “Trunk group” key. The assignment of
the individual trunk group appears.
Press the key of the desired free trunk group.
if
nec.
1
3
5
8
3
6
0
If the party has informed you of the desired call
number, dial it. Otherwise terminate the process
directly with the “End” key.
Page 50
Answer a trunk call out of a refer back (Assist)
You can have a trunk call from an extension in your telephone system handed over to you if this calls you in refer
back.
Answering a trunk call
U. Glaser 123
Assist
LN.9300
HUTT
Exn 43
06. Mar 11:55
am
St
You are called. “Assist” appears in the display. An
extension calls you in refer back.
pm
NY
Conn
Disc
List Ringer
Iden
Mute
Free DTMF
Tape
Intl
Press the “Internal answer” key. You can now talk
to the extension.
If the extension hangs up you are automatically
connected to the trunk extension.
Page 51
Connection to other operator sets (Station transfer)
External calls can also be handed over to other operator sets or transferred from other operator sets. In order to
be able to transfer a call to another operator set, you need the logic station number of the operator set. The logic
station number always has two digits.
Answering a transferred call
U. Glaser 123
Sta. trans. DIPL
Exn 4321
06. Mar 11:55
am
St
You are called. “Sta. trans.” appears in the display.
This connection has been transferred to you by
another operator set.
pm
NY
Conn
Disc
List
Iden
Rng
Mute Free DTMF Tape
STRa
Press the “Answer Station transfer” key to answer
the call. You are connected to the caller.
Page 52
Transferring a call to another operator set
U. Glaser 123
Trunk call
ISDN–TRUNK 1
Conversation 07111358612
06. Mar 11:55
am
St
You receive a trunk call. You want to transfer this
call to another operator set.
pm
NY
Conn
Disc
List
Iden
Rng
Mute Free DTMF Tape
StTr
Press the “Station transfer” key.
e.g.
0
2
Select the logic station number of the other operator set. This must always be two digits, e.g. 02.
Announce the trunk call.
Press the “End” key. This transfers the call. The
process is terminated.
Page 53
Displaying the last callers (Call list)
If callers have not reached you, you can display a list of their names, call numbers and call time. The call list
contains a maximum of twenty entries. An indicator shows how often the same caller has tried to reach you. Only
callers are entered in the call list who have dialled your station call number.
Displaying the call list
The symbol opposite indicates that the call list contains one or more entries.
Press the “Call list” key. The call list appears.
Select an entry from the call list
U. Glaser 123
Call list
2115
ANALOG EXT.
007111358641
Schmidt Heinz
007111358693
Handel Claudia
06. Mar 11:55
am
:3
St
1
10:30 06.Mar
pm
2
NY
10:45 06.Mar
+1
10:46 06.Mar
The call list is displayed. Select the desired entry
with the arrow keys. A pointer shows the selected
call.
The total number of entries in the call list is next to
the telephone symbol.
A “+” in front of the number of call attempts marks
a new entry in the call list.
Page 54
Press the “Dial” key. The displayed call number is
dialled automatically. After the call, the entry is
automatically deleted from the call list.
Deleting an entry
The call list is displayed. Select the desired entry
with the arrow keys. A pointer shows the selected
call.
Press the key for “Delete entry” . The marked entry
is deleted.
Delete all entries
You can delete all entries from the call list.
Press the key “Delete all entries”. All entries of the
call list are deleted.
Closing the call list window
Press the “Close” key. The call list window is
closed.
Note:
The window closes automatically after pressing the
“Dial” key or if more than 10 seconds pass
between your entries.
Page 55
Displaying free extensions (Busy display)
Your operator set has a comfortable busy display. At a glance you can see which extensions are busy. You can
thus inform a caller immediately whether the desired extension is busy or free.
Calling the busy display
Press the “Busy display” key (BD). The busy
display appears.
U. Glaser 123
Trunk call
ISDN–TRUNK 1
Conversation 07111358612
06. Mar 11:55
am
St
08
01 02
10
26
2100
Conn
Disc
List
Iden
44
Rng
Mute
Free DTMF Tape
29
pm
NY
The busy display can hold a maximum of ten
pages. One page contains 50 consecutive
extension call numbers. Only the busy extensions
appear on each page. The positions of the call
numbers are fixed. The first at the top left, the last
at the bottom right.
The number at the left indicates the first complete
call number. Always the last two digits of a call
number appear in the display.
In the example opposite the busy display holds the
entries for the extensions with the call numbers
2100 to 2149.
Page 56
The extensions with the call numbers 2101, 2102,
2108, 2126 and 2129 telephone internally, the
extensions with the call numbers 2110 and 2144
externally.
Scrolling to the next page of the busy display
The busy display can hold a maximum ten pages.
You can only scroll forwards.
Press the “Busy display” key (BD). The next page
of the busy display appears.
Switching states of the extensions
You can read off the following states of an
extension:
No call number appears.
The extension is free.
01
The call number is displayed.
The extension is talking to an internal
partner.
10
The call number is displayed inversely.
The extension is talking to an external
partner.
Page 57
Closing the busy display
You can close the busy display by scrolling through
the pages up to the last page with the “Busy display” (BD) key. After the last page, the busy display closes.
or
Press the “Close” key. The window of the busy display is closed.
If you end a call with the “End” key, the busy display closes.
or
The display time for the busy display can be set by
your revisor.
Finding a free extension with the busy display (“Flying connection”)
Your operator set can be set up so that the busy
display appears automatically when the dialled internal call number can be assigned to a section of
the busy display.
Example:
A busy display for the range 100 to 149 is set up.
You select an internal extension and enter the as
yet uncompleted call number 11. The busy display
appears. You can now see immediately whether
the desired extension, e.g. 115, is free or busy.
Page 58
Displaying call charges
The call charges of a current call can be registered at any time. The charges are not saved.
If a printer is connected to your operator set, you can print out the charges.
Registering charges
U. Glaser 123
Internal call
HUTT
waiting
Exn 43
Trunk outgoing 135860
06. Mar 11:55
am
St
You have seized a trunk line for an extension in
your telephone system.
pm
NY
Conn
Disc
List
Iden
Rng
Mute
Free DTMF Tape
Chg.
Press the “Charges” key. The charges of the
current call are then registered.
Note:
You can start call charge registration at any time
during a current trunk call.
Page 59
Displaying call charges
The extension has ended its trunk call. Your operator set reports a charge call.
Press the “Chg ans” key.
U. Glaser 123
1
06. Mar 11:55
am
St
2100 dialled business
07111358610
LN
: 1600
Cost center : 001815
Units
: 18
Amount : 2.16
pm
NY
The following information appears in the display:
Call numbers of the extensions,
business or private
Line,
Cost center,
Units and the costs of the call.
To print out the charges, press the “Print” key.
The charges are printed. The process is terminated.
Press the “Close” key if you do not want to print.
Page 60
Speed dialling through the central trunk (Code dialling)
Customer service has stored some call number in your telephone system. You can dial these numbers by entering
fixed code numbers.
Dialing by code
Press the “Code dialling” key. This starts code dialling.
e.g.
.
U. Glaser 123
Code dialling 22
Dial
2
2
06. Mar 11:55
am
St
pm
NY
Conn
Disc
List
Iden
Rng
Mute
Enter the code number, e.g. 22. This is displayed
as a check.
The full call number is dialled automatically.
If the extension is free you can hold your conversation.
Note:
If a call number has not been stored completely,
the note “Postdial” appears. You can then post-dial
the additional digits.
Free DTMF Tape
Code
Page 61
Short dialling with destination keys (destination dialling)
You can save frequently used call numbers and dial them easily later with a destination key. It is advisable to use
an additional display and control module – a DSS module – for destination dialling keys. Up to two DSS-modules
can be connected to your operator set.
Every DSS-module contains 36 keys. A key can be assigned a function, a macro or a destination.
A LED is integrated in every key. This signals different states.
Dialling an extension with destination dialling
Press the desired destination dialling key.
The stored call number, whether internal or
external, is dialled automatically.
Display status of an internal extension
If a key of a DSS module is occupied with an
internal extension, the built-in LED signals the
conversation states of the extension.
The LED shows the following states:
off
lights
flashes slowly
Internal extension is free.
Internal extension holding a conversation.
Internal extension is holding a conversation.
Page 62
Save destination dialling (Setup)
You can save frequently used call numbers as destination dialling. Destination dialling keys are created, changed
and saved in the Setup menu. For the Setup menu you require the appropriate class of service. You cannot create
destination dialling keys if you only have the Assistant class of service.
Start Setup
End an active conversation. Press the “Disconnect”
key. You must disconnect your operator set from
the call distribution to be able to use Setup.
Press the “Setup” key. The Setup menu appears.
Setup U. Glaser 123
In the Setup menu you can edit destination dialling
keys and view the terminal ID, Your operator set
can manage up to 1000 destinations.
Your user name is displayed.
Please select a function
Dest
Pass
Page 63
Start key selection
Dest
Ass
You can now create, change or delete destination
dialling keys.
Key selection
Abt Christian
Ammann Edgar
Auer Tina
Bauer Peter
Belinski Ute
Bunsen Karl
Byziow Sabine
Dorne Dieter
Bitt
Rem
New
Del
Press the key “Dest”.
The destinations are shown in alphabetical order.
Edit
Create a destination dialling key
New
Press the “New” key to create a new destination
dialling key.
Key selection
Abt Christian
Ammann Edgar
Auer Tina
Destination dialling input
Bit
A
B
Text:
RNr.:
C
D
E
ABC
F
G
H
Page 64
e.g. Bosse, Carsten
Enter a name.
Move the cursor to the next line.
Enter the call number with the numeric keys.
e.g.
.
3
6
ABC
With the “ABC” key, switch between the character
lines “A to H”, “I to P”, “Q to X” and “Y Z * + . : /”.
With the “Shift” key, switch between capital and
small letters.
With the “Delete character” key, delete the last
character.
Move the cursor to the left and right with the arrow
keys.
Acknowledge your inputs with the “Ok” key.
Press the “Close” key to close the input window.
Assigning a destination dialling key
After you have entered a new destination dialling,
you can assign this destination to a free key of the
operator set or an additional module (DSS).
Page 65
Mark the desired entry with the pointer.
Ass
Press the “Assign” key.
Press the desired free key.
Press the “End” key to close the process.
Note:
You need not assign a destination dialling to any
key. You can then use the destination dialling with
the telephone book function.
Changing a destination dialling key
Mark the desired entry with the pointer.
Edit
Press the “Edit” key to change a destination dialling
key.
Change the entries.
Confirm your entries with the “Ok” key.
Press the “Close” key to close the input window.
Page 66
Deleting assignment of a destination dialling key
You can delete the assignment of a destination
dialling key. A key on the operator set assigned this
destination is then free.
Rem
Press the “Remove” key. The assignment of the
destination key is deleted.
Press the key you want to delete.
Press the “End” key to terminate the process.
Removing a destination dialling key
You can delete a destination dialling key. The destination dialling is removed from the key selection
and a key of the operator set assigned this destination is free.
Del
Press the “Delete” key.
If you really want to delete the element, press the
“Ok” key.
You can cancel the process with the “Close” key.
Page 67
Scrolling in the key selection
You can scroll backwards and forwards one page
with the double arrow keys.
With the triple arrow keys, you can scroll about 50
entries forwards or backwards if they are available.
Ending key selection
Press the “Close” key to end the key selection.
Viewing the terminal ID
You can view the terminal ID in the Setup menu.
The terminal ID tells you about the hardware and
software of the operator set.
Pass
Press the “Pass” key in the setup menu.
Press the “Close” key to close the window
Terminal ID
Ending Setup
Press the “Close” key to end the Setup mode.
Your changes are saved.
Conn
Log in to the call distribution again with the
“Connect” key.
Page 68
Using the electronic telephone book
Your operator set is equipped with an electronic telephone book. This enables you to dial a desired extension
comfortably by means of names or parts of names. The electronic telephone book distinguishes between local
and central electronic telephone book (option). The operation is the same for both. You can add or change entries
in the local telephone book in the Setup menu.
Calling the electronic telephone book
Press the “Telephone book” key. The interface of
the telephone book appears.
U.
11:55
am
St
Electron. phone book
Name :S
Sander Babette
Sauerwein Hans
Schmid Georg
Schmidt Gerhard
Schmitt Heinz
Schmitt Holger
A
B
C
123
D
In the “Name:” line you can enter a search term.
A maximum of 6 entries for the search term are
displayed.
pm
NY
E
ABC
F
G
H
Page 69
Entering the search term
e.g.
S
ABC
Enter a search term with the letter keys. No distinction is made between capital and small letters. You
can enter a maximum 12 characters.
With the “ABC” key, switch between the character
lines “A to H”, “I to P”, “Q to X” and “Y Z * + . : /”.
Delete the last character with the “Delete character” key.
Selecting an extension
Select the desired entry with the arrow keys.
A cursor (hand) points to the selected entry.
Press the “Select” key or lift the receiver.
The displayed call number is selected automatically.
Page 70
Switching between name and call number
You can display the call number of the marked
extension.
123
Press the “123” key. The call number of the entry is
displayed. Press the “123” key to display the name
again.
Scrolling in the telephone book
Scroll with the arrow keys if there are more than six
entries for your search term in the telephone book.
Calling the central telephone book
A central telephone book must be set up in your
telephone system. Press the “CTB” key. You
search in the central telephone book.
Exiting the telephone book
Press the “Close” key. You end the telephone book
function. The search term is saved. These entries
are displayed again when you call the telephone
book.
Page 71
Additional information about connections
You can show different information on individual connections on your display. Apart from the call number, for
example, the name of an internal extension. This information must have been centrally programmed in your
telephone system.
Displaying various information
U. Glaser 123
Internal call Ext 43
Conversation HUTT U.
06. Mar 11:55
am
St
You see the call number of an extension in your
telephone system in the display.
pm
NY
Conn
Disc
List
Rng
Mute
Free DTMF Tape
Iden
Press the “Identify” key. You will see the name of
the extension.
Page 72
U. Glaser 123
Internal call HUTT U.
Conversation Ext 43
06. Mar 11:55
am
St
If you want to see the call number again, press the
“Identify” key again.
pm
NY
Conn
Disc
List
Rng
Mute
Free DTMF Tape
Iden
Information
You can switch between the following displays at
will (if they are programmed in the telephone
system) with the “Identify” key:
Extn
LN/Tie
Pos.
Tr. grp.
CW
Divert
Ref-back
Call number / Name
Line / Tie line
Position call number
Trunk group number
Code dialling
Diversion destination
Refer back
Page 73
Dialling a call number again (Last number redial)
With your operator set you can simply redial a call number you have already dialled once. You have the following
posssibilities:
dial the last internal or external call number again or
dial a certain saved call number again (extended last number re-dial).
Dialling the last internal call number again
Press the “Internal” key, then the “Redial” key.
The last internal call number is dialled again automatically.
Dialling the last external call number again
Press the “External” key then the “Redial” key.
The last external call number is dialled again automatically.
Dialling the last call number again
Press the “Redial” key twice.
The last call number, irrespectively of whether it is
external or internal, is dialled again automatically.
Page 74
Saving the call number for extended last number redial
Press the “Redial” key. The window “Ext. redial”
appears.
Either the last dialled number or the call number of
the extension during a conversation appears next
to the telephone symbol. You can save this displayed call number specifically.
U.
11:55
am
St
Ext. redial
: 007111358693
1 : 2115
2:
3:
4:
5:
6:
pm
NY
Press the “Save” key to change to the save mode.
e.g.
3
Press one of the numeric keys one to six, e.g. 3.
The displayed call number is saved under the selected memory number.
Press the “Back” key. You can now dial the saved
call number.
Page 75
Dialling a call number again with extended last number redial
Press the “Redial” key. The window “Ext. redial”
appears. You can dial one of the saved call numbers specifically.
U.
11:55
am
St
Ext. redial
: 00711123456
1 : 2115
2:
3 : 00711358693
4:
5:
6:
For example, you want to dial the call number of
the third memory number again.
pm
NY
e.g.
3
Press the numeric key for the desired call number,
e.g. 3. The call number is dialled automatically.
Page 76
Deleting all saved call number in the last number redial memory
Press the key “Delete all entries”. All entries of the
extended last number redial are deleted.
Closing the window of the extended last number redial
Press the “Close” key. The window of the extended
last number redial is closed.
Note:
The window closes automatically after 20 seconds.
Page 77
Calling someone anonymously
Part of the scope of features of the ISDN network is that your call number is displayed to the called extension if it
has a comfort telephone. You can suppress your internal call number. Only the general call number of your
telephone system is sent. The “Anonymous” function key must be set up.
Suppressing your internal call number
Anon
Press the “Anonymous” key.
12..
The symbol indicates that the internal position call
number is not sent when dialling.
Dial an internal or external extension as usual.
Your internal position number is suppressed.
Sending your internal call number again
Anon
Press the “Anonymous” key again. Your position
call number is sent again when dialling.
Page 78
Switching over trunk line COS
You can switch over the programmed trunk line COS in your telephone system. The individual changes are
determined by your revisor.
Switching over trunk line COS
COSc
U. Glaser 123
Press the “COS change” key. This initiates programming.
06. Mar 11:55
am
St
COS
pm
NY
active: no
To change the COS, press the “Ok” key. The COS
is changed over in your telephone system.
End the procedure with the “Close” key.
Page 79
Setting tones and calls
You can set the volume of the handset, the loudspeaker and the sound and the frequency of the ringer on your
operator set. The settings are only active until you close the operator set.
Switching on the acoustics menu
Press the “Acoustics” key.
U. Glaser 123
06. Mar 11:55
am
St
Acoustics
The acoustics menu appears.
pm
NY
Page 80
Setting volume of the handset
With this setting you change the volume of the
loudspeaker in the handset. Press the “+” key to
increase the volume, with the “–” key, the volume is
reduced. Your setting is displayed immediately as a
bar.
Setting the volume of the loudspeaker
With this setting you change the volume of the
built–in loudspeaker. Press the “+” key to increase
the volume, with the “–” key the volume is reduced.
Your setting is shown immediately as a bar.
Setting the volume of the ringer
With this setting you change the volume of the
ringer. Press the “+” to increase the volume, with
the “–” key the volume is reduced. Your setting is
displayed immediately as a bar. The changed ringing sound is transmitted for checking.
Page 81
Setting the melody of the ringer
With this setting you change the frequency of the
ringer (ringing). Press the “+” key to increase the
frequency, with the “–” key the frequency is reduced. Your setting is displayed immediately as a
bar. The changed ringing melody is transmitted for
checking.
Closing the acoustics menu
When you have set all tones and calls as you wish,
press the “Close” key or the “Acoustics” key again.
The acoustics menu closes.
Note:
The acoustics menu closes automatically if you do
not make any changes within 20 seconds.
Page 82
Switch off the ringer
You can temporarily switch off the ringer. A call is then only shown by a message in the display. After about tens
seconds, the ringer switches back on again automatically.
Switching off ringer
Rng
Press the “Ringer” key. The ringer is switched off.
The symbol “Ringer off” appears.
Switching on the ringer
Rng
Press the “Ringer” key again. The ringer is
switched back on.
Page 83
Transmitting special dialling signals (DTMF dialling)
You can also send DTMF dialling signals with your operator set. DTMF means dual tone multifrequency dialling.
You need DTMF signals for example for City call, answerphones or other special services. The function key
“DTMF transmitter” must be set up.
Switching off the DTMF transmitter
DTMF
Press the “DTMF transmitter” key.
The “DTMF signalling” symbol appears.
e.g.
2
You can also transmit DTMF signals with the numeric keys. The special keys “*” and “#” can also
be used.
DTMF
Press the “DTMF transmitter” key again to switch
off the DTMF transmitter.
Switching off the DTMF transmitter
Page 84
Using recorders (Tape recorder)
A recorder, e.g. a tape recorder, can be connected to your operator set. Your operator set can be set so that the
recorder starts automatically at the start of the conversation and stops at the end of the conversation. You can
also control the recorder manually. The function key “Tape connection” must be set up.
Switching on the tape recorder
You are holding a conversation and want to record
it.
Tape
Press the “Tape connection” key.
The symbol “Tape connection” appears.
Switching off the tape recorder
Tape
Press the “Tape connection” key again to end recording.
Page 85
Tones and calls
Apart from the call tone there are a number of other acoustic signals which inform you of various telephone
procedures.
You can listen to and change all settings for the tones in the „Set acoustics” menu, see Page 80.
Tones for internal and external calls
Normal call tone for external calls:
You can switch off this tone
Normal call tone for internal calls.
You can switch off this tone
Alert tone:
additional call during a
conversation.
Page 86
Tones in the handset
Tone during a cut-in connection.
Signal tone:
when switching on monitoring,
handsfree and diallling with the handset on-hook.
The partner also hears this tone.
Page 87
Messages
Your display helps you to operate your operator set. In the following list you will find the most important display
messages.
Trunk seizure
A semi-restricted extension wants a trunk line.
Code dialling
You have started the “Code dialling” function.
Assist
An extension calls you in refer-back.
Assist call
A call you have transmitted is not answered and is returned.
D-channel connection
disturbed
The connection of your telephone to the telephone system is interrupted.
Hold call
You keep a caller on hold whom you cannot place immediately.
Conference
You take part in a three-party conference with two other extensions.
Chain call
An extension wants to be connected to several connections one after another.
You initiate a chain call.
Station call
You are called by an external or internal party with your station call number.
Only station calls are saved in the call list.
Station transfer A trunk call is transferred to you by station transfer.
Recall
The called extension has not answered a trunk call.
Page 88
Help with operation
Look at this page first if you need help with the operation of your operator set.
You are called whilst programming a destination dialling in Setup
Press the “Close” key. The Setup menu is closed.
You can answer the call.
“Overload” appears at the position of the international times
If a caller has to wait more than 40 seconds or or there are more calls waiting in the
call distribution than operator sets are connected, the display “Overload” appears in
the position of the international times.
The name of an internal extension is not displayed
Press the “Identify” key. If this does not help, the name is not stored in your telephone system.
In the event of a power failure
If the power supply to your operator set has been temporarily cut off, your set reestablishes the connection automatically to the telephone system. If your operator
set is still not ready to operate, inform your revisor.
Unknown display
Consult chapter “Messages” to find out what this display means.
Page 89
Notes on assembly and care
Mounting
Mount your operator set in a suitable popsition. Make sure the operator set is not
exposed to direct sunlight.
Mount the set where it cannot be splashed with water or chemicals.
Your operator set is designed for normal operating conections. Modern furniture is
coated with numerous varnishes. It cannot be ruled out that some of these substances contain constituents which attack and soften the feet of the operator set.
The feet may then leave unwanted marks on furniture surfaces.
BOSCH TELECOM is not liable for such damages for obvious reasons. Therefore
use a non-slip pad underneath your operator set especially on new or polished
furniture.
Care
Only clean your operator set with a slightly damp cloth or with an antistatic cloth.
Do not use a dry cloth or chemicals!
Make sure that no damp can penetrate your set.
Page 90
Please note:
This telephone is designed for connecting to BOSCH TELECOM telecommunications
systems only. It may not be connected directly to a public telephone network.
This telephone only complies with the European regulations for safety and electromagnetic compatibility when connected to BOSCH TELECOM telecommunications
systems.
Repairs and manipulations of the operator set may only be carried out by an expert.
Do not open the operator set. This could cause damage which render the operator
set incapable of operation.
Page 91
Glossary
B
Brokerage
You can hold up to two partners
and speak alternately with each
party.
C
Call distribution
Several operator sets can be
connected to your telephone
system. All these sets are
logged into the call distribution
and can be reached under a
common number. The operator
sets can be set up so that one
operator set receives external
calls and another internal calls.
Caller identification
The caller identification is a
feature of the ISDN network.
The call number, the name and
the connection type are
displayed.
Call types
Your operator set distinguishes
between the various call types
(internal, external, etc.). Your
revisor can set up a defined
answering key for every call
type. In this way you can
answer a specific call when
several calls are waiting.
City call
Radio call system which covers
one or more regions (tones,
digits, texts).
Class of service
Your operator set distinguishes
between four classes of
service. These are revisor,
supervisor, operator and
assistant. You can change
options of the operator set
depending on the class of
service.
Collective call
Several telephones in a
telecommunications system
can be called internally. The
extension which lifts the
receiver first receives the
incoming call.
CTB
Central TelephoneBook: The
central telephone book is a
database application for finding
and dialling internal and
external call numbers. The data
are on a personal computer. An
application is installed on this
personal computer which
allows access to these data by
the telephone system.
Cut in
Possibility in
telecommunications systems of
cutting into an existing
conversation. This is signalled
acoustically.
D
DTMF
Dual Tone
MultiFrequencydialling.
Transfer the dialling signals as
a frequency combination.
Page 92
E
I
N
Extended last number re-dial
An unsuccessfully dialled call
number is “parked” in a
memory in the operator set. It
can be re-dialled later even
when you have called other
numbers in the meantime.
ISDN
Integrated Services Digital
Network: A network which
integrates all services and
features.
Night circuit
Calls arriving out of office hours
are transferred to a certain
extension which is still manned
or to an answerphone.
H
Monitoring
All the persons in the room can
listen in to a telephone
conversation but not speak.
Muting the microphone (Mute)
The coversation partner on the
telephone cannot listen to
confidential conversations with
other people in the room.
Handsfree
You can hold a telephone
conversation without lifting the
handset. Other persons in the
room can then participate in the
conversation.
Handset and speech equipment
Combination of headphones
and microphone as a useful aid
for all frequent telephone users
to keep their hands free for
making notes.
Hook switch
On /off switch on the cradle of
the operator set (telephone
hook).
M
Page 93
S
T
Semi-restricted
An extension of your telephone
system dials a trunk line with a
code. The extension is
semi-restricted, however, the
call is diverted to the operator
set. You answer the call and
assign a trunk line to the
extension.
Station call number
The station call number is the
physical address of your
operator set. An extension can
call you specifically under this
number.
Three-party conference
The three-party conference is a
telephone conversation with
three extensions which can
speak to each other at the
same time.
Trunk group
One trunk group covers several
trunk lines and tie lines. Your
operator set shows you
whether a trunk group is busy,
barred or free.
Trunk line
Connection between
telecommunications system
and operator position of the
public network.
Page 94
Index
A
Acoustics, 14, 80
Additional information, 72
Anonymous, 11, 15, 78
Answer, 14
Answering side, 9
Assembly, 90
Assignment side, 9
Assist, 51, 88
Assistant, 19
Automatic answering, 12
B
Break, 25
Brokerage, 92
Busy display, 14, 56
C
Call charges, 14, 16, 59
Call distribution, 92
Call list, 10, 15, 54
Call number, 73
dial again, 74
Call type, 92
Calls
answering specifically, 32
assist, 46
internal, 47
keep waiting, 44
switching, 33
Care, 90
Chain call, 16, 40
City call, 92
Class of service, 16, 19, 63, 92
Code dialling, 16, 61, 73, 88
Collective call, 92
Conference, 16, 36, 88
Configuration, 19, 20
Connect, 16
Contrast, 8, 14
CTB, 92
Cut in, 16, 92
D
Destination dialling, 62, 63
Disconnect, 14, 16
Display, 8
Diversion destination, 73
Do not disturb, 35
DSS module, 15, 62
DTMF, 16, 84, 92
DTMF transmitter, 11
E
Emergency call, 24
End, 14, 30
F
Features, 6
Flying connection, 58
H
Handset, 81
Handsfree, 11, 16, 31, 93
Date, 9
Page 95
Hash, 13
Hold, 16
Hold call, 42, 88
Hold field, 15, 45
Hook switch, 93
I
Identification, 72
Identification number, 9, 21
Identify, 16
Internal, 14, 26
International time, 12
ISDN, 93
K
Keys, 13
L
Last number redial, 14, 74, 93
LED, 62
Line, 73
List, 15
Lock, 23
Override, 16, 35
Overview, 5
Login, 21
Logout, 14
Loudspeaker, 30
P
M
Melody, 82
Menu keys, 18
Menus, 12
Messages, 88
Microphone, 10, 30, 93
Monitoring, 10, 31, 81, 93
Mounting, 90
Mute, 16
Pause, 10
Personal computer, 20
Post–dialling, 61
Power failure, 89
Preview, 9
Program. See Operator Set Manager
R
Recall, 15, 38, 88
Refer back, 51
Refer–back, 73
Revisor, 19
Ringer, 10, 17, 81, 83
Ringing, 82
N
Name, 73
Night circuit, 93
Night service, 9
O
Operator, 19
Operator Set Manager, 20
Overload, 89
S
Semi–restricted, 94
Setup, 14, 19, 63
Page 96
Signal tone, 87
Signals, 86
Speaker, 14
Speech equipment, 11, 17, 30, 93
Speed dialling, 61
Standard assignment, 8, 17
Star, 13
Station
answer call, 15
call number, 73
transfer, 15
Station call, 48, 88
Station call number, 94
Station transfer, 52, 88
Status line, 9
Supervisor, 19
Trunk line, 49, 94
T
Tape connection, 11, 17, 85
Tape recorder, 85
Telephone book, 14, 15, 69
Telephoning, normally, 26
Terminal ID, 68
Three–party conference, 36, 94
Tie line, 73
Time, 9
See also International times
Transfer, 14
Trunk, 14, 26
Trunk group, 14, 28, 50, 94
Trunk group number, 73
U
Unlock, 21
User interface, 8
User line, 9
User name, 9
V
Volume
Handset, 81
Loudspeaker, 81
Ringer, 81
Page 97
Page 98
Page 99
An ecological hint
Do not glue stickers to your telephone.
Telephone castings with stickers cannot be recycled later on and
will thus unnecessarily contribute to polluting the environment.
Thanks for your environment-conscious behavior.
These operating instructions have been printed with cadmium-free
colors on environment-friendly paper bleached without chlorine,
and can therefore be fully recycled.
28.0001.1849
08/96
Freephone Info-Service
Telephone 01 30–26 61
Telefax 01 30–86 00 14
D–60277 Frankfurt am Main
Modifications reserved