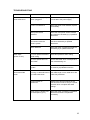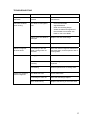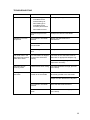
1
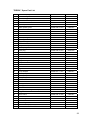
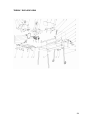
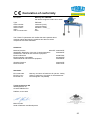
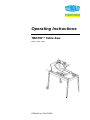
Operating Instructions
TBE350** Table Saw
Index / Indice «000»
10981449 en / 06.06.2009
Manufacturer's address:
TYROLIT Hydrostress AG
Witzbergstrasse 18
CH-8330 Pfäffikon
Switzerland
Tel. +41 (0)44 952 18 18
Fax +41 (0)44 952 18 00
www.hydrostress.com
TYROLIT Hydrostress AG reserves the right to make technical changes without prior notice.
Copyright © 2003 TYROLIT Hydrostress AG, CH-8330 Pfäffikon ZH, Switzerland
All rights reserved, in particular copyrighting and translating rights.
Printing of this operating manual, including extracts from it, is prohibited.
No parts of it may be reproduced in any form or processed using electronic systems, duplicated
or disseminated without the written permission of TYROLIT Hydrostress AG.
2
TBE350** Owner manual text
TABLE OF CONTENTS
Contents……………………………...........
3
Safety precautions………………………..
4
General safety rules…………………….
5
Health warnings………………………….
5
Unpack, assembly & set-up…………….
6
Diamond blade installation……………...
6
Inspection & specification……………….
7
Features……………………………………
8
Cutting table assembly………………….
9
The rip guide…………………………….
10
Cutting depth……………………………...
10
Water pump installation………………….
11
Slide-In legs………………………………
12
Electric motor specifications…………….
13
Do’s & Don’ts for blades…………………
14
Saw maintenance…………………………
15
Troubleshooting…………………………..
16
Customer service…………………………
19
Contact us…………………………………
19
Warranty……………………………………
20
Spare parts list……………………………
21
Explode view…………………………….
22
3
SAFETY PRECAUTIONS
Saw blade should be inspected daily for excessive wear, core cracks, and arbor
damage. Replace any blade that shows signs of damage.
•
To mount blade, clean arbor and outer flanges, tightening nut securely.
•
DO NOT place any portion of body in line with blade while it is rotating.
•
To reduce risk of electrical shock, it is recommended to use GFCI and refer
servicing to qualified professional.
We recommends the use of these safety items when operating the saw:
USE PROPER GROUND CICUIT !
USE BLADE GUARD WHEN OPERATING SAW !
ALWAYS WEAR SAFETY GEAR !
4
GENERAL SAFETY RULES
•
•
•
•
•
•
•
•
•
•
Never use the machine improperly or work in an unsafe manner.
Always wear safety goggles, dust mask, and ear protection while operating
the saw (to comply with ANSI-Z87.1).
Always remain alert when the saw is in use. Failure to pay attention on the
operator’s part may lead to serious injury.
Before you start working, familiarize yourself with the work site and its
surroundings. Take notice of circumstances, which may impede working or
traffic, observe soil conditions (good bearing or not), and take measures to
ensure safety (i.e. the shielding of road works from public traffic).
Take measures to ensure that the machine is in a safe and trouble-free
condition prior to usage. Use the machine only when all protective devices
(i.e. guards, noise absorbers, emergency-off devices) are operating in the
intended locations.
A visual check of the machine must be made at least once a shift to ensure
that visible damages or faults are recognized. Any changes (including
changes in the performance or behavior of the machine) must be reported to
the supervisor. If necessary, stop the machine at once and secure it.
In the case of a malfunction, stop the machine immediately and secure it. Fix
the problem as soon as possible.
For starting and stopping the machine follow the operating instruction steps
and observe any indicator lights.
Before switching the machine on make sure that the activated machine will be
of no danger to anyone.
Be sure to connect the plug to a properly grounded receptacle to reduce the
risk of electric shock.
HEALTH WARNINGS
Some dust are created by power sanding, sawing, grinding, drilling, and cause
other construction activities contains chemicals known to cause cancer, birth
defects or other reproductive harm. Some examples of these chemicals are:
•
•
•
Lead from lead based paints.
Crystalline silica from bricks and cement and other masonry products.
Arsenic and chromium from chemically-treated lumber.
Your risk from these exposures varies, depending on how often you do this type
of work. To reduce your exposure to these chemicals: work in a well ventilated
are, and work with approved safety equipment, such as those dust masks that
are specially designed to filter out microscopic particles.
5
UNPACKING, ASSEMBLY & SET-UP
Open the container, carefully lift the saw frame handles and place it on a flat,
level working area. Be certain that you have the following items before you
discard the container:
•
•
•
•
Saw
45° / 90° rip guide
Universal wrench
Owner’s manual
DIAMOND BLADE INSTALLATION
1. Move the blade shaft cover upwards.
To remove the blade lock nut, open
the shaft space.
2. Place the blade onto the blade shaft.
Make sure that the directional arrow is
pointing in the direction of the shaft
rotation
3. Lock the blade lock nut with the outer
flange. Use the multiple wrench
provided to fasten the blade tightly
6
INSPECTIONS & SPECIFICATION
The compact TBE350** table saws are
shipped completely assembled and ready
for use except for the diamond blade.
Inspect the saw for shipping damage. If any
damage is found, contact the shipper
immediately and file a freight claim. We are
not responsible for any freight related
damages. Remove the saw from the
shipping container.
TBE350** SPECIFICATIONS
Power
2,2 kW
Volts
230 V (110 V)
Amps
10 A (20)
Cycles
50 Hz (60 Hz)
Blade Shaft Speed
2,800 rpm
Max. Blade Size
15,7” / 400 mm
Arbor Size
1” / 25,4 mm
Max. Cutting Length
23,6” / 600 mm
Length
1140 mm
Width
640 mm
Hight
1230 mm
Wight
79 Kg
NOISE LEVEL AND VIBRATIONS
Parameter
Wert
Noise level at the ear of the user (Leq)
81.9 dB(A)*
Noise level at workplace (LPA)
69.3 dB(A)*
Sound power level in acc. ISO 3744 (LwA)
89.3 dB(A)*
Vibrations DIN EN ISO 5349-2
< 2.5 m/s²
*Value applies under the following condition: With Sawblade Ø350mm Type
EB No. 5696.
Higher noise levels may be generated in cutting operation.
ATTENTION! Hearing protection must be worn when 90 dB(A) is exceeded!
7
FEATURES
The TBE350** table saw is designed for the professional contractor in mind. It
enhances performance with a multitude of features facilitating operation.
8
CUTTING TABLE ASSEMBLY
To install the cutting table to the machine:
1. Set the cutting table on the rails
2. Install the screw and brackets to
the cutting table
3. To remove the cutting table do
the reverse of the above two
steps.
THE CUTTING TABLE
Features:
•
The heavy-duty cutting table with
steel wheels provides the durability
to handle large materials.
Only use the Ø14" (350 mm) blade for this saw. Setting smaller size of
diamond blade may grab the material being cut, causing damage and
possibly injury.
USE PROPER GROUND CICUIT !
USE BLADE GUARD WHEN OPERATING SAW !
ALWAYS WEAR SAFETY GEAR !
9
THE RIP GUIDE
Steps to use the 45º / 90º rip guide
1. Set the rip guide by positioning it on the desired dimension and tighten the
threaded knob. Make sure that the rip guide is firmly tightened to avoid
slippage. The rip guide can be used for 90º rip cuts and 45º angle cuts from
both the left and right side. (Note the straight and 45º angled slits on the
bottom of the rip guide
2. After the rip guide is positioned for the desired cut, place material flat against
the rip guide and the measurement rail. After the rip guide is positioned for
the desired cut, place material flat against the rip guide and the measurement
rail. For 45º rip cuts, place the corner of material in the open slot of the
measurement rail.
3. Simply line up the material being cut with the appropriate pre-marked lines on
the cutting table.
4. Now you are ready to make your cut
CUTTING DEPTH
The recommended cutting depth is ¼" below the cutting table surface. The
cutting clearance has been fixed from original designed.
Only use the Ø14" (350 mm) blade for this saw. Setting smaller size of
diamond blade may grab the material being cut, causing damage and
possibly injury.
max. Blade Diameter
400 mm
max. Cutting Depth
120 mm
10
WATER PUMP INSTALLATION
1. Remove the water pump from the box and check that it is not damaged.
2. Place the pump into the middle of the water tray along its side so that the
water outlet is positioned horizontally. Connect the water hose from the blade
guard to the pump and plug the power cord into the 3-prong receptacle.
3. Fill the water tray so that the water intake is fully immersed.
4. Be sure to support the pump during installation to prevent pump failure or
damage.
Disconnect the pump before attempting to handle the pump.
Never operate pump without water in the tray
11
SLIDE-IN LEGS
1. Slide each of the four legs into the housing at the four corners of the saw
frame.
2. After sliding the leg as far as possible, lock the leg in place with the ring bolt
located on the leg housing.
12
ELECTRICAL MOTOR SPECIFICATIONS
Features:
Power
Volts
Amps
otor RPM
Cycle
2,2 kW
230 V (110 V)
15 Amps (30A)
2800 RPM
50 Hz (60 Hz)
Recommendations:
It is recommended that a 15 A (30 A) CIRCUIT be used while operating this saw.
This will prevent any loss of power or interruption.
Always plug saw as close as possible to the power source while operating. This
will allow you to receive optimum electricity.
To avoid permanent motor damage you must use the correct extension
cord. Never use more than one extension cord at a time. Follow the
chart for proper size:
Wiregauge
Length of cord
Ø5 mm (Ø10 mm)
Ø8 mm (Ø16 mm)
Ø15 mm (Ø32 mm)
2,2 kW – 230 V (110V)
8m
15 m
20 m
13
DO’S AND DON’TS FOR BLADES
WET CUT BLADES
DO'S
• Inspect blades daily for cracks or uneven wear.
• Always use appropriate blade for material being cut.
• Inspect arbor shaft for uneven wear before mounting blade.
• Always use blades with the correct arbor shaft size.
• Ensure that blade is mounted in the correct direction.
• Secure the blade to the arbor with a wrench.
• Use proper safety equipment when operating the saw.
• Periodically check the blade for cracks or bond fatigue.
• Always have a continuous flow of water on both sides of blade.
DON'TS
• Do not operate the saw without safety guards in position.
• Do not operate the saw with blades larger than Ø 15,7" (400 mm)
• Do not cut dry with blades marked "Use Wet".
• Do not exceed manufacturer's recommended maximum RPM.
• Do not force blade into material let blade cut at its own speed.
DRY CUT BLADES
DO'S
• In addition to the following, always follow wet recommendations.
• Use appropriate blade for material being cut.
• Inspect segment blades for segment cracking or loss.
• Do not use damaged blades.
• Use proper safety equipment when operating the saw.
DON'TS
• In addition to the following, always follow wet recommendations.
• Do not make long cuts with dry blades--allow them to air cool periodically.
• Do not use the edge or side of blade to cut or grind.
• Do not attempt to cut a radius or curve.
• Do not cut too deep or too fast into the material.
• Do not cut any material not recommended by blade manufacturer.
14
SAW MAINTENANCE
Maintenance interval
Wath to do for maintenance and care
After ecery use ot the
machine
-
Remove dirty water from container.
-
Remove dirt and mud from the bottom of the container
-
Rinse teh immersion pump with fresh water to prevent water
pump dogging from residual dirt.
After wet clearing and
before using the machine
again
Connect the machine to an electric power outlet equipped with
a“GFI” safety power breaker. If the safety power breaker cuts off
the electrical power supply, do not try to operate the machine but
have it checked by an authorized dealer first.
Before not using the
machine for a prolonged
period of time
Clean and lubricate all movable part.
Before not using the
machine for a prolonged
period of time
-
Check that the stand is safely fixed.
-
Check that all screw joints and nuts are fixed.
-
Check that the roller table is in its guides and that it easliy
moves to and fro.
-
With the saw blade removed, switch on the motor for an
instant and switch it off again. If the motor does not run, have
the machine inspected by a qualified electrician.
-
Check that the immersion pump works properly. Turn on the
cooling water tap and switch the machine on. If the pump
does not give any water or only a little, switch the machine off
at once. Clean the pump, or replace of necessary.
Ambient temperture
below 0°C
(operation in winter)
To prevent the water in the pump and cooling system from
freezing, remove the water after using the machine or when there
will be a long break. Make sure that the cooling system is entirely
drained so that there is no water left inside the pump, water hose
and bearing housing
For your safety, before performing any maintenance on the saw turn off
the power switch and unplug the power card
15
TROUBLESHOOTING
Problem
Possible cause
Solution
Machine does not run
when switched on
Power cord not properly
fixed / plugged in
Check that the machine is properly
connected to the power supply.
Power cord defective
Have the power cord checked, replace
if necessary.
Main power switch
defective
Have the main power switch checked
and replace if necessary by a qualified
electrician.
Loose eleectrical
connection inside the
electric system
Have the whole electric system of the
machine checked by a qualified
electrician.
Motor defective
Have the motor checked and replace if
necessary by a qualified techician.
To much pressure exerted
while cutting
Exert less pressure when cutting
Incorrect specification for
saw blade
Use a saw blade which corresponds to
the material being cut
Saw has a defective electric
system
Have the electric system of the saw
checked by a qualified technician
Power cord/extension cable
too long or cable still wound
up inside cable drum
Use a power cord/ectension cable of
the rated length, use a cable drum with
cable fully extended
Power network is
insufficient
Observe the electrical ratings of the
machine and connect it only to a power
network which complies with these
ratings
Drive motor no longer runs
at rated speed (r.p.m.)
Have the motor checked by a qualified
electrician and have it replaced if
necessary
Motor stops
(power cut out)
Poor machine
performance little
power
16
TROUBLESHOOTING
Problem
Possible Cause
Solution
Irregular run of the
saw blade
Poor tension in the blade
material
Return the saw blade to the
manufacture
Saw blade wobbles
when running
Saw blade is damaged or
bent
-
Have the saw blade
aligned/flattened
-
Clean the receiving flange
-
Solder the diamond segments of
the old blade onto another swa
blade or use a new blade
Flange of the saw blade is
damaged
Replace the saw blade flange
Shaft of the motor is bent
Replace the electric motor
Diamond segment
becomes loose
Overheating of the saw
blade, cooling water not
sufficient
Have the diamond segment soldered on
the blade again, ensure optimum flow of
cooling water
Excessive wear
Wrongtype of saw blade
Use harder saw bldes
Shaft of motor causes
wobbling
Have bearings of the motor or the motor
replaced
Overheating
Ensure optimum flow of cooling water
Saw blade too hard
Use a softer blade
Fixed flange is worn out
Have the fixed flange replace
Motor shaft bearing
Replace the bearing of the motor shaft
Cracks in or near the
diamond segment
17
TROUBLESHOOTING
Problem
Possible cause
Saw blade is blunt
-
Saw blade type is
unsuitable for the
meterial being cut
-
Saw blade type is
unsuitable for the
machine performance
-
Saw blade too hard
Appearance of cut is
not optimal
The center hole in the
saw blade has become
wider due to wear
Solution
Use appropriate type of saw blade
Diamond segments are
blunt
Sharpen the diamond saw blade
Poor tension in the blade
material
Return the saw blade to the
manufacture
Too much load placed on
the saw blade
Use a suitable saw blade
Diamond segments are
blunt
Sharpen the saw blade
The saw blade has slipped
on the motor shaft when
running
The arbor otr the saw blade must be
fitted with an appropriate adapter ring
Check the receiving flange and have it
replaced if necessary
Saw blade shows
blooming colors
Lateral friction when cutting
The material feed is too high; proceed
more slowly
Grinding marks on the
saw blade
Material is not being feed
parallel to the saw blade
Ensure that the direction of feed is
absolutley parallel to the saw blade
Adjust the roller table/have it adjusted
Poor tension in the blade
material
Have the saw blade tensioned
Too much load on the saw
blade
The material feed is too high, proseed
more slowly
18
CUSTOMER SERVICE
AFTER SALE SERVICE
All customer service (technical questions, re-order of parts, etc.) will be provided
by us.
CLAIMS FOR LOST OR DAMAGED GOODS
If merchandise is delivered in damaged condition or cartons are missing, a
notation must be placed on all papers signed by the receiver. If unreported or
concealed damages are noticed after delivery, the carrier should be contacted by
telephone and if carrier fails to send an inspector within five days, a request
should be made in writing to the carrier, confirming the telephone request for an
inspection.
All requests for credit due to transportation loss or damage should be
accompanied by properly signed papers. A claim for loss or damage must be
filed with the carrier within 60 days from the shipping date for UPS or other
common carriers. Credit cannot be allowed for damage claims that are not
properly substained with supporting papers or received by us too late for timely
filing with the carrier.
CONTACT US
We pride ourselves on our customer service. If you have any questions
regarding our products, whether it may be product inquiry or troubleshooting,
please don’t hesitate to contact us at our corporate office. We will do our best to
answer your questions. In some cases we may even refer you to a local sales
representative that can better service you.
19
WARRANTY
For a period of one (1) year from the original date of purchase, if the product is
determined to be defective, we will repair or replace the product, at its option, at
no charge to the customer, or pay the associated repair costs to an authorized
service facility. All replacement parts, new or rebuilt, supplied at our option for
repairs will be warranted for the remainder of the original warranty period of one
(1) year. All defective products or components replaced under this limited
warranty will become our property. This limited warranty excludes all components
not manufactured by OUR COMPANY, which are listed below with their
corresponding independent warranty periods. Such components are warranted
by their respective manufacturer, whose warranty will be the governing warranty
for that particular product.
Excluded Components
Electric Motors
Manufacturer’s Warranty
1 Year
EXCLUSIONS FROM WARRANTY
We cannot assume responsibility for claims arising from abuse of the our
product:
•
•
•
•
Due to abuse by the Purchaser in their processing.
Due to improper installation practices or procedures.
Due to abuse or improper usage by the end-user.
Due to contaminants, including, but not limited to, exposure to salt or fresh
water, chemicals and any other form of contamination from a source outside
of our control.
LIMITED WARRANT
This product is covered by a one year warranty from the date of purchase. If the
product is defective in workmanship or material, TYROLIT Hydrostress AG will
repair and /or replace it free of charge upon returning the product to
distributor/dealer in its original packaging.
This warranty does not cover normal wear or damage resulting from operator
abuse. TYROLIT Hydrostress AG obligations under this warranty shall be limited
to the repair and/or replacement of the product. TYROLIT Hydrostress AG shall
not be liable for consequential damages resulting from the improper use of the
product. This warranty is void if the product or any of its components are
modified, altered, or in any way changed. Selected components such as
motor/engines are excluded from this warranty and are subject to the
manufacturer’s warranty. This warranty is in lieu of all warranties expressed or
implied.
20
DISPOSAL
GENERAL
The operator can recycle or dispose of the Table saw
himself provided he observes the statutory provisions. In
order to dismantle the Table saw correctly and to properly
remove the materials some knowledge in the area of
mechanics and knowledge about differentiation of waste
materials is necessary.
If during correct disposal doubts arise that represent a
hazard for persons or the environment, the after-sales
service of TYROLIT Hydrostress AG will be happy to
provide information.
DANGER
Voltage warning
Before working in an area identified in this way, the
installation or device must be fully disconnected from
the power (voltage) and secured against being
accidentally powered up again.
Failure to head this warning may lead to death or
serious injury.
PERSONNEL QUALIFICATIONS
Only personnel with basic technical training and who are in
a position to identify the various material groups should be
involved in disposal.
DISPOSAL REGULATIONS
The normal local and regional rules and guidelines must be
observed when disposing of the machines making up the
Table saw.
21
DISPOSAL OF TABLE SAW
DISPOSAL REGULATIONS
The dismantled parts of the table saw are sorted by material and sent separately to the
appropriate collection points. Ensure that the following parts in particular are properly
disposed of.
The Table saw consists of the following materials:
Cast aluminium
Bronze
Rubber
Synthetic grease
Rolled aluminium products
Steel
Rubber / Nylon fabric
Plexiglas
OBLIGATION OF NOTIFICATION
When a Table saw is taken out of service and disposed of the manufacturer TYROLIT
Hydrostress AG or the corresponding service centre must be informed of this.
22
TBE350** Spare Part List
1
2
3
4
5
6
7
8
9
10
11
12
13
14
15
16
17
18
19
20
21
22
23
24
25
26
27
28
29
30
31
32
33
34
35
36
37
38
39
40
41
42*
Water hose plug
Outer blade guard
Inner blade guard
Water flow “T” adapter
Water valve
Hose clip
Water splash guard
Motor bracket
Switch 230 V
Switch 110 V
Cable sleeve
Back splash guard
Splash guard holder
Angle locking handle
Cross beam
U style hose clip
Load spring
Drain plug
Guide rail
Chain
Main frame
Height slot
Height locking handle
Multiple wrench
Wrench bracket
Bolt
Leg with wheel
Pump adapter
Water pump 230 V
Water pump 110 V
Straight leg
Roller wheel
Sleeve
Cutting table
Cutting table fence
Guide Wheel
Cutting table locking assembly
Rip guide
Motor 230 V
Motor 110 V
Inner flange
Blade
Outer flange
Lock Nut M20 (left)
Cable with connector CEE 16 110V
EOSM-121 01 034
EOSM-131 04 034
EOSM-113 02 034
EOSM-123 04 005
EOSM-130 01 005
EOSM-113 28 005
EOSM-130 04 034
EOSM-131 03 034
EOSM-132 01 041
EOSM-132 05 034
EOSM-122 08 033
EOSM-123 06 034
EOSM-112 25 034
EOSM-130 01 034
EOSM-131 06 034
EOSM-113 37 033
EOSM-112 18 034
EOSM-130 02 034
EOSM-113 03 041
EOSM-131 19 033
EOSM-131 01 041
EOSM-113 10 034
EOSM-130 01 047
EOSM-113 28 034
EOSM-113 29 034
EOSM-121 01 002
EOSM-130 06 034
EOSM-121 11 001
EOSM-132 03 005
EOSM-8000060101
EOSM-112 17 034
EOSM-112 31 033
EOSM-112 13 005
EOSM-131 12 034
EOSM-113 20 034
EOSM-112 29 033
EOSM-130 05 034
EOSM-130 03 005
EOSM-132 01 005
EOSM-1900160101
EOSM-111 06 005
10981925
10981926
10981927
10981928
10981929
10981930
10981931
10981932
10986216
10986025
10981934
10986217
10986218
10981937
10981938
10981939
10981940
10981946
10986219
10981943
10986220
10981945
10986221
10981947
10981948
10986222
10986223
10981951
10981952
10986026
10981953
10981954
10981956
10986224
10981958
10981959
10981960
10986225
10981961
10986027
10986226
EOSM-111 02 013
EOSM-338019
EOSM-7200020101
10981963
977631
10986028
23
TBE350** EXPLODE VIEW
24
Declaration of conformity
Description:
Masonry saw TBE350S
with electric engine 2.2 kW/110V or 230V
Type:
Article number:
Article number:
Serial number:
Index:
Year of construction:
TBE350S
10981424 (110V)
10981423 (230V)
35200001 – 3500_ _ _
001
2009
The TYROLIT Hydrostress AG certifies that the inspected above
machine against the following guidelines and that we confirm
compliance with these standards:
Guidelines:
Machine Directive
98/37/CE,
2002/95/EC Restriction of the use of certain hazardous
substances in electrical and electronic equipment
Electrical Directive
Electromagnetic compatibility
Waste electrical and electronic equipment
2006/42/CE
2002/95/CE
Vibration Directive
Noise Emission
2002/44/CE
2000/14/CE
93/68 EWG
89/336/CEE
2002/96/CE
Standards:
EN 12418:2000
EN ISO 14121
EN 61000-6-3
Masonry and stone-off machines for job site - Safety
Safety of machinery: Principles of risk assessment
Electromagnetic compatibility
Tyrolit Hydrostress AG
Witzbergstrasse 18
CH-8330 Pfäffikon ZH
Pfäffikon, 07.04.2009
Mario Facchin
Head of Research and Development
25