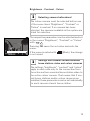
1
Installation and
Operating Instructions
Surface-mounted home station video
1279 ..
Contents
Device description ................................................ 3
Operation .............................................................. 4
Normal conversation mode................................... 6
Switching functions ............................................ 10
Structure of menu interface ................................ 11
User menu .......................................................... 12
Start-up menu ..................................................... 19
Installation........................................................... 26
Connection.......................................................... 27
Removal .............................................................. 28
Start-up ............................................................... 29
Assigning a door station to
surface-mounted home station video ................. 30
Assigning surface-mounted home station video
to a flush-mounted home station......................... 31
Assigning a flush-mounted home station to
surface-mounted home station video ................. 32
Assigning a switching actuator to
surface-mounted home station video ................. 33
Assigning surface-mounted home
station video via floor-call button........................ 34
Deleting all call button assignments
via floor-call button ............................................. 35
What to do if... .................................................... 36
Notes on care...................................................... 37
Technical data .................................................... 38
Warranty ............................................................ 39
2
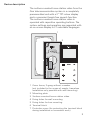
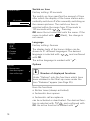
Device description
The surface-mounted home station video from the
Gira telecommunication system is a completely
preassembled unit with a 2" TFT colour display
and a convenient hands-free speech function.
The surface-mounted home station video is
operated with capacitive operating buttons. The
system settings and operation are supported with
an on-screen display in 21 selectable languages.
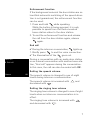
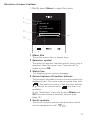
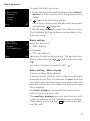
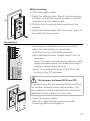
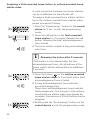
1
2
3
4
5
6
7
5
ZV
ET
4
BUS
1 Cover frame, 2-gang without crossbar
(not included in the scope of supply; frameless
installation only possible with wall mounting)
2 Mounting plate
3 Surface-mounted home station video
4 Fixing holes for wall mounting
5 Fixing holes for box mounting
6 Terminal block
7 Protective cover (for protecting the terminal block
during installation or renovation work)
3
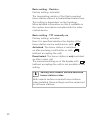
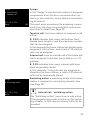
Operation
The surface-mounted home station video is operated with capacitive operating buttons. All that is
needed for operation is to lightly touch the symbols. Successful actuation of the buttons is signalled by an acknowledgement tone, which can
be switched off if desired.
The operating buttons have the following
functions:
specifically switches the display and the
related colour camera on and off:
To switch on, briefly press
. If several colour
cameras are installed, the last active camera is
switched on.
To switch off, press and hold
for
approx. 2 seconds.
If several colour cameras are connected,
is
also used to switch to the next camera.
After a door call, the camera image from the door
station which initiated the door call is displayed.
Pressing
switches on the next camera and
then the one after that, etc. Once the last camera
is reached, the next press of the button switches
back to the first camera. If several colour cameras
are installed, the number of the active camera
(e.g. Cam 1) is displayed for approx. 5 seconds in
the lower part of the display.
In the menus,
serves as a "Back button", i.e.
pressing this button moves back one step in the
menu or exits the menu again.
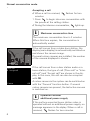
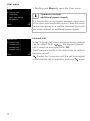
Menu
Briefly pressing the button activates the menu
(see Page 11).
4
OK
OK confirms the menu item selected in the
display.
Selection of the menu items or settings in the
display.
If no menu is active, the voice volume (see Page 7)
and the ringing tone volume (see Page 7) are set
with
.
Directly switches a switching actuator
(see Page 10).
Used for ringing tone deactivation (see Page 8).
Operation of the door opener (see Page 10).
Accepts and ends call and operates the
enforcement function (see Page 6).
5
Normal conversation mode
Accepting a call
✓ When a call is received,
flashes for two
minutes.
1. Press
to begin intercom conversation with
the person at the calling station.
✓ During the intercom conversation,
i
lights up.
Maximum conversation time
The maximum conversation time is 2 minutes.
When this time expires, the conversation is
automatically ended.
If the call comes from a video door station, the
display (main display) is automatically switched on
and shows the camera image.
If several colour cameras are installed, the number
of the camera displayed is shown.
Camera 1
If the call comes from a door station audio or a
home station, the type of call ("Door call" or "Internal call") and "Accept call" are shown in the display. In this case, the call can also be accepted
with OK.
Door call
Accept call
Camera
OK
A colour camera in the system can be switched on
with the "Camera" function button. If several
colour cameras are present, the last active camera
is switched on.
i
Operation without
additional power supply
If the surface-mounted home station video is
operated without an additional power supply, no
message appeares in the diplay. When a call is
received,
flashes for two minutes.
6
Enforcement function
If the background noises at the door station are so
loud that automatic switching of the speech direction is not guaranteed, the enforcement function
can be used:
1. Press and hold
while speaking.
While the button is being pressed, it is only
possible to speak from the flush-mounted
home station video to the door station.
2. To end the enforcement function and release
the call from the door station again, release
again.
End call
✓ During the intercom conversation,
1. Briefly press
✓ The illumination of the
Door call
End call
lights up.
to end the voice connection.
goes out.
During a conversation with an audio door station
or an internal conversation with another home station, "End call" appears during the conversation.
In this case, the call can also be ended with OK.
Setting the speech volume
Camera
OK The speech volume is changed to one of eight
levels during intercom communication.
The speech volume is increased with
decreased with
.
and
Setting the ringing tone volume
The ringing tone volume is changed to one of eight
levels when no intercom communication is in
effect.
The ringing tone volume is increased with
and decreased with
.
7
Deactivating/activating ringing tone
Only deactivate the ringing tone if
necessary
Only deactivate the ringing tone in special cases.
Otherwise, your run the risk of not hearing the
ringing in an emergency, for example.
1. Press
to deactivate the ringing tone.
✓ With the ringing tone deactivated,
2. Press
lights up.
again to reactivate the ringing tone.
✓ The illumination of
goes out.
Switching off the ringing tone with Automatic
call acceptance activated
When
flashes, Automatic call acceptance is
active. With Automatic call acceptance active, it
is not possible to change the status of the ringing
tone deactivation. If the ringing tone is to be
deactivated or activated, first the Automatic call
acceptance must be deactivated in the "Options"
menu (see Page 16).
If
is pressed with Automatic call acceptance
activated, the current status of the ringing tone
deactivation is shown:
• If
lights up for approx. 3 seconds, the ringing
tone is deactivated.
• If
goes out up for approx. 3 seconds, the
ringing tone is activated.
Then
flashes to indicate that Automatic call
acceptance is active.
8
Switching on camera image
With
the display of the home station and the
related colour camera can be specifically switched
on/off:
1. To switch on, briefly press
.
✓ If several colour cameras are present, the last
active camera is switched on.
✓ With several colour cameras, the designation of
the camera currently active is shown in the
lower area of the display for approx. 5 seconds.
2. To switch off, press and hold
approx. 2 seconds.
for
Changing to next colour camera
If several colour cameras are installed, it is possible to switch to the respective next camera with
:
1. Briefly pressing
switches on the next
camera in each case.
✓ The designation of the camera currently active
is shown in the lower area of the display for
approx. 5 seconds.
9
Switching functions
Opening door
1. The door opener is operated with
.
✓ If several doors are present, the door opener of
the door station from which the door call was
made is operated within 2 minutes. It switches
to the main door 2 minutes after the start of the
call or 30 seconds after the door call is ended.
Switching light on (only in conjunction with a
switching actuator)
Switching actions can be triggered in two different ways:
• press
to switch on the light (e.g. the outdoor
or staircase illumination)
• with the "Switching" menu (see Page 13)
10
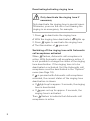
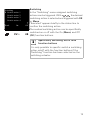
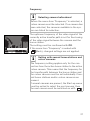
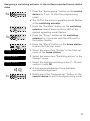
Structure of menu interface
1. Briefly press Menu to open the menu.
1
2
3
Menu
Internal call
Switching
Rng. tone melody
Brightness
>
>
>
>
4
Back
OK
5
1 Menu title
The active menu item is shown here.
2 Selection symbol
The selection symbol indicates which menu item is
selected. Here the menu item "Internal call" is
called up with OK.
3 Status line
For displaying any status messages.
4 Action features of function buttons
The presently available function-button actions are
displayed here. The main menu is exited here with
. The basic functions of the function buttons
(e.g. Switch on camera with
) are then not
available.
In the "Switching" menu the buttons Menu and
OK then also become function buttons (see
Page 13).
5 Scroll symbols
The scroll symbols indicate the directions which
can be navigated in with
.
11
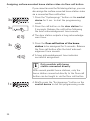
User menu
Menu
Internal call
Switching
Rng. tone melody
Brightness
1. Briefly press Menu to open the User menu.
>
>
>
>
Back
OK
If a conversation is in progress between other users
of the door communication system, then the menu
cannot be opened on a surface-mounted home station video without an additional power supply.
In the "Internal call" menu assigned home stations
can be called. With
the desired internal
call is selected and called with OK.
12
Operation without
additional power supply
Internal call
Internal call
Internal call 1
Internal call 2
Internal call 3
Internal call 4
Back
i
OK
"Sent" appears briefly in the status line to confirm
the internal call.
flashes for 2 minutes until the call is accepted
or the internal call is ended by pressing
again.
Switching
Switch. action
Switch. action
Switch. action
Switch. action
Switching
1
2
3
4
In the "Switching" menu assigned switching
actions can be triggered. With
the desired
switching action is selected and triggered with OK
or Menu.
"Executed" appears briefly in the status line to
Off
confirm the switching action.
Back
On
The marked switching action can be specifically
switched on or off with the On (Menu) and Off
(OK) function buttons.
i
Specifically switching on/off with
function buttons
It is only possible to specific switch a switching
action on/off with the function buttons if the
"Switching" function has been selected on the
switching actuator.
13
Assign melody
Melody 1
Melody 2
Melody 3
Melody 4
Assigning ringing tone melody
The surface-mounted home station video offers
five ringing tone melodies, which can be individually assigned to the call buttons of the door station, the internal call buttons of other home stations or the floor call button. This allows, for
OK
example, a different door station call button with
an individual ringing tone melody to be assigned
in a household with several people (e.g. parents,
children).
Back
The ringing tone melody is set with the "Ringing
tone melody" menu.
1. Trigger the ringing tone melody to be changed
with the corresponding call button taught in
previously.
2. Select the desired melody in the "Assign
melody" menu with
and confirm it
with OK.
✓ When OK is pressed, the selected melody
sounds and is simultaneously saved.
The menu is exited with
i
(Back).
Note
When deleting the call button assignment to the
home station, the corresponding ringing tone
melodies are reset to the factory setting.
14
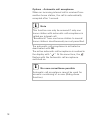
Brightness - Contrast - Colour
i
Selecting camera beforehand
The colour camera must be selected before one
of the menu items "Brightness", "Contrast" or
"Colour" is marked. If no camera has been
selected, the cameras available in the system are
listed for selection.
The respective parameters can be selected and set
in the menus "Brightness", "Contrast" or "Colour"
with
.
Brightness
60 %
Back
OK
Pressing OK saves the set value and exits the
menu.
If the menu is exited with
is not saved.
i
(Back), the change
Settings with several surface-mounted
home stations video and colour cameras
The settings "brightness", "contrast" and "colour"
apply in each case only to the connection from
the active surface-mounted home station video to
the active colour camera. That means that if several home stations and/or colour cameras are
installed, these parameters can be set individually
for each camera at each home station.
15
Switch-on time
Switch-on time
Factory setting: 30 seconds
Back
Language
中文
Cestina
German
English
^
^
Back
The switch-on time specifies the amount of time
after which the display of the home station automatically switches off after manually switching on
OK the camera pictures. The switch-on time is
selected within the range from 20 seconds to
120 seconds with
. Pressing
OK saves the set value and exits the menu. If the
menu is exited with
(Back), the change is
not saved.
Language
Factory setting: German
The display texts of the home station can be
shown in 21 different languages: The desired
language is selected with
and confirmed
with OK.
OK
The active language is marked with " ".
60 seconds
Options
Options
Button tones
Auto door opener
Auto call accept
Back
i
OK
Number of displayed functions
Under "Options" only the functions which have
been released in the Start-up menu under the
item "Releases" appear (see Page 25).
Here the functions
• Button tones (always activated)
• Automatic door opener
• Automatic call acceptance
can be activated or deactivated. The desired function is selected with
and confirmed with
OK. An active function is marked with " ".
16
Options - Button tones
The button tones of the home stations can be
switched on/off here.
Options - Automatic door opener
The automatic door opener is used, for example, in
doctor's offices. If the automatic door opener is
active, the door opener is automatically actuated
approx. 4 seconds after pressing one of the door
station call buttons. If several door stations are
present in the system, the automatic function acts
on the door opener of the door station from which
the door call was triggered.
The automatic door opener is activated or deactivated with OK.
The active automatic door opener is marked in the
display with "
". At the same time
lights up
with the automatic door opener switched on.
i
Behaviour after power failure
Following a power failure, the automatic door
opener is deactivated.
17
Options - Automatic call acceptance
When an incoming internal call is received from
another home station, the call is automatically
accepted after 1 second.
i
Note
This function can only be ensured if only one
home station with automatic call acceptance is
called per internal call.
"Broadcasts" from one home station to several
home stations simultaneously are not permitted.
The automatic call acceptance is activated or
deactivated with OK.
The active automatic call acceptance is marked in
the display with "
". At the same time, the
flashes with the Automatic call acceptance
switched on.
i
No room surveillance possible
Automatic call acceptance cannot be used for
acoustic monitoring of a room (Baby phone
function).
18
Start-up menu
Menu
Basic setting
Frequency
Lighting
Assign
To open the Start-up menu:
>
>
>
>
Back
OK
1. Press the programming button on the control
device for 3 seconds to start the programming
mode.
✓
flashes on the home station.
If the home station has already been assigned
call buttons,
lights up.
2. Briefly press Menu to open the Start-up menu.
The following setting options are available in the
Start-up menu:
Basic setting
Main display
Resistor
TFT manually on
Basic setting
Here the functions
• Main display
• Resistor
• TFT manually on
Back
OK can be activated or deactivated. The desired func-
tion is selected with
OK.
and confirmed with
An active function is marked with "
".
Basic setting - Main display
Factory setting: Main display
If several home stations with a video function are
operated in one flat, a maximum of one home station with video function may serve as the main display per call button; the others are defined as auxiliary displays.
The main display is automatically switched on
with an incoming door call.
The auxiliary displays are only switched on with
a call acceptance at the respective home station
after a door call or via the
(without accepting the call).
19
Basic setting - Resistor
Factory setting: activated
The terminating resistor of the flush-mounted
home station video is activated/deactivated here.
This setting is dependent on the topology.
More detailed information on this is available in
the system description included with the video
control device.
Basic setting - TFT manually on
Factory setting: activated
Here it is specified whether the display of the
home station can be switched on with
.
Activated: The home station is switched
on after pressing a call button or with
(without accepting the call).
Deactivated: The home station is only switched
on after a door call.
The manual switching on of the display with
(without accepting the call) is not possible in this
setting
i
Setting with several surface-mounted
home stations video
With several surface-mounted home stations
video installed, these settings must be carried out
on all home stations.
20
Frequency
i
Selecting camera beforehand
Before the menu item "Frequency" is selected, a
colour camera must be selected. If no camera has
been selected, the cameras available in the system are listed for selection.
The optimum frequency of the video signal of the
currently active transfer path is set for fine-tuning
of the video signal between the camera and the
home station.
The setting must be confirmed with OK.
Frequency
14
Back
If the menu item "Frequency" is ended with
OK
(Back), changed settings are not applied.
i
Setting with several home stations and
colour cameras
The frequency setting applies only for the connection from the active home station to the active
colour camera. This means that the frequency for
the transfer path between the home station and
the colour camera must be set individually if several home stations and/or colour cameras are
present.
If several cameras are present, the Start-up menu
must be exited to select the next camera, then
the next camera must be switched on with
.
21
Lighting
Camera 1
Camera 2
Camera 3
Lighting
Factory setting: activated
The behaviour of the field of view illumination of
the colour camera is activated or deactivated here.
The desired camera is selected with
Back
and
OK confirmed with OK.
A camera with an activated field of view
illumination is marked with "
".
With the function activated, the field of view illumination of the colour camera is switched on for a
door call or with manual switching on of the surface-mounted home station video if the ambient
brightness is less than 1 lux.
With the function deactivated, the field of view
illumination is always switched off.
i
Setting with several home stations and
colour cameras
The illumination setting only applies for the active
surface-mounted home station video and the
active colour camera.
This means that if several home stations and/or
colour cameras are installed, the lighting for each
colour camera must be set individually on each
home station.
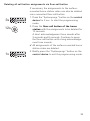
22
Assign
Teach-in call
Internal call
R: 3.24 S: 2.20
Back
Assign
>
In the "Assign" menu the home station is assigned
components from the door communication system (e.g. door stations, home stations and switching actuators).
OK The exact work procedures for assigning compo-
nents from the door communication system are
described in detail from Page 30.
Teach-in call: the home station is assigned a call
button.
R: 3.24 Indicates how many call buttons have
already been taught in and the maximum number
that can be assigned.
In this example the home station has already been
assigned 3 call buttons, and a total of 24 call buttons can be assigned.
Internal call: here an internal call of the home station is assigned to another home station or a TC
gateway.
S: 2.20 Indicates how many internal calls have
been temporarily stored.
In this example, 2 internal calls are temporarily
stored by the home station, a total of 20 internal
calls can be temporarily stored.
Switching action: a switching action of the home
station is assigned to a switching actuator here
(see Page 33).
Assign
Switching action
R: 3.24 S: 2.20
Back
i
OK
Internal call - switching action
The "Switching action" menu item is only active
if the programming mode is active on the switching actuator. In this case no internal calls can be
provided.
23
Factory setting
Factory setting
Disp. parameters
Delete cameras
Del call asgnmnt
Delivered state
The settings of the home station are reset to the
factory settings here.
A differentiation is made between:
Back
Display parameters: Here the values of the menu
OK items Basic setting, Language, Brightness, Con-
trast, Colour and Switch-on time are reset to the
factory setting.
The assignments to colour cameras, call buttons
and stations are retained.
Delete cameras: All camera assignments are
cleared here. The values in the menus Frequency,
Lighting, Brightness, Contrast and Colour are
reset to the factory setting.
"Delete cameras" is, for example, required if the
bus connector of the video door station is to be
replaced.
Once you have executed this function, the cameras must be registered again. For this purpose,
start the programming mode on the control device
and press any call button on all door stations with
a colour camera for 3 seconds each. Important:
Go through the door stations in the order which is
to be displayed later in the video image (e.g. Main
door Camera 1, Side door Camera 2 etc.).
Delete call assignment: Here all assigned call
buttons and the ringing tone melodies are deleted
or reset.
Delivered state: Here all menu items of the home
station reset to the factory setting. In addition, the
assignments to call buttons and colour cameras
are deleted.
24
Version
I00
E904AF
FW 0100-0104-0139
HW 030104-0403
Version
Information on the version and the current software revision of the home station are shown here.
Back
Additional menu items
The following menu items are also available in the
User menu and are described in the front section
of these instructions:
• Internal call (see Page 12)
• Switching (see Page 13)
• Assign melody (see Page 14)
• Brightness (see Page 15)
• Contrast (see Page 15)
• Colour (see Page 15)
• Switch-on time (see Page 16)
• Language (see Page 16)
Release
Release
In the Release menu, the functions
Auto door opener
Auto call accept
• Automatic door opener
• Automatic call acceptance
are released for the end user.
Back
OK The function to be activated is activated/deacti-
vated with
and confirmed with OK.
"
" indicates that the function is activated. They
can then be activated in the "Options" user menu.
25
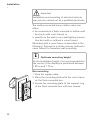
Installation
Important
Installation and mounting of electrical devices
may only be carried out by a qualified electrician.
The surface-mounted home station video can
either
• be mounted on a flush-mounted or hollow-wall
box (only with cover frame) or
• directly on the wall or on a wall lighting connection box (with or without a cover frame).
Mounting with a cover frame is described in the
following. Proceed in a similar manner (without a
cover frame) for frameless wall mounting.
i
Optimum mounting height
As the installation height, it is recommended that
the centre of the display be positioned between
1.60 m and 1.70 m.
Box mounting
1. Strip the supply cable.
2. Place the mounting plate with the cover frame
on the flush-mounted box.
3. Secure the mounting plate to the support ring
of the flush-mounted box with two screws.
26
Wall mounting
1. Strip the supply cable.
2. Mark the drilling holes. Specify the mounting
location so that the mounting plate is located
centrally over the cable outlet.
3. Drill the two mounting holes and insert the
dowels.
4. Attach mounting plate with the cover frame to
the wall with two screws.
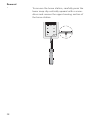
Connection
ZV
ET
BUS
ZV
ET
1. Following the installation of the mounting
plate, the wall station is connected:
• the 2-wire bus to the BUS terminals,
• any additional power supply used to the ZV
terminals
(from 3 surface-mounted home stations video
called simultaneously, one additional power
supply is required per device),
• and, if necessary, the lines of the floor-call
button to the ET terminals.
BUS
No jumpers between BUS and ZV!
No bridges may be laid between BUS and ZV on
the surface-mounted home station video. The
home station automatically detects whether an
additional power supply is connected.
2. Close the home station:
place the upper housing section auf die
mounting plate and engage it.
27
Removal
To remove the home station, carefully press the
lower snap clip vertically upward with a screwdriver and remove the upper housing section of
the home station.
28
Start-up
Once you have installed all of the devices (door
and home stations, control device etc.), you can
start up the door communication system.
Start-up of the door communication system is
described in the system manual included with the
control device (download the system manual at
www.download.gira.de).
The most important start-up procedures of the
surface-mounted home station video are
explained on the following pages.
When the menu is opened for the first time, the
"Language" menu appeares automatically. Please
select the desired language with
and confirm it with OK.
i
Max. number of call buttons
Please note that up to 24 call buttons can be
assigned to a surface-mounted home station
video.
29
Assigning a door station to the surface-mounted home station video
A door station call button is assigned to the surface-mounted home station video as follows:
3s
1. Press the "Systemprogr." button on the control
device for 3 sec. to start the programming
mode.
3s
2. Press the call button on the door station for
3 seconds. Release the call button following
the brief acknowledgement tone sounds.
✓ The door station outputs a long acknowledgement tone.
i
Releasing the button after 3 seconds
If the button is not released after the first
acknowledgement tone, all call buttons of the
door station will be deleted after an additional
3 seconds.
3s
3. Press the button
on the home station for
3 seconds until a brief acknowledgement tone
is heard.
✓ A long acknowledgement tone indicates
successful assignment.
Three short acknowledgement tones indicate
faulty assignment. The memory of the surfacemounted home station video may already be
occupied. A maximum of 24 call buttons can be
assigned.
1x
30
4. Briefly press the "Systemprogr." button on the
control device to exit the programming mode.
Assigning surface-mounted home station video to a flush-mounted
home station
The so-called internal call function can be realized
with the surface-mounted home station video. A
voice connection between two home stations can
be established via the internal call.
To assign the surface-mounted home station video
to another home station, proceed as follows:
1. Press the "Systemprogr." button on the control
device for 3 sec. to start the programming
mode.
3s
2. Press the "Menu" button on the home station
to open the Start-up menu.
Assign
>
3. Select the menu item "Assign" in the Start-up
menu of the home station.
Internal call >
4. Select the menu item "Internal call" in the
"Assign" menu.
Internal call 1
5. Select the desired internal call (1-10) and
confirm it with OK.
✓ The surface-mounted home station video outputs
S: 1:20
3s
a long acknowledgement tone.
At the same time, the counter "S" of the
temporarily stored internal calls is increased by 1.
6. Press the button
on the home station for
3 seconds until a brief acknowledgement tone
is heard.
✓ A long acknowledgement tone indicates
successful assignment.
Three short acknowledgement tones indicate
faulty assignment. The memory of the home
station (flush-mounted home station max. 10,
surface-mounted home stations max. 15 call
buttons) may already be occupied.
1x
7. Briefly press the "Systemprogr." button on the
control device to exit the programming mode.
31
Assigning a flush-mounted home station to surface-mounted home
station video
A voice connection between two home stations
can be established via the internal call.
To assign a flush-mounted home station call button to the surface-mounted home station video,
please proceed as follows:
1. Press the "Systemprogr." button on the control
device for 3 sec. to start the programming
mode.
3s
3s
Hobbyraum
2. Press the call button on the flush-mounted
home station for 3 seconds. Release the call
button following the brief acknowledgement
tone sounds.
✓ The home station outputs a long acknowledgement tone.
i
Releasing the button after 3 seconds
If the button is not released after the first
acknowledgement tone, all call buttons of the
home station will be deleted after an additional
3 seconds.
3s
3. Press the button
on the surface-mounted
home station video for 3 seconds until a brief
acknowledgement tone is heard.
✓ A long acknowledgement tone indicates
successful assignment.
Three short acknowledgement tones indicate
faulty assignment. The memory of the surfacemounted home station video may already be
occupied. A maximum of 24 call buttons can be
assigned.
1x
32
4. Briefly press the "Systemprogr." button on the
control device to exit the programming mode.
Assigning a switching actuator to the surface-mounted home station
video
1. Press the "Systemprogr." button on the control
device for 3 sec. to start the programming
mode.
3s
✓ The LED of the last set operating mode flashes
at the switching actuator.
Funtkion
3s
Progr.
2. Press the "Funktion" button on the switching
actuator several times until the LED of the
desired operating mode flashes.
3. Press the "Progr." button on the switching
actuator for 3 seconds until the LED next to
the button flashes.
4. Press the "Menu" button on the home station
to open the Start-up menu.
Assign
>
5. Select the menu item "Assign" in the Start-up
menu of the home station.
Switch. action >
6. Select the menu item "Switching action" in the
"Assign" menu.
Switch. action 1
7. Select the desired switching action (1-10) and
confirm it with OK.
✓ A long acknowledgement tone indicates
successful assignment.
1x
8. Briefly press the "Systemprogr." button on the
control device to exit the programming mode.
33
Assigning surface-mounted home station video via floor-call button
If you cannot access the flat during start-up, you can
also assign the surface-mounted home station video
via a connected floor-call button:
3s
1. Press the "Systemprogr." button on the control
device for 3 sec. to start the programming
mode.
3s
2. Press the call button on the door station for
3 seconds. Release the call button following
the brief acknowledgement tone sounds.
✓ The door station outputs a long acknowledgement tone.
3s
3. Press the floor-call button of the home
station to be asseigned for 3 seconds. Release
the floor-call button after the brief acknowledgement tone sounds.
✓ A long acknowledgement tone indicates
successful assignment.
i
Only possible with home
station connected directly
With several parallel home stations, only the
home station connected directly to the floor-call
button can be taught in via the floor call button.
1x
34
4. Briefly press the "Systemprogr." button on the
control device to exit the programming mode.
Deleting all call button assignments via floor-call button
If necessary, the assignments to the surfacemounted home station video can also be deleted
via a connected floor-call button:
3s
12s
1. Press the "Systemprogr." button on the control
device for 3 sec. to start the programming
mode.
2. Press the floor-call button of the home
station with the assignments to be deleted for
12 seconds.
A short acknowledgement tone sounds after
3 seconds and 6 seconds. Continue to press
the floor-call button until a long acknowledgement tone sounds.
✓ All assignments of the surface-mounted home
station video are deleted.
1x
3. Briefly press the "Systemprogr." button on the
control device to exit the programming mode.
35
What to do if...
...
, ,
and
running light?
flash clockwise like a
This error message indicates that the additional
power supply on the ZV terminal has failed. In this
case the home station is no longer functional, with
the exception of the door opener function. The
additional power supply and the supply cable
must be checked by a qualified electrician.
If the surface-mounted home station video is to be
operated without an additional power supply in
future, please proceed as follows:
All assignments will be deleted
All call button assignments to the surface-mounted
home station video will be deleted with the instructions for action described in the following!
3s
6s
1x
1. Press the "Systemprogr." button on the control
device for 3 sec. to start the programming
mode.
2. Press the
utton on the home station for
6 seconds. A short acknowledgement tone
sounds after 3 seconds. Continue to press the
button for another 3 seconds until a long
acknowledgement tone sounds.
3. Briefly press the "Systemprogr." button on the
control device to exit the programming mode.
... the display does not switch on during an
internal call
The display switches on during internal calls or
door calls from a door station without a colour
cameras when the surface-mounted home station
video is operated with an additional power supply.
36
Notes on care
Cleaning
To clean the surface-mounted home station video,
wipe it off with a damp cloth (do not use cleaners
containing solvents) or an antistatic cloth.
Never use a dry cloth, as there is danger of static
charging in this case.
A button is accidentally pressed
during cleaning
When wiping off the surface-mounted home station video with a damp cloth etc., the capacitive
buttons may accidentally be pressed.
Therefore, please check after wiping off whether
the front door has been opened accidentally.
Renovation
Before the start of renovation work (e.g. painting
or wallpapering), remove the surface-mounted
home station video from the mounting plate
(see Page 28).
During the renovation work, protect the terminal
block exposed on the mounting plate against
soiling with the included protective cover.
37
Technical data
Power supply: 26 V DC ± 2 V (bus voltage)
Connections:
2 screw terminals for 2-wire bus
2 screw terminals
Floor-call button
2 screw terminals
Additional power supply
Dimensions:
W x H x D 55 x 127 x 21 mm
Temperature
range:
0 ºC to +50 ºC
Display size:
2"
Colour system: PAL
Resolution:
320 x 240 (H x V), QVGA
Additional
power supply: SELV 24 V DC ±10 %, 300 mA
(from 3 surface-mounted home stations video
called simultaneously, one additional power
supply is required per device)
38
Warranty
The warranty is provided in accordance with statutory requirements via the specialist trade.
Please submit or send faulty devices postage paid
together with an error description to your responsible salesperson (specialist trade/installation
company/electrical specialist trade).
They will forward the devices to the Gira Service
Center.
39
Giersiepen GmbH & Co. KG
Elektro-InstallationsSysteme
Postfach 1220
42461 Radevormwald
Deutschland
Tel +49 (0) 21 95 / 602 - 0
Fax +49 (0) 21 95 / 602 - 191
www.gira.de
[email protected]
10 41 05 56 19/11
Gira