1
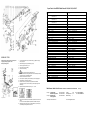
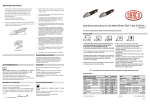
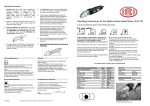
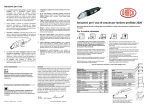
Operating Instructions
Insert the battery (A)
Insert the battery from the back, until it clicks into place.
1. Intended use. This Power Tool is intended for industrial
applications, for cutting sheet metal (maximum capacity is
indicated in the Specifications), for use with cutting jaws
and cutting blades which are indicated in these operating
instructions or recommended by DRÄCO
2. Initial Operation
Abb. A
Observe the rated voltage: The voltage of the power source must
match that given on the nameplate of the machine. Chargers for
230V can also be operated on 220 V power sources.
Switching ON and OFF
Switching ON: Slide the switch (93) forward
Switching OFF: Slide the switch (93) to the rear.
Remove battery (B)
Press both stop locks together, take battery off, see arrow.
6.
7.
2.
The material to be cut must always be free of oil or
grease. Always place the machine flat on the work piece
3.
Cut-outs: Drill a starting hole with a 12-14 mm diameter
drill. Circular cuts: Always cut counter clockwise and
from left to right.
4.
5.
Do NOT cut sheet metal along welding points. Do
NOT cut multi layer sheets, which exceed the
maximum cutting capacity.
Battery Change
Before using the cordless tool, charge a new or empty
battery. The full capacity is reached, after charging the
battery about 4-5 times.
Abb. B
For inside cutting, the shortest curve possible has a
radius of 200 mm (±8”). If cutting a radius with the right
hand, cut from right to left. The outside radius is unlimited.
For cutting out curved or circular inside patterns, a 14 mm
(± 1/2 “) hole, or a punched slot should be made to insert
the centre cutter.
8.
If after cutting, a small strip remains this can easily be
trimmed off to the exact measurement, without leaving a
burr or any distortion of the material. Just one side of the
cordless tools can be used for cutting also (e.g. along a
marked line). Lift the power tools out of the shavings while
the motor is running. Cut off longer shavings.
9.
Both knife and jaws can be sharpened. After being
sharpened or replaced, the knife at it’s lowest point should
protrude the jaws by approximately 3 mm. The knife should
have approximately 0,05 mm (0,005”) play on each side of
the jaws, centring the cutter with spacing shims supplied.
1
2
3
4
1 Safe operation of this machine is possible only
when the operating instructions and the safety
precautions are read completely and the
instructions contained therein are strictly
observed.
2 The machine must not be used when damp and
must not be operated in a wet environment.
11. Ensure that the material to be cut is free of oil and
grease.
4+5 Always wears protective goggles, protective
gloves and heavy-duty shoes when working.
Before working on machine disconnect from power
supply by removing plug from socket.
Always keep the machine and the ventilation slots clean.
Oil the knife pin at regular intervals.
If the machine should happen to fail despite the care taken in
manufacture and testing, repair should be carried out by an
authorised customer services agent for DRÄCO power tools.
DRÄCO tools carry a guarantee of 12 months from date of
delivery.
Damage attributable to normal wear and tear, overload or
improper handling will be excluded from the guarantee. (e.g.
blades/knifes and jaws)
In case of complaint please send the machine, undismantled,
to your dealer or the DRÄCO Service Centre for electric power
tools.
CE-Declaration of conformity
Environnemental protection
Max Draenert
For your safety:
10. Every 200 operating ours have the cutting blade and
cutting jaws sharpened at a specialist workshop.
Warranty
09
To avoid any disturbance please read the following instructions:
3 Always inspect cable and plug before using
machine. Only have damage repaired by a qualified
professional. Put the plug into the mains socket only
when the machine is switched off.
Care and Maintenance
We declare under our sole responsibility that this product is
in conformity with the following standards.
EC 98/37, EC 93/ 68 EWG, EC 04/108 EC, or
standardisation documents DIN EN ISO 12100-1,
DIN EN ISO 12100-2, EN 50 144, EN 55 014
Operating Instructions for the metal-shears AK 3010, AK 3013, AK 3017
Recycling raw materials instead of waste disposal.
Machine, accessories and packaging should be sorted for
environment-friendly recycling.
F
5
l Do not carry the machine by the cable.
l Always remove the plug from the power
supply socket before carrying out any work on
the machine, when interrupting work and when
not using the machine.
l Always place the cable to the rear away
from the machine.
l Apply the machine to the sheet metal only
when switched on.
l Always provide for secure footing when
working.
l Firmly clamp the work piece if it dose not
remain stationary from its own weight.
l The knife should not rub on the jaws:
Possible danger of cutting tool breakage.
l Do not exceed the maximum allowable
material thickness especially when cutting over
doublers, folded joints or welded seams.
For further notes on safety refer to enclosed sheet
Technical Data:
DRÄCO metal-shear
max. thickness
steel
400 N/mm²
stainl. steel
600N/mm²
stainl. steel
800 N/mm²
non ferro
250 N/mm²
tightest radius
working speed
strokes
weight incl. battery
type
AK 3010
AK 3013
AK 3017
mm/ga.
mm/ga.
mm/ga.
mm/ga.
±mm/”
±m/min
min -1
kg
1,0 / 19
0,7 / 21
0,4 / 25
1,5 / 17
50 / 2
3,5
1800
2,1
1,3 / 18
1,0 / 19
0,7 / 21
2,0 / 14
100 / 4
3,5
1800
2,1
1,6 / 17
1,3 / 18
1,0 / 19
2,5 / 12
140 / 5½
3,5
1800
2,1
Spare Parts List for DRÄCO Metal Shear AK 3010, AK 3013, AK 3017
Pos. Order
no. no.
33010
SERVICE TIPS
Before working on machine disconnect from power
supply by removing plug from socket.
Wear protective glasses!
1.
One drop of oil between knife (11) and head-casting (1) keeps the spacing
shims (15) in place.
2.
Dismantle Spring cover (20) and take spring out (19)
3.
Take circlip (16) and washer (17) off.
4.
Push knife pin (18) out of casting.
5.
Take knife out of housing.
6.
Attention, do not exchange the spacing shims (15).
7.
Place the knife inside the housing feed shims in on one side and push knife pin
(18) into housing up to the middle of the knife.
8.
Feed the shims on the other of the knife.
9. Push knife pin in completely, and secure washer (17) and circlip (16) again.
10. Assemble spring (19) and spring cover (20).
Item
Pc.
1
2
3
4
5
6
8
9
Shearhead AK 3010 compl. assembl.
1-43, 48, 51, 52
33013
Shearhead AK 3013 compl. assembl.
1-43, 48, 51, 52
33017
Shearhead AK 3017 compl. assembl.
1-43, 48, 51, 52
33018
Driveshaft complete 34-40
33019
Pinion complete 44-47
BG20241 Head casting Pos. 1-3,24,35
81239
Tap Screw
81263
Screw
81089
Tap Screw
81272
Flat Filister Head Screw
10002
Spacing Block
81286
Flat Head Screw
81248
Pin
1
1
1
1
1
1
1
4
4
10
11
13574/1
01011
Set of Jaws AK 3010
Knife SD5 AK 3010
1
1
10
11
10600
01001
Set of Jaws AK 3013
Knife 1001 AK 3010
1
1
10
11
13074
01013
Set of Jaws AK 3017
Knife 1013 AK 3017
1
1
13
15
16
17
18
19
20
21
22
24
24a
32
32
32
33
34
35566
BG12400
81275
81072
BG12500
12200
12300
81285
10077
17900
17911
BG33018
BG10004
10004
10250
100005
Knife adjusting screw lockring
Spacing Shims
Circlip
Washer
Knife Pin Set
Spring
Spring Cover
Flat Head Screw
Supporting roller in metal
Knife Pin Bushing Ø 10mm
Knife Pin Bushing Ø 11mm
Driveshaft Pos. 32-40
Excentric Drive Shaft Pos.32-34, 37+40
Excentric Drive Shaft
Ball bearing
Sleeve
1
1
2
2
1
1
1
4
1
2
2
1
1
1
1
2
Pos.
no.
35
Order
no.
10300
Item
Pc.
36
BG10450 Cap for Needle Bearing Pos. 35+36
1
37
10006
Key
1
38
39
40
41
42
43
44
45
46
47
48
51
52
80
81
82
83
84
85
86
87
88
89
90
91
92
93
94
99
13051
13036
10009
13046
81249
81262
13039
13540
13041
13042
13043
81243
81031
33080
33081
33082
10038
33084
33085
33086
33087
33088
33089
33090
33091
33092
33093
33094
31298
Gear
Pin
Circlip
Gear Case Cover
Securing Washer
Flat Filister Head Screw
Ball Bearing
Pinion
Gear
Sleeve
Needle Bearing
Securing Washer
Hex Socket Screw
Screw
Screw
Connection Flange
Ball Bearing
Screw
O-Ring
Cable
Switch
Cable
Motor Set 83-88
Screw
Motorhouse Set
Rating Plate
Switch Pad
Guide piece
Power Akku Bxs 12
1
1
1
1
3
3
1
1
1
1
1
2
2
1
1
1
1
1
1
1
1
1
1
1
1
1
1
1
1
31299
31297
Quick Charger SRC
Charger RC 60 Min.
Needle Bearing
2
11. Between the knife (11) and the jaws (10) should be some distance,
approximately 0,05 mm on each side. Knife (11) must be placed tight in the
head casting.
12. Adjustment for the play between the jaws. (a): 0,1 - 0,15 mm.
Max Draenert GmbH & Co.KG Electric - Cordless - Pneumatic Tools - Machines
Factory I:
Factory II:
*Optional
13. If knife has contact with the jaws on both sides, adjust with screws in the head
casting.
If a burr is on the material, adjust the space between the knife and the jaws
14. Replace jaws with a new set, loosen 4 screws (8) take jaws (10) and pins (9)
off, assemble again and tighten with the screws.
Administration
Manufacturing Shears
Manufacturing
Roofing System
Internet: http://www.dracotools.com
D-73777 Deizisau
D-73779 Deizisau
D-73779 Deizisau
P.O.Box
Gutenbergstrasse
Seewiesenweg
1120
15-17
1
e-mail: [email protected]
Germany
Phone +49-7153-8217-0
Fax +49-7153-8217-66