1
1473-1-8652 │ 01.04.2015
Operating Instructions
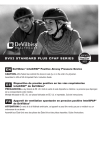
ABB-Welcome
P os: 2 /#N eust rukt ur#/Online -Dok ume ntati on ( +KNX )/ Titelblä tter /Türko mm unikati on/Busc h-W elc ome II/Titelbla tt - 833 41 -A B B @ 36\ mod _13 709 359826 90_ 15.d ocx @ 296 874 @ @ 1
IP gateway
83342
83342-500
83342-515
===E nde der Liste für Tex tmarke C over == =
Operating Instructions
Busch-Welcome ®
P os: 4 /#N eust rukt ur#/Online -Dok ume ntati on ( +KNX )/In haltsv erzeichnis (-- > Für alle Dok um ente <- -)/I nhalt sverz eichnis @ 1 9\m od_1 320 649044 386 _15. docx @ 10 9653 @ @ 1
1
2
3
4
5
6
7
8
9
10
11
12
13
14
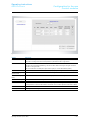
Information about the IP gateway .......................................................................................................................4
1.1
General information ...........................................................................................................................4
1.2
Structure of the manual ......................................................................................................................4
1.3
Symbols in the manual .......................................................................................................................5
Safety................................................................................................................................................................6
2.1
Intended use......................................................................................................................................6
2.2
Improper use .....................................................................................................................................6
2.3
Target groups and qualifications .........................................................................................................6
2.4
Liability and warranty .........................................................................................................................6
Environment ......................................................................................................................................................7
System requirements .........................................................................................................................................7
Start-up .............................................................................................................................................................8
5.1
Commissioning with the Windows UPnP service .................................................................................9
5.2
DNS Server .....................................................................................................................................10
5.3
Manual configuration........................................................................................................................ 10
5.4
Entering the IP address directly ........................................................................................................11
General function of home page......................................................................................................................... 12
6.1
General buttons in the configuration .................................................................................................12
6.2
Login ............................................................................................................................................... 12
6.2.1
RESET ............................................................................................................................................ 13
Configuration for IP Gateway............................................................................................................................ 14
7.1
Network information ......................................................................................................................... 14
7.2
"Network configuration" page ...........................................................................................................15
7.3
"Basic settings" configuration page ................................................................................................... 16
7.4
"Change password" configuration page ............................................................................................17
7.5
"Device settings" configuration page ................................................................................................. 18
7.5.1
Add device ......................................................................................................................................19
7.6
"Portal Login" configuration page...................................................................................................... 20
7.7
"App Management" configuration page .............................................................................................21
7.8
"Associated ComfortTouch 2.x" configuration page ...........................................................................23
7.9
"Associated ComfortTouch 3.x" configuration page ...........................................................................24
7.9.1
"Add user" configuration page .......................................................................................................... 25
7.10
"Import / Export configuration file" configuration page ........................................................................27
7.11
"Firmware Update" configuration page .............................................................................................. 28
7.12
"NTP settings" configuration page .................................................................................................... 30
7.13
"Versions Information" configuration page.........................................................................................31
Configuration for Telephone Gateway ............................................................................................................... 32
Configuration for Access Control modules ........................................................................................................35
9.1
Keypad module................................................................................................................................35
9.2
Fingerprint module ...........................................................................................................................38
9.3
Transponder module ........................................................................................................................41
Integrating mobile end devices with the ABB-Welcome app ............................................................................... 44
10.1
Android version 4.0 or higher............................................................................................................ 44
10.2
iOS version 4 or higher ....................................................................................................................45
Integrating mobile end devices with ABB-Welcome for myABB-LivingSpace ......................................................46
11.1
System requirements ....................................................................................................................... 46
11.2
Software-Update of the IP-Gateway .................................................................................................46
11.3
Setup of the ABB-Welcome for the myABB-LivingSpace solution ......................................................46
11.3.1
Step 1: Registering and logging into myABB-LivingSpace portal ........................................................ 46
11.3.2
Step 2. Connecting the IP gateway with the myABB-LivingSpace portal............................................. 47
11.3.3
Step 3: Installing the "Welcome for myABB-LivingSpace" app ...........................................................47
11.3.4
Step 4: Coupling the IP gateway and "Welcome for myABB-LivingSpace" app ................................... 47
Network security ..............................................................................................................................................48
Integrating a Busch-ComfortTouch® 3.0 or higher.............................................................................................49
Technical data ................................................................................................................................................. 50
Operating Instructions | 0073-1-8652
—2—
Operating Instructions
Busch-Welcome ®
15
16
14.1
Overview table ................................................................................................................................. 50
14.2
Device connection / circuit diagram ..................................................................................................51
14.3
Dimensions / dimensional drawing....................................................................................................52
Product overview ............................................................................................................................................. 52
15.1
Device setup....................................................................................................................................52
Installation and electrical connection .................................................................................................................53
16.1
Requirements for the electrician ....................................................................................................... 53
16.2
Mounting ......................................................................................................................................... 53
===E nde der Liste für Tex tmarke TOC == =
Operating Instructions | 0073-1-8652
—3—
Operating Instructions
ABB-Welcome
Information about the IP
gateway
P os: 6.1 /#Neustr uktur#/Onli ne-D oku ment ation (+K NX )/Ü ber schrif ten (- -> Für alle D okum ente <- -)/ 1. E be ne/G - L/Hinweise zu m IP-G atewa y @ 3 5\mod_ 136 3611 958 376 _15. docx @ 28 830 1 @ 111 1 @ 1
1
Information about the IP gateway
P os: 6.2. 1 /#Neust ruktur#/ Online -Dok ume ntati on( +K NX )/Üb ersch rifte n ( --> Fü r all e Doku men te <-- )/2. Eben e/A - F/A llge mein e Hinweis e @ 3 0\m od_134 848 1024 126 _15 .docx @ 2 3850 5@ 2 @ 1
1.1
General information
P os: 6.2. 2 /#Neust ruktur#/ Online -Dok ume ntati on( +K NX )/Hinw eisezu m K NX T echnischen Hand buc h (--> Fü r alleD oku ment e - -< )/A llgem eine Hi nweis e /A llgemeine Hi nweise - KNX Te chnisc hes Ha ndb uch @ 30\ mo d_1 3484 791 93040_ 15.d ocx @ 238433 @ 1111 @ 1
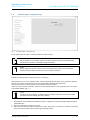
Please read this manual through carefully and adhere to the information listed. This will ensure reliable operation
and long service life of your product.
For reasons of clarity this manual does not contain all the detailed information on all the models of the product,
nor can it take into consideration all conceivable circumstances related to installation, operation and maintenance.
If additional information is required or problems arise that are not dealt with in this manual, the necessary
information can be requested from the manufacturer.
The product has been constructed according to the latest valid regulations governing technology and is
operationally reliable. It has been tested and left the factory in a technically safe and reliable state. To maintain
this state for the period of its operation the specifications of this manual must be observed and adhered to.
Modifications and repairs to the product must only be undertaken if the manual expressly permits this.
It is only the adherence to the safety instructions and all safety and warning symbols in this manual that will
ensure the optimum protection of the user and the environment as well as the safe and trouble-free operation of
the product.
P os: 6.3. 1 /#Neust ruktur#/ Online -Dok ume ntati on( +K NX )/Üb ersch rifte n ( --> Fü r all e Doku men e
t <-- )/2. Eben e/A - F/A ufb au des Handb uche s @ 2 4\mod_ 133 855 2603 038 _15 .docx @ 21 524 5 @ 222 @ 1
1.2
Structure of the manual
P os: 6.3. 2 /#Neust ruktur#/ Online -Dok ume ntati on( +K NX )/Hinw eisezu m K NX T echnischen Hand buc h/T ürko mm unikati on/Busc h-W elc ome II/A uf bau des H andbuch es - 833 41 @ 35\ mod _13 636 119 843 96_15.d ocx @ 288 342 @ @ 1
(
•
•
•
•
•
This manual provides you with the detailed technical information about the device, its installation and
configuration. The use of the device is explained by means of examples.
The chapters "Information on the manual", "Safety", "Environmental information" and "Product overview"
contain general specifications and basic information as well as a description of functions.
Chapters "Technical data" and "Mounting and electrical connection" describe the device technology and
installation, mounting and the electrical connections.
Chapters "Commissioning" and "Configuration" contain instructions on commissioning and setting up or
integrating the device.
Chapter "Maintenance" contains information about cleaning, fault condition diagnostics and repairing the
device.
P os: 6.4 /#Neustr uktur#/Onli ne-D oku ment ation (+K NX )/S t eue rm odule - O nline -Doku men tatio n(- -> Fü r alle Dokument e < - )/+ +++ ++++ +++ +S eit enu mbr uch +++++ ++ ++ +++ @ 9\ mo d_1 2688 986 680 93_ 0.do cx @ 5214 9 @ 1 @ 1
Operating Instructions | 0073-1-8652
—4—
Operating Instructions
ABB-Welcome
Information about the IP
gateway
P os: 6.5. 1 /#Neust ruktur#/ Online -Dok ume ntati on( +K NX )/Üb ersch rifte n ( --> Fü r all e Doku men te <-- )/2. Eben e/S - T/S ym bole des Ha ndb uches @ 3 0\m od_ 134848 1258296 _15 .docx @ 23851 8 @ 111 1 @ 1
1.3
Symbols in the manual
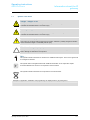
P os: 6.5. 2 /#Neust ruktur#/ Online -Dok ume ntati on( +K NX )/Hinw eisezu m K NX T echnischen Hand buc h (--> Fü r alleD oku ment e - -< )/S ymb oled es Ha ndb uches (V ollstä ndig - K NX THB ) /S ymb ole d es Han dbuc hes (Vollstä ndig - K NX THB ) @ 30\mo d_1 348 480 1998 44_ 15. docx @ 23 8490 @ 1 @ 1
Danger - danger to life
This symbol in connection with the signal word "Danger" indicates dangerous situations which
could lead to immediate death or to serious injury.
Warning - danger to life
This symbol in connection with the signal word "Warning" indicates a dangerous situation which
could lead to immediate death or to serious injury.
Caution - risk of injury
This symbol in connection with the signal word "Caution" indicates a possibly dangerous situation
which could lead to slight or moderately serious injury.
Attention - damage to property
This symbol indicates a possibly harmful situation. Non-observance of the safety instructions can
lead to damage or destruction of the product.
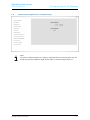
Note ...
This symbol indicates information or references to additional useful topics. This is not a signal word
for a dangerous situation.
This symbol refers to integrated videos with additional information on the respective chapter.
An Acrobat Reader from Version 9.0 is required to view the videos.
This symbol indicates information on the protection of the environment.
Examples on application, installation and programming are displayed with a grey background.
P os: 7 /#N eust rukt ur#/Online -Dok ume ntati on ( +KNX )/S te uer mod ule- Onlin e-Dok um enta tion (-- > Für alle Dok umente <- -)/++ +++ ++++ +++ Seiten um bruc h + +++++ ++ ++++ @ 9\mod_ 126889 866 809 3_0. docx @ 52 149 @ 1 @ 1
Operating Instructions | 0073-1-8652
—5—
Operating Instructions
ABB-Welcome
Safety
P os: 8.1 /#Neustr uktur#/Onli ne-D oku ment ation (+K NX )/Ü ber schrif ten (- -> Für alle D okum ente <- -)/ 1. E be ne/S - T/S ic her heit @ 18\mod _13 026 127 917 90_1 5.docx @ 103 357 @ 22 122 @ 1
2
Safety
P os: 8.2 /#Neustr uktur#/Onli ne-D oku ment ation (+K NX )/S icher heitshi nweise und Hinweise (- -> Fü r alle Doku mente < --) /War nhinweis e/S icherheit - 2 30 V @ 18\ mod _13026 068 167 50_ 15.d ocx @ 103 308 @ 1 @ 1
Warning
Electric voltage!
Risk of death and fire due to electrical voltage of 230 V.
– Work on the 230V supply system may only be performed by authorised electricians!
– Disconnect the mains power supply prior to installation and/or disassembly!
P os: 8.3 /#Neustr uktur#/Onli ne-D oku ment ation (+K NX )/S icher heitshi nweise und Hinweise (- -> Fü r alle Doku mente < --) /Hinweis e - Sac hsch äden /A chtu ng - B esch ädigung d urc häu ße re Einwir kungen @ 26\ mo d_1 3439 959 851 23_ 15.d ocx @ 226 743 @ 2 2222 2@ 1
Caution
Risk of damaging the device due to external factors!
Moisture and contamination can damage the device.
That is why the device must be protected against humidity, dirt and damage during transport,
storage and operation!
P os: 8.4. 1 /#Neust ruktur#/ Online -Dok ume ntati on( +K NX )/Üb ersch rifte n ( --> Fü r all e Doku men te <-- )/2. Eben e/A - F/B esti mmu ngsgem äße r Gebr auch @ 25 \mod_1 340 691 838 858_ 15. docx @ 22 0036 @ 2222 22 @ 1
2.1
Intended use
P os: 8.4. 2 /#Neust ruktur#/ Online -Dok ume ntati on( +K NX )/Siche rheit/Mus ter doku men t/B esti mmu ngsg emä ße r Ge bra uch/B es tim mung sge mä ßer Geb rauc h - 83341 @ 35\ mod _13636 120 582 26_1 5.d ocx @ 288 438 @ 22 @ 1
The device must only be operated within the specified technical data!
The device is used for door communication and video transmission.
To set up the device requires an external device (laptop).
P os: 8.5. 1 /#Neust ruktur#/ Online -Dok ume ntati on( +K NX )/Üb ersch rifte n ( --> Fü r all e Doku men te <-- )/2. Eben e/A - F/B esti mmu ngswid rige r Gebra uch @ 30 \mod_1 348 4823 822 53_ 15.d ocx @ 238 583 @ 1 111 1111 @ 1
2.2
Improper use
P os: 8.5. 2 /#Neust ruktur#/ Online -Dok ume ntati on( +K NX )/Siche rheit/Mus ter doku men t/B esti mmu ngswid irge r Ge bra uch/B estimm ungswi drig erG ebr auch - 83341 @ 35\ mod _13 6361 209 291 1_1 5.doc x @ 2 884 70 @ 12 2233 3 @ 1
The device is dangerious if used improperly. Any non-intended use is deemed improper use. The manufacturer is
not liable for damages resulting from such improper use. The associated risk is borne by the user/operator.
P os: 8.6. 1 /#Neust ruktur#/ Online -Dok ume ntati on( +K NX )/Üb ersch rifte n ( --> Fü r all e Doku men te <-- )/2. Eben e/U - Z/ Zielg rupp en und Qualifikation en @ 30\ mod_13 484 783 392 32_1 5.d ocx @ 238 335 @ 22 3@ 1
2.3
Target groups and qualifications
P os: 8.6. 2 /#Neust ruktur#/ Online -Dok ume ntati on( +K NX )/Siche rheit (- -> Fü ralle D okument e <--) /Ziel gruppe n und Qu alifikati onen /Ziel gru ppen un d A ulifikati onen @ 30\mod_ 134847 812 144 8_15 .docx @ 2 383 22 @ 321 111 333 1 @ 1
Installation, commissioning and maintenance of the product must only be carried out by trained and properly
qualified electrical installers. The electrical installers must have read and understood the manual and follow the
instructions provided. The operator must adhere to the valid national regulations in his country governing the
installation, functional test, repair and maintenance of electrical products.
P os: 8.7. 1 /#Neust ruktur#/ Online -Dok ume ntati on( +K NX )/Üb ersch rifte n ( --> Fü r all e Doku men te <-- )/2. Eben e/G - L/Ha ftung u nd Gewäh rleistu ng @ 30\ mod _13 484 7852522 8_1 5.d ocx @ 238 363 @ 33 111113 33 @ 1
2.4
Liability and warranty
P os: 8.7. 2 /#Neust ruktur#/ Online -Dok ume ntati on( +K NX )/Siche rheit (- -> Fü ralle D okument e <--) /Haft ung und Gewä hrleistung /Haftung und Gewä hrleist ung - KNX ... @ 30 \mo d_1 348 478419 853_15. docx @ 23 8349 @ 2 222233 111 323 @ 1
Improper use, non-observance of this manual, the use of inadequately qualified personnel, as well as
unauthorized modification excludes the liability of the manufacturer for the damages caused. It voids the warranty
of the manufacturer.
P os: 9 /#N eust rukt ur#/Online -Dok ume ntati on ( +KNX )/S te uer mod ule- Onlin e-Dok um enta tion (-- > Für alle Dok umente <- -)/++ +++ ++++ +++ Seiten um bruc h + +++++ ++ ++++ @ 9\mod_ 126889 866 809 3_0. docx @ 52 149 @ 31113 @ 1
Operating Instructions | 0073-1-8652
—6—
Operating Instructions
ABB-Welcome
Environment
P os: 10. 1 /#Neust ruktur#/ Mod ul-S tr uktu /rOnlin e-Do kum enta tion/Ü bers chrift en (-- > Für alle Dokum ente <- -)/ 1. E be ne/U - Z/Umwelt @ 1 8\m od_1 302 614 158 967_15. docx @ 10 338 3 @ 3 333 33 @ 1
3
Environment
P os: 10. 2 /#Neust ruktur#/O nline -Doku men tatio n (+K NX )/Siche rheitshinweis eun d Hinweis e ( --> F ür all eDoku mente <-- )/Hinw eise/Hinw eis -U mwelt - Hinweis E lektr oge räte @ 18\m od_1302 763 973 434 _15. docx @ 10 350 0@ 3 333 333 333 333 @ 1
Consider the protection of the environment!
Used electric and electronic devices must not be disposed of with domestic waste.
– The device contains valuable raw materials which can be recycled. Therefore, dispose of the
device at the appropriate collecting depot.
P os: 10. 3 /#Neust ruktur#/O nline -Doku men tatio n (+K NX )/Siche rheitshinweis eun d Hinweis e ( --> F ür all eDoku mente <-- )/Hinw eise/Hinw eis -U mwelt - E nts orgung E lektro ger äte @ 20\ mod_1 3257606 959 72_ 15.d ocx @ 136 583 @ 3 3333 333 33 @ 1
All packaging materials and devices bear the markings and test seals for proper disposal. Always dispose of the
packaging material and electric devices and their components via the authorized collecting depots and disposal
companies.
The products meet the legal requirements, in particular the laws governing electronic and electrical devices and
the REACH ordinance.
(EU Directive 2002/96/EC WEEE and 2002/95/EC RoHS)
(EU REACH ordinance and law for the implementation of the ordinance (EC) No.1907/2006)
P os: 11 / #Neus truk tur#/Onlin e-Dokum enta tion (+KNX )/Ü bers chrift en (-- > Für alle Dokum ente <- -)/ 1. E bene/S - T/S yst emvora ussetzung en @ 17\ mod_12 976 7444 639 8_1 5.d ocx @ 1003 96 @ 33 333 332 3333 311 311 @ 1
4
System requirements
P os: 12 / #Neus truk tur#/K NX -P o
r dukth and büch er/B us ch-IP_P roject I/P P Guides/Ins tallatio n/S yste mvo rraussetz ung en - 83341 @ 35\mo d_1 363 6121 336 31_ 15.d ocx @ 288 502 @ 3 113 11@ 1
Note
When choosing the installation site, please note that the IP gateway must be connected to the
router by a LAN cable.
The following system requirements are necessary for smooth operation of the IP gateway:
Components for the IP gateway
The following components are required to operate the IP gateway:
A Welcome door communication system including at least one outdoor station and one system controller
IP network (should connect mobile devices, must have a WLAN connection)
An outdoor station with camera must be integrated for video transmission
As tenants
As tenants, the following come into question for operation with the IP gateway:
- The ABB-ComfortTouch ® series 2.4 or higher
Mobile terminal devices with Google Android (from Android 4.0 and Cortex-A8 CPU) or Apple iOS (from iOS
5) operating system
Mobile app
If you want to use the Welcome mobile app from the Internet, the following requirements must also be met:
DSL-6000 Internet connection or faster
Minimum 3G (UMTS) mobile Internet
Camera for fast configuration via QR code
Account at myABB-LivingSpace (see: my.abb-livingspace.com) or DynDNS account.
Note
To correctly route calls from the Internet, Alternatively, a IP gateway must have a static IP address.
Use the my ABB webservice. If not, a DynDNS service can ensure that calls are correctly routed
(see section ""Network configuration" page").
P os: 13 / #Neus truk tur#/Onlin e-Dokum enta tion (+KNX )/S t eue rmo dule - O nline-D oku ment ation (- -> Fü r all e D oku ment e < --) /++ ++ +++++ ++ +S eite nu mbr uch +++ ++ ++ +++ ++ @ 9\ mod _12688 986 680 93_0 .docx @ 5 214 9 @ 1111 111 111 333 3333333 3 @ 1
Operating Instructions | 0073-1-8652
—7—
Operating Instructions
ABB-Welcome
Start-up
P os: 14 / #Neus truk tur#/Le er mod ule/- --- - --- -- --- -- -- --- -- --- ----- --- -- --- -E rstin betrieb nah me- --- -- --- ----- -- --- ----- --- -- --- ----- --- - @ 25\ mod _13 4080 053 762 9_15.do cx @ 2 203 69@ 11 1111 111 1 @ 1
P os: 15 / #Neus truk tur#/Onlin e-Dokum enta tion (+KNX )/Ü bers chrift en (-- > Für alle Dokum ente <- -)/ 1. E bene/A - F/E r stinb etrie bna hme @ 1 7\mod_1 299234 649340 _15. docx @ 10097 8 @ 1 111 111111 111 111 111 111 @ 1
5
Start-up
P os: 16 / #Neus truk tur#/Onlin e-Dokum enta tion (+KNX )/E r stinb etrie bna hme /Busch -W elco me II E
/ rstin betri ebn ahme - 833 41@ 35\ mod _13 636121 65767_1 5.d ocx @ 288518 @ 11 111 111111 1 @ 1
The IP gateway has a user interface that can be reached via an Internet browser. The user interface can be
opened from every computer that is part of the same network as the gateway that is to be configured.
For the initial startup of the IP gateway a few basic settings need to be made in this user interface.
Three options are available to you for commissioning:
Commissioning
Description
Version 1 - UPnP
Commissioning with the Windows UPnP service (Windows Vista or higher)
Version 2 - DNS Server
Commissioning via a router with DNS server
Version 3 - Manual
Manual commissioning
Version 4 - IP address
Enter IP address directly
Information regarding documentation
The Windows Windows 7 interface is used to describe the configuration options.
P os: 17 / #Neus truk tur#/Onlin e-Dokum enta tion (+KNX )/S t eue rmo dule - O nline-D oku ment ation (- -> Fü r alle D oku ment e < --) /++ ++ +++++ ++ +S eite nu mbr uch +++ ++ ++ +++ ++ @ 9\ mod _12688 986 680 93_0 .docx @ 5 214 9 @ 1222 212 222 222 @ 1
Operating Instructions | 0073-1-8652
—8—
Operating Instructions
ABB-Welcome
Start-up
P os: 18 / #Neus truk tur#/Onlin e-Dokum enta tion (+KNX )/Ü bers chrift en (-- > Für alle Dokum ente <- -)/ 2. E bene/G - L/Inb etrie bna hme mit dem Windows UP nP -Dien st @ 35\ mod_ 136361 223415 0_1 5.doc x @ 2885 82 @ 122 222222 222 222 222 2 @ 1
5.1
Commissioning with the Windows UPnP service
P os: 19 / #Neus truk tur#/Onlin e-Dokum enta tion (+KNX )/E r stinb etrie bna hme /Busch -W elco me II E
/ inbind ung üb er UP nP - 83341 @ 35\mo d_1 363 612 1787 13_ 15. docx @ 288 534 @ 2 222 222 2222 222 222 222111 122 2222 22 @ 1
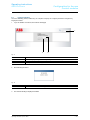
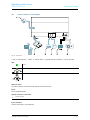
Preconditions:
– There is a DHCP server on the network, e.g. integrated in the router.
– The IP gateway is connected to the router by a LAN cable.
– The PC is connected to the same network.
– The IP gateway is connected and ready for operation.
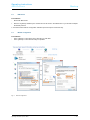
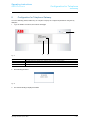
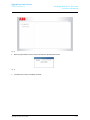
Fig. 1:
1.
2.
3.
Windows UPnP service
Open Windows Explorer.
Click the "Network" entry below the displayed drives.
The window pane on the right now displays all devices currently on the network.
Double-click the IP gateway icon.
A browser window with the configuration interface automatically opens.
Note
If the browser does not open automatically, the device properties appear instead. Copy the
displayed IP address, e.g. 192.168.10.192, and enter it manually into the browser's address bar.
P os: 20 / #Neus truk tur#/Onlin e-Dokum enta tion (+KNX )/S t eue rmo dule - O nline-D oku ment ation (- -> Fü r all e D oku ment e < --) /++ ++ +++++ ++ +S eite nu mbr uch +++ ++ ++ +++ ++ @ 9\ mod _12688 986 680 93_0 .docx @ 5 214 9 @ 2211 122 222 222 22@ 1
Operating Instructions | 0073-1-8652
—9—
Operating Instructions
ABB-Welcome
Start-up
P os: 21 / #Neus truk tur #/Onlin e-Dokum enta tion (+KNX )/Ü bers chrift en (-- > Für alle Dokum ente <- -)/ 2. E bene/A - F/D NS S e vr er @ 3 6\m od_ 1365745 669633 _15.docx @ 29 405 5 @ 222 2222222 222 211 212 222 222 2222 222 222222 @ 1
5.2
DNS Server
P os: 22 / #Neus truk tur #/Onlin e-Dokum enta tion (+KNX )/E r stinb etrie bna hme /Busch -W elco me II /DNS S erve r - 833 41 @ 36\ mod _13 657 457 21504_ 15.docx @ 294 070 @ 22 222 222222 222222 2222 222 222 222 222 222221 1111111 112 @ 1
Preconditions:
Router with DNS server
1.
Enter the IP gateway followed by the domain name of the router in the address line of your browser. Example:
IP-Gateway.fritz.box
2. A browser window with the configuration interface opens with a press of the Enter key.
P os: 23 / #Neus truk tur #/Onlin e-Dokum enta tion (+KNX )/Ü bers chrift en (-- > Für alle Dokum ente <- -)/ 2. E bene/ M - O/Ma nuelle K onfi gur ation @ 35 \mo d_1 363 612218 754_ 15. docx @ 28 856 6@ 1 111221 211 1111 111 111 111 111111 111 1111 111 111 111 111111 1111111 111 111 111 211 1111 @ 1
5.3
Manual configuration
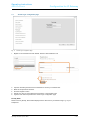
P os: 24 / #Neus truk tur #/Onlin e-Dokum enta tion (+KNX )/E r stinb etrie bna hme /Busch -W elco me II /Einbind ung üb er Manu elle Ko nfigu ratio n - 83341 @ 36\mod _13 709 352 006 60_1 5.docx @ 296 744 @ 11 112 111 111 1111 111 111111 111 111 111 @ 1
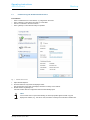
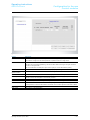
Preconditions:
The IP gateway is connected to the PC directly by a LAN cable.
The IP gateway is connected and ready for operation.
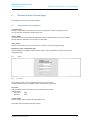
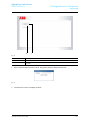
1
5
3
6
7
2
4
Fig. 2:
Manual configuration
Operating Instructions | 0073-1-8652
— 10 —
Operating Instructions
ABB-Welcome
1.
2.
3.
4.
Link the external device in a common network to the IP gateway.
Launch the control panel.
Open the "Network and Sharing Center".
Open the "Local area connection" (1).
5.
6.
7.
In the next window, select the "Properties" (2) button.
In the next window, select the list item "Internet Protocol version 4 (TCP/IPv4)" (3).
Click the "Properties" button (4).
The "Properties" window for Internet protocol version 4 (TCP/IPv4) opens.
8.
9.
Select the option (5) to manually enter the IP address.
Assign an IP address (6) within the same range as the IP gateway.
The default IP gateway address is 192.168.1.111.
Start-up
Note
The IP address of the PC cannot be identical to the IP address of the IP gateway.
Select, for example, 192.168.1.55.
10. Click the "Subnet Mask" (7) box.
The current value is entered automatically and does not need to be changed.
11. Click "OK" to confirm the entry.
P os: 25 / #Neus truk tur#/Onlin e-Dokum enta tion (+KNX )/Ü bers chrift en (-- > Für alle Dokum ente <- -)/ 2. E bene/A - F/A nz eige de r IP -A dr esse @ 36 \mo d_1 365 745928 155_15. docx @ 29 4086 @ 1 111111 111 1111 111 111 111 111111 1111111 111 111 111 111 111 1111 111 121111 112 211 1122 221 111 111111 111 113 1111 111 131 @ 1
5.4
Entering the IP address directly
P os: 26 / #Neus truk tur#/Onlin e-Dokum enta tion (+KNX )/B e dien ung/ Tü rko mmunikatio n/B usch -Welco me/Anz eige de r IP -A dresse - 8 334 1 @ 36\m od_ 136 574 5979907 _15.docx @ 2 9410 2 @ 111 111 121 1132222 222 111 1 @ 1
Enter the IP address of the gateway directly into the address line of your browser.
You can display the current IP address of the gateway as follows:
1.
2.
Open the user interface of your router. Here you will see a list of all connected devices including their names
and IP addresses. For example, when using a Fritzbox under: Home network / network list. Copy the IP
address of the device "IP gateway" and insert it in the address line of your browser to call up the user
interface of the gateway.
Use a special program to identify the IP addresses and associated devices in the network. For example:
SoftPerfect Network Scanner (Windows); Overlook Fing (iOS/ Android)
P os: 27 / #Neus truk tur#/Onlin e-Dokum enta tion (+KNX )/S t eue rmo dule - O nline-D oku ment ation (- -> Fü r all e D oku ment e < --) /++ ++ +++++ ++ +S eite nu mbr uch +++ ++ ++ +++ ++ @ 9\ mod _12688 986 680 93_0 .docx @ 5 214 9 @ 2211 112 222 111 1111111 111113 111 111 113 1 @ 1
Operating Instructions | 0073-1-8652
— 11 —
Operating Instructions
ABB-Welcome
General function of home page
P os: 28 / #Neus truk tur#/Onlin e-Dokum enta tion (+KNX )/Ü bers chrift en (-- > Für alle Dokum ente <- -)/ 1. E bene/G - L/K onfig urati on @ 35\ mod _13 636 122486 73_ 15.d ocx @ 288 599 @ 32 211112 222 311 111 1111 111 111111 111112 111 1112 222 222 222 222222 2222222 222 233 333 333333 3333333 333 333 333 3333333 212222 222 222 333 3333 333 333333 333333 333 3333 333 333 333 333333 3333333 333 321 111 111111 1111111 111 111 111 111 1111 111211 111111 111 111 1111 111 111 11111 @ 1
6
General function of home page
P os: 29 / #Neus truk tur#/Onlin e-Dokum enta tion (+KNX )/B e dien ung/ Tü rko mmunikatio n/B usch -Welco me/Allg emei ne S ch altflösc hen der K onfigurati ons I nte rface - 8334 1@ 35\ mod _136 361226 182 9_1 5.docx @ 2 88614 @ 111132 222221 112 222 222 2121 111 111111 111 111 111 1111 111 111111 111 111 3333 333 333 333 333 3333333 333 333 333 333 333 3333333 333333 333 333 333 3333 333 212222 222 222 222 2222 222 222222 233333 3333 333 333 333 333 333333 3333333 111 111 222 2222222 111111 111 111 111 111 1111 111111 111 111 133 3333 333 333 333 333332 2222 2222 222 2222 221 121 111 233333 333 @ 1
All configurations are set in the browser interface.
6.1
General buttons in the configuration
"Log off" button
Click the "Log off" button at the top right to leave the configuration interface as a logged-on user.
You can leave the configuration interface at any time.
"Reset" button
If you have entered incorrect data in the input fields, click the "Reset" button to clear all your entries.
All input fields are cleared and you can enter your data again.
"Save" button
Click the "Save" button to save your entries and to continue to the next configuration page.
Switching to a new configuration page
Click the individual configuration pages in the left column of the configurations to switch to the required
configuration page.
P os: 30 / #Neus truk tur#/Onlin e-Dokum enta tion (+KNX )/Ü bers chrift en (-- > Für alle Dokum ente <- -)/ 2. E bene/G - L/LOGIN @ 3 5\m od_ 1363 612 270 771_15. docx @ 28 8630 @ 1111112 222222 222 222 222 2222 222 222233 333 333 333 3333 333 333 333 333333 3333 212 222 222 222 3333333 333333 333 333 333 333 3333 333333 222 222 222 2222 222 222 2 @ 1
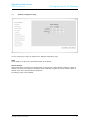
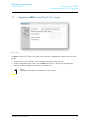
6.2
Login
P os: 31 / #Neus truk tur#/Onlin e-Dokum enta tion (+KNX )/B e dien ung/ Tü rko mmunikatio n/B usch -Welco me/ Men ü LOGIN - 83341 @ 36\mo d_1 3709 352 371 91_ 15.docx @ 296 760 @
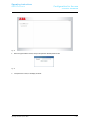
1111 111 1111111 111 111 111 111 111 1111 133 333333 333 333 3333 333 333 333333 333 333 3333 333 333 333333 3333333 333 333 332 122 222 2222222 222 222 222 222 222 3333 333 333333 333 333 3333 333 333 333331 111 112 2222 222 221 111111 1111111 111 111 111 111 111 1111113 333333 333 333 333 3333 222 222222 222 222 222 1121 111 233 333 333222 2222 222 222 222 222 2222222 222222 222 222 222 2222222 222222 222 222 222 2222 222 222222 222222 222 2222 222 222 222 233333 3333331 222 222 222 222233 3333333 333 333 333 333 3333 333333 333 333 333 333 3333 3 3333 333 3333 333 333 333 333333 333 3333 333 333 333 333 333 3332222 222 222 222 222 222 2222 222 222222 222 111 1111 111 111 122222 222 2222 222 222 222 222222 2222222 222 222 222 222 222 2222 222 222222 222 222 222 2222 222 222222 222 222 2222 222 222 222222 222 222 2222 111 111 111 111 1111111 111111 111 111 111 1111111 111111 111 111 111 1111 111 111111 111 111 1111 111 111 111 111 111111 1111 111 111 111 111 1111111 111111 111 111 111 1111111 111111 111 111 111 1111 111 111111 111 111 111 1111 111 111 111 111111 1111111 111 1
1111 111 1111111 111 111 111 111 111 1111111 111111 111 111 1111 111 111 111111 111 111 1111 111 111 111111 111 1111 111 111 111 111 111 1111111 111 111 111 111 111 1111 111 111111 111 111 1111 111 111 111111 111 111 1111 111 111 111 111 1111111 111111 111 111 1 @ 1
3.
Tra gen
Fig. 3:
Login window
The IP address shows you the IP address currently used by the device.
The MAC address shows you the MAC address currently used by the device.
User name
Enter the default values in the "User name" and "Password" input fields.
(default values):
User name:
admin
Password:
admin
"Login" button
Click the "Login" button to display the configuration menu.
The window with the network information appears.
Operating Instructions | 0073-1-8652
— 12 —
Operating Instructions
ABB-Welcome
6.2.1
General function of home page
RESET
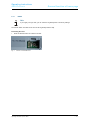
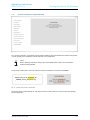
Note
If you forget your login data, you can reset the IP gateway back to its factory settings.
The "Reset" button is located on the front of the IP gateway behind a flap.
Performing the reset
1. Press the "Reset" button for at least 3 seconds.
Fig. 4:
Position of the RESET button
P os: 32 / #Neus truk tur#/Onlin e-Dokum enta tion (+KNX )/S t eue rmo dule - O nline-D oku ment ation (- -> Fü r all e D oku ment e < --) /++ ++ +++++ ++ +S eite nu mbr uch +++ ++ ++ +++ ++ @ 9\ mod _12688 986 680 93_0 .docx @ 5 214 9 @ 2222 222 222 221 1333333 332222 112 122 222 1111 111 111111 111111 1111 111 111 111 111 111111 1111111 111 111 111 1111111 111111 111 111 111 111 1111 111111 111111 111 2222 222 222 222 222222 333 3333 311 211 112 222222 2222222 222 222 222 222 222 2222222 222 222 222 222 2222 222 222 222222 222 2222 222 222 222 222222 222 2222 222 2222 222 2222 222 222 222 222222 222 2222 222 222 222 222222 2222222 222 222 222 @ 1
Operating Instructions | 0073-1-8652
— 13 —
Operating Instructions
ABB-Welcome
Configuration for IP Gateway
P os: 33 / #Neus truk tur#/Onlin e-Dokum enta tion (+KNX )/Ü bers chrift en (-- > Für alle Dokum ente <- -)/ 2. E bene/ M - O/Me nü Netzwe rkinfo rma tion @ 34 \mo d_1 3624945 54308_ 15. docx @ 284581 @
2222 222 2222222 222 222 222 222 222 2222 222 222222 222 222 2222 222 222 222222 222 222 2222 222 222 222222 2222222 222 222 333 333 333 3312 222 222222 222 333 333 3333 333 333333 333 333 3333 333 333 333333 333 333 3333 333 333 333 333 3333333 333 333 333 333 333 3333333 333333 322 222 222 2222 222 222222 222 222 222 2222 211 111 111 111111 2222 222 222 222 222 2222222 222222 222 222 222 2222222 222222 222 222 222 2222 222 222222 222222 222 2222 222 222 222 222222 2222 222 222 222 221 111111 1111111 111 111 111 1111111 111111 111 111 111 111 1111 1 1111 111 1111 111 111 111 111111 111 1111 111 111 111 111111 1111111 111111 111 111 111 1111 111 111111 111 111 1111 111 111 111111 111 1111 111 111 111 111111 1111111 111 111 111 111 111 1111 111 111111 111 111 111 1111 111 111111 111 111 1111 111 111 111111 111 111 1111 111 111 111111 1111111 111 111 111 111 111 1111111 111111 111 111 111 1111 111 111111 111 111 1111 111 111 111111 111 111 1111 111 111 111 111 1111111 111111 111 111 111 1111111 11111 @ 1
7
Configuration for IP Gateway
7.1
Network information
P os: 34 / #Neus truk tur#/Onlin e-Dokum enta tion (+KNX )/B e dien ung/ Tü rko mmunikatio n/B usch -Welco me/ Men ü Netz w erkin for mati on - 833 41 @ 36\ mo d_1 3709 352 574 88_15.d ocx @ 296 776 @ 2 3333 333 333 312 222222 222 2233 333 333 333 333333 3333333 333 333 333 333333 3333333 333 333 333 333 3333 333333 333 333 333 3333 333 333 333 333333 333 2222 222 222 222 222222 2222222 222 222 222 111111 1111111 122 222 222 222 2222 222 222 222222 222 222 2222 222 222 222222 222 2222 222 222 222 222 2 @ 1
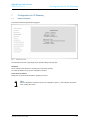
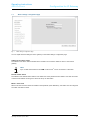
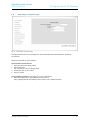
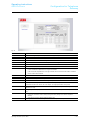
The network information appears after logging in.
Fig. 5:
Network information
The "Network information" page display the IP gateway settings currently used.
IP address
The IP address is the address for accessing the connected IP gateway.
You need this address to log into the configuration interface!
Portal client information
Display the connection status between IP gateway and server.
Note
Note the displayed IP address to log into the configuration again, e.g. after restarting the system
when creating other users.
P os: 35 / #Neus truk tur#/Onlin e-Dokum enta tion (+KNX )/S t eue rmo dule - O nline-D oku ment ation (- -> Fü r all e D oku ment e < --) /++ ++ +++++ ++ +S eite nu mbr uch +++ ++ ++ +++ ++ @ 9\ mod _12688 986 680 93_0 .docx @ 5 214 9 @ 1223 333 333 333 3222222 222222 222 222 222 2222 222 222 222 222222 2222 222 222 222 222 222222 2222222 222 211 222 1212222 112222 222 222 222 222 2222 222222 222 222 222 2222 222 222 222 222222 222 2222 222 222 222 222222 2222222 222 222 222 222222 2222222 222 222 222 222 2222 222 222 22 @ 1
Operating Instructions | 0073-1-8652
— 14 —
Operating Instructions
ABB-Welcome
Configuration for IP Gateway
P os: 36 / #Neus truk tur#/Onlin e-Dokum enta tion (+KNX )/Ü bers chrift en (-- > Für alle Dokum ente <- -)/ 2. E bene/G - L/K onfig urati onss eite „N etzwe rkko nfigu ratio n" @ 34 \mod_1 362 4947 538 00_ 15.d ocx @ 284 613 @ 2 222 2222 222 222 222222 222 222 2211 111 111 111 111 1111111 111 111 111 111 111 1111111 111111 111 111 111 1111 111 111111 111 111 1112 122 211 11111 @ 1
7.2
"Network configuration" page
P os: 37 / #Neus truk tur#/Onlin e-Dokum enta tion (+KNX )/B e dien ung/ Tü rko mmunikatio n/B usch -Welco me/ Men ü Netz w erkk onfig ura tion - 83 341 @ 3 6\mod_1 370 935 504 989 _15. docx @ 29 685 4 @ 2121 111 123 333 3333311 111112 221 211 111 1111111 111111 111 111 111 1133 333 333 333 333333 333 3333 333 333 333 333333 3333333 333 333 333 3333331 111111 111 111 111 11@ 1
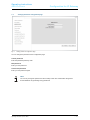
Fig. 6:
"Network configuration" page
You can configure your device as required on the "Network configuration" page.
DHCP
Select "DHCP" if the device is to automatically obtain an IP address.
Static IP address
Please note that the IP address of the gateway does not change when a static address is assigned. A static IP
address only needs to be assigned in exceptional cases to manually configure the network. Click the "Static IP
address" check box to enter the following addresses:
The following option is also available:
P os: 38 / #Neus truk tur#/Onlin e-Dokum enta tion (+KNX )/S t eue rmo dule - O nline-D oku ment ation (- -> Fü r all e D oku ment e < --) /++ ++ +++++ ++ +S eite nu mbr uch +++ ++ ++ +++ ++ @ 9\ mod _12688 986 680 93_0 .docx @ 5 214 9 @ 2222 222 222 222 2222222 222222 222 222 222 2222 222 222222 222 222 2222 222 222 222 222 222222 2222222 222 222 222 2222222 222222 222 222 222 2222222 222222 222222 222 2211 121 211 111 111111 111 2222 222 212 222 222322 2332222 222 222 222 2 @ 1
Operating Instructions | 0073-1-8652
— 15 —
Operating Instructions
ABB-Welcome
Configuration for IP Gateway
P os: 39 / #Neus truk tur#/Onlin e-Dokum enta tion (+KNX )/Ü bers chrift en (-- > Für alle Dokum ente <- -)/ 2. E bene/ M - O/K onfig ura tionss eite "Gr undeinstell ung en" @ 3 4\mo d_1 362 494927 689 _15. docx @ 28 4645 @ 1 111111 111 111 1111 111 111 111111 111111 1111 111 111 111 111 1111111 121111 111 121 111 1111111 111111 111 222 222 2222 222 222222 222 222 222 2222 222 111111 111111 11 @ 1
7.3
"Basic settings" configuration page
P os: 40 / #Neus truk tur#/Onlin e-Dokum enta tion (+KNX )/B e dien ung/ Tü rko mmunikatio n/B usch -Welco me/ Men ü Gr und einst ellung en -83 341 @ 35 \mo d_1 363 612329 100_15. docx @ 28 8694 @ 2 333333 333 331 1112 211 111 111 211 1111111 111 111 111 111 111 1111 111 111111 111 111 111 1111 111 111111 111 111 1111 111 111 111111 111 111 1111 111 111 111 111 1111111 111 111 111 111 111 1112322 233222 222 222 222 22@ 1
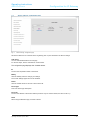
Fig. 7:
"Basic settings" configuration page
You can adjust the basic settings for the IP gateway on the "Basic settings" configuration page.
Address of the indoor station
The address of the indoor station indicates which call button on the outdoor station is used to control the IP
gateway.
Note
Up to 4 mobile terminal devices and ABB-ComfortTouch® can be connected to a call button.
Default outdoor station
The address of the default outdoor station is the station set as the preferred outdoor station. One audio and video
connection also without incoming door call can be set up for this station.
Master / slave mode
When more that one indoor station is installed in the apartment (same addresses), one station must be configured
as master and others as slave.
P os: 41 / #Neus truk tur#/Onlin e-Dokum enta tion (+KNX )/S t eue rmo dule - O nline-D oku ment ation (- -> Fü r all e D oku ment e < --) /++ ++ +++++ ++ +S eite nu mbr uch +++ ++ ++ +++ ++ @ 9\ mod _12688 986 680 93_0 .docx @ 5 214 9 @ 2222 222 222 222 2222222 222222 222 222 222 2222 222 222 222 222222 2222 222 222 222 222 222222 2222222 222 222 222 2222222 222222 222 222 222 222 2222 222222 222222 222 2222 222 222 222 222222 222 2222 222 222 222 222221 2111222 222 222 222 212 111 2222222 222 222 222 222 2222 322 233 222222 222 2222 2 @ 1
Operating Instructions | 0073-1-8652
— 16 —
Operating Instructions
ABB-Welcome
Configuration for IP Gateway
P os: 42 / #Neus truk tur#/Onlin e-Dokum enta tion (+KNX )/Ü bers chrift en (-- > Für alle Dokum ente <- -)/ 3. E bene/ M - O/K onfig ura tionss eite "P asswo rt ä ndern" @ 3 4\m od_ 1362 495 029 239 _15.docx @ 28 467 6 @ 211 1211 122 222222 222 222 2222 222 222 222222 222 222 2222 222 222 211111 1111111 111 111 111 111 111 1111 111 111111 111 111 111 1111 111 111111 111 111 1111 111 111 111111 111 111 1111 111 111 111 111 1222222 222222 @ 1
7.4
"Change password" configuration page
P os: 43 / #Neus truk tur#/Onlin e-Dokum enta tion (+KNX )/B e dien ung/ Tü rko mmunikatio n/B usch -Welco me/ Men ü P asswo rt ä nde rn - 83341 @ 3 5\m od_1 363 612 344 390 _15.docx @ 28 871 0 @ 2111 111 111 112111 222 2212 111 111 121 112111 111 1111 111 111 111 111111 1111111 111 111 111 111 111 1111 111 111111 111 111 1111 111 111 111111 111 1111 111 111 111 111 111 1111111 111 111 111 111 111 1111 111 111111 111 111 111 1111 122 222222 222 21 @ 1
Fig. 8:
"Change password" configuration page
You can change the password on this configuration page.
Current password
Enter the password previously used.
New password
Enter your new password.
Confirm new password
Enter your new password again.
Note
You can only change the password for the currently active user. Please follow the general
recommendations for generating strong passwords.
P os: 44 / #Neus truk tur#/Onlin e-Dokum enta tion (+KNX )/S t eue rmo dule - O nline-D oku ment ation (- -> Fü r all e D okument e < --) /++ ++ +++++ ++ +S eite nu mbr uch +++ ++ ++ +++ ++ @ 9\ mod _12688 986 680 93_0 .docx @ 5 214 9 @ 2222 222 222 222 2222222 222222 222 222 222 2222 222 222 222 222222 2222 222 222 222 222 222222 2222222 222 222 222 2222222 222222 222 222 222 222 2222 222222 222 222 222 2222 222 222 222 222222 222 2222 222 222 222 222222 2222222 222 222 222 222222 2222222 222 222 222 111 2122 222222 222211 111 1111 222 111 222 122222 222 2222 222 @ 1
Operating Instructions | 0073-1-8652
— 17 —
Operating Instructions
ABB-Welcome
Configuration for IP Gateway
P os: 52 / #Neus truk tur#/Onlin e-Dokum enta tion (+KNX )/Ü bers chrift en (-- > Für alle Dokum ente <- -)/ 2. E bene/ M - O/K onfig ura tionss eite "Ge räte einst ellung en" @ 3 4\m od_ 136 2495353 459 _15. docx @ 28 4773 @
2221 121 1111211 122 222 222 222 222 1111 222 111111 211 111 1111 122 111 111121 211 121 2112 221 221 111222 1111112 322 222 222 222 222 1111 111 111111 111 111 111 1111 111 111111 111 111 1111 111 111 111111 111 111 1111 111 111 111 111 1111111 111 111 111 111 111 1111111 111111 111 111 111 1111 111 111111 111 111 111 1111 111 111111 111 111 1111 111 111 111 111 1111111 111111 111 111 111 1111111 111111 111 111 111 1111 111 111111 111111 111 1111 111 111 111 111111 1111111 111 111 111 111111 1111111 111 111 111 111 1111 111111 111 111 111 111 1111 1 1111 111 1111 111 222 222 222222 222 2222 222 222 222 222 222 2222221 111111 211 222 122 2222 222 222222 222 222 2222 222 222 222222 222 2222 222 222 222 222 222 2222222 222 222 222 222 222 2222 222 222222 222 222 222 2222 222 222222 222 222 2222 222 222 222222 222 222 2222 222 222 222 222 2222222 222222 222 222 222 2222222 222222 222 222 222 2222 222 222222 222 222 2222 222 222 222 222 222222 2222 222 222 222 222 2222222 222222 222 222 222 2222222 222222 222 222 222 2222 222 222222 222222 222 2222 222 222 222 222222 2222222 222 2
2222 222 2222222 222 222 222 222 222 2222 222 222222 222 222 2222 222 222 222222 222 222 2222 222 222 222222 2222222 222 222 222 222 222 2222222 222 222 222 222 222 2222 222 222222 222 222 2222 222 222 222222 222 222 2222 222 222 222222 222 2222 222 222 222 222 222 2222222 222222 222 222 222 2222 222 222222 222 222 222 2222 222 222222 222222 2222 222 222 222 222 2222222 222222 222 222 222 2222222 222222 222 222 222 2222 222 222222 222 222 222 2222 222 222 222 222222 2222222 222 222 222 222222 2222222 222 222 222 222 2222 222222 222 222 222 222 2222 2 2222 222 2222 222 222 222 222222 222 2222 222 222 222 222 222 2222222 222 222 222 222 222 2222 222 222222 222 222 2222 222 222 222222 222 2222 222 222 222 222222 222 2222 222 222 222 222 222 2222222 222222 222 222 222 2222 222 222222 222 222 2222 222 222 222222 222 222 2222 222 222 222 222 2222222 222222 222 222 222 2222222 222222 222 222 222 2222 222 222222 222 222 2222 222 222 222 222 222222 2222 222 222 222 222 2222222 222222 222 222 222 2222222 222222 222 222 222 2222 222 222222 222 222 222 2222 222 222 222 222222 2222222 222 2
2222 222 2222222 222 222 222 222 222 2222 222 222222 222 222 2222 222 222 222222 222 222 2222 222 222 222222 2222222 222 222 222 222 222 2222 222 222222 222 222 222 2222 222 222222 222 222 2222 222 222 222222 222 222 2222 222 222 222 222 2222222 222 222 222 222 222 2222222 222222 222 222 222 2222 222 222222 222 222 222 2222 222 222222 222222 2222 222 211 111 111 2111111 111111 111 111 111 1111111 111111 111 111 111 1111 111 111111 111 111 111 1111 111 111 111 111111 1111111 111 111 111 111111 1111111 111 111 111 1111111 111111 111 111 111 111 1111 1 1111 111 1111 111 111 111 111111 111 1111 111 111 111 111111 1111111 111 111 111 111 111 1111 111 111111 111 111 1111 111 111 111111 111 1111 111 111 111 111111 1111111 111 111 111 111 111 1111 111 111111 111 111 111 1111 111 111111 111 111 1111 111 111 111111 111111 1111 111 111 111 111 1111111 111111 111 111 111 1111111 111111 111 111 111 1111 111 111111 111 111 1111 111 111 111 111 111111 1111111 111 111 111 1111111 111111 111 111 111 1111111 111111 111 111 111 1111 111 111111 111 111 111 1111 111 111 111 111111 1111111 111 1
1111 111 1111111 111 111 111 111 111 1111 111 111111 111 111 1111 111 111 111111 111 111 1111 111 111 111111 1111111 111 111 111 111 111 1122 222 222222 222 222 222 2222 222 222222 222 222 2222 222 222 222222 222 222 2222 222 222 222 222 2222222 222 222 222 222 222 2222222 222222 222 222 222 2222 222 222222 222 222 222 2222 222 222222 222222 2222 222 222 222 222 2222222 222222 222 222 222 2222222 222222 222 222 222 2222 222 222222 222 222 222 2222 222 222 222 222222 2222 222 222 222 222 222222 2222222 222 222 222 2222222 2222 @ 1
7.5
"Device settings" configuration page
P os: 53 / #Neus truk tur#/Onlin e-Dokum enta tion (+KNX )/B e dien ung/ Tü rko mmunikatio n/B usch -Welco me/ Men ü Gerät eeinst ellun gen -83 341 @ 3 5\m od_ 1363 612407 376 _15. docx @ 28 8774 @
1111 111 1111111 111 111 111 111 111 1111 111 111111 111 111 1111 111 111 111111 111 111 1111 111 111 111111 1111111 111 111 111 111 111 1111 111 111111 111 111 111 1111 111 111111 111 111 1111 111 111 111111 111 111 1111 111 111 111 111 1111111 111 111 111 111 111 1111111 111111 111 111 111 1111 111 111111 111 111 111 1111 111 111111 111111 1111 111 111 111 111 1111111 111111 111 112 111 1111111 111111 111 111 111 1111 111 111111 111 111 111 1111 111 111 111 111111 1111111 111 111 111 111111 1111111 111 111 111 111 1111 111111 111 111 111 111 1111 1 1111 111 1111 111 111 111 111111 111 1111 111 111 111 111 111 1111111 111111 111 111 111 1111 111 111111 111 111 1111 111 111 111111 111 1111 111 111 111 111111 111 1111 111 111 111 111 111 1111111 111111 111 111 111 1111 111 111111 111 111 1111 111 111 111111 111 111 1111 111 111 111 111 1111111 111111 111 111 111 1111111 111111 111 111 111 1111 111 111111 111 111 1111 111 111 111 111 111111 1111 111 111 111 111 1111111 111111 111 111 111 1111111 111111 111 111 111 1111 111 111 111 111111 111 1111 111 111 111 111111 1111111 111 1
1111 111 1111111 111 111 111 111 111 1111 111 111111 111 111 1111 111 111 111111 111 111 1111 111 111 111111 1111111 111 111 111 111 111 1111 111 111111 111 111 122 2222 2 @ 1
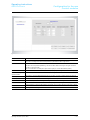
Fig. 9:
"Device settings" configuration page
All outdoor stations to be connected to the IP gateway (max. 4) must be listed in the Device settings.
Add device:
You can add individual devices on this page.
For the next steps, see the "Add devices" section below.
The configuration page displays a list of added devices.
ID
The ID is the sequential number of the device.
Modify
Click the "Modify" button to change your settings.
The current settings appear and can be modified.
Delete
Click the "Delete" button to remove a user from the list.
Device type
This is the device type description.
Device ID
The ID is the address of the outdoor station (If there is only one outdoor station, the ID as a rule is 1).
Name
When using the Welcome app, the name is shown.
Operating Instructions | 0073-1-8652
— 18 —
Operating Instructions
ABB-Welcome
7.5.1
Fig. 10:
Configuration for IP Gateway
Add device
"Add device" configuration page
Device type
Select the required device type from the "Device type" drop-down list.
Note
The floor call button is already set up as the default device. The device name can be adjusted as
required.
Device ID
Enter the address set on the first control dial of the outdoor station (1 – 4).
Name
The device name, e.g. for incoming calls, appears on the display of the mobile device or ABB-ComfortTouch® .
Assign intuitive names, e.g. "Front door".
Permission
Whether the option to automatically record images (snapshots) is permitted can be specified for each outdoor
station individually.
P os: 54 / #Neus truk tur#/Onlin e-Dokum enta tion (+KNX )/Hi nweis/B usch-W elc ome II/Hinw eis E rstell ung von V id eoaufna hmen @ 34\ mod _13 6249 551 751 2_1 5.docx @ 2 848 04 @
2111 111 1121111 111 111 111 111 111 1111 111 111111 111 111 1111 111 111 111111 111 111 1111 111 111 111111 1111111 111 111 111 111 111 1111 111 111111 111 111 111 1111 111 111111 111 111 1111 111 111 111111 111 111 1222 222 222 222 222 2222222 222222 222 222 222 2222222 222222 222 222 222 2222 222 222222 222 222 222 2222 222 222 222 222222 2222 222 222 222 222 2222222 222222 222 222 222 2222222 222222 222 222 222 2222 222 222222 222 222 222 2222 222 222 222 222222 2222 222 222 222 222 222222 2222222 222 222 222 2222222 222222 222 222 222 222 2222 2 2222 222 2222 222 222 222 222222 222 2222 222 222 222 222 222 2222222 222 222 222 222 222 2222 222 222222 222 222 2222 222 222 222222 222 2222 222 222 222 222222 222 2222 222 222 222 222 222 2222222 222 222 222 222 222 2222 222 222222 222 222 2222 222 222 222222 222 222 2222 222 222 222222 2222222 222 222 222 222 222 2222222 222222 222 222 222 2222 222 222222 222 222 2222 222 222 222222 222222 2222 222 222 222 222 2222222 222222 222 222 222 2222222 222222 222 222 222 2222 222 222 222 222222 222 2222 222 222 222 222222 2222222 222 2
2222 222 2222222 222 222 222 222 222 2222 222 222222 222 221 1111 111 111 111111 111 111 1111 111 111 111111 111 1111 111 111 111 111 111 1111111 111111 111 111 111 1111 122 222222 222 222 2222 222 222 222222 222 222 2222 222 222 222 222 2222222 222 222 222 222 222 2222222 222222 222 222 222 2222 222 222222 222 222 222 2222 222 222222 222 222 2222 222 222 222 222 2222222 222222 222 222 222 2222222 222222 222 222 222 2222 222 222222 222 222 222 2221 112 222 121 211212 2222 222 232 223 322 222222 222222 @ 1
Note
Making and saving video recordings can infringe on personal rights!
Always observe applicable legal and labeling requirements for placement and operation of video
components!
Operating Instructions | 0073-1-8652
— 19 —
Operating Instructions
ABB-Welcome
7.6
Configuration for IP Gateway
"Portal Login" configuration page
P os: 53 / #Neus truk tur#/Onlin e-Dokum enta tion (+KNX )/B e dien ung/ Tü rko mmunikatio n/B usch -Welco me/ Men ü Gerät eeinst ellun gen -83 341 @ 3 5\m od_ 1363 612407 376 _15. docx @ 28 8774 @
1111 111 1111111 111 111 111 111 111 1111 111 111111 111 111 1111 111 111 111111 111 111 1111 111 111 111111 1111111 111 111 111 111 111 1111 111 111111 111 111 111 1111 111 111111 111 111 1111 111 111 111111 111 111 1111 111 111 111 111 1111111 111 111 111 111 111 1111111 111111 111 111 111 1111 111 111111 111 111 111 1111 111 111111 111111 1111 111 111 111 111 1111111 111111 111 112 111 1111111 111111 111 111 111 1111 111 111111 111 111 111 1111 111 111 111 111111 1111111 111 111 111 111111 1111111 111 111 111 1111111 111111 111 111 111 111 1111 1 1111 111 1111 111 111 111 111111 111 1111 111 111 111 111111 1111111 111 111 111 111 111 1111 111 111111 111 111 1111 111 111 111111 111 1111 111 111 111 111111 1111111 111 111 111 111 111 1111 111 111111 111 111 111 1111 111 111111 111 111 1111 111 111 111111 111111 1111 111 111 111 111 1111111 111111 111 111 111 1111111 111111 111 111 111 1111 111 111111 111 111 1111 111 111 111 111 111111 1111111 111 111 111 1111111 111111 111 111 111 1111111 111111 111 111 111 1111 111 111111 111 111 111 1111 111 111 111 111111 1111111 111 1
1111 111 1111111 111 111 111 111 111 1111 111 111111 111 111 1111 111 111 111111 111 111 1111 111 111 111111 1111111 111 111 111 111 111 1111 111 111111 111 111 122 2222 2 @ 1
Fig. 11:
1.
"Portal Login" configuration page
Register a new username from this website: https://my.abb-livingspace.com
2
1
3
4
2.
3.
4.
5.
6.
Input the username,password and e-mail address to receive your activation link.
Read and accept both of the items.
Click the “Register” button.
Activate your user account following the instructions in the activation mail.
Login the user name and password on "Portal Login" configuration page.
Friendly Name
Name for this IP gateway, Which will be displayed in the device list of your Welcome App e.g. on your
smartphone.
Operating Instructions | 0073-1-8652
— 20 —
Operating Instructions
ABB-Welcome
7.7
Configuration for IP Gateway
"App Management" configuration page
P os: 53 / #Neus truk tur #/Onlin e-Dokum enta tion (+KNX )/B e dien ung/ Tü rko mmunikatio n/B usch -Welco me/ Men ü Ge ä
r t eeinst ellun gen -83 341 @ 3 5\m od_1363 612407 376 _15. docx @ 28 8774 @
1111111 1111111 111 111 111 111 111 1111111 111 111 111 111 1111 111 111 111111 111 111 1111 111 111 111111 111 1111 111 111 111 111 111 1111111 111 111 111 111 111 1111111 111111 111 111 1111 111 111 111111 111 111 1111 111 111 111111 111 1111 111 111 111 111 111 1111111 111111 111 111 111 1111 111 111111 111 111 111 1111 111 111111 111 111 1111 111 111 111 111 1111111 111111 111 112 111 1111111 111111 111 111 111 1111 111 111111 111 111 111 1111 111 111 111 111111 1111111 111 111 111 111111 1111111 111 111 111 1111111 111111 111 111 111 111 1111 1 1111 111 1111 111 111 111 111111 111 1111 111 111 111 111 111 1111111 111111 111 111 111 1111 111 111111 111 111 1111 111 111 111111 111 1111 111 111 111 111 111 1111111 111111 111 111 111 1111 111 111111 111 111 111 1111 111 111111 111 111 1111 111 111 111 111 111111 1111111 111 111 111 1111111 111111 111 111 111 1111111 111111 111 111 111 1111 111 111 111 111111 1111 111 111 111 111 111111 1111111 111 111 111 1111111 111111 111 111 111 111 1111 111111 111111 111 1111 111 111 111 111111 111 1111 111 111 111 111111 1111111 111 1
1111111 1111111 111 111 111 111 111 1111111 111 111 111 111 1111 111 111 111111 111 111 1111 111 111 111111 111 1111 111 111 111 111111 1111111 111 111 111 111 122 2222 2 @ 1
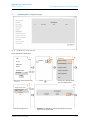
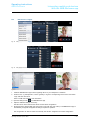
Fig. 12:
"App Management" configuration page
Pair IP gateway and smart phone:
1
2
3
Version:2.0.0
User
Welcome
abc123
System settings
Password
●●●●●●
Friendly Name
SM-N9009
Network settings
Ringtone buiding
Ringtone apartment
Friendly Name
of Smart phone
Reset Application
Login
Quit
Smart phone: Open the Welcom e APP
Click the
Android: select “Network settings”
iOS: select “Manage IPGW”
4
Integrity token 2071 01A9
IPGateway20140731
E2fff616 - pairble
5
Friendly Name
of IP gateway
Portal Client
UUID
Select the IP gateway to pair
Operating Instructions | 0073-1-8652
IP gateway: "APP Managem ent" configuration page displays the pairing
request, click the “Handle” button.
— 21 —
Operating Instructions
ABB-Welcome
Configuration for IP Gateway
6
7
See Step4:
Integrity token 2071 01A9
After configure the pemission, click the “save” button
Input the “Integrity code” which
displayed on smart phone
8
Paired successfully
9
Finish the App Managem ent
Modify
Click the "Modify" button to change your settings.
The current settings appear and can be modified.
Delete
Click the "Delete" button to remove a user from the list.
P os: 55 / #Neus truk tur #/Onlin e-Dokum enta tion (+KNX )/S t eue rmo dule - O nline-D oku ment ation -( -> Fü r all e D oku ment e < --)/++ ++ +++++ ++ + Seite nu mbr uch +++++ ++ +++ ++ @ 9\mod _12 688 986 680 93_0 .docx @ 5 214 9 @
1111111 1111111 211 111 111 111 111 1111111 111 111 111 111 1111 111 111 111111 111 111 1111 111 111 111111 111 1111 111 111 111 111 111 1111111 111 111 111 111 111 1111111 111111 111 111 2222 222 222 111111 111 111 1112 112 121 222221 211 2221 222 222 222 222 221 1112221 111112 111 111 111 1111 111 111111 111 111 111 1111 111 111111 111 111 1111 111 111 111 111 1111111 111111 111 111 111 1111111 111111 111 111 111 1111 111 111111 111 111 111 1111 111 111 111 111111 1111111 111 111 111 111111 1111111 111 111 111 1111111 111111 111 111 111 111 1111 1 1111 111 1111 111 111 111 111111 111 1111 111 111 111 111 111 1111111 111 111 111 111 111 1111 111 111111 111 111 1111 111 111 111111 111 1111 111 111 111 111 111 1111111 111111 111 111 111 1111 111 111111 111 111 111 1111 111 111111 111 111 1111 111 111 111 111 111111 1111 111 111 111 111 1111111 111111 111 111 111 1111111 111111 111 111 111 1111 111 111111 111111 1111 111 111 111 111 111111 1111111 111 111 111 1111111 111111 111 111 111 1111111 111111 111 111 111 1111 111 111 111 111111 111 1111 111 111 111 111111 1111111 111 1
1111111 1111111 111 111 111 111 111 1111111 111 111 111 111 1111 111 111 111111 111 111 1111 111 111 111111 111 1111 111 111 111 111111 1111111 111 111 111 111 111 1111 111 111111 111 111 1111 111 111 111111 111 111 1111 111 111 111111 1111111 111 111 111 111 111 1111111 111111 111 111 111 1111 111 111111 111 111 111 1111 111 111111 111111 1111 111 111 111 111 1111111 111111 111 111 111 1111111 111111 111 111 111 1111 111 @ 1
Operating Instructions | 0073-1-8652
— 22 —
Operating Instructions
ABB-Welcome
Configuration for IP Gateway
P os: 56 / #Neus truk tur#/Onlin e-Dokum enta tion (+KNX )/Ü bers chrift en (-- > Für alle Dokum ente <- -)/ 2. E bene/ M - O/K onfig ura tionss eite "Co mfor tP anel 2.x" @ 34\m od_1 362 552 773 805 _15. docx @ 28 482 5 @
2222 222 2222222 222 222 222 222 222 2222222 111111 111 111 1111 111 111 111111 111 111 1111 111 111 111111 111 1111 111 111 111 111 111 1111111 111 111 111 111 111 1111 111 111111 111 111 1111 111 111 111111 111 111 1111 111 111 111 111 1111111 111111 111 111 111 1111111 111111 111 111 111 1111 111 111111 111 111 111 1111 111 111111 111 111 1111 111 111 111 111 1111111 111 111 111 111 111 1111111 111111 111 111 111 1111 111 111111 111 111 111 1111 111 111111 111111 1111 111 111 111 111 111111 1111111 111 111 111 1111111 111111 111 111 111 111 1111 1 1111 111 1111 111 111 111 111111 111 1111 111 111 111 111 111 1111111 111 111 111 111 111 1111 111 111111 111 111 1111 111 111 111111 111 1111 111 111 111 111 111 1111111 111 111 111 111 111 1111 111 111121 111 111 111 1111 111 111111 111 111 1111 111 111 111111 111 111 1111 111 111 111 111 1111111 111 111 111 111 111 1111111 111111 111 111 111 1111 111 111111 111 111 1111 111 111 111111 111211 2121 222 222 222 222 2221211 222122 222 222 222 2221111 222111 111 222 222 2222 222 222222 222222 222 2222 222 222 222 222222 2222222 222 2
2222 211 1111111 111 111 111 111 111 1111 111 111111 111 111 1111 111 111 111111 111 111 1111 111 111 111111 1111111 111 112 111 111 111 1121 222 21 @ 1
7.8
"Associated ComfortTouch 2.x" configuration page
P os: 57 / #Neus truk tur#/Onlin e-Dokum enta tion (+KNX )/B e dien ung/ Tü rko mmunikatio n/B usch -Welco me/ Men ü Comfo rtP anel 2.x - 83341 @ 35\mo d_1 363 612 425 144 _15. docx @ 28 879 0 @
1111 121 1212221 222 222 222 222 222 2222 222 222222 222 222 2222 211 111 111111 111 111 1111 111 111 111111 1111111 111 111 111 111 111 1111 111 111111 111 111 111 1111 111 111111 111 111 1111 111 111 111111 111 111 1111 111 111 111 111 1111111 111 111 111 121 211 1121111 111111 122 211 111 1111 111 111111 111 111 111 1111 111 111111 111111 1111 111 111 111 111 1111111 111111 111 111 111 1111111 111111 111 111 111 1111 111 111111 111 111 111 1111 111 111 111 111111 1111111 111 111 111 111111 1111111 111 111 111 1111111 111111 111 111 111 111 1111 1 1111 111 1111 111 111 111 111111 111 1111 111 111 111 111111 1111111 111 111 111 111 111 1111 111 111111 111 111 1111 111 111 111111 111 1111 111 111 111 111111 1111111 111 111 111 111 111 1111 111 111111 111 111 111 1111 111 111111 111 111 1111 111 111 111111 111111 1111 111 111 111 111 1111111 111111 111 111 111 1111111 111111 111 111 111 1111 111 111111 111 111 1111 111 111 111 111 111111 1111111 111 111 111 1111111 111111 111 11@ 1
Fig. 13:
"Associated Busch-ComfortTouch ® 2.x" configuration page
The IP gateway can be used to control one Busch-ComfortTouch ® of the series 2.x. The Busch-ComfortTouch ®
firmware must be version 2.4 or higher.
1.
2.
3.
4.
5.
6.
Create a user, e.g. ComfortTouch1.
Set the compatibility mode to "Yes".
Enter the IP address of the Busch-ComfortTouch® in the "ComfortTouch 2.x address" field.
Create a configuration project in IPP 2.4 for the Busch-ComfortTouch® , "Door communication" application
page.
Enter the IP address of the IP gateway in the "Outdoor station" tab in the "Outdoor station IP address" menu
box.
Enter the address of the outdoor station.
Note
If you want to remove a Busch-ComfortTouch ® 2.x that is already connected to the Welcome
system, simply set compatibility mode to "No". The address does not have to be deleted.
Operating Instructions | 0073-1-8652
— 23 —
Operating Instructions
ABB-Welcome
7.9
Configuration for IP Gateway
"Associated ComfortTouch 3.x" configuration page
P os: 46 / #Neus truk tur#/Onlin e-Dokum enta tion (+KNX )/B e dien ung/ Tü rko mmunikatio n/B usch -Welco me/ Men ü B enutze rverwaltun g - 833 41 @ 36\ mod_13 709 352 785 36_1 5.d ocx @ 296 792 @ 22 222 222 222222 2222222 222 111 111 111 1111 111111 111 111 111 111 1111 111 111 111111 111 1111 111 111 111 111111 1111111 111 111 111 111111 1111111 111 111 111 111 1111 111111 111111 111 111 1111 111 111 111111 222 2222 222 222 222 222222 222 2222 222 111 111 111 221 1112221 111 111 111 111 311 1111 111 111111 111 111 1111 111 111 111111 111 1221 111 111 111 1 1111 111 1111 111 111 322 222221 124 2322 233 222 222 222 222 22 @ 1
Fig. 14:
"Associated Busch-ComfortTouch ® 3.x" configuration page
The IP gateway can be used to control one Busch-ComfortTouch ® of the series 3.x.
You can create up to three new users and administer your user settings on this configuration page.
ID
The ID is the sequential number of the user.
User name
All assigned accounts are displayed under "User name". Several devices can be logged in under each account.
You have the option of deleting the user or editing the settings.
Add user
Click the "Add user" button to create a new user.
1. Click the "Add user" button.
The description of the "Create new user" configuration page explains this function.
Modify
Click the "Modify" button to change your personal user settings.
The "Add user" configuration page opens. The current user appears and can be edited.
Delete
Click the "Delete" button to remove a user from the list.
Operating Instructions | 0073-1-8652
— 24 —
Operating Instructions
ABB-Welcome
7.9.1
Fig. 15:
Configuration for IP Gateway
"Add user" configuration page
"Add user" configuration page
The "Add user" configuration page opens.
User name
Enter the name of the new user in the "User name" input field.
A total of 3 different users with different roles can be created.
Password
Enter the required password of the new user in the "Password" input field.
Confirm
Enter the required password of the new user again in the "Confirm" input field.
Note
When specifying the user name, use characters without umlauts and numbers only, e.g.
Smartphone1. Spaces and special characters are not allowed.
Permission
You can assign the following permissions to the user:
Surveillance
The user can use the Welcome app to establish a video connection to the outdoor station (e.g. using a
smartphone or tablet) without there being a door call.
Operating Instructions | 0073-1-8652
— 25 —
Operating Instructions
ABB-Welcome
Configuration for IP Gateway
Unlock
Specify if the door can be opened by a smartphone, for example, or if only the incoming call and video signal are
transmitted.
Switch light
This function is only available if the lighting, e.g. the staircase lighting, can be switched on/off directly from the
Welcome system.
Save new user
1. Click the "Save" button.
The new user is saved.
P os: 47 / #Neus truk tur#/Onlin e-Dokum enta tion (+KNX )/S t eue rmo dule - O nline-D oku ment ation (- -> Fü r all e D oku ment e < --) /++ ++ +++++ ++ +S eite nu mbr uch +++ ++ ++ +++ ++ @ 9\ mod _12688 986 680 93_0 .docx @ 5 214 9 @ 2121 111 222 211 1111111 111111 111 111 111 1111 111 111 111 111111 1111 111 111 111 111 111111 1111111 111 111 111 1111111 111111 111 111 111 111 1111 111111 122 222 222 2222 222 222 222 222222 222 2222 222 222 222 222222 2222222 222 222 222 222222 2222222 222 222 222 222 2222 222222 222 222 222 2222 222 222 222 222222 222 2222 222 2222 222 2222 222 222 222 222222 222 2222 222 222 222 222222 2222222 222 222 222 222222 2222222 222 222 222 222 2222 222 222 222222 222 2222 222 222 222 222222 222 2222 222 222 222 222222 2222222 222 222 222 222 222 2222222 222222 222 222 2222 222 222 222222 222 222 2222 222 222 222222 2222222 222 222 222 222 222 2222222 222222 222 222 222 2222 222 222222 222 222 2222 222 222 222222 222 222 2222 111 122 111 111 1112222 223222 332 222 222 2222222 @ 1
Operating Instructions | 0073-1-8652
— 26 —
Operating Instructions
ABB-Welcome
Configuration for IP Gateway
P os: 48 / #Neus truk tur#/Onlin e-Dokum enta tion (+KNX )/B e dien ung/ Tü rko mmunikatio n/B usch -Welco me/ Men ü B enutze rverwaltun g -N eue n Ben utze r anl egen - 8334 1 @ 35\ mod_136 361 237 177 0_1 5.doc x @ 2 887 42 @ 221311 111 111 111 111111 1111111 111 111 111 1111111 111111 111 111 111 111 1111 111 111 111111 111 1111 111 111 111 111111 111 1111 111 111 111 211112 1122221 222 222 222 222 222 2222111 111 111 111 111 1111 111 111 111111 111 1111 111 111 111 111111 111 1111 111 111 111 111111 1111111 111 111 111 111 111 1111 111 111111 111 111 1111 11111 111 1111 111 111 111 111 111 1111111 111 111 111 111 111 1111 111 111111 111 111 111 1111 111 111111 111 111 1111 111 111 111111 1111111 111 111 111 111 111 1111111 111111 111 111 111 1111 111 111111 111 111 111 1111 111 111111 142 322 2332 222 222 222 222 2 @ 1
P os: 59 / #Neus truk tur#/Onlin e-Dokum enta tion (+KNX )/Ü bers chrift en (-- > Für alle Dokum ente <- -)/ 2. E bene/ M - O/K onfig ura tionss eite "Uplo ad/Dow nloa d de r Kon figur atio nsdat ei" @ 34\ mo d_13 625 528 95392_ 15.d ocx @ 284857 @ 22211 211212 122 222 222 2222 222 211112 111 111 1111 122 212 122 222 222222 2222222 222 222 222 2222222 222222 222 222 222 2222222 222222 222 222 222 2222 222 222 222 222222 222 2222 222 222 222 222222 2222222 222 222 222 222222 2222222 222 222 222 222 2222 222222 222 222 222 2222 222 222 222 222222 222 2222 222 222 222 22 2222 222 2222 222 222 222 222222 2222222 222 222 222 222 222 2222 222 222222 222 222 222 2222 22 @ 1
7.10
"Import / Export configuration file" configuration page
P os: 60 / #Neus truk tur#/Onlin e-Dokum enta tion (+KNX )/B e dien ung/ Tü rko mmunikatio n/B usch -Welco me/ Men ü Uplo ad/D ownloa d d erK o nfigu a
r tio nsdatei - 833 41 @ 35\ mod _13 636 124 38046_ 15.d ocx @ 288806 @ 22 222 222222 221 211 2221 212 122 222222 222 222 2211 112 111 111 111 1122212 121111 111 111 111 1111 111 111111 111 111 111 1111 111 111111 111 111 1111 111 111 111 111 111111 1111111 111 111 111 1111111 111111 111 111 111 1111111 111111 111 111 111 1111 111 111 111 111111 111 1111 111 111 111 111111 1111111 111 111 111 1111111 111111 111 1111 111 1111 111 111 112 222222 222 2222 222 222 222 222222 2222222 222 222 222 222 222 2222 222 222222 222 222 2222 222 221 223222 332 2222 222 222 222 @ 1
Fig. 16:
"Import / Export configuration file" configuration page
Note
The option to create and replace an IP gateway configuration file is for service purposes only and
should only be used by the Busch-Jaeger Service Center on request for diagnosing errors.
P os: 61 / #Neus truk tur#/Onlin e-Dokum enta tion (+KNX )/S t eue rmo dule - O nline-D oku ment ation (- -> Fü r all e D oku ment e < --) /++ ++ +++++ ++ +S eite nu mbr uch +++ ++ ++ +++ ++ @ 9\ mod _12688 986 680 93_0 .docx @ 5 214 9 @ 2222 121 211 122 2222222 222222 222 222 222 2222 222 222 222 222222 2222 222 222 222 222 222222 2222222 222 222 222 2222222 222222 222 222 222 222 2222 222222 222 222 222 2222 222 222 222 222222 222 2222 222 222 222 222222 2222222 222 222 222 222222 2222222 222 222 222 222 2222 222222 222222 222 2222 222 222 222 222222 222 2222 222 2222 222 2222 222 222 222 222222 222 2222 222 222 222 222222 2222222 222 222 222 222222 2222222 222 222 222 222 2222 222 222 322233 222 2222 222 222 2 @ 1
Operating Instructions | 0073-1-8652
— 27 —
Operating Instructions
ABB-Welcome
Configuration for IP Gateway
P os: 62 / #Neus truk tur#/Onlin e-Dokum enta tion (+KNX )/Ü bers chrift en (-- > Für alle Dokum ente <- -)/ 2. E bene/ M - O/K onfig ura tionss eite "Fi rmwa re U pdat e" @ 35\ mo d_1 3625 530 673 74_ 15.d ocx @ 284 908 @ 2 121 1222 121 212 221 121122 2222 222 222 222 211 111111 1111111 111 111 111 1111111 111111 111 111 111 111 1111 111111 111111 111 1111 111 111 111 111111 1111111 111 111 111 111111 1111111 111 111 111 222 2222 222 222 222222 222 222 2222 222 222 222222 222 2222 222 222 222 222222 222 2222 222 222 222 222 222 2222222 222222 222 222 222 2222 222 32 2233 222 2222 222 222 2 @ 1
7.11
"Firmware Update" configuration page
P os: 63 / #Neus truk tur#/Onlin e-Dokum enta tion (+KNX )/P r ojekti eru ng/ Türk ommunik ation/B usch-W elcome II/ Men ü Firmw are U pda te- 83 341 @ 36 \mod_1 370 9353 466 04_ 15. docx @ 296 824 @ 2 111 111 1111 122 222222 222 222 2222 222 222 222211 111111 1112 121 122 212 121 2221121 122222 222 222 222 2211111 111111 111 111 111 1111 111 111111 111 111 1111 111 111 111 111 111111 1111111 111 111 111 1111111 111111 111 111 111 111 1111 111111 111111 111 1111 222 222 222 222222 222 2222 222 222 222 222222 2222222 222 222 222 222 222 2222222 222222 222 22222 222 2222 222 222 222 222 222 2222222 222211 111 111 111 1122 322 233222 222 222 222 22@ 1
Fig. 17:
"Firmware Update" configuration page
The IP gateway has the option to manually update the device software.
Note
Device updates are not normally required and should only be carried out for troubleshooting
purposes and to update to the myABB-LivingSpace solution.
Note
Before updating the firmware, always check if the update bears a date more recent that the
software already installed. See also the section "Version information".
P os: 64 / #Neus truk tur#/Onlin e-Dokum enta tion (+KNX )/S t eue rmo dule - O nline-D oku ment ation (- -> Fü r all e D oku ment e < --) /++ ++ +++++ ++ +S eite nu mbr uch +++ ++ ++ +++ ++ @ 9\ mod _12688 986 680 93_0 .docx @ 5 214 9 @ 2221 212 122 222 2222222 222222 222 222 222 2222 222 222 222 222222 2222 222 222 222 222 222222 2222222 222 222 222 2222222 222222 222 222 222 222 2222 222222 222 222 222 2222 222 222 222 222222 222 2222 222 222 222 222222 2222222 222 222 222 222222 2222222 222 222 222 222 2222 222 222 222222 222 2222 222 222 222 222222 222 2222 222 2222 222 2222 222 222 222 222222 222 2222 222 222 222 222222 2222222 222 222 222 222 222 2222222 222222 222 222 2222 222 222 222222 222 2222 22 @ 1
Perform the following steps to update your device, if necessary.
When determining your current software version, observe especially the instructions of the IP gateway operating
manual, which can be downloaded at www.busch-jaeger-katalog.de/8300-0-0328,artikel.html.
Open the web interface of the IP gateway via your browser and log yourself in.
Under menu item Versions Information, check the current software version of your IP gateway (in the second line
of the display ASM04_GW_V…).
Note
All settings of the IP gateway are deleted during the update. Please first note down the details
specified under basic settings and device settings.
P os: 63 / #Neus truk tur#/Onlin e-Dokum enta tion (+KNX )/P r ojekti eru ng/ Türk ommunik ation/B usch-W elcome II/ Men ü Firmw are U pda te- 83 341 @ 36 \mod_1 370 9353 466 04_ 15. docx @ 296 824 @ 2 111 111 1111 122 222222 222 222 2222 222 222 222211 111111 1112 121 122 212 121 2221121 122222 222 222 222 2211111 111111 111 111 111 1111 111 111111 111 111 1111 111 111 111 111 111111 1111111 111 111 111 1111111 111111 111 111 111 111 1111 111111 111111 111 1111 222 222 222 222222 222 2222 222 222 222 222222 2222222 222 222 222 222 222 2222222 222222 222 22222 222 2222 222 222 222 222 222 2222222 222211 111 111 111 1122 322 233222 222 222 222 22@ 1
1.
2.
3.
Download the current software from the Busch-Jaeger e-catalogue at "www.busch-jaeger-katalog.de/8300-00328,artikel.html".
Save and unpack the zip archive on your PC.
Open menu item firmware update and upload the .tar file. This process can take up to 10 minutes. The device
must not be disconnected from the power supply during this period.
Operating Instructions | 0073-1-8652
— 28 —
Operating Instructions
ABB-Welcome
Configuration for IP Gateway
1. The IP gateway with the new software is now ready for operation. The user name and password have
been reset to the factory settings admin / admin. Assign a new password if necessary.
2. Re-enter the configuration data (basic settings, device settings).
3. Set the time zone.
Note
In case of a fixed IP address there is the possibility that the device has obtained a new address via
DHCP after the software update.
For a new assignment of the IP address, please observe the details in chapter 5 of the IP gateway
manual.
Note
After a software update of the IP gateway, the entire Welcome installation must be disconnected
from the power and then restarted. This step is necessary to ensure that the system controller
accepts the IP gateway as authorized device and as part of the installation. If this step is not
carried out, only the transmission of audio and video signals functions. A door cannot be opened.
Pos:
65 /#Neustruktur#/Online-Dokumentation
(+KNX)/Überschriften (--> Für alle @
Dokumente
O/Konfigurationsseite
"NTP Einstellungen"
@ 35\mod_1362553145958_15.docx
284924 @<--)/2. Ebene/M 222222222222222222222222222222222222222222222222222222222222222222222222222222222222222222222222
222222222222222222222222222222222222222222222222222222222222222222222222222222222221111122222222
22232223322222222222222
@1
Operating Instructions | 0073-1-8652
— 29 —
Operating Instructions
ABB-Welcome
7.12
Configuration for IP Gateway
"NTP settings" configuration page
P os: 66 / #Neus truk tur#/Onlin e-Dokum enta tion (+KNX )/B e dien ung/ Tü rko mmunikatio n/B usch -Welco me/ Men ü NTP E ins tellun gen - 8334 1 @ 36\m od_136 361 248 939 2_15 .docx @ 2 888 38@ 221 221 111 111111 1111111 111 112 222 222 2222 222222 222 222 222 222 2222 222 222 222222 222 2222 222 222 222 222222 2222222 222 222 222 222 222 2222222 222 222 222 222 2222 222222 222222 222 222 2222 222 222 222222 222 2222 222 222 222 222222 222 2222 222 222 222 222 222 2222222 222 222 222 222 222 2222 222 222222 222 222 2222 222 222 222222 222 2222 222 222 222 2 2222 222 2222 122 222 222 211112 111 1111 111 111 111 111 111 1111122 322233 222 222 222 2222 2 @ 1
Fig. 18:
"NTP settings" configuration page
The "NTP (Network Time Protocol) settings are used to define with which time signal the IP gateway is
synchronised.
There are two options for synchronisation:
Synchronisation via the Internet
1. Select the Internet time (NTP) setting.
2. Add an NTP server.
The "ntp.nasa.gov" server is already preset.
3. Set the time zone for your location.
4. Save your entries.
Synchronisation via Busch-ComfortTouch® 3.x or by mobile device
1. Select the setting from the app or Busch-ComfortTouch® 3.x.
The IP gateway takes its time settings from the panel or from a mobile end device.
P os: 67 / #Neus truk tur#/Onlin e-Dokum enta tion (+KNX )/S t eue rmo dule - O nline-D oku ment ation (- -> Fü r all e D oku ment e < --) /++ ++ +++++ ++ +S eite nu mbr uch +++ ++ ++ +++ ++ @ 9\ mod _12688 986 680 93_0 .docx @ 5 214 9 @ 1111 111 111 122 2222222 222222 222 222 222 2222 222 222 222 222222 2222 222 222 222 222 222222 2222222 222 222 222 2222222 222222 222 222 222 222 2222 222222 222222 222 2222 222 222 222 222222 222 2222 222 222 222 222222 2222222 222 222 222 222 222 2222222 222 222 222 222 2222 222 222 222222 222 2222 222 222 222 222222 222 2222 222 2222 222 2222 222 222 222 222222 222 2222 222 222 222 222222 @ 1
Operating Instructions | 0073-1-8652
— 30 —
Operating Instructions
ABB-Welcome
Configuration for IP Gateway
P os: 68 / #Neus truk tur #/Onlin e-Dokum enta tion (+KNX )/Ü bers chrift en (-- > Für alle Dokum ente <- -)/ 2. E bene/ M - O/K onfiu rati onsseite "N eues Ze rtifika ter tsellen" @ 35\ mod _13 625 532 21181_1 5.d ocx @ 284956 @ 22 222 222222 2222222 222 222 222 222222 2222222 222 222 222 222 2222 222222 222222 222 222 2222 222 222 222222 222 2222 222 222 222 222222 222 2222 222 222 222 222 222 2222222 222222 222 222 2222 222 222 222222 222 222 2222 222 222 222222 222 2222 222 222 222 222 222 2222222 222 222 222 222 222 2222222 221111 212 232 223 3222 222 222222 22 @ 1
P os: 71 / #Neus truk tur #/Onlin e-Dokum enta tion (+KNX )/Ü bers chrift en (-- > Für alle Dok um ente <- -)/ 2. E bene/ M - O/Me nü V ersions Inf orm ation @ 3 5\mod_ 1362553 337 526 _15. docx @ 28 498 8 @ 1111 111 111 111 111111 1111111 111 111 111 111 111 1111 111 111111 111 111 111 1111 111 111111 111 111 1111 111 111 111111 1111111 111 111 111 111 111 1111111 111111 111 111 111 1111 111 111111 111 111 111 1111 111 111111 111111 1111 111 111 111 111 111111 1111111 111 111 111 1111111 111 @ 1
7.13
"Versions Information" configuration page
P os: 72 / #Neus truk tur #/Onlin e-Dokum enta tion (+KNX )/B e dien ung/ Tü rko mmunikatio n/B usch -Welco me/ Men ü V ersi ons I nforma tion -83 341 @ 3 6\mo d_1 363 612527 526 _15. docx @ 28 8870 @ 1 111111 111111 111 1111 111 111 111 111111 111 1111 111 111 111 111111 1111111 111 111 111 111 1111 111111 111111 111 111 1111 111 111 111111 111 1111 111 112 222 222222 222 2222 222 222 222 222 222 2222222 222222 222 222 222 2222 222 222222 222 222 2222 222 222 222222 222 2222 222 222 222 222 222 2222222 222222 222 222 222 2222 222 222222 222 221 111 1111 111 111111 111 1111 111 111 111 112 221 @ 1
Fig. 19:
"Version Information" configuration page
The "Version Information" configuration page provides information about the hardware and software components
of the IP gateway and is required for service purposes or error diagnostics.
Note
Before updating the firmware, always check if the update bears a date more recent that the
software already installed.
The firmware creation date is in the file name and version information in the format YYYYMMMDD.
ASM04_GW_V2.29_20140728_MP
_TIDM365_factory_filesystem.img
Fig. 20:
Creation date, position of the firmware
The figures above provide examples of a Zip archive with the creation date 25.12.2012 and the corresponding
version information.
Operating Instructions | 0073-1-8652
— 31 —
Operating Instructions
ABB-Welcome
8
Configuration for Telephone
Gateway
Configuration for Telephone Gateway
Via one IP-Gateway (83342, 83342-5xx), the computer or laptop can configure all parameters configured by
telehpone.
1. Log in via website: 192.168.0.2, then enter the homepage:
1
3
2
Fig. 21
No.
Function
1
The default language is English, and clicking the flag can select other languages
2
Select Telephone Gateway from Device list
3
Click “Login“ to enter the next level
2.
Start searching the device
Fig. 22
3.
The result of seaching is displayed as follows:
Operating Instructions | 0073-1-8652
— 32 —
Operating Instructions
ABB-Welcome
2
Configuration for Telephone
Gateway
1
Fig. 23
No.
Function
1
Click "Refresh" to search all existed Telephone Gateway.
2
Click "Exact Search" to search the targeted Telephone Gateway. Telephone Gateway number m ust be
input firstly.
4.
Select a Telephone Gateway device in the list, and input the password. Default password:1234.
Fig. 24
5.
If the password is correct, it will display as follows:
Operating Instructions | 0073-1-8652
— 33 —
Operating Instructions
ABB-Welcome
Configuration for Telephone
Gateway
Fig. 25
No.
Function
1
Click "Edit" to change the password, all passwords are 4 digits and plain code
2
Installer can select "Enable" or "Disable" for Direct-accept from the list
3
Installer can Enable/Disable "Call Divert for All Indoor Stations"
4
This Admin Password is used when user logins TGW x
5
Installer can edit Default Phone Number directly with maximum 16 digits
6
Installer can Enable/Disable "Indoor Station PIN Active for all Indoor Stations"
7
All Indoor Station numbers are listed from 1 to 99
8
Installer can select "Yes" or "No" from "Existed" according to actual installation
a.
If "Yes" is selected, all parameters on its right can be edited
b.
If "No" is selected, all parameters on its right is deleted, which means this Indoor Station is deleted
from the Indoor Station address.
9
Installer can select "Enable" or "Disable" from "Indoor Station PIN Active"
10
Installer can select "Default" or "Primary" or "Secondary" from "Call Divert Number Active"
11
Installer can edit Primary and Secondary Phone Number, with maximum phone number is 16 digits
12
Installer can edit Indoor Station PIN, PIN is 4 digits and plain code
13
Click "Export", all current parameters of the Telephone Gateway are exported to *.txt. If the installer did
modification but didn't click "Send", then click "Export", the original parameters are exported.
14
After imported, installer must click "Send" to send these parameters to Telephone Gateway (This is only for
replacement in field)
15
Clicking "Import", can import parameters from one file with name *.txt. All parameters are updated in above
table
16
Click "Reset & Send", and a double-confirmation window will pop up.
a.
If click "OK", this table is reset to factory setting and factory setting also is sent to Telephone
Gateway.
b.
If click "back", the pop-up window disappears without reset.
17
Click "Logout", and exit without sending the modification to Telephone Gateway.
Operating Instructions | 0073-1-8652
— 34 —
Operating Instructions
ABB-Welcome
9
Configuration for Access
Control modules
Configuration for Access Control modules
9.1
Keypad module
Via one IP-Gateway (83342, 83342-5xx), the computer or laptop can configure parameters configured by Keypad
module.
1. Log in via website: 192.168.0.2, then enter the homepage:
1
3
2
Fig. 26
No.
Function
1
The default language is English, and clicking the flag can select other languages
2
Select Keypad Module from Device list
3
Click “Login“ to enter the next display
2.
Start searching the device
Fig. 27
No.
Function
1
Click "Confirm" to search all existed keypad module.
3.
The result of seaching is displayed as follows:
Operating Instructions | 0073-1-8652
— 35 —
Operating Instructions
ABB-Welcome
Configuration for Access
Control modules
Keypad Modual4 (OS)
Fig. 28
4.
Select a Keypad module in the list, and input the password. Default password:1234.
Fig. 29
5.
If the password is correct, it will display as follows:
Operating Instructions | 0073-1-8652
— 36 —
Operating Instructions
ABB-Welcome
Configuration for Access
Control modules
Fig. 30
Fuction
Description
Button: Edit
Notice! Please change default AC module password for accessing the IP-gateway.
Click " Edit " to change the access module password, a password must be a 4 digit number.
Button: Enroll
Click " Enroll" to enroll a new user.
The Name and user password (Mandatory) can also be edited. Name max length is 12 digits. Password
must be a 3 to 8 digit number.
The new enrolled user is enabled just to open the door (user) or to act as administrator (admin).
Column “Unlock”
Select the door, the current user should be able to open (1-4). By choosing “Off”, no door can be opened.
Column “Switch Light by
Choose „on“ or „standard“ to enable the user to switch the light. Choose “Off” to disable this function.
Systemcontroller”
Button: Import
Click "Import", can import parameters from a file in *.txt format. To create a propper import file, export an
example at first to have a template for the necessary structure.
Button: Export
Click "Export", all current parameters of this Keypad Module are exported to *.txt
Button: Send
Click "Send", all parameters including modified Login Password are sent to Keypad Module.
Button: Reset/Send
Click " Reset/Send " to reset the AC module to factory settings. After entering and confirming the AC
module password, all users and adminstrators are deleted. The AC module password is set back to default.
Button Delete Selected
Click “Delete Selected” to delete selected user entries.
Butto Logout
Click "Logout", to exit configuration.
Operating Instructions | 0073-1-8652
— 37 —
Operating Instructions
ABB-Welcome
Configuration for Access
Control modules
9.2
Fingerprint module
Via one IP-Gateway (83342, 83342-5xx), the computer or laptop can configure parameters configured by
Fingerprint module.
1. Log in via website: 192.168.0.2, then enter the homepage:
1
3
2
Fig. 31
No.
Function
1
The default language is English, and clicking the flag can select other languages
2
Select Fingerprint Module from Device list
3
Click “Login“ to enter the next display
2.
Start searching the device
Fig. 32
No.
Function
1
Click "Confirm" to search all existed fingerprint module.
3.
The result of seaching is displayed as follows:
Operating Instructions | 0073-1-8652
— 38 —
Operating Instructions
ABB-Welcome
Configuration for Access
Control modules
Fingerprint Modual1 (OS)
Fig. 33
4.
Select a Keypad module in the list, and input the password. Default password:1234.
Fig. 34
5.
If the password is correct, it will display as follows:
Operating Instructions | 0073-1-8652
— 39 —
Operating Instructions
ABB-Welcome
Configuration for Access
Control modules
Fig. 35
Fuction
Description
Button: Edit
Notice! Please change default AC module password for accessing the IP-gateway.
Click " Edit " to change the access module password, a password must be a 4 digit number.
Button: Enroll
Click " Enroll " to enroll a new user.
The Name and user password (Mandatory) can also be edited. Name max length is 12 digits. Password
must be a 3 to 8 digit number.
The new enrolled user is enabled just to open the door (user) or to act as administrator (admin).
Column “Unlock”
Select the door, the current user should be able to open (1-4). By choosing “Off”, no door can be opened.
Column “Switch Light by
Choose „on“ or „standard“ to enable the user to switch the light. Choose “Off” to disable this function.
Systemcontroll”
Column “Switch Light by
in combination with switch actuator 83330-… the relay output can be activated by the user.
Relay”
Columns Hand, Finger
Enter information, which hand and finger is used for current user.
Button: Send
Click "Send", all parameters including modified Login Password are sent to Keypad Module.
Button: Reset/Send
Click " Reset/Send " to reset the AC module to factory settings. After entering and confirming the AC
module password, all users and adminstrators are deleted. The AC module password is set back to default.
Button Delete Selected
Click “Delete Selected” to delete selected user entries.
Butto Logout
Click "Logout", to exit configuration.
Operating Instructions | 0073-1-8652
— 40 —
Operating Instructions
ABB-Welcome
Configuration for Access
Control modules
9.3
Transponder module
Via one IP-Gateway (83342, 83342-5xx), the computer or laptop can configure parameters configured by
Transponder module.
1. Log in via website: 192.168.0.2, then enter the homepage:
1
3
2
Fig. 36
No.
Function
1
The default language is English, and clicking the flag can select other languages
2
Select Transponder Module from Device list
3
Click “Login“ to enter the next display
2.
Start searching the device
Fig. 37
No.
Function
1
Click "Refresh" to search all existed transponder module.
3.
The result of seaching is displayed as follows:
Operating Instructions | 0073-1-8652
— 41 —
Operating Instructions
ABB-Welcome
Configuration for Access
Control modules
Transponder Modual1 (OS)
Transponder Modual2 (OS)
Fig. 38
4.
Select a Keypad module in the list, and input the password. Default password:1234.
Fig. 39
5.
If the password is correct, it will display as follows:
Operating Instructions | 0073-1-8652
— 42 —
Operating Instructions
ABB-Welcome
Configuration for Access
Control modules
Fig. 40
Fuction
Description
Button: Edit
Notice! Please change default AC module password for accessing the IP-gateway.
Click " Edit" to change the access module password, a password must be a 4 digit number.
Button: Enroll
Click " Enroll" to enroll a new user.
The Name and user password (Mandatory) can also be edited. Name max length is 12 digits. Password
must be a 3 to 8 digit number.
The new enrolled user is enabled just to open the door (user) or to act as administrator (admin).
Column “Unlock”
Select the door, the current user should be able to open (1-4). By choosing “Off”, no door can be opened.
Column “Switch Light by
Choose „on“ or „standard“ to enable the user to switch the light. Choose “Off” to disable this function.
Systemcontroller”
Column Relais Schalten
in combination with switch actuator 83330-… the relay output can be activated by the user.
Button: Import
Click "Import", can import parameters from a file in *.txt format. To create a propper import file, export an
example at first to have a template for the necessary structure.
Button: Export
Click "Export", all current parameters of this Keypad Module are exported to *.txt
Button: Send
Click "Send", all parameters including modified Login Password are sent to Keypad Module.
Button: Reset/Send
Click " Reset/Send " to reset the AC module to factory settings. After entering and confirming the AC
module password, all users and adminstrators are deleted. The AC module password is set back to default.
Button Delete Selected
Click “Delete Selected” to delete selected user entries.
Butto Logout
Click "Logout", to exit configuration.
P os: 73 / #Neus truk tur#/Onlin e-Dokum enta tion (+KNX )/S t eue rmo dule - O nline-D oku ment ation (- -> Fü r all e D oku ment e < --) /++ ++ +++++ ++ +S eite nu mbr uch +++ ++ ++ +++ ++ @ 9\ mod _12688 986 680 93_0 .docx @ 5 214 9 @ 2222 222 222 111 1111111 111111 111 111 111 1111 111 111 111 111111 1111 111 111 111 111 111111 1111111 111 111 111 1111111 111111 111 111 111 111 1111 111111 111 111 111 1111 111 111 111 111111 111 1111 111 111 111 111111 1111111 111 111 111 111111 1111111 111 111 111 111 1111 111111 111111 111 1111 111 111 111 111111 111 1111 111 1111 111 1111 111 111 111 111123 222 3322 222 222 222 222 @ 1
Operating Instructions | 0073-1-8652
— 43 —
Operating Instructions
ABB-Welcome
Integrating mobile end devices
with the ABB-Welcome app
P os: 74 / #Neus truk tur#/Onlin e-Dokum enta tion (+KNX )/Ü bers chrift en (-- > Für alle Dokum ente <- -)/ 1. E bene/A - F/E in bindung Mobiler E n dgeräte mit der B u sch-W elcome® A pp @ 3 5\mo d_1 362 553 638 409_15. docx @ 28 5052 @ 2 222 222 222222 2222222 222 222 222 222222 2222222 222 222 222 222 2222 222222 222 222 222 222 2222 222 222 222222 222 2222 222 222 222 222222 222 2222 222 222 222 222 222 2222222 222222 222 222 222 2222 222 @ 1
10
Integrating mobile end devices with the ABB-Welcome app
P os: 75 / #Neus truk tur#/Onlin e-Dokum enta tion (+KNX )/B e dien ung/ Tü rko mmunikatio n/B usch -Welco me/Ein bind ung Mobil er E n dge räte mit der B u sch-W elcom e® A pp - 8334 1 @ 36\m od_136 361 254 275 6_15 .docx @ 2 888 86@ 222 222 222 2222222 222222 222 222 222 222 2111 111111 111 111 111 1111 111 111 111 111111 111 2222 222 222 222 222222 2222222 222 222 222 222 2222 222222 222 222 222 222 2222 222 222 222222 222 2222 222 222 222 222222 222 2222 222 222 222 222222 1111111 111 111 111 111 111 1111111 112222 222 222 2222 222 222 222222 222 222 21 @ 1
You can add end devices to the ABB-Welcome system from the ABB-Welcome app. The ABB-Welcome app is
available in two versions and supports the iOS and Android operating systems.
You can download the ABB-Welcome app from Google Play or the Apple App Store directly
by scanning the adjacent QR code. Apple and Android devices can open the link.
P os: 76 / #Neus truk tur#/Onlin e-Dokum enta tion (+KNX )/Ü bers chrift en (-- > Für alle Dokum ente <- -)/ 2. E bene/A - F/A n droi d ab V ersion 4. 0 @ 35\m od_136 255 381 973 6_15 .docx @ 2 850 85@ 222 222 222 2222222 222222 222 222 222 122 2222 222222 222 222 222 2222 222 222 222 222222 222 2222 222 222 222 222222 2122222 222 222 222 222 222 2222222 222 222 222 222 2222 222 222 222222 222 222 2222 222 222 222222 222 2222 222 222 222 222222 2222222 222 222 222 222 222 2222222 222222 222 222 2222 222 222 222222 222 222 2222 222 222 222222 222 2222 222 222 222 2 2222 222 2222 222 222 222 222222 222 2222 222 222 222 222 222 2222222 222222 211 111 111 1111 111 111111 111 111 1111 111 111 112222 222 2222 222 222 222 222 222 2222222 222 222 222 222 222 2222222 222222 222 222 222 2222 222 222222 222 222 2222 222 222 222222 222 222 2222 222 222 222 222 2222222 222 222 222 222 222 2222222 232223 322 222 222 2222 22 @ 1
10.1
Android version 4.0 or higher
P os: 77 / #Neus truk tur#/Onlin e-Dokum enta tion (+KNX )/B e dien ung/ Tü rko mmunikatio n/B usch -Welco me/An droi d ab V ersio n4. 0 - 83341 @ 36\ mod _13636 125 572 12_1 5.d ocx @ 288 902 @ 12 222 222 222 2222 222 222222 222 222 222 2222 222 222 222 222222 2222 222 222 222 222 222222 2222 @ 1
Figure. 41:
1.
2.
Android Version 4.0 or higher
Install the ABB-Welcome app from Google Play on your smartphone or tablet PC.
Create a user, e.g. Smartphone1, in the IP gateway or log into a corresponding user account. See section
"Create new user".
There is a QR code below the user information.
3. Open the settings menu
in the ABB-Welcome app.
4. Open the "Network settings" menu entry.
The QR code is used to activate the camera via the "Quick configuration".
5. Photograph the IP gateway QR code (see section "Login with new user name").
The ABB-Welcome app is automatically configured and applies all settings required for operation.
P os: 78 / #Neus truk tur#/Onlin e-Dokum enta tion (+KNX )/S t eue rmo dule - O nline-D oku ment ation (- -> Fü r all e D oku ment e < --) /++ ++ +++++ ++ +S eite nu mbr uch +++ ++ ++ +++ ++ @ 9\ mod _12688 986 680 93_0 .docx @ 5 214 9 @
2222 222 2222222 222 222 222 222 222 2222 222 222222 222 222 2222 222 222 222222 222 222 2222 222 122 222222 2222222 222 222 222 222 222 2111111 111111 111 111 111 1111 111 111111 111 111 1111 122 222 222222 222 222 2222 222 222 222 222 2222222 222 222 222 222 222 2222222 222222 222 222 222 2222 222 222222 222 222 222 2222 222 222222 222 222 2222 222 222 222 222 2222222 222222 222 222 222 2222222 222222 222 222 222 2222 222 222222 222 222 222 2222 222 222 222 222222 2222222 222 222 222 222222 2222222 222 222 222 2222222 222222 222 222 222 222 2222 2 2222 222 2222 222 222 222 222222 222 2222 222 222 222 222 222 2222222 222222 222 222 222 2222 222 222222 222 222 2222 222 222 222222 222 2222 222 222 222 222 222 2222222 222 222 222 222 222 2222 222 222222 222 222 222 2222 222 222222 222 222 2222 222 222 222222 222 222 2222 222 222 222 222 2222222 222 222 222 222 222 2222222 222222 222 222 222 2222 222 222222 222 222 2222 222 222 223 222 332222 2222222 222 @ 1
Operating Instructions | 0073-1-8652
— 44 —
Operating Instructions
ABB-Welcome
Integrating mobile end devices
with the ABB-Welcome app
P os: 79 / #Neus truk tur#/Onlin e-Dokum enta tion (+KNX )/B e dien ung/ Tü rko mmunikatio n/B usch -Welco me/ Mobil e E ndg erä te - 83 341 @ 36 \mo d_1 363 612 5700 97_15. docx @ 28 8918 @ 2 222 222 2222 222 222222 222 222 222 2222 222 222222 222 222 2222 222 222 222222 222 222 2222 222 222 222 222 2222222 222 222 222 222 222 2222222 222222 222 222 222 2222 222 222222 222 222 222 2222 222 222222 222222 2222 222 222 222 222 2222222 222222 222 222 222 2222222 222222 222 222 222 2222 111 111111 111 111 111 1111 111 111 111 111111 1121111 111 111 111 111111 111 1111 111 1111 111 111 111 111111 111 1111 111 111 111 111111 1111111 111 111 111 111 111 1111 111 111111 111 111 1111 111 111 111111 111 1111 111 111 111 111111 111 1111 111 111 111 111 111 1111 111 111111 111 111 111 11 @ 1
10.2
iOS version 4 or higher
Fig. 42:
iOS (Apple) version 4 or higher
Fig. 43:
iOS (Apple) version 5 or higher
Fig. 44:
iPad
1.
2.
Install the ABB-Welcome app from the Apple App Store on your smartphone or tablet PC.
Create a user, e.g. Smartphone1, in the IP gateway or log into a corresponding user account. See section
"Login with new user name".
There is a QR code below the user information.
3. Open the settings menu
in the ABB-Welcome app.
4. Open the "Network settings" menu entry.
The QR code is used to activate the camera via the "Quick configuration".
5. Photograph the IP gateway QR code (see section "Login with new user name"). The ABB-Welcome app is
automatically configured and applies all settings required for operation.
The configuration can also be carried out manually. See section "Integration via manual configuration".
Operating Instructions | 0073-1-8652
— 45 —
Operating Instructions
ABB-Welcome
Integrating mobile end devices
with ABB-Welcome for myABBLivingSpace
11
Integrating mobile end devices with ABB-Welcome for myABBLivingSpace
11.1
System requirements
For the setup and use of the myABB-LivingSpace solution for ABB-Welcome the following is required:
Welcome installation with IP gateway 83341 or 83342, software version 1.15 (or higher). The installation of the
software update is described in the following chapter.
Laptop, tablet PC or similar device with an Internet browser for access to the portal at address https://my.abblivingspace.com and for the configuration of the IP gateway in the home network.
Internet connection of the Welcome installation with a band width of at least ADSL 6.000.
Tablet PC or similar device with an iOS or Android operating system for the installation of the app with an Internet
connection via 3G/UMTS or WLAN. The data rate (e.g. a flat rate) must allow for Voice-over-IP ("VoIP")
connections.
Note
An Internet connection slower than ADSL 6.000 or 3G/UMTS impairs the quality of video
streaming from the IP gateway to the apps.
In addition to the apps, at least one indoor station (e.g. an ABB-WelcomeTouch or an indoor audio station) must
be used since the cabled solution always offers more availability than a solution that is only supported by mobile
end devices or apps.
11.2
Software-Update of the IP-Gateway
For the ABB-Welcome for myABB-LivingSpace solution, the IP Gateway must be equipped with software version
1.15 or higher.
Instructions fort he update process can be found in chapter 7.11 „Firmware Update“.
11.3
Setup of the ABB-Welcome for the myABB-LivingSpace solution
11.3.1
Step 1: Registering and logging into myABB-LivingSpace portal
1.
Fig. 45:
Open page https://my.abb-livingspace.com/ and, if necessary, register yourself as new user.
myABB-LivingSpace Login
2. Read and accept the regulations for use and data protection.
3. You will receive an e-mail at the address you specified. Your user account is activated by calling up the link in the
e-mail.
4. You can now log yourself into the portal with your user name and password.
Operating Instructions | 0073-1-8652
— 46 —
Operating Instructions
ABB-Welcome
11.3.2
Integrating mobile end devices
with ABB-Welcome for myABBLivingSpace
Step 2. Connecting the IP gateway with the myABB-LivingSpace portal
In the web interface of the IP gateway, in menu Login Portal, enter your data for access to the myABB-LivingSpace
portal and the name of the IP gateway. Click the login button to connect the IP gateway with the portal.
Fig. 46:
11.3.3
Web Interface IP-Gateway
Step 3: Installing the "Welcome for myABB-LivingSpace" app
1. If necessary, delete an existing version of the Welcome app from your devices.
2. Install the "Welcome for myABB-LivingSpace" app.
Open the app and enter the data for access to the myABB-LivingSpace portal. Click the Login button to connect
the app with the porta.
Fig. 47:
11.3.4
Wecome for myABB-LivingSpace
Step 4: Coupling the IP gateway and "Welcome for myABB-LivingSpace" app
1. In the app, select menu Settings and then Manage IPGW or Network settings.
2. Click the IP gateway you wish to couple and note down the security code (integrity code) displayed.
3. In the web interface of the IP gateway, select menu item App management and select your mobile terminal device via
the edit button.
If the desired device is not in the list, update it via the Update button.
4. You can now assign the desired access rights to the app of the respective device.
5. You complete the coupling by entering the security code (integrity code).
Operating Instructions | 0073-1-8652
— 47 —
Operating Instructions
ABB-Welcome
12
Network security
Network security
This product is designed to be connected to and to communicate information and data via a network
interface, It is your sole responsibility to provide and continuously ensure a secure connection between the
product and to your network or any other network (as the case may be). You shall establish and maintain
any appropriate measures (such as but not limited to the installation of firewalls, application of
authentication measures, encryption of data, installation of anti-virus programs, etc) to protect the product,
the network, its system and the interface against any kind of security breaches, unauthorized access,
interference, intrusion, leakage and/or theft of data or information. ABB Ltd and its entities are not liable for
damages and/or losses related to such security breaches, any unauthorized access, interference,
intrusion, leakage and/or theft of data or information.
P os: 80 / #Neus truk tur#/Onlin e-Dokum enta tion (+KNX )/S t eue rmo dule - O nline-D oku ment ation (- -> Fü r all e D oku ment e < --) /++ ++ +++++ ++ +S eite nu mbr uch +++ ++ ++ +++ ++ @ 9\ mod _12688 986 680 93_0 .docx @ 5 214 9 @ 2111 111 111 111 1111111 111111 111 111 111 1111 222 222222 222222 2222 222 222 222 222 222222 2222222 222 222 222 2222222 222222 222 222 222 221 1111 111111 111 111 111 1111 111 111 111 111111 211 1111 111 111 111 111111 1111111 111 111 111 111111 1111111 111 111 111 111 1111 111111 111111 111 1111 111 111 111 111111 111 1111 111 1111 111 1111 111 111 111 111111 111 1111 111 111 111 111111 2222222 222 222 222 222222 2222222 222 222 222 222 2222 222 222 222222 222 2222 222 222 222 222222 222 2222 222 222 222 222222 2222222 222 222 222 222 222 2222 222 222222 222 222 2222 222 222 222222 222 222 2222 222 222 222222 2222222 222 222 22 @ 1
Operating Instructions | 0073-1-8652
— 48 —
Operating Instructions
ABB-Welcome
Integrating a ABBComfortTouch® 3.0 or higher
P os: 81 / #Neus truk tur #/Onlin e-Dokum enta tion (+KNX )/Ü bers chrift en (-- > Für alle Dokum ente <- -)/ 1. E bene/A - F/E in bindung B us ch-C omf ortPan el® ab 3. 0 @ 35\m od_136 2554 085 194 _15 .docx @ 28 514 8@ 222 222 2222 222 222 222222 222 2222 222 222 222 222222 222 2222 222 222 221 111 111 1111111 111111 111 111 111 1111 111 111111 111 111 1111 111 111 111111 1111111 111 111 111 111 111 1111111 111111 111 111 111 1111 111 111111 111 111 111 1111 111 111111 111 111 1111 111 111 111 111 111111 1111 111 111 111 111 1111111 111111 111 111 111 1111111 11 1111 111 1111 111 111 111 111111 1111111 111 111 111 111 111 1111 111 111111 111 111 111 1111 111 111111 111 111 1111 111 111 111 111 1111111 111111 111 111 111 1111111 111111 111 111 111 1111 @ 1
Integrating a ABB-ComfortTouch® 3.0 or higher
13
P os: 82 / #Neus truk tur #/Onlin e-Dokum enta tion (+KNX )/B e dien ung/ Tü rko mmunikatio n/Busch -Welco me/Ein bind ung B us ch-Comf ortPan el® a b3. 0 - 83341 @ 36\ mod _136361 258542 9_1 5.do cx @ 2889 34 @ 11 111 1111 111 111 111 111111 1111111 111 111 111 111 111 1111111 111111 111 111 1111 111 111 111111 111 1111 111 111 111 111111 111 1111 111 111 111 111 111 1111111 111111 111 111 111 1111 111 111111 111 111 1111 111 111 111111 111 111 1111 111 111 111 111 1111111 111 111 111 111 111 1111111 111111 111 111 111 1111 111 111111 111 111 1111 111 111 1 1111 111 1111 111 111 111 111111 111 1111 111 111 111 111 111 1111111 111111 111 111 111 1111 111 111111 111 111 1111 @ 1
Fig. 48:
Integrating ABB-ComfortTouch ® 3.0 or higher
The Busch-ComfortTouch® series 3.0 or higher can be connected to a ABB-Welcome system directly via the IP
gateway.
1.
2.
3.
Create a user, e.g. ComfortTouch1, in the IP gateway. See section "Create new user".
Create a configuration project in IPP 3.x for the ABB-ComfortTouch® , a "Door Entry" application page.
Enter the "IP gateway address" and user in the "IP Gateway" tab.
Note ...
A detailed user description is available in the IPP online help.
Jeweils 1 C omf ortP a nel d er B aureih e 2.x kan n
P os: 83 / #Neus truk tur #/Onlin e-Dokum enta tion (+KNX )/S t eue rmo dule - O nline-D oku ment ation -( -> Fü r all e D oku ment e < --)/++ ++ +++++ ++ + Seite nu mbr uch +++ ++ ++ +++ ++ @ 9\mod _12 688 986 680 93_0 .docx @ 5 214 9 @ 2222 222 222 222 2222222 222222 222 222 222 2222 222 222222 222 222 2222 211 111 111 111 111111 1111111 111 111 111 1111111 111111 111 111 111 111 1122 222222 222 222 222 2222 222 222 222 222222 222 2222 222 222 222 222222 2222222 222 222 222 222 222 2222222 222 222 222 222 2222 222 222 222222 222 2222 222 222 222 222222 222 2222 222 2222 222 2222 222 222 222 222222 222 2222 222 222 222 222222 2222222 222 222 222 222222 2222222 222 222 222 222 2222 222 222 222222 222 2222 222 222 222 222222 222 2222 222 222 222 222222 2222222 222 222 222 @ 1
Operating Instructions | 0073-1-8652
— 49 —
Operating Instructions
ABB-Welcome
Technical data
P os: 84 / #Neus truk tur#/Le er mod ule/- --- - --- -- --- -- -- --- -- --- ----- --- -- --- T
- echnische D aten-- --- --- -- ----- --- -- --- -- -- --- -- ------ -- -- @ 25\ mod _13 408 007678 96_ 15.d ocx @ 220 397 @ 11 111111 111 111 111 1111 111 111111 111111 1111 111 111 111 111 111111 1111222 222 222 222 2222222 222222 222 222 222 222 2222 222222 222222 222 222 @ 1
P os: 85. 1 /#Neust ruktur#/O nline -Doku men tatio n (+K NX )/Übe rsch rifte n (- -> Fü r alle Doku ment e< -- )/1. Eb ene /S - T/T echnisc he D aten @ 1 1\mo d_1 279 185 386320 _15. docx @ 83019 @ 21 @ 1
14
Technical data
P os: 85. 2 /#Neust ruktur#/O nline -Doku men tatio n (+K NX )/Übe rsch rifte n (- -> Fü r alle Doku ment e< -- )/2. Eb ene /U - Z/Üb ersich tstab ell e @ 33\ mod _13 613 692 1370 8_1 5.docx @ 278 559 @ 21 111 111111 1111111 111 111 111 1 @ 1
14.1
Overview table
P os: 85. 3 /#Neust ruktur#/O nline-Doku men tatio n (+K NX )/Technisc heD aten /Tü rko mmunikatio n/B usc h-Welco me/Über sichts t abelle Tec hnisc he Dat en - 83 341 @ 3 5\m od_1 362 554 518 764_15. docx @ 28 519 6 @ 2 122 111 111111 111 111 1111 111 111 222 222 2222222 222 222 222 222 2 @ 1
General
Operating temperature
-5 ...45°C
Protection type (only for related installation)
IP 20
Single-wire clamps
2 x 0.6 … 2 x 1 mm²
Fine-wire clamps
2 x 0.6 … 2 x 0.75 mm²
Size
10 TE
Bus input voltage
28 V- ±2 V
P os: 85. 4 /#Neust ruktur#/O nline-Doku men tatio n (+K NX )/Steu er modul e - Onli ne -Dok ume ntati on ( -- > F ür alle Dokume nte <-- )/+ ++ ++++ +++ ++S ei ten umb ruch ++ ++ ++ +++ ++ + @ 9\m od_ 1268 898 668 093 _0.d ocx @ 521 49 @ 21 22 @ 1
Operating Instructions | 0073-1-8652
— 50 —
Operating Instructions
ABB-Welcome
Technical data
P os: 85. 5 /#Neust ruktur#/O nline -Doku men tatio n (+K NX )/Übe rsch rifte n (- -> Fü r alle Doku ment e< -- )/2. Eb ene /G - L/G erät eans chluss / A nschl ussbild @ 33 \mod_1 361 3691 252 77_ 15.d ocx @ 278 543 @ 2 111 2111 111 111 112222 222 222 2222 222 222 222222 221 1111 111 111 222 222 222 2222222 222222 222 222 222 2 @ 1
14.2
Device connection / circuit diagram
P os: 85. 6 /#Neust ruktur#/O nline -Doku men tatio n (+K NX )/Technisc heD aten /Tü rko mmunikatio n/B usc h-Welco me/ Ger ätea nschl uss, Ansc hlussbild - 8 334 1 @ 35\ mod _136 308 054949 2_1 5.doc x @ 2871 62 @ 211 111111 111 222 222 2222222 222222 222 222 222 1111 111 111111 111111 111 1111 111 111 111 111111 2212 @ 1
Fig. 49:
Connection
1 LED | 2 LAN connection | 3 Reset | 4 Terminal resistor | 5 System controller / internal bus | 6 Floor call button
LED
ready
Bus activity
Fault
LAN connection
The LAN connection is made via the RJ 45 jack on the WLAN router.
Reset
Here is the Reset button.
System controller / internal bus
a1
System controller
b1
Internal bus
Floor call button
The floor call button is connected here.
P os: 85. 7 /#Neust ruktur#/O nline -Doku men tatio n (+K NX )/Steu er modul e - Onli ne -Dok ume ntati on ( -- > F ür alle Dokume nte <-- )/+ ++ ++++ +++ ++S ei ten umb ruch ++ ++ ++ +++ ++ + @ 9\m od_ 1268 898 668 093 _0.d ocx @ 521 49 @ 22 2222 222 222 222 222 222222 2222 222 222 222 222 2222222 222222 222 222 @ 1
Operating Instructions | 0073-1-8652
— 51 —
Operating Instructions
ABB-Welcome
Product overview
P os: 85. 8 /#Neust ruktur#/O nline -Doku men tatio n (+K NX )/Übe rsch rifte n (- -> Fü r alle Doku ment e< -- )/2. Eb ene /A - F/A bm essun gen /M aßbil d@ 33\m od_ 136 136 890 2556_15 .docx @ 2 78527 @ 111 111 111111 111 1111 111 111 111 111111 1111111 111 111 111 111 112 2 @ 1
14.3
Dimensions / dimensional drawing
P os: 85. 9 /#Neust ruktur#/O nline -Doku men tatio n (+K NX )/Technisc he D aten /Tü rko mmunikatio n/B usc h-Welco me/A bmess ung en, Maßbild - 8 3341 @ 35\m od_ 1363 080 518 891 _15. docx @ 28 714 6 @ 222 2222 222 222211 111 111 1111 111 111 111111 111111 1111 111 111 111 111 1111111 112111 111 111 11 @ 1
The dimensions of the IP gateway are indicated in the following image.
Fig. 50:
Dimensional drawing
The depth of the device is 65 mm.
The module width is 10 MW.
P os: 86 / #Neus truk tur#/Le er mod ule/- --- - --- -- --- -- -- --- -- --- ----- --- -- --- A
- ufb au und Fun ktion --- -- ----- --- --- -- ----- --- --- -- --- -- --- - @ 25\ mod _134 080 082 653 7_15.doc x @ 2 204 11@ 222 222 211 111222 111 1111 111 111 222 222 222 2222222 222 2@ 1
P os: 87. 1 /#Neust ruktur#/O nline -Doku men tatio n (+K NX )/Übe rsch rifte n (- -> Fü r alle Doku ment e< -- )/1. Eb ene /P -R/P r oduktüb ersicht @ 3 3\mod_ 1361365 511 862 _15. docx @ 27808 2 @ 222 2222 221 111 122 212 222 @ 1
15
Product overview
P os: 87. 2 /#Neust ruktur#/O nline -Doku men tatio n (+K NX )/Übe rsch rifte n (- -> Fü r alle Doku ment e< -- )/2. Eb ene /A - F/A ufb auG erä t @ 3 3\m od_ 136 1366224 154 _15 .docx @ 27 8226 @ 2222 @ 1
15.1
Device setup
P os: 87. 3 /#Neust ruktur#/O nline -Doku men tatio n (+K NX )/Aufb au u nd Fun ktion/ Tü rko mmu nikation/B usch-W elco me/A u fbau Ge rät Funk tion en- 833 41 @ 36\ mod_1 3636126 337 67_ 15.d ocx @ 288 950 @ 2 2222 222 222 222 222 222 2222222 222 222 222 222 222 2222 222 222222 222 222 222 2222 222 222222 @ 1
The IP gateway is a Welcome door communication system and is used for door communication and video
transmission.
The IP address makes communication possible between the Welcome door communication and the local IP
network.
It also allows use of the Busch-ComfortTouch® as door communication indoor station and a ABB-Welcome
app.
The product connects to the myABB-LivingSpace / myABB-LivingSpace Internet portals. It can be used to
configure other Welcome products using a web browser.
P os: 88 / #Neus truk tur#/Onlin e-Dokum enta tion (+KNX )/S t eue rmo dule - O nline-D oku ment ation (- -> Fü r all e D oku ment e < --) /++ ++ +++++ ++ +S eite nu mbr uch +++ ++ ++ +++ ++ @ 9\ mod _12688 986 680 93_0 .docx @ 5 214 9 @ 2222 222 222 122 2222222 222222 222 222 222 2222 122 222 222 222222 2222 222 222 222 222 222222 2222222 222 222 222 2222222 222222 222 222 222 222 2222 222222 222 222 222 2222 222 222 222 222222 2 @ 1
Operating Instructions | 0073-1-8652
— 52 —
Operating Instructions
ABB-Welcome
Installation and electrical
connection
P os: 89 / #Neus truk tur#/Le er mod ule/- --- - --- -- --- -- -- --- -- --- ----- --- -- --- M
- onta geu nd elektris che r Anschl uss - --- -- --- ----- --- -- --- - @ 25 \mo d_1 3408009 21288_ 15.d ocx @ 220439 @ 2222 2222221 222 222 222 222222 2222222 222 222 122 222 2222 222222 222 222 222 222 2222 222 222 222222 222 2222 222 222 222 222222 222 2@ 1
P os: 90 / #Neus truk tur#/Onlin e-Dokum enta tion (+KNX )/Ü bers chrift en (-- > Für alle Dokum ente <- -)/ 1. E bene/ M - O/Mo nta geu nd el ektrisc her A nschluss @ 2 3\mod_ 133 647 715 7864 _15 .docx @ 2 0903 3 @ 222 122 222 2222 222 222 222222 222 2222 212 222 222 222222 222 2222 222 222 222 222 222 2222222 222222 222 222 222 2222 222 222222 222 222 2222 222 222 22222 @ 1
16
Installation and electrical connection
P os: 91 / #Neus truk tur#/Onlin e-Dokum enta tion (+KNX )/S icherh eitshinw eise und Hi nweise (- -> Für alle Dokum ente < --)/W arn hinweise/S iche h
r eit - Nieders pan nun gs- und 230 V L
- eit ung en@ 23\ mod _13 365588 68201_1 5.d ocx @ 2091 64 @ 22 222 2222222 222 222 222 222 222 2212 222 222222 222 222 222 22@ 1
Warning
Electric voltage!
Risk of death due to electrical voltage of 230 V during short-circuit in the low-voltage line.
– Low-voltage and 230 V lines must not be installed together in a flush-mounted socket!
P os: 92 / #Neus truk tur#/Onlin e-Dokum enta tion (+KNX )/S icherh eitshinw eise und Hi nweise (- -> Für alle Dokum ente < --)/W arn hinweise/S iche h
r eit - Fachk ennt nis se @ 23\mo d_1 336 5591 830 27_ 15.d ocx @ 209 179 @ 2 222 222 2222 2 @ 1
16.1
Requirements for the electrician
Warning
Electric voltage!
Install the device only if you have the necessary electrical engineering knowledge and experience.
•
Incorrect installation endangers your life and that of the user of the electrical system.
•
Incorrect installation can cause serious damage to property, e.g. due to fire.
The minimum necessary expert knowledge and requirements for the installation are as follows:
•
Apply the "five safety rules" (DIN VDE 0105, EN 50110):
1. Disconnect from power;
2. Secure against being re-connected;
3. Ensure there is no voltage;
4. Connect to earth and short-circuit;
5. Cover or barricade adjacent live parts.
•
Use suitable personal protective clothing.
•
Use only suitable tools and measuring devices.
•
Check the supply network type (TN system, IT system, TT system) to secure the following
power supply conditions (classic connection to ground, protective earthing, necessary
additional measures, etc.).
P os: 93 / #Neus truk tur#/Onlin e-Dokum enta tion (+KNX )/S icherh eitshinw eise und Hi nweise (- -> Für alle Dokum ente < --)/W arn hinweise/S iche h
r eit - 2 30V @ 18\mod _13 026 068 1675 0_1 5.docx @ 1033 08 @ 11 111 112 2222 222 222 222222 222 2222 222 222 222 222222 222 2222 222 222 222 222222 2222222 222 222 21 @ 1
Warning
Electric voltage!
Risk of death and fire due to electrical voltage of 230 V.
– Work on the 230V supply system may only be performed by authorised electricians!
– Disconnect the mains power supply prior to installation and/or disassembly!
P os: 94 / #Neus truk tur#/Onlin e-Dokum enta tion (+KNX )/Ü bers chrift en (-- > Für alle Dokum ente <- -)/ 2. E bene/ M - O/Mo nta ge@ 18\ mod _13 026 1596 045 8_1 5.docx @ 1034 24 @ 22 111 1111 222 222222 222 222 222 2222 222 222222 222 222 2222 222 222 222222 222222 2222 122 222 222 222 2211111 111111 211 111 111 1111111 111111 111 111 111 1111 111 111112 222222 @ 1
16.2
Mounting
P os: 95 / #Neus truk tur#/Onlin e-Dokum enta tion (+KNX )/ Montag e/alle Ger äte/Mont age - Hu tschienen nach DIN E N 5 0002 2- Ohn e Docv aria ble @ 20\mod _13 257 6604 514 0_1 5.do cx @ 1366 03 @ 22 222 2222 222 222111 111111 112 1111 111 111 111 111111 1111111 111 111 111 111111 1222222 211 111 111 111 1111 111111 111 111 111 1121 @ 1
The MDRC must only be installed on mounting rails according to DIN EN 500022. The MDRC is latched onto the
mounting rail.
===E nde der Liste für Tex tmarke C ontent ===
Operating Instructions | 0073-1-8652
— 53 —
P os: 97 / #Neus truk tur#/Onlin e-Dokum enta tion (+KNX )/R ückseit en (-- > F ür all e Dok ume nte <- )-/Rüc kseite - A B B V
- ari ante @ 36 \mod_1 368 707 504 080_15. docx @ 29 605 9 @ 2 111 111 111 111 1122 222 222222 222 222 222 2222 222 222222 222 222 2222 222 222 222222 222 2222 222 222 222 222 222 2222222 222222 222 222 222 2222 222 222222 222 222 222 2222 222 222222 222 222 2222 222 222 222222 222 222 2222 222 222 222 222 2222222 22 @ 1
A member of the ABB Group
Notice
We reserve the right to at all times make
Busch-Jaeger Elektro GmbH
PO box
58505 Lüdenscheid
technical changes as well as changes to the
contents of this document without prior notice.
The detailed specifications agreed to at the time
of ordering apply to all orders. ABB accepts no
Freisenbergstraße 2
58513 Lüdenscheid
Germany
www.BUSCH-JAEGER.com
[email protected]
Central sales service:
Phone:
+49 (0) 2351 956-1600
Fax:
+49 (0) 2351 956-1700
responsibility for possible errors or
incompleteness in this document.
We reserve all rights to this document and the
topics and illustrations contained therein. The
document and its contents, or extracts thereof,
must not be reproduced, transmitted or reused by
third parties without prior written consent by ABB.
Copyright© 2013 Busch-Jaeger Elektro GmbH
All rights reserved
===E nde der Liste für Tex tmarke B a ckcove r = ==
1473-1-8652 | 01.04.2015
Operating Instructions
Busch-Welcome ®