1
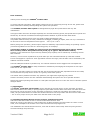
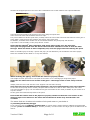
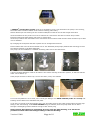
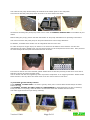
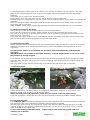
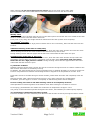
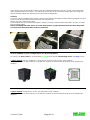
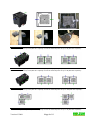
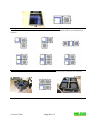
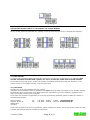
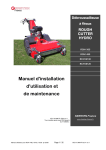
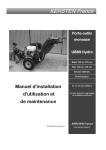
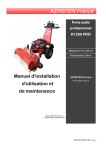
®
Installation and Operating Instructions
CHEOPS
®
for
Pre-Filter Module
Order No. CHEOPS 0015
CHEOPS
®
and
Main Filter Module
Order No. CHEOPS 0010
Before putting the filter system into operation please carefully read the information below and follow the
directions given in the operating instructions.
Your dealer will be happy to answer any questions you might have regarding the products.
The brand CHEOPS® is a registered German brand (303 12 757)
The CHEOPS® modular filter system is protected by patents:
German Patent
DE 101 46 281 C1
European Patent
EP 1 427 503 B 1
Further property rights pertaining to CHEOPS® filter technology have been registered.
All rights reserved. We reserve the right to make modifications to the products.
Version 03.2006
Page 1 of 12
Dear Customer,
Thank you for choosing the CHEOPS® modular filter.
To ensure that this innovative, high quality product serves you well during its long service life, please read
these instructions carefully before putting the system into operation.
The CHEOPS® modular filter system is distinguished by high filter performance and very low
maintenance.
This type of filter has been developed especially for use with swimming ponds, fish ponds and Koi ponds and
should only be used for mechanical and biological water filtration of ponds and fish sales tanks.
The sturdy filter housing and its cover are made of black polyethylene (PE).
This plastic material is easy to clean, suitable for foodstuffs, resistant to impact, does not rot, is resistant to
UV and can be used in temperatures from approx. - 300C up to + 600C.
Before putting into operation, please enquire about the statutory requirements relating to operating a pond
(electrical regulations in the case of a swimming pond, for example).
A main filter module is suitable for natural ponds and swimming ponds (up to approx. 40,000
litres content) and for fish ponds and Koi ponds (up to approx. 20,000 litres content).
Filtration of any desired size of pond and any desired pump capacity can be realised by combining several
filter modules.
However, not more than 10,000 litres of pond water per hour should be filtered by each filter module.
If more throughput is required or if the population of fish is too large, then the filter can be extended by the
addition of another module.
Connect additional modules in parallel only. The internal elements can be staggered to accomplish this.
The CHEOPS® modular filter is easily extended or modified by exchanging the seal plates on two input
sides and on two output sides.
In this way, the filter system can grow with the size of the pond and the fish population and can be readily
converted from the pump-driven version to a gravity-driven filter system.
Your dealer will be pleased to answer any questions you might have regarding the product.
Children and other persons who are unfamiliar with handling the system are not to operate the filter.
Please keep these operating instructions in a safe place and pass them on to the new owner if the filter system
changes hands.
1.) Applications
The Cheops® main filter and pre-filter can be operated as a pump-driven version (the filter is located
above the surface of the water, a pump pumps the pond water into the filter which then runs back down into
the pond) as well as a gravity version (the filter is located in a shaft only just above the surface of the
water, the pond water flows via outlets and surface skimmers into the pre-filter and then into the main filter
– one or more pumps convey the water from the filter back to the pond).
2.) Installing the Pump-Driven Version (Factory Configured Version)
The base of the filter needs to rest on a firm surface with its entire area.
Please do not set up the filter on a soft surface such as foam sheeting, the soft surface of a lawn or loose
earth, as it will adapt to the surface once it has been filled and may topple over.
The installation site should therefore be firm, level and at least 2 metres away from the pond (paved or
concreted footings are preferred).
Version 03.2006
Page 2 of 12
Shorten the stepped spout on the cover with a hacksaw at one of the marks to the required diameter.
Connect the pond pump to the spout on the cover using the spiral hose.
Then secure the hose with stainless steel hose clips.
If it proves difficult to fit the spiral hose, carefully warm the end of the hose first with either a hot air gun or
warm water; push the hose into position and secure using hose clips.
In addition, a suitable UVC clarifier can be connected between the pond pump and the filter.
A pre-filter is not necessary in the pump-driven version.
Please fill the CHEOPS® filter completely with water before using it for the first time.
Then open the spigot and raise the ball on the foam filter elements in order to flush the filter
through. Allow the water to drain completely out, close the spigot and start filtering the pond.
Black or standard grey PP bends, t-pieces and pipe (75 mm diameter) can be fitted to the drain spigot;
these are available at the dealer or in any DIY market.
When installing the piping, ensure that the seals are properly seated.
The sludge from the pond can be conveyed to the sewer or to a drainage pit using these pipes.
Please do not reduce the cross section of the pipes – the sludge needs to flow freely from the
filter!
Always push the cover first with the cover support onto the filter housing.
Only when the cover has been properly pushed in, will it not unintentionally come off of the filter.
In the case of the pump-driven version, the pond water needs to be able to drain freely from the outlet.
You will need black or grey 110 mm diameter PP pipe and bends for the outlet, available at your dealer or in
any DIY market.
Fit the pipes and bends and lay them to the pond.
Ensure that the rubber seals in the pipes are properly seated and that the cross section of the
drainage pipe is not reduced or the water will not be able to drain away and the filter will
overflow!
The water feed can be above the surface of the pond water or just below it.
3.) Installing the Gravity Version
If you intend to use the CHEOPS® modular filter in gravity mode, please install in addition the appropriate
pre-filter (order no. CHEOPS 0015) or another pre-filter, in order to filter out larger pieces of debris such as
leaves.
Version 03.2006
Page 3 of 12
A CHEOPS® gravity filter system needs to be installed in such a way that when the pump is not running,
the water level is at the overflow of the interior housing (main filter).
Please decide upon the bushing for the surface outlet/floor outlet as well as the sludge outlet first.
All of the feeds from the pond are not to be reduced in cross section and are to lead to the pre-filter.
Each feed should be fitted with a gate valve or a ball valve.
All of the pre-filters and main filters have connections for two water feeds and two water outlets of up to 200
mm in diameter.
By changing the seal plates the filter system can be configured as desired.
Each modular filter unit can accommodate one or two standard pond pumps (without filter housing) such as
the Holzum Holmax or the Oase Aquamax.
One pump can be installed on a suitable accessory plate next to the filter block.
A hole of suitable diameter needs to be made in the interior housing of the filter system, so that the filtered
water can be drawn up.
Pond pumps can also be fitted “dry” next to the filter, if they are suitable.
If no new seal plates are to be used, then a tank pipe fitting or the OASE TRADUX (order no. 57154) wall
bushing can be fitted to the standard seal plate.
To do this, cut a hole of the appropriate size in the seal plate using a hole cutter and fit either the tank pipe
fitting or the wall bushing. If the Oase TRADUX fitting is selected, then the pump cable can be fitted
through a watertight grommet without having to take off the plug.
Please ensure that the hole is sufficiently far away from the filter housing, or it will not be
possible to install either the tank pipe fitting or the wall bushing!
Version 03.2006
Page 4 of 12
The outlet to the pump should always be located at the lowest point on the seal plate.
This ensures that the pond pump does not draw in air if the water level falls!
Accessories for fitting the pond pump either into or onto the CHEOPS® modular filter are available at your
dealer.
Before fitting the pump, please read the information in the pump manufacturer’s operating instructions.
The return line from the pond pump to the pond should be a hose of large diameter.
In addition, a suitable UVC clarifier can be integrated into the return line.
In order to improve oxygen input, air stones or air hoses can be fitted to each module. Use the hole
intended for the upper middle screw (do not fit this screw) on the seal plate for the air hose. Then push the
air hose through the seal plate and seal and fit the air stone.
If several air stones are to be installed, please install them so that they all hang at the same level and so
that they cannot get under the filter mats.
The air stones can then be supplied by either a pond air compressor or an oxygen generator. Please locate
these devices in the dry above the water level or fit non-return valves in the lines!
4.) Pre-Filter for the Gravity Version
If the CHEOPS® modular filter is to used in gravity mode, then a coarse filter should always be fitted
before the inlet.
The CHEOPS® modular pre-filter (order no. CHEOPS 0015) is distinguished by its ease of cleaning.
If the pre-filter is very dirty, drain the water out and hose down the brushes and the interior.
The drain spigot should be open during cleaning.
Version 03.2006
Page 5 of 12
In the configuration as delivered from the factory, you will need to install a 110 mm coupler in the inlet
plate, fit the connecting plate as well as the two seal plates with the appropriate fixturing and sealing
materials.
This allows you to configure the direction of flow.
Please always direct the pond water into the interior housing of the pre-filter first.
Depending upon the configuration of the filter system, the pre-filter’s brushes can be fitted in any position as
required.
Bend the PVC pipes slightly and together with the brushes push them over the screws of the inlet plate,
connecting plate or seal plate.
When installing, please ensure that the short brushes are pushed onto the retaining rods on the outside.
5.) Water Circulation in the Pond
Ensure that your pond has strong water flow to prevent particles settling.
In the case of a pump-driven version, please position the pump at the deepest part of the pond.
The pond pump should be as far away from the filter inlet as possible to guarantee good circulation of the
entire contents of the pond.
If the pond has a large surface area, it is advisable to increase circulation in the pond with a second pump
thus conveying more particles to the filter pump or the base outlet.
6.) Running-in the Filter
Please remember that a biological filter will only reach maximum efficiency after 4 to 8 weeks of continuous
operation (depending upon load and the time of year), without the addition of starter bacteria or microorganisms.
For this reason, please do not populate the pond fully with fish immediately and feed them
sparingly!
Biological filters only function at maximum efficiency at water temperatures of over 20°C and in
the presence of enough oxygen!
If you already own a pond, the running-in period for the filter can be shortened. To do this, take the mats
out of the filter, put them one by one into a bucket containing pond sludge (from your existing pond) and
refit them.
The pond water will then become cloudy which is normal but will clear again after a short time.
7.) Fish Population
A filter module which has been properly run-in has been designed for 1,000 cm of fish or 20 Koi (of a
maximum length of 50 cm each) in a 20,000 litre pond.
When calculating the fish population, please take the growth of the fish into account!
If the fish population is larger than this, then the filter should be extended by adding a further module.
8.) Cleaning the Filter
Your CHEOPS® filter will function optimally when the outer surfaces of the pyramid filter block are covered
with particles of dirt. The pyramid block should be cleaned as little as possible.
Only when the water level in the pump-driven version rises within the filter housing and flows out of the
overflow should the filter block be cleaned with pond water. (In the case of the gravity version, when the
water level falls on the supply side).
Do not remove the pyramid filter block – simply flush it from above using pond water in a
watering can or bucket.
Version 03.2006
Page 6 of 12
When cleaning, do not use a high pressure cleaner and do not wring out the filter mats.
This is to ensure that useful small creatures and filter bacteria survive in the filter medium.
Weekly Clean
Open the spigot. Then carefully raise the cover of the filter system and lift the ball in the middle of the filter
block for a short time until clear water drains out.
If the pond is very dirty, the sludge should be drained from the filter system more frequently.
The CHEOPS® Pre-Filter
If a pre-filter is fitted, remove large pieces of debris with a net. If necessary, drain the filter and rinse the
brushes.
Additional Cleaning if the Filter is Visibly Dirty
Turn off the pump and UVC clarifier, remove the cover, drain the water from the filter and rinse the entire
interior housing as well as the outer surface of the filter block only with a hose.
During cleaning ensure that the spigot and the ball valve underneath the filter block are open.
Complete Clean if the Filter is Very Dirty
Turn off the pump and UVC clarifier, remove the cover, drain the water from the filter and pre-filter and
completely rinse the filter with a hose. Completely rinse the filter block from above with pond water.
Please do not use a high pressure cleaner. During cleaning ensure that the spigot and the ball valve
underneath the filter block are open.
9.) Filtration in Winter
Filtration using the pump-driven version can also be carried out during the winter if a heater is fitted to the
filter and the entire filter is insulated (covered).
In addition, the pond should also be covered (insulated cover or floating PE balls), to prevent it cooling out.
If this is not possible then filtration and feeding should be stopped at air temperatures of under 10°C.
If the filter will not be needed during the winter months, please drain the water and completely clean the
filter.
Remove the filter mats, clean them and store them in a dry place until they are needed again.
In addition, open the spigot or remove it completely so that freezing water cannot damage it.
If frost is likely, the water in the filter housing needs to be completely drained!
Small quantities of remaining water at the bottom of the filter housing are no cause for concern.
In the spring, pond filtration can restart at a continuous air temperature of approx. 10°C.
The gravity version should be operated throughout the winter, well insulated, at reduced pump capacity.
10.) Extending or Dismantling the Filter System
If several modules are to be connected, first determine the direction of flow by turning the interior inserts.
Version 03.2006
Page 7 of 12
Then fit all of the nuts and bolts together with the seals and washers as well as a 20 mm thick connecting
plate (supplied with the pre-filter – can otherwise be ordered as an accessory) finger tight. Then align the
filter and finally tighten the stainless steel nuts and bolts diagonally.
Caution!
To ensure that the modified filter system remains permanently watertight, always replace damaged nuts and
bolts, as well as seal washers and seals with new components.
Please use only original spare parts.
If the modules are to be connected together, please use longer stainless steel bolts (M6 x 70 mm) to install
the connecting plate.
Before installing the filter mats, all of the black pieces of pipe should be inserted into the guides
and only then should the filter mats be installed.
Several CHEOPS® system configurations are illustrated below.
For clarity, the dirty water is represented by green arrows and the discharging water with blue arrows.
1 Filter module (factory configured – pump-driven version via the cover). Pump capacity
10,000 l/h. For Koi or fish ponds up to 20,000 litre capacity as well as natural ponds of up to 40,000 litre
capacity:
1 Filter module (pump-driven version via seal plate). Pump capacity
10,000 l/h. For Koi or fish ponds up to 20,000 litre capacity as well as natural ponds of up to 40,000 litre
capacity:
Version 03.2006
Page 8 of 12
2 Filter modules (pump-driven version via the cover). Pump capacity 20,000 l/h.
For Koi or fish ponds up to 40,000 litre capacity as well as natural ponds of up to 80,000 litre capacity:
2 Filter modules (pump-driven version via seal plate) Pump capacity 20,000 l/h.
For Koi or fish ponds up to 40,000 litre capacity as well as natural ponds of up to 80,000 litre capacity:
3 Filter modules (pump-driven version via seal plate). Pump capacity 30,000 l/h.
For Koi or fish ponds up to 60,000 litre capacity as well as natural ponds of up to 120,000 litre capacity:
Gravity Filter System with 1 Pre-Filter, Pump capacity 10,000 l/h.
For Koi or fish ponds up to 20,000 litre capacity as well as natural ponds of up to 40,000 litre capacity:
Version 03.2006
Page 9 of 12
Gravity Filter System with 1 or 2 Pre-Filters and 2 Filter Modules Pump capacity
20,000 l/h. For Koi or fish ponds up to 40,000 litre capacity as well as natural ponds of up to 80,000 litre
capacity:
Gravity Filter System with 1 Pre-Filter and 3 Filter Modules Pump capacity 30,000 l/h.
For Koi or fish ponds up to 60,000 litre capacity as well as natural ponds of up to 120,000 litre capacity:
Version 03.2006
Page 10 of 12
Gravity Filter System with 2 or 4 Pre-Filters and 4 Filter Modules
Pump capacity 40,000 l/h.
For Koi or fish ponds up to 80,000 litre capacity as well as natural ponds of up to 160,000 litre capacity:
11.) UVC Clarifier
To ensure that all floating algae flocculate the whole year over and can be filtered out, an additional UVC
clarifier should be installed with a power of 1.5 to 2.0 watts per 1,000 litres of pond contents.
In the case of the pump-driven version, the clarifier is installed between the pump and the filter; in the
gravity version it is installed between pump and pond inlet.
12.) Guarantee
We want you to be fully satisfied with the product.
Therefore the manufacturer gives a guarantee of 5 years from the date of purchase on the PE filter housing.
On all of the other components of the filter system the manufacturer gives the statutory guarantee from
date of purchase (wearing parts excepted).
If you have any questions, suggestions or if you are experiencing problems, please contact your dealer or
the distributor directly:
Holzum GmbH
Empeler Straße 91
46459 Rees
Germany
Tel.
Fax:
+49 2851 – 92360
+49 2851 – 923630
E-Mail:
[email protected]
Internet: www.holzum.de
If you need to make a claim on the guarantee, please contact your dealer with a copy of the receipt who will
evaluate the damage and then contact the distributor.
Version 03.2006
Page 11 of 12
During the guarantee period, the distributor will either repair or replace the faulty filter system at no charge
as he sees fit, or the purchase price will be refunded less a usage fee, dependent upon how long ago the
system was delivered.
The right to guarantee ends with the expiry of the guarantee period.
The guarantee does not cover frost damage (where the filter system has not been drained), damage caused
by force, improper handling as well as temperature damage which occurred under -30°C or over +60°C.
Furthermore, the guarantee does not cover wearing parts such as spigots and filter mats.
Printer’s errors and errors excepted; subject to change and different delivery methods.
Claims for damages resulting from incorrect installation or faulty parts and consequential damage will not be
accepted.
Version 03.2006
Page 12 of 12