1
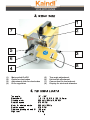
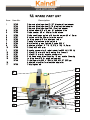
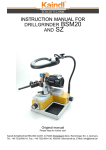
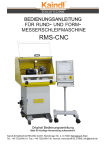
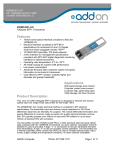
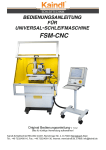
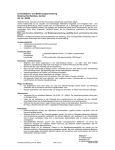
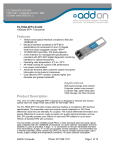
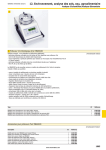
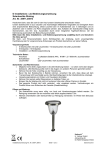
OPERATING INSTRUCTIONS FOR ELECTRODE SHARPENING MACHINE WIG 4 Original Please keep for further use! Kaindl-Schleiftechnik REILING GmbH, D-75203 Königsbach-Stein, Remchinger Str. 4 Germany Tel.: +49 7232/4001 -0, Fax.: +49 7232/4001 -30, Internet: www.kaindl.de, E-Mail: [email protected] CONTENT EC Declaration or conformity 3 Description of product 4 Directed use 4 Set up 4 Structure & Technical data 5 General safety advise 6 Duty of taking care by the user 6 Starting and opteration 7 Change the grinding wheel 8 Maintenance and care 9 Warranty 9 Repairs 9 Spare parts list 10 2 EC DELARATION OF CONFORMITY The manufacturer: Kaindl-Schleiftechnik Reiling GmbH Remchinger Straße 4 75203 Königsbach-Stein Germany Herewith declares tht the machine decribed hereafter: Grinding machine Typ: WIG 4 Refers to the security and health requirement of EC-Machine instruction (2006/42/EC) the following EC instructions: EC-instruction EMV (2004/1 08/EC) Applied harmonised norms: EN ISO 121001 and EN ISO 121002; EN ISO 13857; EN ISO 137321; EN 610291, EN 60204 Part 1; EN 6100061; EN 6100062; EN 6100063; EN 6100064 Changes in engineering design, having effect on technical data stated in this operation manual and directed use, therefore change the character of the machine substanially make this declaration of conformity invalid. These documents had been made up by: Reinhard Reiling Kaindl-Schleiftechnik Reiling GmbH Remchinger Straße 4 75203 Königsbach-Stein 3 1. DESCRIPTION OF PRODUCT The Kaindl electrode grinding machine incl. diamond grinding wheel is ideal for grinding of tungsten carbide welding electrodes diameter 1,0 4,0 mm with a top angle 15° 180°. The centric pointing in logitudinal direction grants a stable arc and a longer lifetime of the tungsten carbide electrodes. 2. DIRECTED USE The Kaindl electrode-grinding machine is exclusively for: • • • grinding of tungsten carbide welding electrodes with diameter from 1 ,0 - 4,0 mm for grinding of shot plasma electrodes only in connection with the designated use of bushes (option) The machine is only designed for occasional grinding of electrodes, in connection with a dust exhaust or industrial vacuum cleaner. A filter class M is forced. For other use than listed here, the machine is not designed for and is regarded as a matter of adverse use! The directed use includes also reading this operation manual, as well as keeping well containing directions of use - expecially the security information. Further it includes that all inspections and maintenance works are carried out during the provided periods. In case the Kaindl electrode grinding machine is no used as per the intended purpose, as save operation cannot be granted. For all material- and personal damages arising by not intended use, not the manufacturer, but the user of the Kaindl electrode grinding machine is responsible. 2. SET UP Environmental conditions for set up: Use the electrode grinding machine only in dry rooms. The WIG 4 is a table machine. Please pay attention that the machine has a solid and safe stand on a plan surface. The place for set up must grant a vibration free running of the machine. Enviromental temperature: Humidity: from 5+ to +50° C up to 90%, not condensing 4 3. STRUCTURE 7 5 6 3 8 4 (1) (2) (3) (4) 1 2 Main switch On/Off Guide for electrodes Adjustment slide for electrodes Drive regulation (5) (6) (7) (8) Top angle adjustment Horizontal adjustment Connection for dust exhaust Display for electrode diameter 4. TECHNICAL DATA Top angle Electrode-Ø Grinding motor Rotation speed Motor for electrode drive Rotation speed Diamond grinding wheels Ø Wight net 1 5° - 1 80° 1 ,0 / 1 ,6 / 2,0 / 2,4 / 3,2 / 4,0 mm 230 Volt /50 Hz / 0,05 KW 2720 RPM 230 Volt /50 Hz 375 RPM 1 25 mm 6,5 Kg 5 5. GENERAL SAFETY ADVISE 1. 2. 3. 4. 5. 6. 7. 8. To grant a protection against electric overflow, the machine must be plugged in a socket with protectiv plug reception. By using an electric extension cable, take care that the lead cables have minimum 1 ,5 mm 2 cross-section. We recommend FI protections for the main circuit connection! The protective contact of the plug and coupling must be connected . The specification shown on the type plate of the machine must match with the data of the local power supply main. Check the machine for damages. Vacuum the grinding dust! This is expecially recommended by permanent use. By using a industrial vacuum cleaner pay attention to the filter class. only use filters having class "M". ATTENTION! Before removing or opening the machine, disconnect the main plug! 6. DUTY OF TAKING CARE BY THE USER The Kaindl electrode grinding machine has been designed and constructed unter consideration of an endangering analysis and careful selection of observed harmonized normes, as well as further technical specifications. This safety can only be achieves in daily work, when all necessary steps are taken. It is the duty of taking care by the user to plan and control these steps. The user has to take care that: • • • • the machine is used as directed (see chapter description) the machine is used flawless workable condition, especially that the safety installations are checked. the operation manual is always in a readable condition, complete and available near the machine. all safety and warning stickers placed on the machine are in a readable condition and hat not been removed. 6 7. START UP AND OPERATION 1. 2. 3. 4. 5. 6. 7. 8. 9. 1 0. 11 . 1 2. Connect the dust exhaust of industrial vacuum cleaner with Filter type M to the pipe (7) Degrease the electrodes before grinsing, best with spirit or similar. Adjust the top angle after opening the clamping lever (5), the number on the scale corresponds to the top angle of the finished electrode Switch on the dust exhaust Select the diameter of the eclectrode with the adjustment slide (3) Turn on the machine with the main switch (1 ) Adjust the drive control with knob number (4) to the requested diameter (see display) Tuck the electrode trough the electrode guide with the selected diameter of boring Turn the drive control (4) anticlockwise until the electrode turns constantly Finish the grinding operations, tear back the drive control (4) and withdraw the electrode simultaneously Switch of the machine with the main switch (1 ) Switch off the dust exhaust ATTENTION! By using the bushes (sepcial accessory) let project the electrodes around 10 mm ! 9 7 (1 ) (2) (3) (4) 5 6 4 Main switch ON/OFF Guide for electrodes Adjustment slide for electrodes Drive control 1 2 3 (5) (6) (7) (8) (9) 7 8 Top angle adjustment Horizontal adjustment Connection pipe for dust exhaust Display: diameter of electrode Carrying handle 8. CHANGE OF GRINDING WHEEL For changing the grinding wheel absolutely disconnect from electric current! 1. 2. 3. 4. First loosen the screw which holds the electrode drive with a 1 3 mm engineers wrench (page 5, No. 6). Open the screws of the transparent plastic cover with a four-way rim wrench . Then tuck the hexagon socket wrench 2,5 mm trough the opening on the right side of the sheet metal casing and open the setscrew. (siehe Bild 1 +2). Now you can pull off the diamond wheel. When placing the new diamond wheel on the motor spindle, pay attention that the marking on the motor spindle and on the diamond wheel are in line (see picture). Now mount the other parts on the machine. Adjust the diamond wheel in the way, that at a top angle adjustment of 1 5° the wheel has a gap of 0,4 mm to the adjustment slide. Marking Diamond wheel Marking Motor shaft 8 9. MAINTENANCE AND CARE Under standard working conditins, the Kaindl electrode-grinding machine needs a minimum on maintenance and care. The observation of some items is essential in order having the machine ready for duty for many years. 1. 2. 3. 4. Check the electric cable and plug occasionally for damaging. Degrease the electrodes before grinding by use of some spirit. Use the full surface of the diamond wheel by occasionally shifting the horizontal adjustment. Clean the drive belt periodical (with spirit). 10. WARRANTY The warranty is 12 months from date of shipment and refers to a one shift work under condition of a appropriate use of the machine. The gurantee includes the costs for replacing of defect parts and assembly groups including the required working time. Replacment can also included repaired, used parts and assembies. Excluded from any gurantee are: • • • • • Wear parts Transport damage Damage by improper use of the machine Damage by use of force Damages and consequential damages caused be breach of the duty of taking care of the user In case of a warranty claim, we ask you to inform us about the serial number of the machine. Returns have to be authorized by us, before shipment. We reserve the right to charge you with the transportation cost if the return was not authorized. Spare parts or replacment parts are transferred absolutely in our ownership. 11. REPAIRS Returns have to be authorized by us before back-shipment. we reserve the right to charge you with the shipping costs, in case the return was not authorized. Excluded from this are wear parts. 9 12. SPARE PART LIST Item 1 2 3 4 5 6 7 8 9 10 11 12 13 14 15 16 17 Item No. 1 0745 1 0744 1 0743 1 0760 1 0758 1 0759 1 0757 1 0762 1 0765 1 0764 1 0761 1 0755 1 0750 1 0752 1 0751 1 0756 1 0763 1 0748 1 6739 Description Diamond grinding wheel D 1 07 (standard) incl. adaptor Diamond grinding wheel D 76 (medium) incl. adaptor Diamond grinding wheel D46 (fine) incl. adaptor Knurled screw M4 x 1 2 mm for guidance bloc Guidance bar M5 x 1 40 mm for electrode Guidance bloc complete with knurled screw M4 x 1 2 mm Knurled nut M5 x 20 mm for drive control Locking screw M5 for adjustment slide Casing of electrode drive, painted Motor switch, green lighted, 2 poles 230 V Adjustment slide 1 ,0 / 1 ,6 / 2,0 / 2,4 / 3,2 / 4,0 mm Drive belt 3 x 40 mm Synchronous motor for electrode drive 230 Volt / 50 Hz Pulley Ø 1 9 mm with ball bearing for drive unit Pulley Ø 1 2 mm for synchronous motor Fork head complete with pulley 1 9 mm and ball bearing Locking lever M8 for angle adjustment Grinding motor, 230 V /50 Hz; 0,05 KW; 2720 Rpm Adjustment pointer for electrode diameter Carrying handle 8 4 3 6 12 9 10 16 13 11 5 17 2 1 14 7 15 10