1
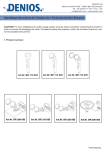
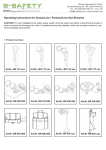
DENIOS AG
Dehmer Straße 58-66 • 32549 Bad Oeynhausen
Tel. +49 (0)5731 7 53-0 • Fax. -197
[email protected] • www.denios.com
Operating Instructions for ClassicLine / PremiumLine Safety Showers
CAUTION! For new installations the water supply system must be rinsed out before connecting the shower in order to
prevent dirt damaging the valve. Complaints arising from pipeline, which has not been rinsed out, cannot be accepted
(see point 5).
1. Standards and regulations
The safety showers comply with all aspects of DIN 12899-3:2009, DIN EN 15154-1:2006, ANSI Z358.1-2009,
TRGS 526 and the BG Chemie BGI/GUV-I 850-0 guidelines. This operating manual serves as a supplement to
the valid rules and regulations. Please take note of the DIN 12899-3:2009, DIN EN 15154-1:2006, ANSI Z358.12009, TRGS 526 and the BG Chemie BGI/GUV-I 850-0 guidelines.
2. Operating pressure
The safety showers are covered for an operation pressure of a maximum of 10 bar (PN 10). The safety showers
commands about an automatic flow regulator of 50 1/min (category I in accordance with DIN 12899-3:2009). The
flow rate amounts 45 till 55 litre / minute. Independent from the upcoming operative pressure, this flow rate will
be automatically centred by a flow regulator.
3. Construction
Where possible, the safety showers are to be stored and delivered in the transport packaging (box/pallet) supplied and kept in dry and frost-free conditions.
The surface must be level and be able to hold the weight of the safety shower when installed and filled. Walls and
special structures must be able to hold the weight of the safety shower and the piping.
Any water leaking from the safety shower during use should not be able to cause any consequential damage. Leaking water is to be safely drained away using barriers and drain trays if necessary.
bed-notd-eng
DENIOS AG
Dehmer Straße 58-66 • 32549 Bad Oeynhausen
Tel. +49 (0)5731 7 53-0 • Fax. -197
[email protected] • www.denios.com
3.1 Water connection
The connections for the various safety showers have a ¾” to 1 ¼” thread. We recommend attaching the safety
shower to at least a ¾ inch pipe. The water pressure should be at least 1 bar. The water supply for the safety shower should be situated near the system and have a stop valve for maintenance and repair work that no one can
tamper with.
3.2 Necessary space / installation height of body safety showers
There must be a free space with a radius of 400 mm underneath the body safety shower. The installation height
in accordance with DIN EN 15154-1:2006 of the lower edge of the shower head (body safety shower) must be
210–230 cm.
3.3 Necessary space / installation height of eye showers
There must be a free space with a radius of 150 mm around the eye shower. The installation height in accordance
with DIN EN 15154-2:2006 of the upper edge of the spray head (eye shower) must be 80–120 cm.
3.4 Installation height of safety shower valve / release button
The safety shower valve / release button should be mounted in a maximum height of 175 cm above the floor in
the immediate vicinity of the safety shower.
4. Installation
4.1 Installation of wall/ceiling mounted versions
Wall or ceiling mounted versions must be securely fastened to the wall/ceiling or other special structure. The
technique required to fasten the shower depends on the construction and is to be decided by the installation company.
4.2 Installation of over-door mounted versions
The over-door models are delivered with an already attached valve adapter (type A) for installation of the rod-operated valve to the right of the door. If an installation to the left of the door is required, then the attached valve adapter (type A) must be replaced by another valve adapter (type B), which is also included in the delivery. The
specialist tool (C31), which is also included in the delivery, must be used to attach the valve adapter to the ball
cock. The nut of the ball cock must be tightened with a standard screw locking device.
4.3 Installation of freestanding body safety showers
Freestanding body safety showers must be securely fastened to the surface using the base plate. The technique
required to fasten the shower depends on the construction and is to be decided by the installation company.
DENIOS AG
Dehmer Straße 58-66 • 32549 Bad Oeynhausen
Tel. +49 (0)5731 7 53-0 • Fax. -197
[email protected] • www.denios.com
5. Water supply
The body safety showers must be connected to drinking water. The drinking water network must be set up in accordance with DIN 1988 and DIN EN 1717.
CAUTION! For new installations the water supply system must be rinsed out before connecting the shower in
order to prevent dirt damaging the valve. The high-performance shower head must be deinstalled during this process. It must be reinstalled after the rinsing process.
6. Safety labelling
The enclosed safety label (self-adhesive label) is to be attached near the body safety shower.
7. Location
The location is to be chosen in accordance with the BG Chemie BGI/GUV-I 850-0 guidelines. Access must always
be kept clear. Special care must also be taken at the installation location that the safety shower:
• cannot be damaged by vehicles.
• is readily accessible to users at all times.
• is less than 10 metres away from the potential danger zone and can be reached within 10 seconds.
• For highly corrosive substances, a distance between 3-6 metres is recommended. The area around the shower
must be well-lit and the shower itself must be clearly identified by easily visible signs.
8. Operating
8.1 Body safety showers with pull rods
Pull the handle until the valve arm stops. Once showering begins, remove all contaminated items of clothing that
are not stuck to the skin and rinse all affected areas with clean and cold water. Push the lever upwards until the
valve closes to turn off the shower.
Contact a doctor!
8.2 Models with safety eye showers
In order to start the eye shower press the big PUSH lever. This locks the PUSH lever in the open position. The
eyewash should not make direct contact with the contaminated eye or any surrounding areas. Ideal rinsing is assured at a distance of approximately 150 mm. In order to stop the shower, pull back the PUSH lever.
Contact a doctor!
DENIOS AG
Dehmer Straße 58-66 • 32549 Bad Oeynhausen
Tel. +49 (0)5731 7 53-0 • Fax. -197
[email protected] • www.denios.com
9. Maintenance / Problems
The safety shower must be checked for visible damage or faults after installation and before being put into use
and subsequently at the intervals stated and after any alterations or maintenance.
9.1 Maintenance
The safety showers must be checked for operation at least once a month. This is also set out in the BGI/GUV-I
850-0 guidelines from BG Chemie. For this purpose, the shower must be turned on for approximately 5 seconds.
This not only checks the operation of the shower itself but also replaces the water in the shower with fresh water
(contamination protection).
During the course of this test, the shower is to also be inspected visually to see how it closes and if any leaks or
dirt, such as dust or limescale, are apparent. Faulty parts must be replaced immediately.
9.2 Problems
Problem
Possible cause
Possible solution
The amount of water coming out of the
shower does not appear to be sufficient.
Water pressure or cross section of the
connecting pipes is too low.
Check the piping. Ensure that the piping has a minimum diameter of ¾ inches and that the water pressure is at
least 1 bar.
The volume of water which flows from
the eyewash does not appear to be adequate.
Water pressure is too low, supply line
cross-section is too small or the jet regulator is contaminated.
Unscrew the jet regulator and clean
the regulator and sieve (blue). If water
pressure is too low, low-pressure diffusers are available as accessories.
The shower drips continuously.
The valve does not close properly.
Check the valve for damage and ensure that the valve is pushed back into
a fully-closed position.
The shower drips continuously.
The valve seal is damaged.
Replace the valve.
The body safety shower does not automatically switch itself off after use.
This is NOT a fault. This is a requirement according to DIN standards.
This is NOT a fault. This is a requirement according to DIN standards.
10. Disposal
The safety shower can be fully dismantled. The individual parts, e.g. metal, insulation etc, can be recycled separately. Please note the national and international disposal regulations.
Operating Instructions ClassicLine / PremiumLine Safety Showers
B-SAFETY
01-2012
bed-notd-eng