1
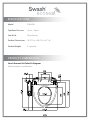
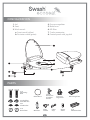
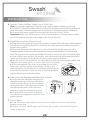
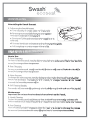
O W N E R ’S MA N UA L
S100-EW
FEATURES
Hygienic Dual Wash Wands
The Swash Ecoseat uses two hygienic wash wands: one for posterior cleansing and the
other for feminine cleansing.
Sterilizing Water Filter
The MF filter uses Nano Silver Ceramic technology to sterilize the water to ensure proper
product operation and purified wash functions.
Non-Electric Operation
No electricity is required to use the Swash Ecoseat. All Swash functions are operated by
the convenient jog dial control and household water pressure.
Easy Installation
No special tools, professional plumber, or electrical outlet required for installation.
Ergonomic Design
The slow-close ergonomic lid and seat are designed to ensure the most comfortable experience.
Self-cleaning Hygienic Wands
Before and after each use, the wash wands self-clean to help stay free of build-up or debris.
Aerated Washing Stream
Micro-bubbles introduced into the wash function increase cleansing effectiveness and comfort.
SAFETY INFORMATION
! Use this product only for its intended use as directed in this manual.
! Do not disassemble, repair or modify the product - service should only be performed by a
certified Brondell representative.
! Do not submerge or spray water directly on or into the product.
! Do not stand or drop heavy objects on this product and do not insert any object into
openings or hose.
! Do not pull or stress the water supply hose.
! Do not use harsh brushes or abrasive detergents to clean the product, use only mild soap
and a soft cloth for cleaning.
1
SPECIFICATIONS
Model:
S100-EW
Tap Water Pressure:
14 psi – 98 psi
Seat & Lid:
Slow closing
Product Dimensions: 18.25” (w) x 20.4” (l) x 6.1” (h)
Product Weight:
5.1 pounds
PRODUCT DIMENSIONS
Swash Ecoseat 100 Toilet Fit Diagram
Measurements in millimeters
2
CONFIGURATION
1. Lid
2. Seat
3. Wash wands
a. Front wand (yellow)
b. Posterior wand (green)
4. Pressure regulator
5. Bidet hose
6. MF filter
7. T-valve connector
8. Control panel with jog dial
8
7
6
PARTS
2 ea
Mounting
Bolt
T-Valve
Connector
w/rubber
washer
Bidet Hose
2 ea Rubber
Cone Washer
Pressure
Regulator
Mounting Plate
2 ea
Flat Washer
2 ea
Barrel Nut
MF Filter
Filter
Holder
3
Filter
Clip
Union
Valve
2 ea
Metal Bracket
INSTALLATION
Before Installation:
Check water supply line:
Check the line that connects the toilet tank to the water shut off valve. If it is a rigid pipe,
you may need to purchase a flexible hose to replace it before installing the Swash
Ecoseat. The length of the hose and the size of the connectors will vary.
Tools:
A Phillips head or standard screwdriver may be needed to remove the existing toilet seat
and a standard wrench may be needed for tight water supply connections.
Installation:
*Please read these instructions carefully before installing the Swash. Failure to do so could
result in flooding, leaking or damage to the product.
1. Existing Toilet Seat Removal
a. Lift hinge covers and use a screwdriver to remove the mounting bolts.
b. Remove the toilet seat.
Note: Steps may vary by type of seat.
Step 2c
2. Turn Off Water Supply Valve and Flush Toilet
a. Turn water valve off completely to stop the flow of water.
b. Flush toilet and hold down handle to completely empty tank.
c. Disconnect water supply hose from toilet tank.
Important Notes:
• You may wish to place a container under the tank to catch any
excess water.
• Do not continue without completing the above steps.
Failure to do so could result in flooding, leaking or damage to
the Swash Ecoseat.
3. Assemble T-Valve, Filter, and Hose Water Connections
a. Insert MF filter in filter holder by turning counter clockwise to
lock into place.
b. Connect filter holder and MF filter to T-Valve and secure using
the provided filter clip.
c. Connect bidet hose to the filter holder making sure to push all the
way in until secure.
d. Attach the union valve to the open end of the bidet hose.
4
Step 3a
Step 3, Fully Assembled
INSTALLATION
4. Connect T-Valve to Water Supply Line & Toilet Tank
Note: If your water supply line is rigid you may need to replace it before continuing.
a. Install the T-Valve with rubber washer (washer flat side down with lip facing up towards
tank connection) to the incoming water connection on the bottom of your toilet tank.
b. Connect the water supply line coming from the wall to the T-Valve.
Important: Make sure all connections are secured properly. Failure to do so could
result in flooding, leaking, or damage to the Swash Ecoseat.
5. Install Mounting Plate & Attach Swash
a. Place mounting plate over mounting holes on toilet, flat side down, black rubber
side of mounting plate should be closest to the toilet tank and rubber should be
against the ceramic.
b. Place metal brackets flat side down in the center of the square opening in the
mounting plate and insert mounting bolts through metal brackets and mounting
holes. Be sure that the square mounting bolt head is even with sides of metal bracket.
c. Slide rubber cone washer, flat washer, and then barrel nut onto mounting bolts
under the toilet bowl and tighten to keep mounting plate in place.
d. Set the Swash Ecoseat flat on the toilet bowl in front of the mounting plate, and
slide seat onto plate until it is secure and “clicks” into place.
Step 5
e. If the seat appears too short or too long for the toilet,
adjust the mounting plate accordingly. To adjust the
mounting plate, loosen barrel nut and slide seat forward or
backwards as needed. Once the seat is lined up properly,
tighten barrel nuts to hold in place.
6. Connect Pressure Regulator and Bidet Hose to Swash
a. Insert pressure regulator into pressure
regulator hook-up on bottom side of the
control panel by lining up the round and
rectangular holes in the control panel with
the appropriate ends of the pressure
regulator and push into place securely.
b. Connect the union valve to bottom
side of pressure regulator and push into
place securely.
Step 6a
Step 6b
7. Turn on Water
a. Turn the water valve back on slowly. Ensure connections are not leaking
before continuing.
b. After 5 minutes, check again and if there are no leaks, the Swash Ecoseat is
ready to operate.
5
UNINSTALLING
Uninstalling the Swash Ecoseat:
1. To Remove the Swash Ecoseat
a. Turn off water at supply valve and flush toilet.
b. Remove pressure regulator from pressure regulator
hook-up on underside of control panel.
c. Disconnect T-Valve and reconnect water supply hose to
toilet tank.
d. Unscrew barrel nuts and remove washers from mounting bolts.
e. Pull straight up on seat to remove it from toilet.
OPERATION & MAINTENANCE
How to Use:
1. Front Cleansing
For front, or feminine wash, turn the dial counter-clockwise while seated. The further the dial is
turned, the stronger the water pressure.
2. Rear Cleansing
For rear, or posterior wash, simply turn the dial clockwise while seated. The further the dial is
turned, the stronger the water pressure.
3. Water Pressure
To change the water pressure, turn the dial more or less in the direction of the wash, either
front or rear (posterior). The further the dial is turned, the stronger the water. The less the dial
is turned, the lower the pressure will be.
4. Self-Cleaning Nozzles
The nozzles will automatically go through a brief self-clean cycle with each use of the jog dial.
Maintenance:
Important! Do not use abrasive chemicals or solvents on the Swash.
1. Nozzle Cleaning
To clean the nozzles, gently pull them out from inside of the seat manually, and use a soft
cloth or toothbrush to clean off any build up. Clean front and rear nozzles in the same manner.
2. Seat Cleaning
Use a soft cloth and mild detergent to clean the Swash seat. For better cleaning, the seat can
be removed (see instructions for uninstalling the Swash Ecoseat in previous section).
6
For questions, contact
Brondell Customer Service:
1-888-542-3355
CONTACT INFORMATION
Brondell, Inc.
PO Box 470085
San Francisco, CA 94147-0085
Phone: 1-888-542-3355
Email: [email protected]
Web: www.brondell.com
WARRANTY
For detailed warranty information and product registration,
please go on-line at www.brondell.com
Please retain receipt records for any warranty claims.
7