1
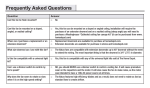
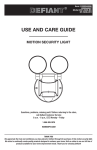
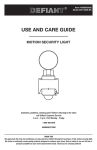
Item # 1000048551
Model # 84045
USE AND CARE GUIDE
48 LED SOLAR MOTION LIGHT
Questions, problems, missing parts?
Before returning to the store, call Defiant Customer Service
8 a.m. - 6 p.m., Monday-Friday
1-866-308-3976
HOMEDEPOT.COM
THANK YOU
We appreciate the trust and confidence you have placed in Defiant through the purchase of this solar motion light. We strive to continually create
quality products designed to enhance your home. Visit us online to see our full line of products available for your home improvement needs. Thank
you for choosing Defiant!
Table of Contents
Table of Contents. . . . . . . . . . . . . . . . . . . . . . . . . . . . . . . . . . . . 2
Safety Information. . . . . . . . . . . . . . . . . . . . . . . . . . . . . . . . . . . 2
Warranty. . . . . . . . . . . . . . . . . . . . . . . . . . . . . . . . . . . . . . . . . . . 2
What is Covered. . . . . . . . . . . . . . . . . . . . . . . . . . . . . . . . . . . . 2
Pre-Installation . . . . . . . . . . . . . . . . . . . . . . . . . . . . . . . . . . . . . 3
Planning Installation . . . . . . . . . . . . . . . . . . . . . . . . . . . . . . . . 3
Tools Required. . . . . . . . . . . . . . . . . . . . . . . . . . . . . . . . . . . . . 3
Hardware Included. . . . . . . . . . . . . . . . . . . . . . . . . . . . . . . . . . 3
Package Contents . . . . . . . . . . . . . . . . . . . . . . . . . . . . . . . . . . 4
Installation . . . . . . . . . . . . . . . . . . . . . . . . . . . . . . . . . . . . . . . . . 5
Installing the Solar Panel. . . . . . . . . . . . . . . . . . . . . . . . . . . . . 5
Installing the Quick-Clip Mounting Bracket. . . . . . . . . . . . . . . 6
Installing the Motion Light. . . . . . . . . . . . . . . . . . . . . . . . . . . . 6
Operation. . . . . . . . . . . . . . . . . . . . . . . . . . . . . . . . . . . . . . . . . . 7
Using Motion Light. . . . . . . . . . . . . . . . . . . . . . . . . . . . . . . . . . 7
Replacing the Battery . . . . . . . . . . . . . . . . . . . . . . . . . . . . . . . 8
Maintenance. . . . . . . . . . . . . . . . . . . . . . . . . . . . . . . . . . . . . . . . 9
Care & Cleaning . . . . . . . . . . . . . . . . . . . . . . . . . . . . . . . . . . . . . 9
Troubleshooting . . . . . . . . . . . . . . . . . . . . . . . . . . . . . . . . . . . . . 9
Safety Information
This manual has been carefully designed and organized to make
the assembly, operation, and continued maintenance of the
product as easy and safe as possible, provided it is installed,
operated, maintained, and tested in strict accordance with the
instructions and warnings contained in this manual. Read and
follow all guidelines and operating instructions before the first
use of this product. Store the manual in a safe, easily accessible
location.
WARNING: When selecting a replacement battery, ensure
the correct battery type is chosen.
WARNING: Keep these instructions safe for future
reference.
WARNING: Do not make any additions to the wiring of the
48 LED Solar Motion Light.
WARNING: Always take precautions if using a step ladder
when installing the 48 LED Solar Motion Light.
WARNING: Never look directly into the 48 LED Solar
Motion Light when illuminated.
Warranty
1 YEAR WARRANTY
WHAT IS COVERED
The manufacturer warrants to the original purchaser that the products delivered are free of defects in material and workmanship for the
period listed below from the date of purchase.
The manufacturer requires a proof of purchase for any warranty claim.
The warranty is conditioned on the following:
1)
The manufacturer must be notified within the period of the warranty from the date purchased and have
been given the opportunity of inspection by return of any alleged defective product.
2)
The product must not have been abused, misused or improperly maintained, installed or repaired during the warranty period.
3)
Such alleged defects should not be deemed as a result of any circumstance not falling under ordinary ‘wear and tear’.
The manufacturer makes no other warranty or representation either expressed or implied.
The manufacturer’s maximum liability is limited to the purchased price of the product. In no event shall the manufacturer be liable for any
consequential, indirect, incidental, or special damages of any nature arising from the sale or use of this product.
Contact the Customer Service Team at 1-866-308-3976 or visit www.HomeDepot.com
2
Pre-Installation
PLANNING INSTALLATION
For the best result, locate the solar panel in a position where it receives direct sunlight and is generally free from cover and shade. Be
aware and consider foliage and building overhangs, which will affect the solar panel’s ability to charge.
Solar Panel
Solar Panel
NOTE: Face the solar panel due south for maximum
sun exposure.
TOOLS REQUIRED
Power drill
Phillips
screwdriver
Pencil
Safety
Ladder
Level
goggles
HARDWARE INCLUDED
AA
BB
CC
Part
Description
AA
Screws
6
BB
Plugs
6
CC
Quick-Clip mounting bracket
1
Quantity
3HOMEDEPOT.COM
Please contact 1-866-308-3976 for further assistance.
Pre-Installation (continued)
PACKAGE CONTENTS
B
A
Part
Description
A
48 LED Motion Light
1
B
Solar panel with wire
1
4
Quantity
Installation
1 Installing the solar panel
2 Installing the solar panel (continued)
□□ Place the solar panel mounting bracket (B) on the desired
wall.
□□ Place four plugs (BB) in the mounting holes.
□□ Place the solar panel mounting bracket (B) over the four
plugs (BB).
□□ Mark with a pencil, the four pre-drilled holes in the
mounting bracket on the wall.
□□ Use a Phillips screwdriver to screw in the four screws (AA)
into the pre-drilled holes of the mounting bracket.
□□ Utilize a standard power drill to create the mounting holes.
Top View
Wall
BB
BB
AA
AA
B
5HOMEDEPOT.COM
Please contact 1-866-308-3976 for further assistance.
Installation (continued)
3
4
Installing the Quick-Clip
mounting bracket
□□ Place the Quick-Clip mounting bracket (CC) on the desired
wall.
□□ Mark with a pencil, the two pre-drilled holes in the
mounting bracket on the wall.
□□ Utilize a standard power drill to create the mounting holes.
Installing the Quick-Clip
mounting bracket (continued)
□□ Place two plugs (BB) in the mounting holes.
□□ Place the Quick-Clip mounting bracket (CC) over the two
plugs (BB).
□□ Use a Phillips screwdriver to screw in the two
screws (AA) into the pre-drilled holes of the
Quick-Clip mounting bracket.
Side View
Wall
CC
AA
CC
BB
NOTE:
The beveled side of the Quick-Clip mounting bracket
should be facing downwards and the flat side should
be facing outwards.
5
Installing the motion light
□□ Once the Quick-Clip mounting bracket (CC) is installed,
ensure all the screws are tightly fastened. The 48 LED
Motion Light is now ready to be positioned into place.
□□ Place the light hook (pre-installed on the back of the light)
over the mounting bracket. At this point, a click will be
heard as the light secures into place.
Side View
Wall
CC
A
6
6
Connecting the solar panel
to the motion light
□□ Insert the wire plug from the solar panel to the motion light
socket located underneath the battery housing.
□□ The 48 LED Solar Motion Light is now installed and ready
to charge.
Front View
Operation
1 Charging the battery
2 Using the motion light switch
□□ Before the 48 LED Solar Motion Light can operate to its full
capacity, the solar panel needs to be in sunlight for 3 days
to fully charge the included battery. Charge the unit in the
“OFF” position.
□□ Turn the switch to the “AUTO” position, once the battery
is fully charged. Then the light will turn on automatically
at night when motion is detected by the motion detector
head.
ON
ON
OFF
OFF
AUTO
AUTO
ON
OFF
AUTO
ON
OFF
AUTO
NOTE:
Turn the switch to the “ON” position to override the motion
detection. This feature allows a limited time of constant
illumination.
3 Using the control dials
The 48 LED Solar Motion Light has 3 different control dials, which
control the light’s duration, sensitivity to light, and sensitivity to
motion.
1. SENS (Sensitivity)
This dial determines the range of motion detection.
SENS
TIME
LUX
ON
2. TIME
This dial sets the duration of illumination time.
OFF
AUTO
3. LUX (Light level)
This dial tells the sensor the level of darkness that must be
reached before the light turns on.
□□ If set to
daytime.
the sensor will trigger the light to turn on in the
□□ If set to the sensor will only trigger the light to turn on
at dusk or when it is dark. This is the ideal position for
general usage.
MAX
MED
MIN
7HOMEDEPOT.COM
Please contact 1-866-308-3976 for further assistance.
Operation (continued)
4 Replacing the battery
□□ The battery pack is located in back of the light’s battery
housing.
□□ Turn the switch to the “OFF” position. Remove the four
screws from the battery housing. Separate the battery
pack connector. Remove the old battery pack and replace
it with a new identical rechargeable battery pack.
□□ Replace the cover of the battery housing and
secure it with the four screws.
Battery
Pack
Battery
Pack
NOTE: Please contact www.homedepot.com for
battery replacement information.
8
Maintenance
Periodically check the connection from the solar panel to the light. Ensure this plug is correctly inserted.
□□ Some seasonal adjustment of the solar panel may be required to offset shorter charge days during the winter.
□□ Ensure the solar panel is free from any obstruction such as trees or buildings.
Care and Cleaning
□□ The solar panel should be cleaned on a regular basis. This will ensure the 48 LED Solar Motion light charges consistently.
□□ To clean the solar panel, use a damp cotton cloth. Never use any abrasive materials or cleaning products.
□□ The lens of the LED light should also be cleaned with a damp cotton cloth. This ensures a clear illumination.
Troubleshooting
Problem
Solution
Where should the solar panel be mounted?
□□ Mount the solar panel in a position that will enable the
maximum amount of light to be absorbed. In the Northern Hemisphere this is usually south facing.
Does the solar panel require direct sun to charge?
□□ The solar panel can charge the internal battery in direct and
indirect light. For best results, place the panel in direct light
to maximize and increase efficiency.
Can additional or extended cable wire for the 48 LED Solar Motion
Light be purchased?
□□ At this point there are no extensions available for the cable that
connects the light to the solar panel. Any additions to the cable
will void the warranty.
Why does the 48 LED Solar Motion Light not illuminate at night?
□□ See Operation (Step 3) on page 7. It may be required to
re-adjust the light’s LUX dial setting.
Where can a new battery for the 48 LED Solar Motion Light be
purchased?
□□ Please contact www.homedepot.com
or call 1-866-308-3976.
Are any parts of the 48 LED Solar Motion Light weatherproof?
□□ All parts of the 48 LED Solar Motion Light are fully weatherproofed and are ideal for any exterior installation.
Why does the 48 LED Solar Motion Light appear to ‘strobe’ or flash?
□□ Turn the 48 LED Solar Motion Light to the “OFF” position. Allow
the battery to recharge for two full sunny days. At the end of the
second day, turn the light to the “AUTO” position. See Operation
(Step 3) on page 7 to confirm the light’s LUX dial settings. The
48 LED Solar Motion Light should now work as required.
Will decorative or street lights have an effect on the 48 LED Solar
Motion Light’s ability to operate?
□□ Yes, the sensor of the 48 LED Solar Motion Light is light
sensitive. For nighttime usage, ensure no other light
activates the motion sensor.
9HOMEDEPOT.COM
Please contact 1-866-308-3976 for further assistance.
Questions, problems, missing parts?
Before returning to the store, call Customer Service
8 a.m. - 6 p.m., Monday-Friday
1-866-308-3976
HOMEDEPOT.COM
Retain this manual for future use.
Artículo # 1000048551
Modelo # 84045
GUÍA DE UTILIZACIÓN Y CUIDADO
LÁMPARA SOLAR DE 48 LED CON SENSOR DE MOVIMIENTO
¿Preguntas, problemas o partes faltantes?
Antes de regresar a la tienda, llame al servicio al cliente de Defiant
8:00 AM a 6:00 PM, de lunes a viernes
1-866-308-3976
HOMEDEPOT.COM
GRACIAS
Agradecemos la confianza que ha depositado en Defiant al adquirir esta lámpara solar con sensor de movimiento. Nos esforzamos para seguir
creando productos de calidad diseñados para mejorar su casa. Visítenos en línea para ver nuestra línea de productos disponibles para sus
necesidades del hogar. ¡Gracias por su elegir Definat!
Tabla de contenidos
Tabla de contenidos . . . . . . . . . . . . . . . . . . . . . . . . . . . . . . . . . . 2
Información de seguridad . . . . . . . . . . . . . . . . . . . . . . . . . . . . . 2
Garantía. . . . . . . . . . . . . . . . . . . . . . . . . . . . . . . . . . . . . . . . . . . 2
Cobertura. . . . . . . . . . . . . . . . . . . . . . . . . . . . . . . . . . . . . . . . . 2
Pre-Instalación. . . . . . . . . . . . . . . . . . . . . . . . . . . . . . . . . . . . . . 3
Planificación de la instalación. . . . . . . . . . . . . . . . . . . . . . . . . 3
Herramientas requeridas. . . . . . . . . . . . . . . . . . . . . . . . . . . . . 3
Partes incluidas. . . . . . . . . . . . . . . . . . . . . . . . . . . . . . . . . . . . 3
Contenidos del paquete. . . . . . . . . . . . . . . . . . . . . . . . . . . . . . 4
Instalación . . . . . . . . . . . . . . . . . . . . . . . . . . . . . . . . . . . . . . . . . 5
Instalación del panel solar. . . . . . . . . . . . . . . . . . . . . . . . . . . . 5
Instalación del soporte de enganche. . . . . . . . . . . . . . . . . . . . 6
Instalación de la lámpara. . . . . . . . . . . . . . . . . . . . . . . . . . . . . 6
Operación . . . . . . . . . . . . . . . . . . . . . . . . . . . . . . . . . . . . . . . . . . 7
Uso de la lámpara . . . . . . . . . . . . . . . . . . . . . . . . . . . . . . . . . . 7
Reemplazo de la batería . . . . . . . . . . . . . . . . . . . . . . . . . . . . . 8
Mantenimiento. . . . . . . . . . . . . . . . . . . . . . . . . . . . . . . . . . . . . . 9
Cuidado y limpieza. . . . . . . . . . . . . . . . . . . . . . . . . . . . . . . . . . . 9
Solución de problemas. . . . . . . . . . . . . . . . . . . . . . . . . . . . . . . . 9
Información de seguridad
Este manual ha sido cuidadosamente diseñado y organizado para
hacer la instalación, operación y mantenimiento del producto lo más
fácil y seguro posible, siempre y cuando se instale, opere, mantenga
y pruebe de acuerdo a las instrucciones y advertencias incluidas en
este manual. Lea y siga todas las indicaciones e instrucciones de
operación antes de utilizar este producto por primera vez. Guarde el
manual en un lugar seguro y de fácil acceso.
ADVERTENCIA: Guarde estas instrucciones
seguramente para referencia futura.
ADVERTENCIA: No haga ninguna adición al cableado de
la lámpara..
ADVERTENCIA: Siempre tome precauciones si utiliza
una escalera de mano para instalar la lámpara.
ADVERTENCIA: Asegúrese de elegir el tipo correcto de
batería al reemplazarla.
ADVERTENCIA: Nunca mire directamente hacia la
lámpara cuando esta se ilumina.
Warranty
1 AÑO DE GARANTÍA
¿QUÉ ESTÁ CUBIERTO?
El fabricante garantiza al comprador original que el producto entregado no tiene defectos de materiales ni de mano de obra durante el
periodo aquí descrito, a partir de la fecha de compra.
El fabricante requiere un comprobante de compra para cualquier reclamo de garantía.
Las siguientes condiciones aplicar a la garantía:
1) El fabricante debe ser notificado dentro del periodo de garantía a partir de la fecha de compra y debe haber tenido la oportunidad de
inspeccionar directamente el producto presuntamente defectuoso a través de su devolución.
2)
El producto no debe haber sido maltratado, utilizado, mantenido, instalado o reparado incorrectamente durante el periodo de garantía.
3)
Los defectos presuntos no deben ser el resultado de ninguna circunstancia prevista en el deterioro normal.
El fabricante no ofrece ninguna otra garantía o representación expresa o implícita.
La responsabilidad máxima del fabricante se limitará al precio de compra del producto. En ningún caso el fabricante será responsable por
cualquier daño consecuente, indirecto, incidental o especial de cualquier naturaleza que surja de la venta o uso de este producto.
Contacte al equipo de servicio al cliente al 1-866-308-3976 o visite www.HomeDepot.com
2
Pre-Instalación
PLANIFICACIÓN DE LA INSTALACIÓN
Para mejores resultados, ubique el panel solar en un lugar donde reciba luz solar directa sin obstrucción y generalmente libre de sombras.
Tenga en cuenta follaje y estructuras salientes que puedan afectar la capacidad de carga del panel solar.
Panel Solar
Panel Solar
NOTA: Oriente el panel hacia el sur para mayor exposición
al sol.
HERRAMIENTAS REQUERIDAS
Taladro
Lápiz
Destornillador
Phillips
Escalera
Gafas de
protección
Nivel
PARTES INCLUIDAS
AA
Parte
BB
Descripción
CC
Cantidad
AA
Tornillos
6
BB
Taquetes
6
CC
Soporte de enganche
1
3HOMEDEPOT.COM
Por favor contacte el 1-866-308-3976 para más asistencia
Pre-Instalación (Continuación)
CONTENIDOS DEL PAQUETE
B
A
Parte
Descripción
A
Lámpara de 48 LED
1
B
Panel solar con cable
1
4
Cantidad
Instalación
1
2
Instalación del panel solar
□□ Coloque el soporte de montaje del panel solar (B) en el
muro deseado.
Instalación del panel solar
(continuación)
□□ Coloque cuatro taquetes (BB) en los agujeros de montaje.
□□ Coloque el soporte de montaje del panel solar (B) sobre los
taquetes (BB).
□□ Marque con un lápiz en la pared los cuatro agujeros preperforados del soporte de montaje.
□□ Utilice un destornillador Phillips para atornillar los cuatro
tornillos (AA) en los agujeros pre-perforados del soporte de
montaje.
□□ Utilice un taladro eléctrico estándar para crear los agujeros
de montaje.
Vista desde arriba
Muro
BB
BB
AA
AA
B
5HOMEDEPOT.COM
Por favor contacte el 1-866-308-3976 para más asistencia
Instalación (continuación)
3
Instalación del soporte de enganche
□□ Coloque el soporte de enganche (CC) en el muro deseado
□□ Marque con un lápiz en la pared los dos agujeros preperforados del soporte de enganche.
□□ Utilice un taladro eléctrico estándar para crear los agujeros
de montaje.
4
Instalación del soporte de enganche
(continuación)
□□ Coloque dos taquetes (BB) en los agujeros de montaje.
□□ Coloque el soporte de enganche (CC) sobre los dos
taquetes (BB).
□□ Utilice un destornillador Phillips para atornillar los dos
tornillos (AA) en los agujeros pre-perforados del soporte de
enganche.
Vista lateral
Muro
CC
AA
CC
BB
NOTA:
El lado biselado del soporte de enganche debe ser orientado
hacia abajo y el lado plano hacia el exterior.
5
Instalación de la lámpara solar
□□ Una vez haya instalado el soporte de enganche (CC),
asegúrese que todos los tornillos estén bien apretados. La
lámpara solar de 48 LED podrá ahora ser colocada en su
lugar.
□□ Enganche la lámpara (gancho instalado en la parte
posterior de la luz) en el soporte. Cuando se escuche un
clic, el gancho de la lámpara estará asegurado.
Vista lateral
Muro
CC
A
6
6
Conexión del panel solar a la
lámpara solar
□□ Conecte el cable del panel solar al enchufe de lámpara
situado debajo del compartimento de la batería.
□□ La lámpara solar de 48 LED con sensor de movimiento está
ya instalada y lista para cargar.
Vista frontal
Operación
1 Carga de la batería
2 Uso del interruptor de la lámpara
□□ Para que la lámpara solar opere a máxima capacidad, el
panel solar necesitará 3 días de carga bajo el sol para
cargar la batería incluida. Realice esta carga con el
interruptor en la posición de apagado (OFF).
□□ Coloque el interruptor en la posición de AUTO una vez
la batería esté completamente cargada. La lámpara se
encenderá automáticamente durante la noche cuando el
detector de movimiento la active.
ON
ON
OFF
OFF
AUTO
AUTO
ON
OFF
AUTO
ON
OFF
AUTO
NOTA:
Coloque el interruptor en la posición de ON para anular la
detección de movimiento. Esta modalidad sólo permite un
periodo limitado de iluminación.
3 Uso de las perillas de ajuste
La lámpara solar de 48 LED tiene 3 perillas de ajuste que controlan
el alcance de detección, la duración de la iluminación y la
sensibilidad a la luz.
1. SENS
Esta perilla determina el alcance de detección de
movimiento.
SENS
TIME
LUX
ON
OFF
2. TIME
Esta perilla ajusta la duración de iluminación al ser
activada la lámpara.
AUTO
3. LUX
Esta perilla dicta el grado de oscuridad requerida por el
sensor para activar la lámpara.
□□ Hacia el ícono
el día.
el sensor activará la lámpara durante
□□ Hacia el ícono el sensor sólo activará la lámpara al
anochecer o cuando esté oscuro. Esta es la posición ideal
para uso general.
MAX
MED
MIN
7HOMEDEPOT.COM
Por favor contacte el 1-866-308-3976 para más asistencia
Operación (continuación)
4 Reemplazo de la batería
□□ El paquete de baterías está ubicado en la parte posterior
de la lámpara.
□□ Coloque el interruptor en la posición de apagado “OFF”.
Quite los cuatro tornillos del compartimento de la batería.
Saque el paquete de baterías y desconéctelo. Reemplace
con un paquete recargable nuevo e idéntico.
□□ Cierre el compartimento de baterías y ajuste los tornillos.
Paquete
de bateria
Paquete
de bateria
NOTA: Por favor contacte www.homedepot.com para
mayor información sobre la batería de reemplazo.
8
Mantenimiento
Verifique periódicamente la conexión entre el panel solar y la lámpara. Verifique que el panel esté conectado correctamente.
□□ Puede ser necesario ajustar el panel solar durante periodos diurnos de carga más cortos durante el invierno.
□□ Asegúrese de que el panel solar está libre de cualquier obstáculo como árboles o edificios.
Cuidado y limpieza
□□ El panel debe ser limpiado regularmente. Esto asegura que la lámpara solar reciba cargas de manera consistente.
□□ Para limpiar el panel solar utilice un trapo húmedo. Nunca utilice materiales abrasivos o productos de limpieza.
□□ El vidrio de la lámpara debe ser también limpiado con un trapo húmedo. Esto garantiza una iluminación clara.
Solución de problemas
Problema
Solución
¿Dónde debe instalarse el panel solar?
□□ Instale el panel solar en una posición que permita la máxima
absorción de luz posible. En el hemisferio norte esto es por lo
general orientado hacia el sur.
¿El panel solar requiere sol directo para cargar?
□□ El panel solar puede cargar la batería interna en luz directa o
indirecta. Para obtener los mejores resultados, coloque el panel
en luz directa para maximizar la eficiencia.
¿Se puede adquirir cable adicional para el panel solar?
□□ En este momento no hay extensiones disponibles para el cable
del panel solar. Cualquier adición al cable anulará la garantía..
¿Por qué no se ilumina la lámpara solar durante la noche?
□□ Consulte Operación (paso 3) en la página 7. Puede ser necesario
reajustar la perilla LUX..
¿Dónde puede adquirirse una nueva batería?
□□ Por favor contacte www.homedepot.com o llame al
1-866-308-3976.
¿Es alguna parte de la lámpara resistente a la intemperie?
□□ Todas las partes de la lámpara son completamente impermeabilizadas e ideales para cualquier instalación exterior.
¿Por qué se ilumina intermitentemente la lámpara solar?
□□ Coloque el interruptor en la posición de OFF. Permita que la
batería se recargue por dos días soleados. Al final del segundo
día coloque el interruptor en la posición de AUTO. Vea Operación
(paso 3) para confirmar el ajuste de la perilla LUX. La lámpara
solar deberá retomar su función normal.
¿Podría ser afectada la lámpara por luces decorativas o de calle?
□□ Sí, el sensor de la lámpara solar es sensible a la luz. Para uso
nocturno, asegúrese de que ninguna otra luz active el sensor de
movimiento.
9HOMEDEPOT.COM
Por favor contacte el 1-866-308-3976 para más asistencia
¿Tiene preguntas, problemas o partes faltantes?
Antes de regresar a la tienda, llame al servicio al cliente
8:00 AM a 6:00 PM, de lunes a viernes
1-866-308-3976
HOMEDEPOT.COM
Conserve este manual para futuras consultas
Def48LEDMLman_06-11-14