Transcript
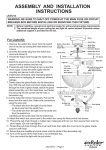
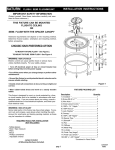
Installation Instruction
Item No: 8102-3H/8103-3H
A
B
C
D
E
F
G
1. Carefully unpack and take out the parts as picture shown.
2. Install the tube(G)onto nipple(H),then slide the cap(D)onto
nipple(E),and secure it with hex nut(C),then thread fixture
loop(A)on;
3. Hang the side rod(F)onto cap(D)& clip of the frame(Q)and
fabric shade(P)using cap nut(B),(I)on;
4. Thread nipple with hex nut(L)into coupling(K),then slide the
tube(M),ring(N),rubber washer(O),plate(R),steel
washer(S)onto nipple with hex nut(L),and secure them with
hex nut(T);
5. Slide the cap(U)onto nipple with hex nut(L),and secure it with
finial(V);
H
I
J
K
L
M
N
O
S
T
U
V
Important Safety Instruction
This portable lamp has a polarized plug (One blade is wider than
the other) as a safety feature to reduce the risk of the electric
shock. This plug will fit in a polarized outlet only one way. If the
plug does not fit in the outlet, reverse the plug. If it still does not
fit, consult a qualified electrician. Never use an extension cord
unless the plug can be fully inserted. Do not alter the plug.
Note: 120V/60W
WARNING ! – To reduce the risk of fire ,electric shock, or personal injury:
- Turn off / unplug lamp and allow to cool before replacing bulb.
- Do not touch bulb when fixture is turned on
- Do not look directly at lighted bulb
- keep materials that burn easily away from lighted bulb
CLEANING:
Use only soft cloth to dust and clean fixture. Never use chemicals or abrasive cleaners as it may
damage finish
\★ Keep this instruction for future reference
P
Q
R