1
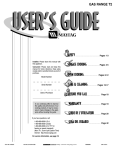
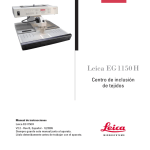
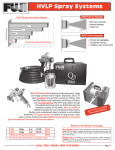
IF YOU HAVE ANY QUESTIONS OR CONCERNS, OR ARE MISSING PARTS DO NOT RETURN SPRAYER TO THE STORE! PLEASE CALL OUR HOT LINE AT 1-800-253-4642 Year Round: Mon. – Fri., 8:00 a.m. to 7:00 p.m., ET March 1 – August 31: Sat. and Sun., 10:00 a.m. to 4:00 p.m., ET For all other ECHO products, call Consumer Product Support at 1-800-432-3246 Operators Manual Model MS-300 WARNING!!! THIS PRODUCT IS DESIGNED TO SPRAY CHEMICALS THAT MAY BE HARMFUL AND COULD CAUSE SERIOUS PERSONAL INJURY IF INHALED OR BROUGHT INTO CONTACT WITH THE USER. FAILURE TO READ AND FOLLOW OWNERS’ MANUAL INSTRUCTIONS BEFORE USE AND/OR MISUSE OF THIS PRODUCT COULD RESULT IN EXPLOSIVE FAILURE WITH MAJOR INJURIES. • ALWAYS water test sprayer before each use. • ALWAYS wear long sleeve shirts, long pants, goggles, gloves and durable shoes. • ALWAYS READ AND FOLLOW label instructions for the chemicals to be applied. • AFTER USE release pressure and clean the sprayer. • ALWAYS RELEASE pressure in sprayer before servicing. • DO NOT alter the sprayer or any components. • DO NOT spray flammable, caustic (i.e. acids, chlorines and bleach), corrosive, heated or self-heating solutions with this sprayer. • DO NOT store liquids in the sprayer. • NEVER fill tank above the “3G” line on the tank. Attaching Wand to Flow Control 1. Ensure that the gasket is in the open end of the flow control. 2. Insert the non-threaded end of the wand into the open end of the flow control. 3. Tighten the screw cap. Attaching Hose to Flow Control 1. With petroleum jelly, lubricate the o-ring on the large hose insert. 2. Push the large hose insert into the handle end of the flow control until fully seated. 3. Slide the hose spring nut onto the flow control and screw on; hand tighten only. Attaching Hose to Tank 1. Insert open end of black supply tube into the small black hose insert until snug. 2. With petroleum jelly, lubricate the hose insert o-ring. 3. Fully insert hose insert/supply tube assembly into threaded tank nipple, slide spring nut to the tank nipple and screw on. Hand tighten only. Changing the Nozzle from Adjustable Cone to other patterns 1. Unscrew #1 adjustable poly cone nozzle cap 8 2. Unscrew #8 retaining nut 8 8 8 3. Push #6 nozzle body with o-ring out of #8 retaining nut You are now ready to change to a different spray pattern. 1 3 3 7 Follow the “Spayer Tip Assemblies” diagram for your desired 4 2 2 spray pattern. 2 2 Sprayer Tip Assemblies: 1. Poly Adjustable Cone 2. Gasket 3. Jet Cap 4. Swirl Plate 5 5 5 5 5. Elbow 6. Nozzle Body w/o-ring 7. Flat Fan Tip 8. Retaining Nut Flat Hollow Poly Jet Operation Fan Cone Adjustable Stream 1. Turn pump handle counterclockwise to remove pump. 2. Fill tank with desired chemical solution, careful to follow chemical manufacturers’ guidelines. 3. Tighten pump assembly for a good seal. 4. To pressurize the tank, pump the pump handle; to spray, squeeze flow control lever. . 5. Prior to every removal of the pump release pressure by turning pressure relief valve once to the right until it snaps. Before repressurizing, turn it one more time to the right until it snaps. Servicing the Pump 1. Remove pump from tank. 2. Unscrew cap at top of the pump cylinder in counter-clockwise motion. 3. Remove plunger assembly from cylinder. 4. When reassembling, be sure square tabs on lock plate are fitted into cylinder notches, then screw cap on. 1. Remove pump assembly from the tank. 2. Unlock the pump handle and pull it out as far as it will go. 3. Place a flat blade screwdriver in the slot below PRY . Move the screwdriver handle down towards the bottom of the pump, prying the cap out and around the tab. Put a wedge in opening. Repeat this procedure on the other side of the pump cap. 4. To reassemble, insert the plunger assembly into the cylinder and snap the cap 971-297 back into place. 11/13 Cleaning and Storing 1. Do not store chemicals in the tank. If the chemical is stored in the tank, it can clog the system as it dries and destroy the seals and other components. 2. To prolong its life, clean the sprayer after each use. After using water-based products, rinse thoroughly with soapy water then clean water, being sure to flush out the hose and flow control. After spraying solvent or oil-based products, follow the chemical manufacturers’ recommended cleaning procedure, following up with a thorough rinsing and flushing of the sprayer, hose and flow control with soapy water then clean water. 3. To store the sprayer, remove the complete hose assembly (hose w/siphon tube, wand, flow control) from the tank. 4. For proper drainage and drying, lock flow control lever on. 5. Loosen pump assembly, but leave in the tank. 6. Store all components in a clean, dry area. TROUBLESHOOTING Always depressurize the sprayer, remove all chemical solution and clean the sprayer before making repairs. Replacement parts may be purchased at the store where the sprayer was purchased or they can be ordered from our PRO Hot line at 1-866-967-7677. PROBLEM: Pump works hard or does not pressurize the tank. CAUSE: Plunger o-ring either not lubricated or damaged. SOLUTION: Apply petroleum jelly or similar lubricant around outside of plunger o-ring. Check for cracks or other damage and replace if necessary. PROBLEM: Spray solution or air leaks into pump cylinder. CAUSE: Check valve on bottom of cylinder is prevented from sealing by dirt, residue or damage. SOLUTION: Remove the pump assembly and examine the check valve. Clean if dirty; replace if necessary. PROBLEM: Hose leaks air at tank connection. CAUSE: (1)Tank nut is loose or (2) hose insert o-ring is damaged. SOLUTION: (1) Tighten hose tank nut or (2) replace hose insert o-ring. PROBLEM: Flow control leaks. CAUSE: Improper assembly or cracked. SOLUTION: Refer to “Assembly for Wand” instructions, replace if necessary. PROBLEM: Bad spray pattern or low spray volume. CAUSE: (1) Nozzle is clogged or (2) low pressure in sprayer. SOLUTION: (1) Remove nozzle and clean; remove wand and clean. If wand cannot be unclogged, replace it or (2) repressurize the tank. PROBLEM: Nozzle leaks when flow control is closed. CAUSE: Flow control remaining open (lever is locked on). SOLUTION: Completely disassemble flow control. Inspect all components, clean and lubricate all seals or replace flow control. PROBLEM: Leak at tank opening. CAUSE: (1) Pump assembly not sealed tightly into tank or (2) dry or damaged pump cylinder gasket or o-ring. SOLUTION: (1) Thoroughly clean pump cylinder gasket or o-ring and surrounding area and apply grease or petroleum jelly to pump gasket or o-ring or (2) Replace gasket or o-ring. LIMITED WARRANTY Root-Lowell manufacturing Co. warrants to the original purchaser only that this product will continue to function as intended if used in accordance with the operating instructions for as long as the original purchaser owns the product. If the product fails to function as intended—DO NOT RETURN TO THE STORE—call out Consumer Hotline at 1-800-253-4642 (toll free) for fast service. We will, at our option, repair or replace any non-functioning parts without charge—shipping charges will apply. Root-Lowell Manufacturing Co. shall have the option of requiring the return of the non-functioning product to the address listed below together with the proof of purchase to establish a claim under this warranty. This warranty does not apply to damage resulting from accident, misuse, neglect, alterations, operation not in accordance with instructions, or normal wear or o-rings or seals. NOTE: Rubber seals and gaskets require periodic maintenance, and are not warrantable once they come in contact with chemicals. ANY IMPLIED WARRANTIES, INCLUDING THE IMPLIED WARRANTY OF MERCHANTABILITY AND FITNESS FOR CONSUMER USE, ARE SOLELY LIMITED TO THE DURATION SPECIFIED ABOVE. ROOT-LOWELL MANUFACTURING CO.’S LIABILITY IS LIMITED SOLELY TO THE REPAIRS OR REPLACEMENT OF THE NON-FUNCTIONING PRODUCT OR PART. ROOT-LOWELL MANUFACTURING CO. EXCLUDES LIABILITY UNDER THIS WARRANT FOR ANY AND ALL INCIDENTAL AND CONSEQUENTIAL LOSS OR DAMAGE. Some states do not allow limitations on how long an implied warranty lasts, or the exclusion or limitation of incidental or consequential damages, so these limitations or exclusions may not apply to you. This warranty gives you specific legal rights and you may have other rights which vary from state to state. Root-Lowell Manufacturing Co. • 1000 Foreman Rd. • Lowell, MI 49331 ECHO® is a registered trademark of Echo, Incorporated and is used under license by Root-Lowell Manufacturing Company. MANUAL DEL PROPIETARIO ¡¡¡ADVERTENCIA!!! ESTE PRODUCTO ESTÁ DISEÑADO PARA ROCIAR PRODUCTOS QUÍMICOS QUE PUEDEN SER DAÑINOS Y PUEDEN OCASIONAR LESIONES PERSONALES SERIAS SI SE INHALAN O ENTRAN EN CONTACTO CON EL USUARIO. EL NO LEER Y SEGUIR LAS INSTRUCCIONES DEL MANUAL DEL PROPIETARIO ANTES DEL USO Y/O DEL MAL USO DE ESTE PRODUCTO PUEDE RESULTAR EN UNA FALLA DE EXPLOSIÓN CON LESIONES GRAVES. • • • • • • • SIEMPRE pruebe el rociador con agua antes de cada uso. SIEMPRE use camisa de manga larga, pantalones largos, gafas de protección, guantes y zapatos durables. SIEMPRE LEA Y SIGA las instrucciones de la etiqueta de los productos químicos que se aplicarán. DESPUÉS DE USAR libere la presión y limpie el rociador. SIEMPRE LIBERE la presión del rociador antes de darle servicio. NO altere el rociador o alguno de sus componentes. NO use este rociador para rociar soluciones inflamables, cáusticas (Ej. ácidos, cloros y blanqueadores), corrosivos, soluciones calentadas y auto-calentables. • NO guarde líquidos en el rociador. • NUNCA llene el tanque por arriba de la “2G o 3G LÍNEA del tanque. CONEXIÓN DE LA VARILLA CON EL REGULADOR DE FLUJO 1. Asegúrese de que la junta se encuentre en el extremo abierto del regulador de flujo. 2. Coloque el extremo sin rosca de la varilla en el extremo abierto del regulador de flujo. 3. Ajuste los tapones de rosca. CAMBIO DE BOQUILLA DE CONO AJUSTABLE POR ABANICO PLANO 1. Desenrosque el tapón de difusión ajustable #2. 2. Desenrosque la tuerca de retención #3. 3. Retire la base de difusión #5a y la junta #6 de la tuerca de retención #3. 4. Coloque la boquilla de abanico plano #5 y luego la junta #6 en la tuerca de retención #3. 5. Enrosque la tuerca de retención #3 nuevamente en la tuerca de retención #9. (Asegúrese de que el filtro #7 se mantenga en la tuerca de retención #9). FUNCIONAMIENTO 1. Gire la manija de la bomba en sentido contrario a las aguas del reloj para retirir la bomba. La bomba y la tapa roja pueden retirarse por separado. Gire la tapa roja en sentido contrario a las aguas del reloj para retiraria y poder limpiar el enterior del tanque. 2. Liene el tanque con la colucion quimica deseada, siguiendo cuidadosamente las instrucciones del fabricante. 3. Apriete la tapa roja y el mecanismo de la bomba para que queden bien sellados. 4. Bombee para genera presion, apriete el control de flujo para pulverizar. 5. Cada vez que retire la bomba, primero descargue la presion, sa condo el vastago de la valvula de descarga de presion, hasta que la presion se haya liberado por completo. MANTENIMIENTO DE LA BOMBA 1. Retire la bomba del tanque. 2. Desenrosque el tapón de la parte superior del cilindro de la bomba en el sentido contrario a las manecillas del reloj. 3. Retire el émbolo del cilindro. 4. Al armarlo nuevamente, asegúrese de que las pestañas cuadradas de las levas estén en las ranuras del cilindro, luego vuelva a enroscar el tapón. LIMPIEZA Y ALMACENAMIENTO DESPUES 1. No almacene productos químicos en el tanque. Si el producto químico está almacenado en el tanque, éste puede tapar el sistema al secarse y destruir los sellos y otros componentes. 2. Para prolongar su vida, limpie el rociador después de cada uso. Después de usar productos de base de agua, enjuague muy bien con agua jabonosa y luego con agua limpia, asegurándose de enjuagar la manguera y el control de flujo. Después de rociar un solvente o producto de base de aceite, siga el procedimiento de limpieza recomendado por el fabricante del producto químico, siguiendo con un buen enjuague del rociador, la manguera y el control de flujo con agua jabonosa y luego con agua limpia. 3. Para guardar el rociador, retire completamente el montaje de la manguera del tanque. 4. Para drenar y secar correctamente, cierre la palanca del control de flujo. 5. Afloje el montaje de la bomba, pero déjelo en el tanque. 6. Guarde todos los componentes en un área limpia y seca. RESOLUCIÓN DE PROBLEMAS Siempre despresurice el rociador, retire toda solución química y limpie el rociador antes de hacer reparaciones. Las piezas de repuesto se pueden comprar en la tienda donde se compró el rociador o se pueden ordenar de nuestra línea telefónica gratuita de Servicio a Clientes al 1-866-967-7677. PROBLEMA: La bomba trabaja duro o no presuriza el tanque. CAUSA: La junta tórica del émbolo o el émbolo no están lubricados o están dañados. SOLUCIÓN: Aplique vaselina alrededor de la parte exterior del émbolo o de la junta tórica del émbolo. Revise que no tenga grietas u otro daño y reemplace si es necesario. PROBLEMA: La solución de rociado o el aire se fugan del cilindro de la bomba. CAUSA: La válvula de retención de la parte inferior del cilindro no se sella por haber tierra, residuos o estar dañada. SOLUCIÓN: Retire el montaje de la bomba y examine la válvula de retención. Limpie si está sucia; reemplace si es necesario. PROBLEMA: La manguera tiene fugas de aire en la conexión con el tanque. CAUSA: (1) La rosca del tanque está floja o (2) la junta tórica de inserción de la manguera está dañada. SOLUCIÓN: (1) Apriete la rosca del tanque de la manguera o (2) reemplace la junta tórica de inserción de la manguera. PROBLEMA: El control de flujo tiene fugas. CAUSA: Montaje incorrecto. SOLUCIÓN: Lea las instrucciones de montaje de “Varilla a Control de Fujo”. PROBLEMA: Patrón de rociado malo o bajo volumen de rociado. CAUSA: (1) La boquilla está tapada o (2) poca presión en el rociador. SOLUCIÓN: (1) Retire la boquilla y límpiela; retire la varilla y límpiela. Si no se puede destapar la varilla, reemplácela o (2) vuelva a presurizar el tanque. PROBLEMA: La boquilla tiene fugas cuando el control de flujo está cerrado. CAUSA: El control de flujo permanece abierto (la palanca está cerrada). SOLUCIÓN: Desmonte completamente el control de flujo. Inspeccione los componentes, limpie y lubrique todos los ellos o reemplace el control de flujo. PROBLEMA: Fuga en la abertura del tanque. CAUSA: (1) El montaje del tanque no está bien sellado en el tanque o (2) el empaque del cilindro de la bomba o la junta tórica están dañados. SOLUCIÓN: (1) Limpie bien el empaque del cilindro de la bomba o la junta tórica y las áreas cercanas y aplique grasa o vaselina al empaque de la bomba o a la junta tórica o (2) reemplace el empaque o la junta tórica. PROBLEMA: El fluido se fuga de la válvula de liberación de presión. CAUSA: El tanque está sobrellenado. SOLUCIÓN: Libere la presión siguiendo las instrucciones de “Liberación de Presión”. NO USE la válvula de liberación de presión para liberar la presión. Quite todo el fluido sobrante. GARANTÍA LIMITADA DE VIDA ÚTIL ECHO, Incorporated garantiza al comprador original únicamente que este producto seguirá funcionando según su diseño y finalidad, siempre que se lo utilice de conformidad con las instrucciones de manejo (conforme al USO NORMAL DEL CONSUMIDOR) por todo el tiempo que dicho comprador original posea el producto. Si el producto no funcionara según su diseño y finalidad, NO LO DEVUELVA AL ESTABLECIMIENTO DONDE LO HAYA COMPRADO; llame a nuestra LÍNEA DE ASISTENCIA AL, número 1-800-253-4642 (llamada gratuita) para obtener servicio sin demora. A nuestra discreción, repararemos o reemplazaremos todo componente defectuoso sin cargo alguno (no obstante, procederá la aplicación de los cargos de manejo y envío). ECHO, Incorporated tendrá la opción de solicitar la devolución del producto defectuoso al domicilio indicado más adelante, junto con el recibo de la compra para justificar un reclamo conforme a esta garantía. Esta garantía no corresponde en los casos de averías causadas por accidente, mal uso, negligencia, alteraciones, manejo contrario a las instrucciones, uso comercial, o desgaste normal de las empaquetaduras. TODA GARANTÍA IMPLÍCITA, INCLUSIVE LAS GARANTÍAS IMPLÍCITAS DE COMERCIABILIDAD Y APTITUD PARA UN PROPÓSITO EN PARTICULAR, ESTÁ LIMITADA A LA DURACIÓN ANTERIORMENTE ESPECIFICADA. LA RESPONSABILIDAD DE ECHO, INCORPORATED. SE LIMITA EXCLUSIVAMENTE A LA REPARACIÓN O REEMPLAZO DEL PRODUCTO O COMPONENTE DEFECTUOSO. ECHO, INCORPORATED. NO SERÁ RESPONSABLE DE CUALESQUIERA DAÑOS O PÉRDIDAS INCIDENTALES O INDIRECTOS DE CUALQUIER TIPO. Algunos estados no permiten limitaciones en la duración de una garantía implícita, o la exclusión o limitación de daños incidentales o indirectos. Por tanto, es posible que estas limitaciones o exclusiones no le correspondan. Esta garantía le otorga derechos legales específicos, y es posible que usted tenga otros derechos, los cuales varían de un estado a otro.