1
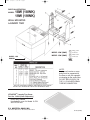
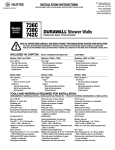
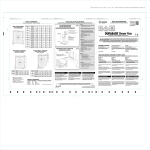
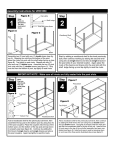
061274
4/19/06
5:56 PM
MODEL
Page 1
18W (18WK)
19W (19WK)
WALL MOUNTED
LAUNDRY TRAY
TYPICAL STUD WALL INSTALLATION
NOTE:
The rear ledge of your Model 18W (18WK) DurastoneTM laundry tray will accept many different faucets: 4" CenterSet on center, 4" CenterSet either right or
left. 8" CenterSet on center. Depending on the model faucet you choose, the appropriate holes will have to be drilled. You will notice that there are five
indented hole locators molded-in, on the underside of the rear ledge, do not cut out faucet holes until you have measured the actual faucet (some single lever
faucets require a large center/supply hole and small diameter mounting holes). A 1” diameter, fine tooth hole saw with center drill pilot would
normally be used for the majority of faucet hole drilling. Drill from underside of rear ledge to mark center, turn upright to finish cutting with hole saw.
1.
Mount Wall Plate to wall using two 5/16" x 2" Lag Screws provided. Locate mounting holes, 1 1/4" below desired
Laundry Tray height - add 5/8" for rear splash flange, locating Wall Plate as shown in "Typical Stud Wall Installation"
positions front rim edge of Laundry Tray - 34" from floor line;
Hole size:
Wood walls - Drill 3/16" diameter holes in wall studs. STUD PLATE will be required for mouting tab holes.
Cement/Masonry Walls - Drill 3/8" diameter holes for Anchors provided.
2.
Turn Laundry Tray upside down on clean, smooth surface, assemble Molded Side Fillers - insert tab into slot under rear
ledge, position bottom plate on molded lug of Laundry Tray, insert Drive Rivets, hammer to lock in place.
Turn Laundry Tray upright.
3.
Place rear ledge of Laundry Tray into Wall Plate and apply pressure downward, to seat.
4.
Mark location of each molded side filler mounting tab holes. Remove Laundry Tray and follow anchoring procedures as
outlined in Step 1. Reinstall Laundry Tray. Be sure to use the 5/16" diameter Flat Washers under the heads of the 5/16"
Lag Screws. The washers will keep the lag screws from digging into and possibly damaging the side filler tab.
5.
Make 1 1/2" drain connection in full compliance with local code regulations, mount faucet and make water supply
connections.
Cleaning Note:
Most stains that you may acquire in your Laundry Tray Model 18W (or 19W) may be removed with common household cleanser or liquid cleaner,
stubborn stains may be removed with a bleach solution – follow bleach manufacturers recommended procedures pertaining to safety, handling and use of
their product.
SI-103 (04•06)
061274
4/19/06
5:56 PM
Page 2
PARTS ILLUSTRATION
MODEL
18W (18WK)
19W (19WK)
WALL MOUNTED
LAUNDRY TRAY
MODEL 19W
SHOWN
MODEL 18W (18WK)
IAPMO® LISTED
FILE NO. 0820
MODEL 19W (19WK)
IAPMO® LISTED
FILE NO. 0635
NOTE:
Any type of transfer or sump
pump must be supported by
the floor or wall plus appropriate bracing for the waste lines.
DO NOT RELY SOLELY ON
THE 1 1/2" MOLDED DRAIN
THREAD CONNECTION.
* NOTE: FOR REPLACEMENT HARDWARE, ORDER COMPLETE PARTS PACKAGE
PART NO. 19.601. PACKAGES WILL NOT BE SPLIT FOR INDIVIDUAL PARTS.
UTILATOPTM Laundry Tray Cover
Part No. 19.204 (Order Separately)
Heavy-duty, molded
thermoplastic cover fits Model 18 F/W
and 19 F/W tubs.
E.L. MUSTEE & SONS, INC.
5431 West 164th Street • Brook Park, Ohio 44142
SI-103 (04•06)