Transcript
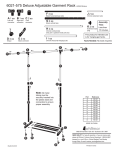
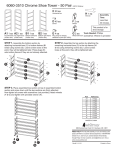
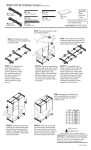
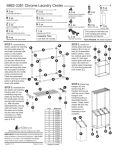
6486-1746 36 Pair Over the Door Shoe Rack
A 3 ea
C 2 ea
Right side frame
E 4 ea
Over the door bracket
B 3 ea
©2010 Whitmor
Assembly Time:
Less than 15 minutes.
Male & female
velcro dots
This product's intended use
is for storing shoes.
D 24 ea
Left side frame
Horizontal pole
Tools Needed: No tools required.
STEP 1. Place three right side frames (A) on a flat hard surface. Snap each side frame together. Insert 24 horizontal
poles (D) into holes in each side frame.
D
D
D
D
D
D
D
D
D
D
D
D
D
A
D
D
D
D
D
D
D
D
A
D
D
D
A
STEP 2. Place three left side frames (B) on a flat hard surface. Snap each side frame together. Place assembled left side
frames onto top of poles aligning poles with the holes in side frame. Tap firmly until poles are seated into holes.
B
B
B
STEP 3. Place the two over the door brackets (C) on the top of the door.
Snap assembled shoe rack onto door brackets as shown below. Peel off
backing and place male & female velcro dots (E) on bottom of rack and
door where the rack rests on the door.
C
C
Part
A
B
C
D
E
NOTE: Bars
C
C
can be folded up
for optional
hightop shoe or
boot storage.
Reference
F6666
F6667
F6668
F6669
F6670
MADE IN CHINA
U.S. Patent No. D598,218 & U.S. Patent No. 7,762,406
8680 Swinnea Road • Suite 103 • Southaven, MS • 38671
NEED HELP? For help with assembly, or if you are missing a part,
please call Whitmor’s Customer Service Department, 1-888-944-8667
between 8 a.m. and 4:30 p.m. (Central Standard Time) Monday
through Friday. Or email: [email protected]
Rev. 3 | 09.17.10
Printed in China