Transcript
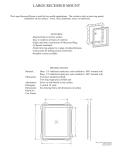
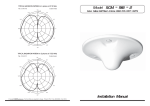
LDR 06/15/06 PL
Large Square Window
An easy and attractive way to give any wooden structure its own view on the world
1-800-437-0784
#16600
PARTS LIST
Part Qty.
(LV) 2
(DT) 2
(DV) 2
1
1
Description
Framing
Hor. Trim
Ver. Trim
Window
Hardware Kit
1
A
Size
2x3x22-1/2”
1x3x28-1/8”
1x3x30-1/8”
For 6’ wall: 3” below doubler
For 7’ wall: 12” below doubler
Inside View of Wall
(8) 3/4” Screws; (28) Finish Nails; (8) 3” Nails
2
30”
(76cm)
1
Window Opening
3/8” Starter
22-1/2”
(57cm)
1. Locate area to install window, making
sure there are no studs or braces in the
way.
2. Mark an opening 22-1/2” wide by 30”
high using outside of dotted line (fig. A-1).
B
3. Drill 3/8” starter hole in corners. Cut
opening according to marked line (fig. A-2).
4. Place framing (LV) at top and bottom of
cutout flush with opening edges, nail through
studs into framing ends. (fig. C)
3/4" (1.9cm)
5. Position window in opening from outside
the building. Attach window using eight 3/4”
screws (fig. B).
C
3“ Nails
LV
2
Window & Trim Installation
2. Position and center vertical window trim
(DV) flush to mid-lip on the window frame.
Secure trim with (6) 4d finish nails, making
sure not to nail through the window flange.
Continue with the other side. Center trim
pieces (DT) and attach with (6) 4d finish nails
per piece.
D
Outside View
Note that the horizontal trim (DT) piece
overhangsvertical piece (DV) on the ends by
about 3/8”.
Notice: Caulk window trim (with a
quality, paintable exterior grade caulk)
along sides and across top and bottom.
LV
DT
Inside View
DV
DV
DT