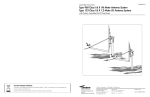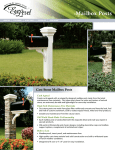
1
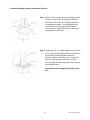
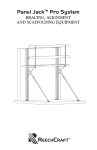
Eye Level Corporation
One Trefoil Drive
Trumbull, CT 06611 USA
Phone: 888.782.1760
Fax: 888.782.1761
[email protected]
The Heritage Pergola
Installation Instructions
ARBORS
•
COLUMNS
•
HOSE REELS
•
MAILBOX POSTS
• PERGOLAS
•
AND MORE
Heritage Pergola Installation Instructions
Content
Page
General Information…………………………………………..………………......................3
Parts List……………………………………………………………..…………………..……………...4
Materials and Tools Required………………………………..…………………..…………...4
Pergola Dimensions………………………………………………..…………………..…………..5
Layout
- Pergola ………………………………………………………………………………………6
- The Four 4˝× 4˝ Support Post Locations ……………………………………6
The 4˝× 4˝ Wooden Support Post on Concrete Piers Method…………………7
High Wind Load Post Installation …………………………………………………………..9
Installing the Pergola Parts
- Assemble Base / Cap / Wing Bracket / Extension Columns……....11
- Assemble Dual Support / Cross Beams ……………………………………..12
- Assemble Optional Purlins…………………………………………………….…..14
Cleaning and Care……………………………………………………………………………..…...15
Warranty Terms and Conditions……………………………………………………………..16
2
Version 3.0, March 2010
General Information
Your Eye Level Pergola has been designed for installation on a cement slab, cement piers, or in
ground using wood post supports. All installation methods require the installer to supply four 4"x 4"
wood support posts in proper lengths and if pier or slab mounted, four metal fasteners with
hardware. These and other tools and materials needed for installation are listed on page 4.
Installations requiring 150 mph wind loads must follow post installation found on page 9.
Item
A
Part Name
Purlin [Optional ]
1.5" x 2" x 161"
Qty.
[pcs]
12
or
15
B
Cross Beam
9
C
1.5" x 7.5" x 168"
Notched Support
Beam
4
D
Column Extension
4
E
6" x 6" x 61"
Base Cap
4
F
17" x 17" x 4"
Stone Base
4
15" x 15" x 31"
3
Version 3.0, March 2010
Parts and Materials List
Item
Installation Kit
Quantity
[pcs]
4
1
Stainless Steel Wing Bracket
2
(Secures support Notched Beams to posts)
Stainless Steel Load Plate
4
3
(Supports beams and wing bracket)
Screw #12 1 1/2” Philips Pan Head
4
4
(Secures Load Plate to post)
Screw #14 x 3/4” Hex Head Self Drilling Screw
16
5
(Secures Notched Beams to Wing Bracket)
Screw #8 x 1 1/2” Philips Flat Head Wood Screw
32
6
(Secures Column and Stone Base metal brackets to wood support post)
Screw #8 x 1 1/2” Philips Pan Head
48
7
(Secures Wing Bracket to posts)
Construction Grade Adhesive
1
Materials Required:
1. Four 4" × 4" wood support posts 10’ or longer (* Length depends on installation method)
2. Four 4" × 4" galvanized metal support post fasteners for pier installation method. (Wood
screws, wedge anchors, bolts, and masonry and wood drill bits)
3. Exterior construction grade silicone sealant
4. 80 lb. ready to mix concrete (approximately 2 bags per pier)
Tools Required:
•Tape measure
•Drill
•Trowel / Float
•Caulk gun
•Level
•Hand / Power saw
•Socket wrench set
•Bucket / Hose
•Ladders
•Screwdriver set
•Hammer
•Post hole digger
•String or chalk line
•Wheelbarrow
•Carpenter pencil
•Shovel
•Carpenter Square
•Clamps
•Drill Bits
4
Version 3.0, March 2010
Pergola Dimensions
The overall height of the basic kit from ground level to the top of the pergola cross beams is
approximately 9’. Optional purlins add 1 ½ “ in height. The height from ground level to the bottom
of the support beams is 8 feet. The overall dimension of your pergola (14'×14') are the outside
measurements of the top support beam and cross beam measured from tip to tip.
Note: The center of each
support post is 28 inches
inside the cross and
support beams.
*As shown to the left.
5
Version 3.0, March 2010
Pergola Layout
The layout of your pergola and support posts is important. You will need to consider post
locations and the slope of concrete patios and wood decks. Before digging, check for underground
utilities. The North America One Call Referral Service at 1.888.258.0808 connects you to a national
directory of utility companies.
The support posts are positioned 28" inside the tips of the top beams. To accommodate smaller
outdoor living areas the positioning of the posts may be moved inward, make sure the center of
the post is positioned in the center of the notched beams.
Finding the correct placement of your columns and the inside 4" x 4" wood support post is
extremely important. Take your time analyzing and measuring where each support post will be
placed. Make sure you are clear of all electric, water, phone lines, etc. prior to digging for piers if
you are not securing your pergola to a concrete patio floor.
Note: It is recommended that you verify local building codes, ordinances and neighborhood
covenants for height restrictions and other local requirements for these structures.
Layout of the Four 4" x 4" Support Post Locations
*Before digging, contact your local surveyor
to determine where you can dig safely.
Measure and mark the width and length of
the desired area to make sure your pergola
will fit and be square (see the dimension as
shown).
Use string lines to measure both diagonal
distances. They must be the same to ensure
a square installation.
6
Version 3.0, March 2010
Foundation for 4" x 4" Support Post
The Heritage Pergola can be installed on a concrete patio, concrete piers, or in 31"- 48" deep holes
(depends on local building codes) filled with concrete.
Installation method for 4" x 4" wood support post on concrete piers
1. Construction of Piers
Step 1. Using a post hole digging tool, dig a
hole 12" in diameter; approximately
31"- 48" deep. Fit a 12" sonatube
down into the hole for the concrete
pier.
Step 2. Dig a 16" x 16" x 3" deep square
pad for Pergola Base (F) platform.
*Limestone column base requires a
13” x 13” platform*
Step 3. Level the pier platforms using string
line, wood pegs and a level (as shown).
Mix the ready- mix concrete with water
in a wheelbarrow (follow
instructions on the bag).
You will need approximately two
80 lb. bags of ready mix concrete for
each pier. Then fill in pier and pad.
Smooth the surface with trowel /
float.
* Curing times vary; follow instructions
on the ready mix bag.
7
Version 3.0, March 2010
2. Secure the Wedge Anchors to the Metal Fastener
Step 1. Place each 4" x 4" galvanized metal support post
fastener at the center of each pier. Mark the
base holes, then drill with a masonry drill bit to
the appropriate depth. Insert wedge anchors
into each hole and tap tight with a hammer.
Using a wrench, tighten the bolts to secure the
metal fastener to the pier.
Step 2. Stand up the 4" x 4" wood support post one at a
time in the post fastening bracket. Level the post
on two sides. Mark the bracket side hole
positions and then drill pilot holes. Secure the
post by screwing wood screws into the pilot
holes through the fastening bracket and into the
wood support post.
Note: Minimum post height from grade level is
8’6”.
8
Version 3.0, March 2010
High Wind Load Installation
The Heritage Pergola is designed to withstand 150 mph windloads but requires securing 4”x4”
wood post into the ground with concrete.
Installation method for 4" x 4" wood support post in ground
1. In ground Method
Step 1. Using a post hole digging tool, dig a
hole 12" in diameter; approximately
31"- 48" deep. Fit a 12" sonatube
down into the hole for the concrete
pier.
Step 2. Dig a 16" x 16" x 3" deep square
pad for pergola base (F) platform.
*Limestone column base requires a
13” x 13” platform*
Step 3. Level the pier platforms using string
line, wood pegs and a level (as shown).
Mix the ready- mix concrete with water
in a wheelbarrow (follow
instructions on the bag).
You will need approximately two
80 lb. bags of ready mix concrete for
each pier. Then fill in pier just
below pad.
9
Version 3.0, March 2010
2. Install 4” x 4” Posts
Step 4. Insert twelve 16D 3 1/2”
Stainless Steel nails in the bottom
of the 4”x4”.
Step 5. Insert 4”x4” into the 12” Sonatube about 12”
below the grade.
Step 6. Square and secure posts as concrete cures.
Note: Minimum post height from grade level is
8’6”.
Step 7. Complete pad fill with concrete and smooth
with trowel/float.
* Curing times vary; follow instructions on the
ready mix bag.
10
Version 3.0, March 2010
Installing the Pergola Parts
These parts are heavy. For safety, you will need two or more people to do this assembly.
1. Assemble Base / Cap / Wing Bracket / Extension Column
Step 1. Slide the Cast Stone Base (F) over the top of
the 4" x 4" support post. Use four #8 x 1 1/2”
Philips Wood screws (Item 5) to secure the
galvanized fastening bracket at the top of the
Base into the 4" x 4" support post.
Item 1
Step 2. Slide the Base Cap (E) over the 4" x 4" post and
seat it onto the base. Secure it with exterior
silicone to the base top edges.
Item 2
Step 3. Measure the Extension Post (D) and add 1/8”
to 1/4” for Load Plate spacing. Take the total
measurement which should be roughly 61 1/8”
and mark a line up from the Base Cap (E).
Draw a straight line at the top of the post and
carefully remove the excess post material with
a saw.
D
E
F
Step 4. Align the groves on the Load Plate (Item 2) with
the Wing Bracket (Item 1) arm extensions that
fit over the 4”x4” post. Slide the two brackets
together and place on top of the 4”x4” post.
Use twelve #8 x 1 1/2” Pan Head screws (Item
6) to attach Wing Bracket to 4”x4” post. Ensure
load plate moves freely prior to installing. Once
installed remove Load Plate. Note: Determine
the desired direction for the Notched Beams.
Then orient the Load Plate and Wing Bracket.
Step 5. Squeeze Wing Bracket beam attachment arms
together completely and secure. Carefully slide
Extension Column (D) over Wing Bracket and
4’x4” post. Make sure bracket at the top of the
Extension Column is positioned opposite of the
Wing Bracket extension arms screwed into the
4”x4” post. Use four #8 x 1 1/2” Philips Wood
screws (Item 5) to secure Extension Column to
4”x4” post.
11
Version 3.0, March 2010
2. Dual Support & Cross Beams Assembly
Item 4
Item 1
Item 3
Item 6
C
Item 2
Item 5
12
Step 1. Evenly space the Notched
Beam ( C ) with the Wing
Bracket (Item 1). With a
metal drill bit, drill a pilot
holes. Duplicate this step for
the second Notched Beam.
Note: Make sure the
notches on the beams line
up perfectly so Cross Beam
(B) fits.
Step 2. Apply Exterior Construction
Adhesive (Item 7) to the
Wing Bracket (Item 1) facing
the Notched Beam ( C ).
Clamp Wing Bracket and
Notched Beam together and
secure with four #14 x 3/4”
Hex Head Self Drilling Screw
(Item 4).
Step 3. Secure Load Plate to post
using one #12 x 1 1/2” Philips
Pan Head Screw (Item 3).
Version 3.0, March 2010
Make sure both lengths are 27”
Step 4. Lay each of the nine Cross
Beams (B) into the notches.
[Tip end of the cross beam
should be approximately 27
inches from the face of the
bottom support beam on
each side.] Apply Exterior
Adhesive (Item 7) along the
touching surfaces of (B) & (C)
13
Version 3.0, March 2010
3. Assembling Optional Purlin Kits
Optional purlins provide additional shade and enhance the design, and are available in kits of 12 or
15. The photographs below feature kits of 15.
The placement of purlins is subjective. We recommend placing two end purlins approximately 16”
in from the tips of the cross beams. For a 15 unit purlin kit, the remaining 13 purlins should be
spaced approximately 9" on center from the center of the end purlin (see diagram below).
14
Version 3.0, March 2010
Final Step: Apply Exterior Adhesive (Item 7) to the contact points between the Purlin (A) and Cross
Beam (B).
Care and Cleaning
Your Eye Level Heritage Pergola will provide years of maintenance free use. The materials used
will withstand many years of normal weathering with no additional finishing required. However,
dirt and acids from rain may discolor or dirty the finish. Cleaning using STET mild detergents is
recommended.
To change the color or freshen the appearance, the roof beams and purlins of your pergola can be
painted with an exterior oil based paint as the beam material is a polymer. The cast stone
extension post, on the other hand, should be painted with a water based paint.
We are confident you and your friends will have years of enjoyment with your pergola. Please
shop our complete line of outdoor living products on our website: eyelevelliving.com.
15
Version 3.0, March 2010
Original Owners Limited Warranty
for Eye Level, LLC Pergola/Arbor Products
General Conditions for Limited Warranties on all Eye Level, LLC Pergolas/Arbors
COVERED BY THIS LIMITED WARRANTY:
Eye Level, LLC (hereinafter Eye Level) warrants the original purchaser and not any other purchaser, or subsequent owner, that its
Pergola/Arbor is free from defects in material and workmanship including severe splitting, rusting, and corrosion resulting in a loss of
Pergola’s/Arbor’s structural integrity for a period of five (5) years from date of purchase so long as the Pergola/Arbor has never been
moved from the original installation location. The original purchase receipt is required as proof of purchase. This warranty applies to
Pergolas/Arbors constructed entirely of components manufactured and/or supplied by Eye Level, LLC and installed according to Eye
Level’s Installation Instructions for Pergola/Arbor Systems.
EYE LEVEL’S SOLE OBLIGATION UNDER THIS LIMITED WARRANTY IS LIMITED TO REPAIR OR REPLACE, AT ITS
SOLE DISCRETION, THE DEFECTIVE PRODUCT OR PORTION THEREOF, AFTER EYELEVEL, LLC DETERMINES THAT A
DEFECT IN MATERIAL OR WORKMANSHIP IS COVERED BY THE LIMITED WARRANTY .
OWNERSHIP OF LIMITED WARRANTY:
This limited warranty is non transferable and can only be enforced by the original purchaser.
NOT COVERED BY THIS LIMITED WARRANTY:
Damage from normal wear and tear, expected weathering of product due to but not limited to exposure to vapor or acid rain, chalking,
mildew, exposure to harmful chemicals, faulty or improper assembly and/or installation, settlement or failure of any structure on which
the product(s) is installed, settlement or soil movement, misuses, abnormal or improper use or design, accident, alteration, neglect, abuse,
abrasion, cosmetic cracks, air pollutants, improper service or installation, impact of foreign objects, or damage caused by flood, wind,
hail, lightning, fire, or other act of God is not covered by this limited warranty.
GENERAL CONDITIONS AND EXCLUSIONS:
THE LIMITED WARRANTY DOES NOT INCLUDE THE COST OF LABOR TO INSTALL THE REPLACEMENT
COMPONENTS, DELIVERY CHARGES, SALES TAX OR ANY OTHER CHARGES, NOR IS EYE LEVEL REQUIRED TO
PROVIDE SUCH LABOR OR SERVICE.
THIS LIMITED WARRANTY BY EYE LEVEL IS THE ONLY LIMITED WARRANTY FOR THIS EYE LEVEL PRODUCT. ANY
OTHER WARRANTY, EITHER VERBAL OR WRITTEN, BY ANY OTHER PERSON OR AGENT, REGARDING THE PRODUCT
IS SUPERCEDED BY THIS LIMITED WARRANTY.
EXCEPT TO THE EXTENT PROHIBITED BY APPLICABLE LAW, ANY IMPLIED WARRANTY FOR THIS PRODUCT,
INCLUDING WITHOUT LIMITATION, THE IMPLIED WARRANTY OF MERCHANTABILITY AND THE IMPLIED
WARRANTY OF FITNESS FOR A PARTICULAR PURPOSE, IS LIMITED IN DURATION TO THE FIVE (5) YEAR TERM OF
THIS LIMITED WARRANTY.
IN NO EVENT SHALL EYE LEVEL BE LIABLE FOR ANY CONSEQUENTIAL, SPECIAL, OR INCIDENTAL DAMAGES
ARISING OUT OF OR CONNECTED WITH THE PURCHASE OR USE OF THIS PRODUCT OR FOR ANY BREACH OF THIS
LIMITED WARRANTY.
SOME STATES OR PROVINCES DO NOT ALLOW LIMITATIONS ON HOW LONG AN IMPLIED WARRANTY LASTS, OR
THE EXCLUSION OR LIMITATION OF INCIDENTAL OR CONSEQUENTIAL DAMAGES, SO THE ABOVE LIMITATIONS OR
EXCLUSION MAY NOT APPLY TO YOU. THIS LIMITED WARRANTY GIVES YOU SPECIFIC LEGAL RIGHTS, AND YOU
MAY HAVE OTHER RIGHTS THAT VARY FROM STATE TO STATE. THIS LIMITED WARRANTY IS APPLICABLE ONLY
TO SYSTEMS INSTALLED WITHIN THE UNITED STATES AND CANADA.
HOW YOU CAN GET SERVICE:
If you discover a potential warranty issue in relation to your Eye Level Pergola/Arbor during the limited warranty period, please contact
an authorized Eye Level Dealer or call Eye Level LLC Customer Service at (888) 782-1760. After having a reasonable time to inspect
the potential warranty issue, Eye Level will determine whether the potential warranty issue is covered by this Limited Warranty. In the
event of repair or replacement under the terms of this limited warranty, the original limited warranty shall apply to the replaced
component and said component shall have a warranty of five (5) years from the date the new component was delivered to the original
purchaser.
16
Version 3.0, March 2010