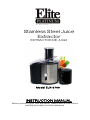
1
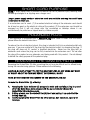
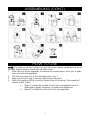
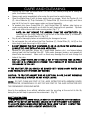
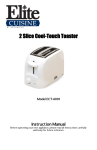
Stainless Steel Juice
Extractor
EXTRACTOR DE JUGO
Model EJX-9700
INSTRUCTION MANUAL
Before operating your new appliance, please read all instructions
carefully and keep for future reference.
IMPORTANT SAFEGUARDS
When using electrical appliances, basic safety precautions should always be followed,
including the following:
1. Read all instructions before operating.
2. Remove all packaging plastics and other materials from unit before operating.
3. Wash all removable accessories before using for the first time.
4. To protect against electrical shock, do not immerse cord, plug or appliance itself in
water or any other liquids.
5. Close supervision is necessary when appliance is used by or near children.
6. Unplug from outlet when not in use and before cleaning. Allow to cool before putting
on or taking off parts and before cleaning.
7. Do not operate any appliance with a damaged cord or plug or after the appliance
malfunctions or has been damaged in any manner. Return the appliance to the
nearest authorized service facility for examination, repair or adjustment.
8. The use of accessory attachments not recommended by the appliance manufacturer
may cause injuries.
9. Do not use outdoors.
10. Do not let cord hang over edge of table or counter or touch hot surfaces.
11. Do not place on or near a hot gas or electric burner, or in a heated oven.
12. Always attach plug to appliance first, then plug cord into wall outlet. To disconnect,
turn any control to OFF position, then remove plug from wall outlet. Do not pull plug
out from the cord.
13. Oversized foods or metal utensils must not be inserted in the appliance as they may
cause a fire or risk of an electrical shock.
14. A fire may occur if the appliance is covered or touching flammable material including
curtains, draperies, walls and the like when in operation.
15. Do not clean with metal scouring pads. Pieces can break off the pad and touch
electrical parts, involving a risk of electrical shock.
16. Do not store any materials other than manufacturer's recommended accessories in
this unit when not in use.
17. Do not place any of the following materials in the unit: Paper, cardboard, plastic and
the like.
18. Do not leave the appliance unattended while it’s in operation.
19. Always make sure juicer cover is clamped securely in place before motor is turned on.
Do not unfasten clamps while juicer is in operation.
20. Be sure to turn switch to “0” (OFF) position after each use of your juicer. Make sure
the motor stops completely before disassembling.
21. After periodic use, always check for any cracks or damages to the outer plastic
ring of the Grater/Filter part. If there are any damages, discontinue use
immediately and contact servicing for replacement parts.
SAVE THESE INTRUCTIONS
THIS PRODUCT IS FOR HOUSEHOLD USE ONLY!
1
SHORT CORD PURPOSE
NOTE: A short power cord is provided to reduce the risk of personal injury resulting from
becoming entangled in or tripping over a longer cord.
Longer power-supply cords or extension cords are available and may be used if care
is exercised in their use.
If an extension cord is used: (1) the marked electrical rating of the extension cord should
be at least as great as the electrical rating of the product; (2) the extension cord should be
arranged so that it will not drape over the countertop or tabletop where it can
unintentionally be pulled on or tripped over by children or pets.
POLARIZED PLUG
If this appliance is equipped with a polarized plug (one blade is wider than the other),
please follow the below instructions:
To reduce the risk of electrical shock, this plug is intended to fit into a polarized outlet only
one way. If you are unable to fit the plug into the electrical outlet, try reversing the plug. If
the plug still does not fit, contact a qualified electrician. Never use the plug with an
extension cord unless the plug can be fully inserted into the extension cord. Do not alter
the plug of the product or any extension cord being used with this product. Do not attempt
to defeat the safety purpose of the polarized plug.
REMOVING THE GRATER/FILTER
Removing the Grater/Filter (D) after unpacking the unit may be difficult as it is affixed firmly
during the manufacturing process. Please adhere to the following:
CAUTION: DO NOT ATTEMPT TO PRY THE GRATER/FILTER (D) OFF USING ANY SORT
OF SHARP OBJECT AS THIS MAY RESULT IN PERSONAL INJURY!
NOTE: DO NOT REMOVE THE SCREWS ON THE GRATER/FILTER (D)!
Remove the Grater/Filter (D) either by:
A.
B.
C.
Grasping the Juice Collector (E) at opposite ends and carefully pulling it up and
off of the Motor Base (I) to release both the Juice Collector (E) and the
Grater/Filter (D) simultaneously.
Putting a towel over the Grater/Filter (D) itself and pulling it up and off of the
Driving Shaft (H).
Carefully prying the Grater/Filter (D) off by using a dull object (i.e. spoon) for
leverage.
2
PARTS IDENTIFICATION
A. Pusher
H. Driving Shaft
B. Feeding Tube
I. Motor Base
C. Lid
J. Safety Clamp
D. Grater/Filter
K. Juice Jug Lid
E. Juice Collector
L. Juice Jug (5 cup Capacity)
F. Pulp Container
G. Control Knob
* Includes a soft cleaning brush. (not pictured)
Maxi-Matic is continuously improving our product development. This may result in slight variances
between the photography of the product on the packaging compared to the actual contents within the
box.
3
ASSEMBLING
1.
Wash all detachable parts and accessories before using for the first time (see ‘Care
and Cleaning’ section for instruction). BE SURE TO THOROUGHLY DRY ALL PARTS
BEFORE ASSEMBLING THE UNIT. DO NOT PLUG THE UNIT INTO THE ELECTRICAL
OUTLET BEFORE OR DURING ASSEMBLY OR WHILE CLEANING!
2.
Place the Juice Collector (E) onto the Motor Base (I). Place the Pulp Container (F) onto
the Motor Base (I) by tilting it forward underneath the Juice Collector (E) on the
opposite side of the spout: insert the top end first and then push in the bottom end.
(Fig.2)
3.
Insert the Grater/Filter (D) into position inside the Juice Collector (E). Make sure the
Grater/Filter (D) is locked in place on top of the Driving Shaft (H). (Fig. 3)
4.
Place the Pusher (A) into the Feeding Tube (B) on the Lid (C) and then place the Lid (C)
onto the Motor Base (I). (Fig. 3)
5.
Pull the Safety Clamp (J) up to lock all parts into place. Make sure the Safety Clamp (J)
is locked into the grooves located on both sides of the lid. (Fig. 4)
NOTE: The Pulp Container (F) will remain loose.
6.
Place the Juice Jug Lid (K) on the Juice Jug (L) and then place the Juice Jug (L) under
the spout. Please note that there is a special opening on the Juice Jug Lid (K) to
accommodate the spout. (Fig.5 & 6)
NOTE: Using the Juice Jug (L) and Juice Jug Lid (K) helps to avoid
splattering and allows you to store juice in the refrigerator.
7.
Now you can plug the power cord into a wall outlet.
8.
To separate the foam from the juice when pouring the juice into a glass, insert the
foam separator by sliding it into the Juice Jug (L). (Fig.6)
4
ASSEMBLING (CONT.)
HOW TO USE
NOTE: The appliance will only function if all parts have been properly assembled and the lid
has been properly locked in place with the safety clamp.
1. Wash your fruit and/or vegetables and remove any inedible stems, skins, pits, or peels
from your fruits and vegetables.
2. Cut them into pieces that fit into the feeding tube. (Fig. 7)
3. Make sure the Juice Jug (L) has been placed under the spout.
4. Switch the appliance ON by turning the Control Knob (G) to setting 1 (low speed) or 2
(normal speed).( Fig.8)
a. Speed 1 is especially suitable for soft fruits and vegetables such as
watermelons, grapes, tomatoes, cucumbers and raspberries.
b. Speed 2 is suitable for all kinds of fruits and vegetables.
5
5.
HOW TO USE (CONT.)
Put the pre-cut pieces in the Feeding Tube (B) and gently press them down towards
the rotating filter by using the Pusher (A). (Fig.9)
NOTE: DO NOT EXERT TOO MUCH PRESSURE WITH THE PUSHER (A).
CAUTION: NEVER INSERT YOUR FINGERS OR ANY OTHER OBJECT INTO THE
FEEDING TUBE (B)!
6.
After you have processed all ingredients and the juice flow has ceased, switch the
appliance off and wait until the Grater/Filter (D) has stopped rotating completely before
unplugging it from the electrical outlet. Disassemble for cleaning.
7.
It is highly recommended to discard the pulp and clean the parts immediately after
use to prevent staining.
NOTE: ALWAYS MAKE SURE THE APPLIANCE IS SHUT OFF,
UNPLUGGED FROM THE ELECTRICAL OUTLET, AND THAT THE
GRATER/FILTER (D) HAS COMPLETELY STOPPED BEFORE DISASSEMBLING
THE JUICE EXTRACTOR.
TIPS
• Use fresh fruits and vegetables. Pineapples, beetroots, celery stalks, apples,
cucumbers, carrots, spinach, melons, tomatoes, pomegranates, oranges and grapes
are particularly suitable for processing with this juice extractor.
• Remove thick or inedible peels, (e.g. oranges, pineapples, melon, etc….).
• When preparing apple juice, remember that the consistency of the apple juice
depends on the kind of apple you are using. The juicier the apple, the thinner the juice.
• FRUITS THAT CONTAIN STARCH, SUCH AS BANANAS, PAPAYAS, AVOCADOS,
FIGS AND MANGOES ARE NOT SUITABLE FOR PROCESSING IN THIS JUICE
EXTRACTOR.
• Leaves and leaf stalks (e.g. of lettuce) can also be processed in the juice extractor.
• Drink the juice immediately after you have extracted it.
• To extract the maximum amount of juice, always press the pusher down slowly.
• THIS JUICER IS NOT SUITABLE FOR PROCESSING VERY HARD AND /OR
FIBROUS/STARCHY FRUIT OR VEGETABLES SUCH AS SUGAR CANE.
• When the pulp container is too full, shut the unit off, unplug the unit from the outlet,
and ensure the Grater/Filter has stopped rotating completely. Empty the Pulp
Container (F) and clean the Grater/Filter (D) before turning the unit on again.
UNPLUG THE UNIT FROM THE OUTLET WHEN NOT IN USE
6
•
•
•
•
•
•
•
•
•
CARE AND CLEANING
Unplug the unit from the outlet when it is not in use, before putting on or taking off
parts, and before cleaning.
Always wash parts immediately after using the machine to avoid staining.
Clean the Motor Base (I) with a damp soapy cloth or sponge. Wash the Pusher (A), Lid
(C), Juice Collector (E), Pulp Container (F), Grater/Filter (D), the Juice Jug(L) and Juice
Jug Lid (K) by hand in warm soapy water and rinse thoroughly.
To remove pulp from Grater/Filter (D), hold Grater/Filter (D) bottom side facing up
under running water and gently scrub with the soft cleaning brush provided. Flip over
and scrub other side as well under running water. (Fig. 11)
NOTE: DO NOT REMOVE THE SCREWS FROM THE GRATER/FILTER (D);
carefully push the Juice Collector (E) up and off of the Motor Base (I) to release it
along with the Grater/Filter (D). (Fig. 10)
Dry all parts thoroughly before re-assembling for storage or for use.
Do not operate the unit without the Pulp Container (F), Grater/Filter (D), Lid (C) or the
Juice Jug (L) and Juice Jug Lid (K) in place.
DO NOT REMOVE THE PULP CONTAINER (F) OR LID (C) FROM THE MOTOR BASE
(I) WHILE THE JUICE EXTRACTOR IS IN OPERATION.
Remove all pits (peaches, plums, etc.), large seeds (melons, etc.), and stems before
placing food into the Feeding Tube (B). Thick peels (oranges, lemons, and grapefruit)
should also be removed. Items such as these may damage the unit and change the
taste of the juice.
KEEP ALL BODY PARTS AND UTENSILS OUT OF THE FEEDING TUBE (B) WHILE
THE UNIT IS IN OPERATION TO PREVENT THE POSSIBILITY OF SEVERE INJURY
OR DAMAGE TO THE UNIT.
** THE GRATER/FILTER (D) SHOULD BE WASHED WITH WARM SOAPY WATER AND
DRIED THOROUGHLY TO PREVENT ANY RUSTING.
CAUTION: TO PROTECT AGAINST RISK OF ELECTRICAL SHOCK, DO NOT SUBMERGE
THE MOTOR BASE (I) IN WATER OR ANY OTHER LIQUIDS.
NOTE: DO NOT CLEAN ANY PART OF THE JUICE EXTRACTOR WITH ABRASIVE SOAPS,
DETERGENTES, OR MATERIALS. DO NOT PUT ANY PART OF THE JUICE EXTRACTOR INTO
THE DISHWASHER OR BOILING WATER.
Hand in the appliance to an official collection point for recycling at the end of its life. By
doing this you will help to preserve the environment. (Fig.12)
SAFETY PRECAUTION:
IT IS IMPORTANT TO ALWAYS VISUALLY INSPECT THE GRATER/FILTER FOR UNUSUAL
WEAR. IF YOU NOTICE ANY RUSTING, CRACKS OR THAT THE BASKET IS BEGINNING
TO LOSE ITS SHAPE, IMMEDIATELY REFRAIN FROM USING THE UNIT. CONTACT THE
MANUFACTURER FOR A REPLACEMENT GRATER/FILTER.
7
RECIPES
(All recipes are for your reference only. They can all be adjusted to your liking.)
Below recipes are for 1-2 servings. (All citrus fruits must have their peel removed first.)
Citrus Eye Opener
1 red grapefruit
1 lemon
1 lime
1 orange
1/2 cup green grapes
(Peel the citrus fruits and remove before juicing)
Good Morning
1/2 red beet
1 celery stalk
1 apple
1 carrot
Spicy Veggie Blast
1 cup of broccoli flowerets including stem
1/4 green pepper
1 carrot
1 celery stalk
1 tomato
Cayenne powder or hot pepper sauce to taste
Amazing Green Drink
1/2 green pepper
1 carrot
1 celery
1/2 cup parsley
1 apple
1/c cup spinach
Smooth Refresher
1 cup of fresh jicama
2 celery stalks
1 green apple
1 cucumber
Salad in a Glass
1 ring of red onion
2 medium tomatoes
1 cup spinach
1 cup lettuce
1 lemon peeled
1 cucumber
8
Jogger’s Delight
3 oranges
2 hard pears
1 small yam
RECIPES (CONT.)
Try it w/ crushed or slushy ice
Heavenly Health
2 carrots
1 sweet potato
2 apples
thin slice of Spanish onion (red onion to substitute)
Athletic Fuel
1/2 of a watermelon
1 lemon
5 oranges
1 can frozen pineapple concentrate (to mix)
Fantastic Voyage
3 hard pears
1 cantaloupe
1 sweet potato
Grand Ole Pineapple
1 pineapple, cored and sliced
1 sweet potato
4 oranges
Soaring Orange
2 pears
3 pink grapefruit
1 sweet potato
Run, Run, Run
1 lemon
2 radish
1 beet
1 slice Spanish onion
2 sweet potato
1 celery
2 Tbs. cider vinegar
9
LIMITED WARRANTY* ONE (1) YEAR
WARRANTY IS ONLY VALID WITH A DATED PROOF OF PURCHASE
1. Your small kitchen appliance is built with precision, inspected and tested before leaving
our factory.
2. It is warranted, to the original purchaser to be free from any manufacturing defects
under normal use and conditions for one (1) year, cord excluded. This Warranty applies
only to the original purchaser of this product.
3. If you need to exchange the unit, please return it in its original carton, with a sales
receipt, to the store where you purchased it. If you are past the store's allowed return policy
period, please see the enclosed Warranty.
4. If you use your appliance for household use and according to instructions, it should give
you years of satisfactory service.
5. During the one-year warranty period, a product with a defect will be either repaired or
replaced with a new or reconditioned comparable model (at our option) when the product is
returned to our Service Center. (See the “Returns” section below).
6. The repaired or replacement product will be in warranty for the remaining balance of the
one-year warranty period and an additional one-month period.
7. This limited warranty covers appliances purchased and used within the 50
contiguous states plus the District of Columbia and does NOT cover:
- Damages caused by unreasonable use, neglect, normal wear and tear, commercial use,
improper assembly or installation of product.
- Damages caused in shipping.
- Damages caused by replacement or resetting of house fuses or circuit breakers.
- Defects other than manufacturing defects.
- Breakage caused by misuse, abuse, accident, alteration, lack of proper care and
maintenance, or incorrect current or voltage.
- Lost or missing parts of the product. Parts will need to be purchased separately.
- Damages of parts that are not electrical; for example: cracked or broken plastic or glass.
- Damage from service or repair by unauthorized personnel.
- Extended warranties purchased via a separate company or reseller.
- Consumer’s remorse is not an acceptable reason to return a product to our Service
Center.
*One Year Limited Warranty valid only in the 50 contiguous states plus the District of
Columbia, excluding Puerto Rico and the Virgin Islands.
This warranty is effective only if the product is purchased and operated in the USA; product
usage which is in violation of the written instructions provided with the unit will void this
warranty.
For international warranty, please contact the local distributor.
**Any instruction or policy included in this manual may be subject to change at any time.
MAXI-MATIC, USA
18401 E. Arenth Ave. City of Industry, CA 91748
Customer Service Dept: (626) 912-9877 Ext: 120/107 MON-FRI 8am-5pm PST
Website: www.maxi-matic.com email: [email protected]
10
RETURN INSTRUCTIONS
RETURNS:
A.
Any return of defective merchandise to the manufacturer must be processed
accordingly by first contacting customer service (contact information shown below) to
obtain an RA # (Return Authorization Number). We will not accept any returns of
merchandise without an applicable RA #.
B. IMPORTANT RETURN INSTRUCTIONS. Your Warranty depends on your following
these instructions if you are returning the unit to Maxi-Matic USA:
1. Carefully pack the item in its original carton or other suitable box to avoid
damage in shipping.
2. Before packing your unit for return, be sure to enclose:
a) Your name, full address with zip code, daytime telephone number,
and RA#,
b) A dated sales receipt or PROOF OF PURCHASE,
c) The model number of the unit and the problem you are having
(Enclose in an envelope and tape directly to the unit before the
box is sealed,) and
d) Any parts or accessories related to the problem.
3. Maxi-Matic USA recommends you ship the package U.P.S ground service for
tracking purposes. We cannot assume responsibility for lost or damaged
products returned to us during incoming shipment. For your protection, always
carefully package the product for shipment and insure it with the carrier. C.O.D
shipments cannot be accepted.
4. All return shipping charges must be prepaid by you.
5. Mark the outside of your package:
MAXI-MATIC USA
18401 E. ARENTH AVE.
CITY OF INDUSTRY, CA 91748
6. Once your return has been received by our warehouse, Maxi-Matic USA will
repair or replace the product if it is defective in material or workmanship, subject
to the conditions in paragraph B.
7. Maxi-Matic will pay the shipping charges to ship the repaired or
replacement product back to you.
11
IMPORTANTES MEDIDAS DE
SEGURIDAD
Cuando use aparatos eléctricos, precauciones básicas de seguridad deberán seguirse,
incluyendo las siguientes.
1.
2.
3.
4.
5.
6.
7.
8.
9.
10.
11.
12.
13.
14.
15.
16.
17.
18.
19.
20.
21.
22.
23.
Lea todas las instrucciones cuidadosamente, antes de usar el aparato
Remueva todo material de empaque, antes de usar el aparato
Lave todas las partes o accesorios removibles, antes de usar por vez primera.
Para protegerse, de una descarga eléctrica, no sumerja el cordón, enchufe eléctrico o la base
del motor en agua o ningún otro líquido.
Cercana supervisión es necesaria, cuando el aparato sea usado por o cerca de niños.
Desconecte el aparato, cuando no esté en uso y antes de limpiarlo. Permita que se enfríe, antes
remover las partes o accesorios y antes de limpiar.
Nunca use ningún aparato con el enchufe dañado. Si el cordón de alimentación es dañado este
debe ser reemplazado por el fabricante, personal capacitado o su agente de servicio, para evitar
riesgos.
El uso de accesorios no recomendados por el fabricante, pueden causar daños personales o al
aparato.
No lo use a la intemperie o en lugares húmedos.
No deje que el cordón cuelgue de la orilla de la mesa, mostrador o toque cualquier superficie
caliente.
No lo ponga sobre o cerca de superficies calientes como estufas y hornos.
Siempre deberá conectar el cordón eléctrico al aparato primero y después al toma corriente, si
aplica. Para desconectar, primero apague el aparato y luego desconéctelo del toma corriente.
Nunca jale del cordón para desconectar.
Nunca introduzca utensilios de metal en el aparato, podría causar fuego, descarga eléctrica o
daños personales.
Fuego podría ocurrir, si el aparato es cubierto o toca material inflamable como cortinas
alfombras y paredes cuando esté en uso.
No limpie ninguna parte de este aparato usando estropajos de metal. Partículas de este se
pueden quedar en el aparato, tocando partes eléctricas y esto produce un riesgo de descarga
eléctrica.
No guarde ni ponga ningún material dentro del aparato, únicamente los accesorios
recomendados por el fabricante, cuando no esté en uso.
No ponga dentro o en la superficie exterior del aparato los siguientes materiales, papel, cartón,
plásticos o algún otro material inflamable.
Nunca deje el aparato desatendido cuando este en operación.
Asegúrese de que la Abrazadera este bien colocada y asegurada sobre el aparato antes de
ponerle en operación. Nunca intente de remover la Abrazadera cuando el aparato este en
operación, para evitar riesgos.
Asegúrese que el motor pare de girar completamente y que el aparato este apagado y
desconectado del toma corriente antes de intentar de removerle las partes.
Es recomendable revisar el Filtro cortador regularmente, para asegurar que no esté dañado en
ninguna forma. Si el Filtro cortador está dañado, inmediatamente pare de usar el aparato y
reemplace el Filtro cortador antes de usar el aparato de nuevo.
Este aparato no se destina para utilizarse por personas (incluyendo niños) cuyas capacidades
físicas sensoriales o mentales, sean diferentes o estén reducidas o carezcan de experiencia o
conocimiento, a menos que dichas personas reciban una supervisión o capacitación para el
funcionamiento del aparato por un responsable.
Los niños deben supervisarse, para asegurar que ellos no empleen los aparatos como juguetes.
12
GUARDE ESTAS INSTRUCCIONES
ESTE PRODUCTO ES PARA USO DOMÉSTICO UNICAMENTE.
1)
2)
3)
•
•
USO DE UN CORDÓN CORTO
Para reducir el riesgo de daños personales, como un tropezón o enredarse con el
cordón eléctrico, un cordón eléctrico corto es suministrado con la unidad.
Una extensión eléctrica más larga podrá ser utilizada, siempre y cuando tome
extremas precauciones durante su uso.
Si una extensión eléctrica más larga va a ser utilizada, tenga muy en cuenta las
siguientes recomendaciones:
Las especificaciones eléctricas especialmente el (amperaje) del cordón eléctrico a
utilizar deberá de ser igual o de más amperaje que el especificado en el aparato a
utilizar.
La extensión eléctrica deberá de ser colocada de una manera que no cuelgue de la
mesa, donde una mascota, los niños o cualquier otra persona lo pueda jalar o tropezar
sobre ella, accidentalmente.
ENCHÚFE POLARIZADO
Si este aparato es suministrado con un cordón eléctrico de enchufe polarizado (un lado
del enchufe es más ancho que el otro) favor de seguir las siguientes recomendaciones.
Para reducir el riesgo de una descarga eléctrica, este enchufe está diseñado para
entrar en el receptáculo eléctrico de una sola manera. Si el enchufe eléctrico no entra
completamente, de un giro al mismo y trate de nuevo; si no entra de ninguna manera,
póngase en contacto con un electricista para solucionar el problema.
NO TRATE DE MODIFICAR EL ENCHÚFE DE NINGUNA MANERA.
REMOVIENDO EL FILTRO CORTADOR
Removiendo el Filtro cortador (D) después de desempacar el aparato es difícil porque este
se aprieta firmemente durante la fabricación. Por favor use estas instrucciones para
remover el Filtro cortador (D).
PRECAUCION: NO INTENTE REMOVER EL FILTRO CORTADOR (D) USANDO OBJECTOS
FILOSOS (COMO NAVAJAS), PARA PREVENIR GRAVES LESIONES PERSONALES.
ADVERTENCIA: NO REMUEVA LOS TORNILLOS DEL FILTRO CORTADOR (D).
Puede remover el Filtro Cortador (D):
A. Agarre el Recolector de jugos (E) de los dos lados y cuidadosamente levántelo de la
Base del motor (I) para liberar este junto con el Filtro cortador (D).
B. Ponga una toalla sobre el Filtro cortador (D) y levántelo del Eje del motor (H).
C. Use un objeto sin filo (como una cuchara) para cuidadosamente apalancar y remover
el Filtro cortador (D) del Eje del motor (H).
13
DESCRIPCIÓN DE PARTES
A. Empujador
H. Eje del motor
B. Tubo alimentador
I. Base del motor
C. Tapadera
J. Abrazadera
D. Filtro cortador
K. Tapadera para vaso
E. Recolector de jugos
L. Vaso para jugo(1 L de capacidad)
F. Contenedor para pulpa
G. Interruptor
* Incluye un cepillo blando. (No ilustrado)
14
1.
COME ENSAMBLAR
LAVE TODAS LAS PARTES Y ACCESORIOS ANTES DE USAR POR PRIMERA VEZ. (Vea
la sección de “LIMPIEZA Y MANTENIMIENTO” para instrucciones).
2. Seque todas las partes perfectamente antes de re-ensamblar para usar o para almacenar.
3. Asegure que el aparato no esté conectado al toma corriente, que no esté en operación, y
que el interruptor este apagado (posición “0”) antes de ensamblar el aparato.
4. Coloque el Recolector de jugos (E) dentro de la Base del motor (I). Luego, coloque el Filtro
cortador (D) dentro de la Base del motor (I) uniéndolo con el Eje del motor (H). (Figura 2)
ADVERTENCIA: Asegúrese que el filtro cortador (D) esté bien insertado sobre el Eje
del motor (H) y que el filtro cortador (D) no esté flojo ni suelto.
5. Coloque el Contenedor para pulpa (F) en el lado opuesto a la boquilla del Recolector de
jugos (E). Puede angular el Contenedor para pulpa (F) para insértalo debajo del Recolector
de jugos (E). (Figura 2)
ADVERTENCIA: El Contenedor para pulpa (F) se mantendrá suelto después de ser
colocado en su posición.
6. Coloque la Tapadera (C) sobre la Base del motor (I) asegurando que este bien insertada y
que quede dentro del Contenedor para pulpa (F). (Figura 3)
7. Levante la Abrazadera (J) y colóquela sobre la Tapadera (C) asegurando que la Abrazadera
(J) esté bien insertada sobre las ranuras de los dos lados de la Tapadera (C). (Figura 4)
8. Ponga la Tapadera para vaso (K) sobre el Vaso para jugo (L). Inserte la boquilla del
Recolector de jugos (E) dentro del Vaso para jugo (L) usando el espacio de la Tapadera
para vaso (K). (Figuras 5 y 6)
9. Para evitar salpicaduras o si le gustaría guardar el jugo extraído en el refrigerador, tape el
Vaso para jugo (L) con la Tapadera del vaso (K).
10. Para separar la espuma del jugo cuando este sirviendo, introduzca el separador de
espuma deslizándolo dentro del Vaso para jugo (L).
(Figura 6)
11. Ahora ya puede conectar su aparato al toma corriente.
15
INSTRUCCIONES
El aparato funcionara únicamente si todas las partes han sido ensambladas correctamente
principalmente si la Tapadera (C) está bien asegurada con la Abrazadera (J).
1. Lave las frutas o vegetales y corte en trozos, si es necesario, para que puedan entrar en
el tubo alimentador sin ser forzados. (Figura 7)
2. Remueva toda semilla, tallo o cáscara de sus ingredientes.
3. Asegúrese que el Vaso para jugo (L) este en su lugar.
4. Encienda el aparato, seleccione la velocidad de acuerdo a su preferencia.
(Figura 8)
a. La velocidad “1” es ideal para frutas y vegetales blandos como melón sandía,
uvas, tomates, pepinos y frambuesa.
b. La velocidad “2” es para toda otra clase de frutas y vegetales.
5. Coloque los trozos de frutas o vegetales dentro del Tubo alimentador (B) de la unidad y
empuje suavemente utilizando el Empujador (A). (Figura 9)
ADVERTENCIA: No empuje sus ingredientes demasiado, al hacerlo puede afectar el
funcionamiento del aparato.
PRECAUCIÓN: Nunca introduzca ningún objeto o extremidad (manos, dedos, etc...)
dentro del Tubo alimentador (B) cuando este en operación el aparato.
6. Después de que haya terminado procesar sus frutas y verduras, apague la unidad y
desconecte el aparato del toma corriente.
ADVERTENCIA: Siempre espere que el motor deje de girar completamente
antes de desensamblar las partes.
7. Es muy recomendado que se deshaga de la pulpa y limpie todas las partes
inmediatamente después de cada uso para prevenir que la unidad se manche.
Sugerencias
• Siempre use frutas y vegetales frescas porque contienen más jugo. Piña, betabel, apio,
manzanas, pepinos, zanahoria, espinacas sandía, melón, tomates, granadas, naranjas y
uvas son particularmente adecuadas para procesar.
• No es necesario pelar todo tipo de frutas, únicamente las frutas con cascara gruesa: como
de todo cítrico, piña y betabel fresco.
• Cuando extraiga jugo de manzana tenga en mente que el jugo extraído dependerá mucho
del tipo de manzana que procese. Dependiendo de qué jugosa este la manzana,
determinara que espeso este el jugo—menos jugo en la manzana, más espeso quedara el
jugo.
• El jugo de manzana se torna color café muy rápidamente, puede aminorar este proceso
echándole varias gotas de jugo de limón.
• INGREDIENTES QUE CONTIENEN MUCHO ALMIDÓN COMO PLÁTANOS, PAPAYA,
AGUACATE, DÁTIL Y MANGO NO SON APROPIADOS PARA PROCESAR EN EL
EXTRACTOR DE JUGO, UTILICE UNA LICUADORA PARA PROCESAR ESTOS
INGREDIENTES.
• Hojas, tallos y hoja de lechuga pueden ser procesados en el extractor de jugo.
• Beba inmediatamente el jugo después de ser extraído; si se expone al aire por un tiempo
prolongado perderá su color, sabor y valor nutricional.
• Para extraer la máxima cantidad de jugo, siempre empuje la fruta despacio
• El extractor de jugo no está diseñado para extraer jugo de frutas muy duras que
contengan mucho almidón y que son fibrosas como la caña de azúcar.
16
1.
2.
3.
4.
5.
6.
7.
8.
9.
LIMPIEZA Y MANTENIMIENTO
Asegúrese de que la unidad este completamente ensamblada antes de usar. No opere
la unidad sin el contenedor de pulpa (F), filtro cortador (D), tapadera o el vaso para
jugo (L) en su lugar.
No remueva el contenedor de pulpa (F) o destape la unidad cuando el motor este en
uso.
Remueva toda semilla de la fruta (durazno, ciruela, sandia, etc.) y tallo de la fruta
antes de procesar en el extractor. La cáscara de los cítricos deberá ser removida.
Frutas como estas podrán dañar la unidad o dejar un mal sabor en los jugos extraídos.
Mantenga sus extremidades y utensilios fuera del Tubo alimentador (B) de la unidad,
esto es para evitar la posibilidad de severas lesiones personales o daño a la unidad.
Desconecte del tomacorriente cuando no esté en uso, cuando quite o coloque
partes y antes de limpiar.
Siempre limpie las partes del aparato inmediatamente después de usar el extractor
para evitar que se manchen sus partes.
Limpie el exterior de la Base del motor (I) con un trapo ligeramente mojado y
enjabonado. Lave el Empujador (A), Tapadera (C), Filtro cortador (D), Contenedor para
pulpa (F), Vaso para jugos (L) y la Tapadera para Vaso (K) con jabón y agua caliente,
enjuague y seque perfectamente.
Para remover los residuos de pulpa adheridos al filtro cortador (D) sosténgalo hacia
arriba y deje correr agua sobre él y utilice una pequeña brocha de nilón y suavemente
talle.
ADVERTENCIA: No use jabones, detergentes o materiales abrasivos para
limpiar el Filtro cortador (D). (Figura 11)
Seque todas las partes perfectamente antes de ensamblar para guardar u
operar.
**El filtro cortador (D) deberá de lavarse con agua caliente y jabón, y secar
perfectamente para prevenir cualquier oxidación del mismo.
PRECAUCIÓN: Para protegerse de cualquier riesgo de una descarga eléctrica, nunca
sumerja el aparato o el cordón eléctrico en agua o ningún otro líquido.
Nota: Nunca limpie ninguna parte del aparato usan detergentes, jabones o
materiales abrasivos. No sumerja la unidad o las partes en agua hirviendo o
dentro de un lava platos.
PRECAUCIÓN:
ES MUY IMPORTANTE QUE SIEMPRE EXAMINE E INSPECCIONE VISUALMENTE EL
FILTRO CORTADOR (4) POR CUALQUIER DESGASTE ANORMAL. SI NOTA CUALQUIER
IRREGULARIDAD O DAÑO A ESTE, PARA EL USO DEL APARATO INMEDIATAMENTE.
CONTACTE AL FABRICANTE O PERSONAL AUTORIZADO PARA REEMPLAZAR EL
FILTRO CORTADOR (D).
17
GARANTÍA LIMITADA * UN (1) AÑO
GARANTIA ES VALIDA CON UNA PRUEBA DE COMPRA FECHADA
Su aparato de cocina está construido con precisión, inspeccionados y probados antes de
salir de nuestra fábrica.
2. Se garantiza, al comprador original, de estar libres de defectos de fabricación en
condiciones de uso normales y las condiciones para un (1) año, cordones excluidos. Esta
garantía se aplica sólo al comprador original de este producto.
3. Si necesita cambiar la unidad, devuélvala en su caja original, con el recibo de compra, a
la tienda donde lo compró. Si usted está más allá del plazo concedido para el retorno por
la política de la tienda, por favor consulte la garantía incluida.
4. Si utiliza el aparato para uso doméstico y de acuerdo con las instrucciones, debería
ofrecerle años de servicio satisfactorio.
5. Durante el período de garantía de un año, un producto con un defecto será reparado o
reemplazado por un modelo nuevo o reacondicionado (a nuestro criterio) cuando el
producto sea devuelto a nuestro Centro de Servicio. (Consulte la sección "Devoluciones" a
continuación).
6. El producto reparado o reemplazado estará garantizado por el saldo restante del
período de garantía de un año y un plazo adicional de un mes.
7. Esta garantía limitada cubre los aparatos comprados y usados en los 50 estados
contiguos y el Distrito de Columbia, y no cubre:
- Los daños causados por el uso excesivo, negligencia, uso y desgaste normal, uso
comercial, montaje o instalación incorrecta del producto.
- Los daños causados durante el envío.
- Los daños causados por la sustitución o reposición de fusibles o disyuntores.
- Defectos que no sean defectos de fabricación.
- Rotura causada por mal uso, abuso, accidente, alteración, falta de cuidado y
mantenimiento, o incorrecta de corriente o voltaje.
- Pérdida o falta alguna pieza del producto. Las piezas se deben comprar por separado.
- Daños de piezas que no sean eléctricos; por ejemplo: agrietado o roto de plástico o de
vidrio.
- Daños por servicio o reparación por personal no autorizado.
- Las garantías extendidas compradas a través de una empresa independiente o
revendedor.
- Remordimiento del consumidor no es una razón aceptable para devolver un producto a
nuestro Centro de Servicio.
* Un año de garantía limitada válida solamente en los 50 estados contiguos y el Distrito
de Columbia, excluyendo Puerto Rico y las Islas Vírgenes.
Esta garantía es válida sólo si el producto es comprado y operado en los EE.UU., el uso
del producto que se encuentra en violación de las instrucciones escritas proporcionadas
con la unidad anulará esta garantía.
Para la garantía internacional, por favor póngase en contacto con el distribuidor local.
** Cualquier instrucción o política incluida en este manual puede estar sujeta a cambios en
cualquier momento.
MAXI-MATIC, EE.UU.
18401 E. Ave Arenth. City of Industry, CA 91748
Departamento de Atención al Cliente: (626) 912-9877 Ext: 120/107 Lunes a viernes 8am5pm PST
Sitio web: www.maxi-matic.com email: [email protected]
18
INSTRUCCIONES DE DEVOLUCIÓN
DEVOLUCIONES:
A. Cualquier devolución de mercancía defectuosa al fabricante deben ser procesados
apropiadamente contactando primero al servicio al cliente (información de contacto se
muestra a continuación) para obtener un # RA (Número de autorización de devolución). No
se aceptará ninguna devolución de mercancía sin un # RA aplicable.
B. INSTRUCCIONES IMPORTANTES DE RETORNO. Su garantía depende que usted
siga estas instrucciones si va a devolver la unidad a Maxi-Matic EE.UU.:
1. Empaque cuidadosamente el producto en su caja original o en otra caja
adecuada para evitar daños durante el envío.
2. Antes del envío de la devolución unidad, asegúrese de adjuntar:
a) Su nombre, dirección completa con código postal, número de
teléfono durante el día, y #RA
b) Un recibo de compra fechado o COMPROBANTE DE COMPRA,
c) El número de modelo de la unidad y el problema que tiene (Encierre
en un sobre y pegue directamente a la unidad antes de
sellar la caja) y
d) Todas las piezas o accesorios relacionados con el problema.
3. Maxi-Matic EE.UU. recomienda enviar el paquete de servicio terrestre de UPS
para fines de seguimiento. No podemos asumir la responsabilidad por productos perdidos
o dañados devueltos a nosotros durante el transporte entrante. Para su protección,
siempre cuidadosamente empaquetar el producto para su envío y asegurarlo con la
compañía. Envíos C.O.D no puede ser aceptado.
4. Todos los gastos de envío de devolución debe ser pagado por usted.
5. Marque el exterior del paquete:
MAXI-MATIC EE.UU.
18401 E. ARENTH AVE.
CITY OF INDUSTRY, CA 91748
6. Una vez que su devolución ha sido recibida por nuestro almacén, Maxi-Matic
EE.UU. se compromete a reparar o sustituir el producto si presenta defectos de
materiales o mano de obra, sujeto a las condiciones del apartado B.
7. Maxi-Matic pagará los gastos de envío para enviar el producto reparado
o reemplazado de nuevo a usted.
19