1
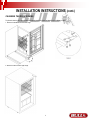
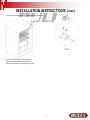
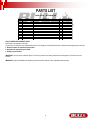
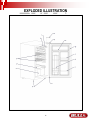
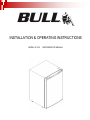
INSTALLATION & OPERATING INSTRUCTIONS MODEL #11001 REFRIGERATOR MANUAL TABLE OF CONTENTS PAGE # SAFETY INSTRUCTIONS……………………...…………………………………………………….………………………..………………………...2 INSTALLATION INSTRUCTIONS……………………….….…….………………...…….....….………………………………....…...………….…..3 CABINET LOCATION GUIDELINES.........................................................................................................................................................3 CHANGING THE DOOR’S SWING...........................................................................................................................................................4 OPERATION INSTRUCTIONS............................................................................................................................................................................6 SETTING THE TEMPERATURE CONTROL............................................................................................................................................6 ELECTRICAL..............................................................................................................................................................................................6 STORING FOODS......................................................................................................................................................................................6 REGULAR MAINTENANCE…………………………………………………………………………………………..……………..……….....…....….7 AUTOMATIC DEFROSTING OF THE REFRIGERATOR…….…..….…..………….………...…....……..…………………...………..........7 CLEANING THE UNIT……………………….......................………..….….…..………...……........…..…...…….…….…..............................7 POWER FAILURE...................………..….….…..………...……........…..…....……….….…..…….….…...…...............................................7 VACATION TIME.........................................................................................................................................................................................7 MOVING YOUR UNIT.................................................................................................................................................................................7 ENERGY SAVING TIPS..............................................................................................................................................................................7 TROUBLESHOOTING.........................................................................................................................................................................................8 PARTS LIST………………………………………………….………….……….……….…….………….……….…………………….........................9 EXPLODED ILLUSTRATION………………………………………………………………………….……….…….…………….….......….………...10 1 YEAR LIMITED WARRANTY……………………….………….…….……….….……………..….………………….……..………....…...….........11 REGISTERING YOUR REFRIGERATOR.................................................................................................................................................11 - READ THE FOLLOWING INSTRUCTIONS CAREFULLY AND BE SURE YOUR REFRIGERATOR IS PROPERLY INSTALLED, ASSEMBLED AND CARED FOR. FAILURE TO FOLLOW THESE INSTRUCTIONS MAY RESULT IN SERIOUS BODILY INJURY AND/OR PROPERTY DAMAGE. IF YOU HAVE QUESTIONS CONCERNING ASSEMBLY OR OPERATION, CONSULT YOUR DEALER OR APPLIANCE SERVICE REPRESENTATIVE. - NOTE TO INSTALLER: LEAVE THESE INSTRUCTIONS WITH THE CONSUMER AFTER INSTALLATION. - NOTE TO THE CONSUMER: RETAIN THESE INSTRUCTIONS FOR FUTURE REFERENCE. - THIS REFRIGERATOR IS INTENDED FOR STORING BEVERAGES AND FRESH FOODS AT TEMPERATURES HIGHER THAN 0°C/32°F. *FOR WARRANTY PURPOSES, PLEASE RECORD YOUR SERIAL NUMBER, DATE OF PURCHASE & A COPY OF YOUR RECEIPT OR INVOICE IN THE BACK OF YOUR MANUAL ON PAGE 11. 1 SAFETY INSTRUCTIONS READ CAREFULLY BEFORE OPERATION OF YOUR REFRIGERATOR ATTENTION: To minimize shock and fire hazards, be sure not to overload outlet. Please designate one outlet for your unit and that cannot be turned off by a switch or pull chain. The fuse or circuit breaker size should be 15 amps. Do not use extension cords. Do not put your hands under the unit when the unit is required to be moved. When the unit is not in use for a long period of time, please unplug the unit from the outlet. After unplugging the unit, wait at least 10 minutes before re-plugging it. Failure to do so could cause damage to the compressor. Do not defrost the appliance with other electric appliances (for example a hair dryer) and never attempt to scrape/remove ice/frost with sharp objects. Never clean refrigerator parts with flammable fluids. The fumes can create a fire hazard or explosion. The refrigerator must be installed with all electrical connections in accordance with state and local codes. A standard electrical supply (115V AC only, 60Hz), properly grounded in accordance with the National Electrical Code and ordinances is required. Do not use solvent-based cleaning agents of abrasives on the interior. These cleaners may damage or discolor the interior. UNPLUG CORD: To minimize shock and fire hazards, please do not plug or unplug the cord with wet hands. During maintenance and cleaning, please unplug the unit. PROPER GROUNDING REQUIRED: To minimize shock and fire hazards, make sure that the unit is properly grounded. PROHIBITION: Do not attempt to remove or repair any component unless instructed by factory. Make sure that the unit is not resting on or against the electrical cord and plug. To minimize personal injury, do not hang on the door. Do not store any flammable and explosive gas or liquids inside the unit. Do not attempt to alter or tamper with the electrical cord. 2 INSTALLATION INSTRUCTIONS READ CAREFULLY BEFORE INSTALLATION OF YOUR REFRIGERATOR If the unit has recently been transported, please let unit stand still for a minimum of 24 hours before plugging it in. Make sure that the unit drops down to desired temperature before loading the unit with product. Make sure that there is proper ventilation around the unit in the area where it will operate. Make sure all accessories are installed (for example shelves, drawer, etc.) before plugging the unit in. CABINET LOCATION GUIDELINES Install the unit on strong and leveled surfaces. - Unit may make unpleasant noises if surface is uneven. - Unit may malfunction if surface is uneven. Install the unit in a dry, well-ventilated area. - Unit should be away from direct sunlight; extreme cold ambient temperatures may also cause the unit not to perform properly. Avoid installation in a high humidity and/or dusty area. - Humidity could cause unit to rust and decrease efficiency of the unit. - Dust collected on condenser coil will cause unit to malfunction. Clean the condenser at least once a month with a brush or clean cloth. Avoid placing the unit near heat emitting devices (for example cooking appliances, radiators, water heaters, or similar devices) and moisturegenerating equipment. - High ambient temperatures will cause the compressor to overwork, leading to higher energy bills and gradual breakdown of the unit. The unit must have more than 20 cm of clearance from the cabinet to any walls. - Since this product has many ventilation holes underneath, please make sure there is a gap of at least 3 cm between the bottom of the product and the ground. Also make sure there is nothing stuck underneath. 3 INSTALLATION INSTRUCTIONS (cont.) CHANGING THE DOOR’S SWING The direction that the door opens could be changed by placing the upper and lower hinges in different corners. 1. Remove the hardware from the lower hinge. 2. Remove the door from the upper hinge. 4 INSTALLATION INSTRUCTIONS (cont.) 3. Remove the upper hinge cover and hardware from the upper hinge. 4. Remove the hole covers on the opposite side. 5. Place the hinges and door to your preference. 6. Reinstall the hardware and the upper hinge cover. 5 OPERATION INSTRUCTIONS SETTING THE TEMPERATURE CONTROL Your unit has only one control for regulating the temperature in the compartment. The temperature control is located on the upper right hand side of the compartment. The first time you turn the unit on, set the temperature control to “6”. The range of the temperature control is from position “OFF” to “6”. After 24 to 48 hours, adjust the temperature control to the setting that best suites your needs. The setting of “3” should be appropriate for home or office use. To turn the appliance off, turn the temperature control to “OFF”. Note: Turning the temperature control to “OFF” position stops the cooling cycle but does not shut off the power to the unit. If the unit is unplugged, has lost power or is turned off, you must wait 3 to 5 minutes before restarting the unit. If you attempt to restart before this time delay, the unit will not start. ELECTRICAL Please ensure that the required voltage of the compressor is being supplied at all times. Low or high voltage can detrimentally affect the refrigeration unit. All units should be plugged into a grounded and properly-sized electrical outlet with appropriate overcurrent protection. Please refer to the electrical requirements on the nameplate. Please make sure that your unit has its own dedicated outlet. Do not use an extension cord. STORING FOODS Foods to be stored in the refrigerator should be properly packed so as to prevent mixing various moisture degrees and odors. Make sure that foods do not touch each other. Assure adequate air circulation around packages. Never store flammable, volatile or explosive substances. Beverages with high alcohol percentage shall be stored in tightly sealed bottles in a vertical position. Food should not touch the rear wall of the refrigerator. Try not to open the door too often. Make sure to remove perishable articles of food out of the appliance before you leave for a long time. 6 REGULAR MAINTENANCE DISCONNECT POWER CORD BEFORE CLEANING ANY PARTS OF THE UNIT AUTOMATIC DEFROSTING OF THE REFRIGERATOR There is no need to defrost the refrigerator; ice depositing on the inner back wall is defrosted automatically. Ice build-up on the inner back wall during the compressor operation will (when the compressor has cycled off) defrost automatically. Defrosted water collects inside the drain by passing through the drain outlet in the inner back wall into a drain pan situated above the compressor. From there the water will evaporate over time. CLEANING THE UNIT CAUTION: Do not use boiling water because it may damage the plastic parts. In addition, never use a sharp or metallic instrument to remove frost as it may damage the cooling system and will void the warranty. We recommend using a plastic scraper. Turn the temperature control to “OFF”, unplug the unit and remove the food, shelf and tray. Wash the inside surfaces with a warm water and baking soda solution. The solution should be about 2 tablespoons of baking soda to a quart of water. Wash the shelf and tray with a mild detergent solution. The outside of the unit should be cleaned with mild detergent and warm water. Rinse well and wipe dry with a clean soft cloth. Wring excess water out of the sponge or cloth before cleaning the area of the controls or any electrical parts. POWER FAILURE Most power failures are corrected within a few hours and should not affect the temperature of your unit if you minimize the number of times the door is opened. If the power is going to be off for a longer period of time, you need to take the proper steps to protect your food. VACATION TIME Short vacations: Leave the unit operating during vacations of less than three weeks. Long vacations: If the appliance will not be used for several months, remove all food and unplug the power cord. Clean and dry the interior thoroughly. To prevent odor and mold growth, leave the door open slightly, blocking it open if necessary. MOVING YOUR UNIT Remove all the food. Securely tape down all loose items inside your unit. Tape the door shut. Be sure the unit stays secure in the upright position during transportation. Also protect the outside of the unit with a blanket or similar item. ENERGY SAVING TIPS Let hot foods cool to room temperature before placing in the unit. Overloading the unit forces the compressor to run longer. Be sure to wrap foods properly and wipe containers dry before placing them in the unit. This cuts down on frost build-up inside the unit. Unit storage bin should not be lined with aluminum foil, wax paper or paper towels. Liners interfere with cold air circulation, making the unit less efficient. Organize and label food to reduce door openings and extended searches. Remove as many items as needed at one time and close the door as soon as possible. 7 TROUBLESHOOTING SYMPTOM Unit does not operate. POSSIBLE CAUSE Not plugged in. The circuit breaker tripped or a blown fuse. The unit temperature control is set at “OFF” position. Turns on and off frequently. The room temperature is hotter than normal. A large amount of food has been added to the unit. The door is open too often. The door is not closed completely. The temperature control is not set correctly. The door gasket does not seal properly. The unit does not have the correct clearances. Vibrations. Check to assure that the unit is level. The unit seems to make too much noise. The rattling noise may come from the flow of the refrigerant, which is normal. As each cycle ends, you may hear gurgling sounds caused by the flow of refrigerant in your unit. Contraction and expansion of the inside walls may cause popping and crackling noises. The unit is not level. The door will not close properly. The unit is not level. The door was reversed and not properly installed. The gasket is dirty or bent. The shelves, bins or baskets are out of position. 8 PARTS LIST MODEL #11001 REFRIGERATOR REF # PARTS # QTY WARRANTY PERIOD 1 11504 INTERIOR LIGHT COVER DESCRIPTION 1 1 Yr 2 11500 TEMPERATURE CONTROL KNOB 1 1 Yr 3 11503 SHELF (WIRE) 2 1 Yr 4 11506 GLASS SHELF 1 1 Yr 5 11505 DRAWER 1 1 Yr 6 11508 LEVELING LEG 2 1 Yr 7 11510 DOOR BAR 2 1 Yr 8 11507 CAN DISPENSER 1 1 Yr 9 11511 CONDIMENT BAR 1 1 Yr 10 11501 DOOR 1 1 Yr 11 11509 BOTTOM HINGE 1 1 Yr 12 11512 TOP HINGE 1 1 Yr 13 11513 TOP HINGE COVER 1 1 Yr HOW TO ORDER REPLACEMENT PARTS Please refer to the parts list on this page. To make sure you obtain the correct replacement parts for your refrigerator, the following information is required to assure getting the correct part. 1. Reference number of replacement part needed. 2. Description of replacement part needed. 3. Quantity of parts needed. IMPORTANT: Use only factory authorized parts. The use of any part that is not factory authorized can be dangerous. This will also void your warranty. IMPORTANT: Keep this installation and operating instruction manual for referral, and for replacement parts ordering. 9 EXPLODED ILLUSTRATION 10 1 YEAR LIMITED WARRANTY REGISTERING YOUR REFRIGERATOR In order to validate your Bull Limited Warranty, you must complete the Warranty Registration Card within 90 days from the Proof of Purchase. You may register your unit either online at www.bullbbq.com or by sending in the completed hard copy along with a copy of the Proof of Purchase to: Product Registration Bull Outdoor Products 2483 W Walnut Ave Rialto, CA 92376 Bull Outdoor Products, Inc. warrants to the original purchaser at the original site of delivery with proof of purchase of each refrigerator that when subject to normal residential use, it is free from defects in workmanship and materials for the periods specified below. This warranty excludes refrigerators used in rental or commercial applications. It does not cover labor or labor related charges. There will be a shipping and handling charge for the delivery of the warranty part(s). Our obligation under this warranty is limited to repair or replacement, at our option, of the product during the warranty period. The extent of any liability of Bull Outdoor Products, Inc., under this warranty is limited to repair or replacement. This warranty does not cover normal wear of parts, damage resulting from any of the following: negligent use or misuse of the product, use contrary to operating instructions or alteration by any person other than our factory service center. The warranty period is not extended by such repair or replacement. Warranty claim procedure: If you require service or parts for your refrigerator or if you have any questions about warranty, please contact our Warranty Service Center for factory direct assistance. Our hours of operation are 5AM to 5PM PST. Our phone number is (800) 521-2855 and our FAX number is (909) 770-8627. The serial number is located on the back of the refrigerator. Product repair as provided under this warranty is your exclusive remedy. Bull Outdoor Products, Inc. shall not be liable for any incidental or consequential damages for breach of any express or implied warranty on its products. Except to the extent prohibited by applicable law, any implied warranty or merchantability or fitness for a particular purpose on this product to the duration of the above warranty. Some states do not allow the exclusion or limitation of incidental or consequential damages, or allow limitations on how long an implied warranty lasts, so the above limitations or exclusions may not apply to you. This warranty gives you specific legal rights, and you may have other rights, which vary from state to state. Model Number Serial Number Date of Purchase *Attach a copy of your receipt or invoice here* 11