1
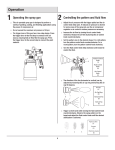
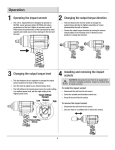
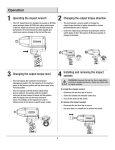
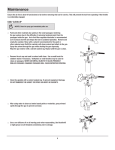
Operation
1 Operating the spray gun
□□ This air operated spray gun is designed to perform a
variety of painting, coating, and finishing applications using
the power of compressor air.
□□ Do not exceed the maximum air pressure of 45 psi.
□□ The trigger lever of this gun has a two-step design. Press
the trigger lever to the first step to connect to the air
source, ensuring that air flow fills the spray gun. Press
the trigger lever to the second step to connect the paint
material.
2 Controlling the pattern and fluid flow
□□ Adjust the air pressure with the trigger pulled. If reduced
air pressure is desired for some areas of the spray job,
use the air compressor regulator to reduce pressure as
necessary.
□□ Set the pattern size to the desired shape. For a full pattern,
turn the pattern control knob counterclockwise. For a
round pattern, turn the pattern control knob clockwise.
□□ Turn the fluid control clockwise to reduce fluid and counter
clockwise to increase fluid.
1
2
Pattern Control
Knob
(1)
Fluid Control
Knob
(2)
□□ The direction of the fan (horizontal or vertical) can be
adjusted by loosening the air cap ring and turning the air
cap 90 degrees.
Air Cap
(1)
2
1
Air Cap Ring
(2)
3
4
Horizontal Fan
(3)
Vertical Fan
(4)
□□ Trigger a short burst while turning the fluid control knob
counterclockwise. Observe the spray pattern on the
target and adjust the fluid control knob until the desired
atomization is achieved.
6
Operation (continued)
3
□□ Keep the nozzle about 6 to 9 inches from the work surface
throughout the stroke and always keep the gun in motion
while spraying. Stopping gun movement in mid-stroke
will cause a build up of paint and result in runs. Do not
fan the gun from side to side while painting. This will
cause a build-up of paint in the center of the stroke and an
insufficient coating at each end.
Preparing and loading the paint
□□ Thoroughly mix and thin the paint in accordance with the
paint manufacturer’s instructions. Most materials will
spray readily if thinned properly.
□□ Strain the material through cheese cloth or a paint strainer.
□□ Fill the paint canister to the maximum of the 3/4 full
capacity carefully.
□□ Trigger the gun properly. Start the gun moving at the
beginning of the stroke BEFORE SQUEEZING THE TRIGGER.
Release the trigger BEFORE STOPPING GUN MOVEMENT at
the end of the stroke. This procedure will feather (blend)
each stroke with the next without showing overlap or
unevenness.
□□ Set up a piece of cardboard or other scrap material to use
as a target. Adjust the spray gun for the best spray pattern
and the best atomization option.
□□ Test the consistency of the material by making a few
strokes on a cardboard target. If the material still appears
too thick, add a small amount of thinner. THIN WITH
CARE!! Do not exceed paint manufacturer’s thinning
recommendations.
□□ The amount of paint being applied can be varied by
the speed of the stroke, distance from the surface and
adjustment of the fluid control knob.
□□ Use a piece of cardboard as a shield to catch overspray
at the edges of the work to protect other surfaces. Use
masking tape to cover other areas if needed.
4 Painting with the sprayer
□□ Begin spraying. Always keep the spray gun a a right angle
to the work surface.
7HUSKYTOOLS.COM
Please contact 1-888-43-HUSKY for further assistance.