1
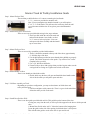
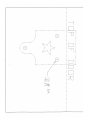
INTERIOR DOOR HARDWARE PROGRAM
IDHP - 3000Star Kit includes:
2 Star Drop Strap
1 8’ Easy Track
2 6 1/2” Trolley with Roller Bearings
1 Handle
1 Door Glide
HP.IDHP-3000
Harvard Products, Inc
Interior Track & Trolley Installation Guide
Step 1. Mount Track to Wall
- The track has pre drilled holes at 16” centers to match typical wall studs.
1. 3 ½ “ screws are provided to mount to wall.
Note: If your opening has trim installed around it, you will require a
2” x 6” x 9’ wood header. This will move the track away from the wall
to avoid contact with the trim. If not, please proceed with number 1
above.
Step 2. Mount End Caps to end of track.
- There are two caps provided with carriage bolts, stops and nuts.
1. End Caps slide inside the end of the track and
and cam in the bottom. Once inside, use the 1
3 1/2” screw to lock cap in place. Leave one
end open to side door assembly and then install
cap to secure door.
Step 3. Mount Trolley to Door
- There are two trolley assemblies provided with hardware.
1. Trolley’s should be mounted at the top end of the doors, approximately
6” from the edge of the door.
2. Use the drill pattern provided to ensure that the holes drilled are properly
spaced. The critical element is to line up the “Top of Door Line” on the
template before you drill.
3. Use a 3/8” drill bit to drill holes.
4. Fasten Trolley to door with carriage bolts provided. Again, make sure the
carriage bolts are facing out. Tighten nuts on back of the door.
Step 4. Mount Handle on Door
- There is one handle provided with each kit.
1. Decide which way the door will open and install the door handle on the
side of the door that you will pull to open and close.
Step 5. Lift Door Assembly on Track.
- Depending on your door configuration, you may need assistance to lift the door and
trolley onto the track.
1. Lift Door and place trolley onto track. There is a grove in the wheel that
allows the trolley to ride on the track.
Step 6. Install Door Guide to Wall
- There is one door guide provided with each kit. This guide keeps the bottom of the door
to swing out, away from the wall, as well as provides support for the door to slide open and
close.
1. Mount Door Guide on the wall ¼” below the bottom of the hanging door.
Locate the guide on the side of the opening in which the door is slid open to.
This will allow the guide to work as the door is open and closed.
This should finish your installation. If you have any questions please feel free to call: Harvard Products at 800 526-1958