Transcript
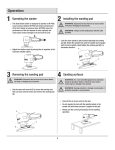
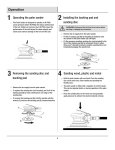
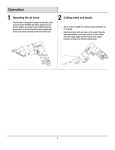
Operation
1 Operating the sander
□□ This Dual Action Sander is designed to operate on 90 PSIG.
Lower pressure (below 90 PSIG) will reduce performance
of the tool.
2 Installing the sanding pad
WARNING: Disconnect the tool from the air source before
servicing or changing any accessories.
WARNING: Always use the sanding discs with the rated
tool RPM.
CAUTION: Higher air pressure (over 90 PSIG) raises
the performance of the tool beyond its rated capacity
and could cause serious damage to the tool and the
user.
□□ Use the spanner wrench (C) to loosen the bearing seat from
the sander (A).
□□ Lock the drive spindle in place before attaching the sanding
pad (B). Rotate the spindle lock until the spindle lock engages
with the drive spindle. Hand tighten the sanding pad (B) in a
clockwise direction.
A
C
B
3 Removing the sanding pad
4 Sanding surfaces
WARNING: Disconnect the tool from the air source before
servicing or changing any accessories.
□□ Use the open spanner wrench (C) to secure the bearing
seat, then use your hand to loosen and remove the sanding
pad (B).
WARNING: You must wear ANSI approved eye protection
during the operation; failure to follow this may result in
serious injury or damage to the operator.
WARNING: Hearing protection is strongly recommended. A
protective respirator is recommended.
□□ Connect the air source and run the tool.
□□ Do not operate the tool with the spindle locked or the
sander will stall when pressure is applied to the pad.
□□ Always use the correct grit practical for the sanding
operation.
A
C
B
6