1
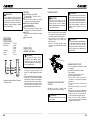
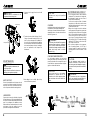
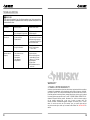
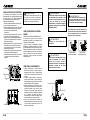
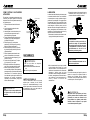
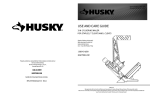
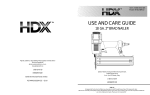
MODEL: HDUFL50
GARANTÍAS
GARANTÍAS LIMITADA DE 2 AÑOS
Si dentro del año a partir de la fecha de compra, esta herramienta neumática Husky
presentara dos falla debido a un defecto en los materiales o en la mano de obra, llame de
inmediato al Centro de Servicio de Productos al 188-669-5672 (8 a.m. a 5 p.m. hora
estándar del Este, de lunes a viernes, excepto días feriados). No devuelva la herramienta
neumática a la tienda. Esté preparado para enviar el producto, franqueo prepagado, junto
con una copia del recibo de compra con la fecha en la que se adquirió el producto y el
modelo de la herramienta a: PRIME GLOBAL PRODUCTS, INC. Dirección: 201 Ropemill
Parkway, suite#1, Woodstock, GA. 30188. Un producto defectuoso será reemplazado con
uno nuevo de igual o mayor valor. Esta garantía excluye daños accidentales o resultantes y
fallas debido a mal uso, abuso o desgaste debido al uso normal. Esta garantía le otorga
derechos específicos, pero podría tener también otros derechos que varían según el
estado. Llame al 1-888-669-5672 para más información.
26-Sp
WARNING:
Failure to follow warnings could result in DEATH OR SERIOUS INJURY.
SAVE THIS MANUAL FOR FUTURE REFERENCE
KEEP YOUR DATED PROOF OF PURCHASE FOR WARRANTY PURPOSES
Distributed By:
Home Depot U.S.A., Inc.
2455 Paces Ferry Rd, N.W. Atlanta, GA 30339
IMH300400AV-E/S 04/11
GENERAL SAFETY RULES
P3
UNPACKING
P5
FEATURES
P5
OPERATION
● In this manual, on the labels, packages and all other information provided with this tool. The following
signal words and meanings are intended to explain the levels of risk associated with this tool.
SYMBOLS
SIGNAL
MEANING
Indicates a potentially hazardous situation, which, if not avoided,
could result in death or serious injury.
Indicates a potentially hazardous situation, which, if not avoided,
may result in minor or moderate injury.
(Without symbol) Indicates a situation that may result in
property damage.
LOADING CLEAT NAILS
P6
!
WARNING:
LOADING STAPLES
P6
!
CAUTION:
UNLOADING CLEAT NAILS AND STAPLES
P6
CHANGE THE FOOT PLATE
P6
ADJUSTING THE FRONT FOOT
P7
SETTING THE AIR PRESSURE
P7
OPERATING THE TOOL
P8
CLEARING JAMS
P8
MAINTENANCE
P9
RECOMMENDED HOOKUP
P10
TROUBLE SHOOTING
P11
WARRANTIES
P12
CAUTION:
GENERAL SAFETY RULES
IMPORTANT SAFETY INSTRUCTIONS
INSTRUCTIONS PERTAINING TO A RISK OF
FIRE, ELECTRIC SHOCK, OR INJURY TO
PERSONS
To reduce the risks of electric shock, fire, and injury
to persons, read all the instructions before using the
tool.
! WARNING:
When using tools, basic precautions
should always be followed, including the
following:
WARNING:
The warnings and precautions discussed in the manual cannot cover all possible conditions and
situations that may occur. It must be understood by the user that common sense and caution are
factors which cannot be built into this product, but must be supplied by the user.
CALIFORNIA PROPOSITION 65
! WARNING:
SAVE THIS MANUAL
Keep this manual for the safety warnings,
precautions, operations, inspections and
maintenance. Keep this manual and the
receipt in a safe and dry place for future
reference.
SYMBOLS
! WARNING:
To avoid serious personal injury, do not
attempt to use this product until you read
the manual thoroughly and understand it
completely. Save this manual and review
frequently for continuing safe operation
and instructing others who may use this
● Some of the following symbols may be used on this tool. Please study them and learn their
meaning. Proper interpretation of these symbols will allow you to operate the tool better and safer.
Read operator's manual : To reduce the risk of injury, user must read and understand operator's manual
before using this product.
Risk to hearing: Always wear ear protection when using this tool. Failure to do so may result in hearing loss.
Eye protection: Always wear safety goggles, safety glasses with side shields, or a full face shield when
operating this product.
WDH100401AV-S 10/10
Risk of serious personal injury: Never place hands or any other body parts in the
fastener discharge area
of the nailer. The tool might eject a fastener and could result in death or serious personal injury.
02
This product or its power cord may
contain chemicals known to the State
of California to cause cancer and birth
defects or other reproductive harm.
Wash hands after handling.
WORK AREA
Keep the work area clean and well lighted.
Cluttered benches and dark areas increase the
risks of accidents.
Do not operate the tool in explosive
atmospheres, such as in the presence of
flammable liquids, gases, or dust. The tool
creates a spark which may ignite flammable
liquids, gases or dust.
Keep bystanders, children, and others away
while operating the tool. Distractions could
result in improper use and cause injury.
Avoid unintentional misfires. Always use
caution to avoid accidentally firing. Do not point
towards yourself or anyone whether it contains
fasteners or not.
PERSONAL SAFETY
Always wear eye protection. Operator and
others in the work area should always wear
ANSI-approved safety goggles with side shields.
Eye protection is used to guard against flying
fasteners and debris, which may cause severe
eye injury. You can use the goggles packed with
the tool.
Always wear hearing protection when using
the tool. Prolonged exposure to high intensity
noise may cause hearing loss.
Use safety equipment. A dust mask, non-skid
safety shoes and a hard hat must be used for the
applicable conditions. Wear a full face shield if
you are producing metal filings or wood chips.
Dress properly. Do not wear loose clothing or
jewelry. Contain long hair. Keep your hair,
clothing, and gloves away from moving parts.
Loose clothes, jewelry, or long hair can be
caught in moving parts.
Avoid unintentional starting. Be sure the
switch (hammer cap) is off before connecting to
the air supply. Do not carry the tool with your
finger on the switch (hammer cap) or connect the
tool to the air supply with the switch (hammer
cap) on.
Stay alert, watch what you are doing and use
common sense when operating a power tool.
Do not use tool while tired or under the influence
of drugs, alcohol, or medication. A moment of
inattention while operating the tool may cause
serious injury.
Do not overreach. Keep proper footing and
balance at all times. Proper footing and balance
enables better control of the tool in unexpected
situations.
03
Make sure the hose is free of obstructions or
snags. Entangled or snarled hoses can cause
loss of balance or footing and may become
damaged, resulting in possible injury.
Do not attach the hose or tool to your body.
Attach the hose to the structure to reduce the risk
of loss of balance if the hose shifts.
Always assume that the tool contains
fasteners. Do not point the tool toward yourself
or anyone whether it contains fasteners or not.
! WARNING:
Do not nail on top of another nail. This is
able to cause the nail to be deflected and hit
someone, or cause the tool to react and result
in a risk of injury to persons.
! WARNING:
Remove finger from the hammer cap
when not driving fasteners. Never carry the
tool with finger on hammer cap, the tool is
able to fire a fastener.
TOOL USE AND CARE
! WARNING:
Disconnect the tool from the air source
before making adjustments, doing tool
maintenance, clearing jams, leaving work
area, or unloading the tool. Such
precautionary measures reduce the risk of
injury to persons.
Know this tool. Read manual carefully, learn its
applications and limitations, as well as the
specific potential hazards related to this tool.
Use only fasteners that are recommended for
your models. Do not use the wrong fasteners or
load the fasteners incorrectly.
Use only accessories that are identified by
the manufacturer for the specific tool model.
Use of unauthorized parts or failure to follow
maintenance instructions may create a risk of
injury.
Use only those fasteners recommended for
use with this tool. Fasteners not identified for
use with this tool by the tool manufacturer are
able to result in a risk of injury to persons or tool
damage when used in this tool.
04
Check for misalignment or binding of moving
parts, breakage of parts, and any other
condition that may affect the tool's operation.
If damaged, have the tool serviced before using.
Many accidents are caused by poorly maintained
tools. There is a risk of bursting if the tool is
damaged.
Maintain tools with care. Keep tool clean. A
properly maintained tool, reduces the risk of
binding and is easier to control.
Store tools out of the reach of children and
other untrained people when it is idle. Tools
are dangerous in the hands of untrained users.
Check operation of the tool before use.
Do not force tool. Use the correct tool for your
application. The correct tool will do the job better
and safer at the rate for which it is designed.
Use clamps or another practical way to
secure and support the workpiece to a stable
platform. Holding a tool by hand or against the
body is unstable and may lead to loss of control.
Keep the tool and its handle dry, clean and
free from oil and grease. Always use a clean
cloth when cleaning. Never use brake fluids,
gasoline, petroleum-based products, or any
strong solvents to clean your tool.
Do not use the tool as a hammer.
Never use this tool in a manner that could
cause a fastener to be directed toward
anything other than the workpiece.
Always carry the tool by the handle. Never
carry the tool by the air hose.
Do not use the tool if it leaks air or does not
function properly.
Do not operate the tool if it does not contain
a legible warning label.
Do not use the tool if the switch (hammer
cap) does not turn the tool on or off. Any tool
that cannot be controlled with the switch is
dangerous and must be repaired.
TOOL SERVICE
Use only accessories that are identified by
the manufacturer for the specific tool model.
Use of unauthorized parts or failure to follow
maintenance instructions may create a risk
of injury.
Use only the lubricants supplied with the
tool or specified by the manufacturer.
Tool service must be performed only by
qualified repair personnel.
When servicing a tool, use only identical
replacement parts. Use only authorized
parts.
OPERATION
Do not drive fasteners near edge of material.
The workpiece may split causing the fastener or
ricochet, injuring you or people around.
Do not drive fasteners on top of other
fasteners or with the tool at an overly steep
angle as this may cause deflection of
fasteners which could cause injury.
Do not actuate the tool unless you intend to
drive a fastener into the workpiece.
Always handle the tool with care:
◆Respect the tool as a working implement.
◆Never engage in horseplay.
◆Keep others a safe distance from the tool
while tool is in operation as accidental
actuation may occur, possibly causing injury.
AIR SUPPLY AND CONNECTIONS
The connector on the tool must not hold
pressure when air supply is disconnected. If an
incorrect fitting is used, the tool can remain
charged with air after disconnecting and thus will
be able to drive a fastener even after the air line is
disconnected, possibly causing injury.
Never use oxygen, combustible gases or
bottled gasses as a power source for this tool.
explosion may occur, causing injury or death.
Never connect with an air compressor which
can potentially exceed 200 Psi. Over
pressurizing the tool is able to result in bursting,
abnormal operation, breakage of the tool or
serious injury to persons. Use only clean, dry,
regulated compressed air at the rated pressure or
within the rated pressure range as marked on the
tool. Always verify prior to using the tool that the
air source has been adjusted to the rated air
pressure or within the rated air-pressure range.
Always disconnect air resource:
Before unloading or making adjustments.
When maintaining the tool.
When clearing a jam.
When touching the safety yoke.
When tool is not in use.
When moving to a different work area.
Such precautionary measures reduce the risk of
injury to persons.
SAVE THESE INSTRUCTIONS
LOADING TOOL
Do not load the tool with fasteners when any
one of the operating controls is activated.
Never place a hand or any part of body in
fastener discharge area of tool.
Never point tool at anyone.
! WARNING:
The warnings and precautions discussed
above cannot cover all possible conditions
and situations that may occur. It must be
understood by the user that common
sense and caution are factors which cannot
be built into this product, but must be
supplied by the user.
UNPACKING
This tool has been shipped completely
assembled.
Make sure that all items listed in the packing
list are included.
Carefully remove the tool and any accessories
from the box.
Inspect the tool carefully to make sure no
breakage or damage occurred during shipping.
Do not discard the packing material until you
have carefully inspected and satisfactorily
operated the tool.
If any parts are damaged or missing, please
call 1-888-669-5672.
PACKING LIST
3 In 1 flooring nailer
Color box
Mallet
Air connector(pre-attached)
Adjustment tools
Lubrication oil
Anti-dust cap(pre-attached)
5/8" foot plate
Instruction manual
Safety goggles
! WARNING:
If any parts are missing do not operate
this tool until the missing parts are
replaced. Failure to do so could result in
possible serious personal injury.
05
FEATURES
! WARNING:
Do not attempt to modify this tool or
create accessories not recommended for
use with this tool. Any such alteration or
modification is misuse and could result in
hazardous condition leading to possible
serious personal injury.
FEATURES
REVOLUTIONARY 3 IN 1 DESIGN
For use with Staples, T-Cleats and L-Cleats.
NO-MAR DESIGN
Provides increased protection from marring
when working with a finished flooring surface.
ANODIZED ALUMINUM MAGAZINE
For long lasting durability.
DURABLE CONSTRUCTION
Light weight and durably constructed of highstrength aluminum and heat treated steel parts.
AIR FILTER
Keeps interior components debris free, extending
tool life.
MALLET INCLUDED
SPECIFICATIONS
Operation pressure:
Nails capacity:
Tool weight:
Air inlet:
Fasteners:
70-115psi
L: 100pcs
T: 100pcs
U: 90pcs
10.25 lbs
1/4"NPT
1-1/2" to 2"
OPERATION
16Ga.
15-1/2 Ga.
Compatible with Generic Brands 1/2" Staples,
T-Cleats, & L-Cleats.
! WARNING:
The tool may fire when it is first
connected to the air resource. Always
connect the tool to the air resource
before loading fasteners to prevent injury
from unintended cycling.
⒈Pull the Pusher(A) back to the end of magazine.
Lock pusher in the place by using Lock button(C).
Then pull the Magazine side shelter(B) back.
⒉Place a full clip of 1/2" Crown Staples in the
magazine from the top. Up to 90pcs can be
loaded into the tool.
⒊Press the Lock button(C), then the Pusher(A)
sets back to make the Magazine side shelter(B)
down back.
LOADING CLEAT NAILS
! WARNING:
Use only those fasteners recommended for
use with this tool. Fasteners not identified
for use with this tool by the tool
manufacturer are able to result in a risk of
injury to persons or tool damage when
used in this tool.
⒈ Pull the Pusher(A) back to the end of magazine.
Lock pusher in the place by using the Lock
button(C). Then pull the Magazine side shelter(B)
back.
⒉ Place full clip of desired Fasteners into magazine
from the side. Up to 100 cleat nails can be loaded
into magazine. Be noted that, when loading the L
cleat nails, the side with the L head should be in
the left of the Magazine side shelter(B). Press the
Lock button(C), then the Pusher(A) set back to
make the Magazine side shelter(B) down back.
Magazine side
shelter (B)
Lock button (C)
CHANGE THE FOOT PLATE
Pusher (A)
UNLOADING CLEAT NAILS AND
STAPLES
Unloading is the reverse of loading. Always
disconnect the air resource before unloading.
! WARNING:
Always unload all fasteners before removing
tool from service.
06
! WARNING:
The tool may fire when it first connected to
the air resource. Always connect the tool
to the air resource before loading fasteners
to prevent injury from unintended cycling.
Always make sure the tool's magazine is
empty at the beginning of each work
session, before connecting to an air
resource.
! WARNING:
The tool may fire when it is first
connected to the air resource. Always
connect the tool to the air resource
before loading fasteners to prevent injury
from unintended cycling.
16Ga.
LOADING STAPLES
The tool is equipped with a factory pre-installed
3/4" foot plate(D).
And an additional uninstalled 5/8" foot plate.
To change the plate:
⒈ Disconnect the tool from the air resource.
⒉ Empty the magazine completely.
⒊ Fire the tool into a piece of scrap wood to
ensure there is no compressed air or fasteners
left in the tool.
⒋ Set the tool on its side to expose the four
screws(E).
⒌ Remove the four screws(E), then, remove the
foot plate.
⒍ Align the four screw holes in the replacement
foot plate with the four threaded mounting holes.
⒎ Using the four screws you removed just now,
secure the replacement foot plate to the tool.
⒏ Ensure the correct Foot Plate is installed by
firing into a scrap piece of flooring and checking
for proper fastener placement.
07
OPERATING THE TOOL
! WARNING:
Disconnect the tool from the air source
whenever changing the foot plate.
Make sure there is no fastener in the
magazine before changing the foot plate.
⒈ Attach the tool to the air resource. Start your
compressor and check the pressure, making
sure it is set between 70-115psi. Do not exceed
the maximum115psi.
2. Hold the Hand grip(J) securely and Press the
Foot plate(D) to the work surface. Make sure the
plate is over the fastener target position.
3. Press down hard so that the foot plate is firmly
contacting the work surface. Then, using the
mallet packed with the Tool, strike the hammer
cap(K) firmly to drive the fastener into work
surface. Lift the tool off the work surface. Repeat
this process until the job is completed.
4. When finished, make sure to store the tool in a
clean, dry, safe location out of reach of children
and other unauthorized People.
Bolts(G)
Front Foot
(F)
Small Plate
(H)
Screws(E)
! WARNING:
An improperly functioning tool must not be
used. Do not actuate the tool unless the
tool is placed firmly against the work piece.
NOTE: Make sure the Hammer Cap on the flooring
nailer is in the up position before adding the air hose,
if not, the nailer may cycle(See below):
Hammer Cap(Up Position) Hammer Cap (Down Position)
! WARNING:
Foot plate(D)
Adjust
groove(I)
Adjust
groove(I)
! WARNING:
ADJUST THE FRONT FOOT
The tool is equipped with an adjustable front foot,
can be adjusted for 3/4"-5/8" wood floors. This tool
is shipped out set for 3/4" wood floor.
To adjust the front foot (F):
1. Disconnect the tool from the air resource.
2. Empty the magazine completely.
3. Fire the tool into a piece of scrap wood to ensure.
There is no compressed air or fasteners left in the
tool.
4. Set the tool on its side to expose the two Bolts(G)
and two Small Plates(H).
5. Loose these two Bolts (G) and two Small Plates
(H) to ensure move the Front Foot(F) in the range
of the Adjust Groove(I).
6. Adjust the proper position of the Front Foot(F)
according to the actual thickness of wood floors
and then lock tightly these two Bolts(G) and two
Small Plates(H).
7. Ensure the correct front foot set for te wood floor
by firing into a scrap piece of flooring and
checking for proper fastener placement.
08
Disconnect the tool from the air source
whenever changing the foot plate.
Make sure there is no fastener in the
magazine before changing the foot plate.
Extreme caution must be used whenever
this tool is connected to an air resource. If
the tool is dropped, or if the Hammer
cap(K)is accidentally struck, then the tool
will fire a fastener, potentially causing
SERIOUS PERSONAL INJURY.
! WARNING:
Keep your feet off the tool.
! WARNING:
Before using the tool on a floor, test the
tool on a scrap piece of wood. Adjust the
driving depth by providing more or less air
pressure. Never exceed 115PSI.
SETTING THE AIR PRESSURE
The amount of air pressure required depends on
the size of the fasteners and the workpiece material.
Begin testing the depth of drive by driving a test nail
into the same type of workpiece material used for
the actual job.
Drive a test fastener with the air pressure set at 9095psi. Raise or lower the air pressure to find the
lowest setting that will perform the job with
consistent results.
Hammer Cap
(K)
Hand grip
(F)
CLEARING JAMS
Occasionally, fasteners may become jammed in
the firing mechanism of the tool, making the tool
inoperable. To remove a jammed fastener, follow
the steps below:
⒈ Disconnect the tool from air resource.
2. Empty the magazine. Make sure all fasteners are
removed.
3. Try to fire the tool into a piece of scrap wood or
flooring to make sure that it's incapable of firing
any fasteners.
4. Set the tool on its side to expose the two Bolts
(G) and two Small Plates(H)under the screws.
5. Removed these Nose Bolts(G) and two Small
Plate(H). Three Nose Bolts(L) can be seen after
removing the Front Foot(F).
6. Remove three Nose Bolts(L), slide the Driver
Guide (M) out to expose the jammed fastener.
7. Remove jammed fastener, using plier or a
screwdriver if required.
8. Replace the Driver Guide(M) and Nose Bolts (L)
9. Replace the Front Foot (F), Plate (H) and bolts
(G) back.
10.Reload the tool with fasteners, then reconnect
the air resource to the tool.
11.Press the Drive guide (M) against a piece of
wood, and test fire the fasteners several times to
check for proper operation. If the tool is properly
firing, you may continue using the tool. If the tool
fails to perform properly, immediately discontinue
use and have the tool repaired by a qualified
service technician.
09
! WARNING:
Make sure there is no fastener in
magazine before clearing a jam.
the
⒈ Disconnect the air supply from the tool to add
lubricant.
CAUTION:
Lubricate tool only with specified
lubricants.
CLEANING
Nose Bolts (L)
Avoid using solvents when cleaning plastic parts.
Most plastics are susceptible to damage from
various types of commercial solvents and maybe
damaged by their use. Use clean cloths to remove
dirt, dust , oil, grease, etc.
Driver guide (M)
2. Turn the tool so the air inlet is facing up. Place 23 drops of pneumatic fastening tool oil into air
inlet. Do not use detergent oils, oil additives, or
air -tool oils. Do not use detergent oil or additives
as these lubricants will cause accelerated wear
to the seals and bumpers in the tool, resulting in
poor tool performance and frequent tool
maintenance.
! WARNING:
Do not at any time let brake fluids, gasoline,
petroleum-based products, penetration
oils, ect. come in contact with plastic parts.
Chemicals can damage, weaken or destroy
plastic which may result in serious
personal injury.
RECOMMENDED HOOKUP
1.The air compressor must be able to maintain a
minimum of 70 psi when the tool is being used.
2.An inadequate air supply can cause a loss of
power and inconsistent driving.
An oiler can be used to provide oil circulation
through the tool. A filter can be used to remove
liquid and solid impurities which can rust or gum
up internal parts of the tool.
3.Always use air supply hoses with a minimum
working pressure rating equal to or greater than
the pressure from the power source if a regulator
fails, or 150 psi, whichever is greater. Use 3/8" air
hose for runs up to 50'. Use 1/2" air hoses for 50'
run or longer. For better performance, install a
3/8" quick plug (1/4" NPT thread) with an inside
diameter of 0.315" (8mm) on the tool and 3/8"
quick coupler on the air hose.
4.Use a pressure regulator on the compressor,
with an operating pressure of 0-125 psi. A
pressure regulator is required to control the
operating pressure of the tool between 70 and
115 psi.
COLD WEATHER OPERATION
For cold weather operation, near and below
freezing, the moisture in the air line may freeze and
prevent tool operation. We recommend the use of
air tool lubricant or permanent antifreeze (ethylene
glycol) as a cold weather lubricant.
MAINTENANCE
! WARNING:
Any time inspection, maintenance, and
cleaning are done:
◆Disconnect the tool from the air resource.
◆Empty the magazine completely.
ANTI-DUST CAP
Each tool is packed with an anti-dust cap on the air
connector, check it after unpacking. Keep the antidust cap to cover the air connector when the tool is
not in use to prevent debris from entering the tool.
CAUTION:
The air compressor must be able to
maintain a minimum of 70psi when the
tool is being used. An inadequate air supply
can cause a loss of power and inconsistent
driving.
CAUTION:
3.After adding oil, run too briefly. Wipe off any
excess oil from the cap exhaust.
Do not store tools in a cold weather
environment to prevent frost or ice
formation on the tools' operating valves
and mechanisms that could cause tool
failure.
! WARNING:
Do not connect with an air compressor
which can potentially exceed 200psi. As
tool may burst, possibly causing injury.
LUBRICATION
Frequent, but not excessive, lubrication is required
for best performance. Oil for the tool added through
the air line connection add will lubricate the internal
parts. Do not detergent oil or additives as these
lubricants will cause accelerated wear to the seals
and bumpers in the tool, resulting in poor tool
performance and frequent tool maintenance.
10
11
TROUBLE SHOOTING
! WARNING:
Stop using tool immediately if any of the following problems occur. Serious personal injury
could result. Any repairs or replacements must be done by a qualified service person or an
authorized service center.
PROBLEMS
POSSIBLE CAUSES
CORRECTION ACTIONS
Air leaking in head cap.
⒈Loose screws.
⒉Worn or damaged O-rings or seals.
⒈Tighten screws.
⒉Install overhaul kit.
Lack of power.
Slow to cycle.
⒈Tool is too dry.
⒉Air pressure too low.
⒊Exhaust blocked.
⒈Add about 2-3 drops of
lubrication into the air connector.
⒉Make sure the air compressor
is set between 70psi and 115psi.
⒊Clean exhaust channel.
Not shooting fasteners .
⒈Damaged pusher spring.
⒉Wrong size of fasteners.
⒈Replace spring.
⒉Use 1/2" crown staples or
1-1/2" to 2"nails.
Fasteners are
jammed in the tool
frequently.
⒈Drive channel is worn.
⒉Piston is broken or worn.
⒊Bent fasteners.
⒋Dirty magazine.
⒌Loose magazine.
⒍Wrong fasteners.
⒈Fix the drive channel.
⒉Replace the piston.
⒊Remove the bent fasteners,
replace with the 1/2"crown
staples or 1-1/2" to 2"nails.
⒋Clean magazine.
⒌Tighten screws.
⒍Verify that fasteners are the
correct size.
WARRANTY
2 YEARS LIMITED WARRANTY
If within two years from the date of purchase, this Husky air tool product fails due to a defect
in materials or workmanship, please immediately contact Product Support at 1-888-6695672 (8am to 5pm EST, M-F, except normal Holiday).Do not return the air tool to the store.
Please be prepared to send the product, postage prepaid, along with a copy of the dated
first owner purchase receipt with the tool model to: PRIME GLOBAL PRODUCTS, INC.
Address:201 Ropemill Parkway, suite#1, Woodstock, GA. 30188. A defective product
will be promptly replaced with a new one of equal or greater value. This
warranty excludes incidental/consequential damages and failures due to misuse,
abuse or normal wear and tear. This warranty gives you specific rights, and you
may also have other rights, which vary, from state to state. Please call 1-888-669-5672 for
details.
12
13
MODELO: HDUFL50
NORMAS GENERALES DE SEGURIDAD
P14
DESEMBALAJE
P16
CARACTERÍSTICAS
FUNCIONAMIENTO
P17
CÓMO CARGAR LISTONES
P17
CÓMO CARGAR GRAPAS
P17
CÓMO CARGAR LISTONES LOS GRAPAS
P18
CÓMO CAMBIAR LA PLACA BASE
P18
CÓMO AJUSTAR LA PATA FRONTAL
P19
CÓMO CONFIGURAR LA PRESIÓN DE AIRE
P19
CÓMO USAR LA HERRAMIENTA
P19
CÓMO RETIRAR SUJETADORES ATASCADOS
P21
MANTENIMIENTO
P21
CONEXIÓN RECOMENDADA
P23
SOLUCIÓN DE PROBLEMAS
P24
GARANTIAS
P25
ADVERTENCIA:
Las advertencias y precauciones mencionadas en este manual no cubren todas las condiciones y
situaciones posibles que pudieran ocurrir. El usuario debe comprender que el sentido comun y la
precaucion son factores que no se pueden incorporar con el producto, sino que deben ser
suministrados por el usuario.
GUARDAR ESTE MANUAL
Guarde este manual como referencia para las
advertencias de seguridad, precauciones, el
funcionamiento, las inspecciones y el
mantenimiento. Guarde este manual y el recibo
de compra en un lugar seguro y seco para
referencia futura.
SÍMBOLOS
! ADVERTENCIA:
Para evitar lesiones personales graves, no
intente usar este producto hasta que haya
le do y comprendido completamente el
manual. Guarde este manual y consultelo
frecuentemente para utilizar la herramienta
de forma segura y para instruir a otras
personas para que puedan utilizarla.
Algunos de los siguientes símbolos pueden ser utilizados en esta herramienta. Por favor,
estudiarlos y aprender su significado. Una correcta interpretación de estos símbolos le permitirá
utilizar la herramienta mejor y más seguro.
ADVERTENCIA:
No seguir las advertencias correctamente puede causar
LA MUERTE O LESIONES GRAVES.
GUARDA ESTE MANUAL PARA CONSULTARLO EN EL FUTURO.
GUARDE SU COMPROBANTE DE COMPRA CON FECHA PARA FINES DE LA GARATÍA.
Distribuido Por:
Home Depot U.S.A., Inc.
2455 Paces Ferry Rd, N.W. Atlanta, GA 30339
Lea el manual del operador de: Para reducir el riesgo de lesiones, el usuario debe leer y entender
el manual del operador antes de usar este producto.
Protección de los ojos: Use siempre gafas de seguridad, gafas de seguridad con protección lateral o
una careta completa cuando utilice esta producto.
El riesgo a la audición: Siempre use protección para los oídos cuando se utiliza este tool. Failure lo
contrario, podría resultar en la pérdida de audición.
WDH100401AV-S 10/10
Riesgo de lesiones personales graves: Nunca coloque las manos o cualquier
otra parte del cuerpo
en la zona de descarga del sujetador de la clavadora. La herramienta puede expulsar un sujetador y
puede causar la muerte o lesiones graves.
14-Sp
En este manual, en las etiquetas, los embalajes y en toda la información incluida con esta herramienta,
se usan las siguientes indicaciones y sus significados para explicar los niveles de riesgo asociados a
esta herramienta.
SÍMBOLOS
INDICACIÓN
SIGNIFICADO
!
ADVERTENCIA: Indica una situación potencialmente peligrosa que, de no evitarse,
puede ocasionar la muerte o lesiones graves.
!
PRECAUCIÓN:
PRECAUCIÓN:
Indica una situación potencialmente peligrosa que, de no evitarse,
puede ocasionar lesiones menores o moderadas.
(Sin símbolo) Indica una situación que puede ocasionar daños
en la propiedad.
NORMAS GENERALES DE
SEGURIDAD
INSTRUCCIONES DE SEGURIDAD
IMPORTANTES
INSTRUCCIONES EN REFERENCIA AL PELIGRO
DE INCENDIOS, CHOQUE ELECTRICO O
LESIONES PERSONALES
Para reducir los riesgos de choque eléctrico,
incendio y lesiones personales, lea todas las
instrucciones antes de usar la herramienta.
! ADVERTENCIA:
AREA DE TRABAJO
Mantenga el área de trabajo limpia y bien
iluminada. Los bancos de trabajo desordenados y
las áreas oscuras aumentan el riesgo de
accidentes.
No utilice la herramienta en atmósferas en las
que exista riesgo de explosión, como por
ejemplo en presencia de líquidos inflamables,
gases o polvo. La herramienta produce una
chispa que podría encender líquidos inflamables,
gases o polvo.
Mantenga a los transeúntes, niños y a otras
personas alejadas cuando esté utilizando la
herramienta. Las distracciones podrían resultar en
el uso inapropiado y causar lesiones.
Evite los disparos accidentales. Siempre tenga
precaución para evitar disparos accidentales. No
apunte la herramienta hacia usted u otra persona,
aun cuando no contenga sujetadores.
Cuando se usen herramientas, siempre se
deberan seguir precauciones basicas,
incluyendo las siguientes:
PROPOSICIÓN 65 DE CALIFORNIA
! ADVERTENCIA:
Este producto, a su cordón eléctrico,
puede contener productos quimicos
conocidos por el estado de California como
causantes de cáncer y defectos de
nacimiento u otros daños reproductiveos.
Lave sus manos después de usar.
15-Sp
SEGURIDAD PERSONAL
Use siempre lentes de protección. El operador y
cualquier otra persona que esté en el área de
trabajo deben usar siempre gafas de seguridad con
protecciones laterales aprobadas por las normas
ANSI. Los lentes de protección se usan para evitar
que los sujetadores o los desperdicios que se
expulsen puedan causar una lesión ocular grave.
Puede usar las gafas que se incluyen con la
herramienta.
Use siempre protección para los oídos cuando
utilice esta herramienta. La exposición
prolongada a ruidos de alta intensidad puede
causar la pérdida de la audición.
Utilice equipo de seguridad. Se deben utilizar
una máscara de polvo, zapatos de seguridad
antideslizantes y un casco para las condiciones
aplicables. Use una máscara que cubra
completamente su rostro si está produciendo
partículas metálicas o astillas de madera.
Use ropa adecuada. No use ropa holgada o joyas.
Tómese el cabello largo. Mantenga el cabello, ropa
y guantes lejos de las piezas en movimiento. Las
ropas holgadas, joyas o el cabello largo pueden
quedar atrapados en las piezas en movimiento.
Cuidado con disparos accidentales. Quiten la
cappa de plastico que cubre la coneccion de aire.
No cargen la grapadora con su dedo en el la barilla
o conecten la grapadora con la cappa de plastico.
Manténgase alerta, preste atención a lo que
hace y utilice el sentido común cuando utilice
una herramienta eléctrica. NO utilice la
herramienta si está cansado o bajo la influencia de
drogas, alcohol o medicamentos. Un momento de
desatención mientras utiliza la herramienta puede
causar lesiones graves.
No se extienda demasiado. Mantenga un apoyo
de pies y un equilibrio adecuados en todo
momento. Un apoyo de pies y equilibrio
adecuados permiten un mejor control de la
herramienta en situaciones inesperadas. No la use
si está parado sobre una escalera u otra superficie
inestable. Un apoyo de pies estable sobre una
superficie sólida permite un mejor control de la
herramienta en situaciones inesperadas.
Asegúrese de que la manguera esté libre de
obstrucciones o enganches. Las mangueras
enredadas o enganchadas pueden causar la
pérdida de equilibrio o del apoyo de pies y podrían
dañarse y causar posibles lesiones.
No fije la manguera o herramienta a su
cuerpo. Fije la manguera a la estructura para
reducir el riesgo de pérdida de equilibrio en caso
que la manguera se mueva.
Siempre dé por sentado que la herramienta
contiene sujetadores. No apunte la
herramienta hacia usted u otra persona, aun
cuando no contenga sujetadores.
! ADVERTENCIA:
No clave sobre otro clavo. Esto puede
causar que el clavo se desvíe y alcance a
alguien, o que la herramienta reaccione de
alguna manera y lesione a alguien.
! ADVERTENCIA:
Retire el dedo del Tapa del martillo
cuando no coloca sujetadores. Nunca
transporte la herramienta con el dedo en
el Tapa del martillo, ya que la herramienta
puede disparar un sujetador.
USO Y CUIDADO DE LA HERRAMIENTA
! ADVERTENCIA:
Disconecten la grapadora de el aire antes
de ajustes, mantenimiento, quitando
grapas quebradas y terminado el
proyecto. Esto va ayudar para que nadien
tenga un dano.
Conozca esta herramienta. Lea el manual
cuidadosamente, conozca sus aplicaciones y
limitaciones, así como también los posibles peligros
específicos relacionados con esta herramienta.
Utilice sólo los sujetadores recomendados para
cada modelo. No utilice sujetadores inadecuados
ni cargue los sujetadores de forma incorrecta.
Usa únicamente accesorios identificados por el
fabricante para ese modelo específico de
herramienta. La utilización de piezas no
autorizadas o el incumplimiento de las instrucciones
de mantenimiento pueden aumentar el riesgo de
lesiones.
Use solamente los sujetadores recomendados
para esta herramienta. Los sujetadores no
identificados por el fabricante de la herramienta
para usarse con la misma pueden causar lesiones
a las personas o daños en la herramienta cuando
se usanconella.
16-Sp
Verifique que no existan piezas móviles mal
alineadas o trabadas, piezas rotas ni cualquier
otra condición que pueda afectar el
funcionamiento de la herramienta. Si se daña,
haga reparar la herramienta antes de usarla.
Muchos accidentes son producto del mal
mantenimiento de las herramientas.Hay un peligro
de explocion si la grapadora esta dañiada.
Realice un mantenimiento adecuado de las
herramientas. Mantenga la herramienta limpia.
Una herramienta mantenida adecuadamente no se
trabará con frecuencia y será más fácil de controlar.
Cuando no estan usando la grapadora, pongan
la grapadora en un lugar seguro. Las
herramientas son peligrosas en manos de usuarios
sin capacitación.
Revise el funcionamiento de la herramienta
antes de usarla. No utilice la herramienta si el
mecanismo de contacto de la pieza de trabajo no
funciona correctamente, ya que se podría disparar
un sujetador accidentalmente.
No fuerce la herramienta. Utilice la herramienta
adecuada para su aplicación. La herramienta
adecuada realizará un trabajo más seguro y de
mejor calidad al ritmo para el que fue diseñada.
Utilice abrazaderas u otro método práctico para
asegurar y sostener la pieza de trabajo en una
plataforma estable. Sostener la herramienta con
una sola mano o apoyada en su cuerpo es
inestable y puede causar la pérdida del control.
Mantenga la herramienta y su mango secos,
limpios y sin aceite ni grasa. Siempre utilice un
paño limpio para limpiarla. Nunca utilice líquidos
para frenos, gasolina, productos a base de petróleo
o cualquier solvente fuerte para limpiar la
herramienta.
No utilice la herramienta como un martillo.
Nunca utilice esta herramienta de una manera
que pueda causar que un sujetador sea dirigido
hacia cualquier cosa que no sea la pieza de
trabajo.
Siempre transporte la herramienta por el
mango. Nunca transporte la herramienta por la
manguera de aire comprimido.
No utilice la herramienta si hay una filtración de
aire o si no funciona correctamente.
No utilice la herramienta si no tiene una
etiqueta de advertencia legible.
No usen la grapadora si la barilla esta
quebrada. Manden la grapadora que la
compongan.
17-Sp
REPARACIÓN DE LA HERRAMIENTA
SUMINISTRO DE AIRE Y CONEXIONES
Use sólo accesorios identificados por el
fabricante para utilizarse con el modelo
específico de la herramienta.
El uso de piezas no autorizadas o no seguir las
instrucciones de mantenimiento podrían
provocar riesgo de lesiones.
Use sólo los lubricantes incluidos con la
herramienta o especificados por el fabricante.
Sólo personal de reparación calificado puede
llevar a cabo la reparación de la herramienta.
Cuando hagan mantenimiento, usen partes
autorizadas.
●El conector de la herramienta no debe tener
presión cuando el suministro de aire está
desconectado. Si se utiliza un conector
incorrecto, la herramienta puede permanecer
cargada con aire después que se le desconecte y
podría disparar un sujetador incluso con la línea
de aire desconectada, causando posibles
lesiones.
● No utilice oxígeno, gases combustibles u
otros gases embotellados como fuente de
alimentación para esta herramienta. Puede
provocar una explosión y causar lesiones o la
muerte.
● No conecte a una compresora de aire que
pueda exceder los 13,79 bar. El exceso de
presión de la herramienta es capaz de ocasionar
una explosión, funcionamiento anormal, rotura de
la herramienta o lesiones graves a personas.
Utilice sólo aire limpio y seco, y regulado a la
presión nominal o dentro del rango de presión
indicado en la herramienta. Verifique siempre
antes de utilizar la herramienta que la fuente de
aire se ha ajustado a la presión de aire
especificada o dentro del rango nominal de
presión de aire.
● Desconecte siempre la fuente de aire:
Antes de descargar o realizar ajustes.
Al realizar el mantenimiento de la
herramienta.
Al desatascarla.
Al tocar la horquilla de seguridad.
Cuando la herramienta no está en uso.
Al desplazarse a otra área de trabajo.
Dichas medidas de precaución reducirán el
riesgo de lesiones a personas.
FUNCIONAMIENTO
No dispare sujetadores cerca del borde del
material. La pieza de trabajo se puede partir,
causando que el sujetador rebote lastimándolo a
usted o las personas que estén a su alrededor.
No disparare los sujetadores sobre otros
sujetadores o con la herramienta en un ángulo
demasiado inclinado, ya que esto puede
provocar que los sujetadores se desvíen y
causar lesiones.
No accione la herramienta al menos que intente
disparar el sujetador en la pieza de trabajo.
Siempre manipule la herramienta con cuidado:
◆ Respete la herramienta como implemento de
trabajo.
◆ Nunca juegue con la herramienta.
◆ Mantenga a otras personas a una distancia
segura mientras la herramienta está en
funcionamiento, ya que se puede
accionar accidentalmente y causar lesiones.
EXCEPTO ESTAS INSTRUCCIONES
! ADVERTENCIA:
Las advertencias y precauciones
mencionadas anteriormente no cubren
todas las condiciones y situaciones
posibles que pudieran ocurrir. El usuario
debe comprender que el sentido común y
la precaución son factores que no se
pueden incorporar con el producto, sino
que deben ser suministrados por el
usuario.
DESEMBALAJE
Esta herramienta ha sido enviada
completamente ensamblada.
Asegúrese de que estén incluidos todos los
artículos que aparecen en la lista de empaque.
Retire la herramienta y los accesorios de la
caja cuidadosamente.
Inspeccione cuidadosamente la herramienta
para asegurarse de que no se produjo
ninguna ruptura o daño durante su envío.
No deseche el material de embalaje hasta que
haya inspeccionado cuidadosamente y
utilizado satisfactoriamente la herramienta.
Si hay piezas dañadas o faltantes, llame al
1-888-669-5672.
LISTA DE EMPAQUE
Clavadora para pisos 3 en 1
Caja de color
Mazo
Conector de aire(Pre-unido)
Herramientas de ajuste
Aceite lubricante
Tapa antipolvo(Pre-unido)
Placa base de 1,59cm
Manual de instrucciones
Gafas de seguridad
CÓMO CARGAR LA HERRAMIENTA
No cargue la herramienta con sujetadores cuando
alguno de los controles de funcionamiento esté
activado.
Nunca coloque una mano o cualquier parte del
cuerpo en el área de descarga de los sujetadores
de la herramienta.
Nunca apunte la herramienta hacia una persona.
! ADVERTENCIA:
Si hay piezas dañadas o faltantes, no
utilice esta herramienta hasta reemplazar
dichas piezas. No hacerlo podría provocar
lesiones personales graves.
18-Sp
FUNCIONAMIENTO
! ADVERTENCIA:
No intente modificar esta herramienta ni
crear accesorios que no sean los
recomendados para ésta. Cualquier
alteración o modificación es considerada
mal uso y podría llevar a una condición
peligrosa que puede causar una lesión
personal grave.
CARACTERÍSTICAS
ESPECIFICACIONES
Presión de funcionamiento:
Capacidad de clavos:
Peso de la herramienta:
Entrada de aire:
Sujetadores:
(Listones en T)
4,83-7,93 bar
L: 100 pzas
T: 100 pzas
U: 90 pzas
4,66 kgs
NPT DE 6,35mm
3,8cm - 5,0cm
(Listones en L)
CÓMO CARGAR LISTONES
! ADVERTENCIA:
La herramienta puede dispararse al ser
conectada por primera vez a la fuente de
aire. Conecta siempre la herramienta a la
fuente de aire antes de cargar los
fijadores para evitar lesiones causadas
por ciclos accidentales.
⒈ Jale la palanca (A) hacia el extremo del cargador.
Asegure la palanca en la posición usando el
botón de bloqueo (C). Luego jale hacia atrás el
seguro lateral del cargador (B).
⒉ Coloque una carga completa de los sujetadores
deseados por el lado. Se pueden cargar hasta
100 listones en el cargador. Tenga en cuenta
que cuando cargue listones en L, el lado con la
cabeza en L debe estar a la izquierda del seguro
lateral del cargador (B). Presione el botón de
bloqueo (C). La palanca (A) retrocederá y hará
que el seguro lateral del cargador (B) también
retroceda.
CÓMO CARGAR GRAPAS
Ga./Calibre:15-1/2
Ga./Calibre:16
Ga./Calibre:16
Compatible con grapas de 12,7mm y listones en
T y L de marcas genéricas.
CARACTERÍSTICAS
REVOLUCIONARIO DISEÑO 3 EN 1
Para usar con grapas y listones en T y L.
DISEÑO que no raya
Brinda protección a las superficies acabadas de
los pisos.
CARGADOR DE ALUMINIO ANODIZADO
Para una mayor durabilidad.
FABRICACIÓN DURADERA
Fabricación liviana y duradera en aluminio de
alta resistencia y piezas de acero con
tratamiento térmico.
FILTRO DE AIRE
19-Sp
! ADVERTENCIA:
La herramienta puede dispararse al ser
conectada por primera vez a la fuente de
aire. Conecta siempre la herramienta a la
fuente de aire antes de cargar los
fijadores para evitar lesiones causadas
por ciclos accidentales.
⒈ Jale la palanca (A) hacia el extremo del
cargador. Asegure la palanca en la posición
usando el botón de bloqueo (C). Luego jale
hacia atrás el seguro lateral del cargador (B).
⒉ Coloque una carga completa de grapas de
corona de 1/2" por la parte superior del
cargador. Se pueden cargar hasta 90pzas.
(listones) en la herramienta.
⒊ Presione el botón de bloqueo (C). La palanca
retrocederá (A) y hará que el seguro lateral del
cargador (B) también retroceda.
CÓMO CAMBIAR LA PLACA BASE
Seguro lateral del
cargador (B)
Botón de bloqueo (C)
Palanca (A)
CÓMO CARGAR LISTONES LOS GRAPAS
La descarga es lo opuesto a la carga, (Excepción)
siempre desconecte la fuente de aire antes de
realizar la descarga.
! ADVERTENCIA:
S i e m p re d e s c a r g u e t o d o s l o s
sujetadores antes de retirar la
herramienta del servicio.
La herramienta viene equipada con una placa base
(D) de 3/4" preinstalada de fábrica. También
incluye una placa base adicional no instalada de
5/8".
Para cambiar la placa:
⒈ Desconecte la herramienta de la fuente de aire.
Vacíe el cargador completamente.
⒉ Dispare la herramienta hacia un trozo de
⒊ madera que no utilice para asegurarse de que
no haya aire comprimido o sujetadores en la
herramienta.
⒋ Coloque la herramienta de lado para ver los
cuatro tornillos (E).
⒌ Retire los cuatro tornillos (E) y luego retire la
placa base.
⒍ Alinee los cuatro orificios de los tornillos en la
placa base de repuesto con los cuatro orificios
de montaje roscados.
⒎ Usando los cuatro tornillos que retiro, fije la
placa base de repuesto a la herramienta.
⒏ Asegúrese de haber instalado la placa base
correcta disparando la herramienta hacia un
trozo de madera que no utilice y verificando la
colocación adecuada del sujetador.
! ADVERTENCIA:
! ADVERTENCIA:
La herramienta puede dispararse cuando
se conecte por primera vez a una fuente
de aire. Siempre conecte la herramienta a
la fuente de aire antes de cargar los
sujetadores para prevenir lesiones
causadas por ciclos accidentales.
Asegúrese siempre de que el cargador de
la herramienta esté vacío al comienzo de
cada sesión de trabajo antes de conectar
la herramienta a la fuente de aire.
! ADVERTENCIA:
Us e s ol a me n te lo s s uj et a do re s
recomendados para esta herramienta. Los
sujetadores no identificados por el
fabricante de la herramienta para usarse
con la misma pueden causar lesiones a las
personas o daños en la herramienta
cuando se usan con ella.
Desconecte la herramienta de la fuente de
aire cada vez que cambie la placa base.
Asegúrese de que no haya sujetadores en
el cargador antes de cambiar la placa
base.
Tornillos
(E)
Placa base
(D)
Piso de
1,59cm
20-Sp
CÓMO AJUSTAR LA PATA FRONTAL
La herramienta viene equipada con una pata
frontal ajustable, la que se puede ajustar para pisos
de madera de 3/4” a 5/8”. Esta herramienta se
envía ajustada para pisos de madera de 3/4".
Para ajustar la pata frontal (F).
1. Desconecte la herramienta de la fuente de aire.
2. Vacíe el cargador completamente.
3. Dispare la herramienta hacia un trozo de madera
que no utilice para asegurarse de que no haya
aire comprimido o sujetadores en la
herramienta.
4. Coloque la herramienta de lado para ver los dos
pernos (G) y las dos placas pequeñas (H).
5. Afloje los pernos (G) y las dos placas pequeñas
(H) para mover la pata frontal (F) en el espacio
de la ranura de ajuste (I).
6. Ajuste la pata frontal (F) en la posición adecuada
de acuerdo al grosor de los pisos de madera y
luego asegure los pernos (G) y las dos placas
pequeñas (H) firmemente.
7. Asegúrese de que la pata frontal sea adecuada
para el piso de madera disparando la
herramienta hacia un trozo de piso que no utilice
y verificando la colocación adecuada del
sujetador.
! ADVERTENCIA:
Desconecte la herramienta de la fuente de
aire cada vez que ajuste la pata frontal.
Asegúrese de que no haya sujetadores en el
cargador antes de ajustar la pata frontal.
CÓMO CONFIGURAR LA PRESIÓN DE AIRE
La cantidad de presión de aire requerida
dependerá del tamaño de los sujetadores y del
material de la pieza de trabajo.
Comience a probar la profundidad de disparo,
disparando un sujetador de prueba en el mismo
tipo de material de la pieza de trabajo que ocupará.
Dispare un sujetador de prueba, con la presión de
aire configurada entre 6,21-6,55 bar. Incremente o
reduzca la presión del aire hasta encontrar la
configuración mínima requerida para obtener
resultados óptimos.
Pata Frontal
(F)
Placa pequeña
(H)
Ranura de ajuste (I)
21-Sp
Ranura de ajuste (I)
1. Conecte la herramienta a la fuente de aire.
Encienda su compresor y verifique la presión,
asegurándose de que esté configurada entre
4,83-7,93 bar. No exceda la presión máxima de
7,93 bar.
2. Sostenga el agarre manual (J) firmemente y
presione la pata frontal (D) en la superficie de
trabajo. Asegúrese de que la placa esté sobre el
lugar donde desea colocar el sujetador.
3. Presione hacia abajo con fuerza para que la
pata frontal entre firmemente en contacto con la
superficie de trabajo. Luego, usando el mazo
incluido con la herramienta, golpee la tapa del
martillo (K) firmemente para disparar el sujetador
en la superficie de trabajo. Levante la
herramienta de la superficie de trabajo. Repita
este proceso hasta que termine el trabajo.
4. Una vez que haya terminado, asegúrese de
guardar la herramienta en un lugar limpio, seco
y seguro, fuera del alcance de los niños y de
personas no autorizadas.
! ADVERTENCIA:
No se debe utilizar una herramienta que
funcione de forma inadecuada. No accione
la herramienta a menos que se encuentre
bien colocada en la pieza de trabajo.
NOTA: Asegúrese de que la tapa del martillo en
la clavadora de pisos esté hacia arriba antes de
colocar la manguera de aire, si no, la clavadora
puede girar. (Ver a continuación)
CÓMO CONFIGURAR LA PRESIÓN
DE AIRE
CÓMO USAR LA HERRAMIENTA
Pernos(G)
! ADVERTENCIA:
Se debe tener extrema precaución cuando
esta herramienta esté conectada a una
fuente de aire. Si la herramienta se cae, o si
la tapa del martillo (K) se golpea
accidentalmente, la herramienta disparará
un sujetador, pudiendo causar una LESIÓN
PERSONAL GRAVE.
! ADVERTENCIA:
Mantenga sus pies alejados de la
herramienta.
! ADVERTENCIA:
Tapa del martillo
(Posición hacia arriba)
Tapa del martillo
(Posición hacia abajo.)
Antes de usar la herramienta sobre un piso,
pruebe la herramienta en un trozo de
madera que no utilice. Ajuste la
profundidad de disparo incrementando o
reduciendo la presión de aire. Nunca
exceda el máximo de 7,93 bar.
Tapa del martillo (K)
Agarre manual (F)
22-Sp
LUBRICACIÓN
CÓMO RETIRAR SUJETADORES
ATASCADOS
En ocasiones, un sujetador puede atascarse en el
mecanismo de disparo, dejando la herramienta
inoperante. Para retirar el sujetador atascado, siga
los siguientes pasos:
⒈ Desconecte la herramienta de la fuente de
aire.
2. Vacíe el cargador. Asegúrese de retirar
todos los sujetadores.
3. Intente disparar a un trozo de madera o piso
que no utilice para asegurarse de que no
puede disparar ningún sujetador.
4. Coloque la herramienta de lado para ver los
dos pernos (G) y las dos placas pequeñas
(H) debajo de los tornillos.
5. Retire los pernos (G) y las dos placas
pequeñas (H). Verá tres pernos con nariz (L)
después de retirar la pata frontal (F).
6. Retire los tres pernos con nariz (L) y deslice
la guía de disparo (M) hacia fuera para ver el
sujetador atascado.
7. Retire el sujetador atascado usando unas
pinzas o un destornillador si es necesario.
8. Vuelva a colocar la guía de disparo (M) y los
pernos con nariz (L).
9. Vuelva a colocar la pata frontal (F), la placa
(H) y los pernos (G) en su lugar.
10.Recargue la herramienta con sujetadores y
uego vuelva a conectarla a la fuente de aire.
11.Presione la guía de disparo (M) contra un
trozo de madera y dispare varios sujetadores
para asegurarse de que la herramienta funciona
correctamente. Si la herramienta dispara de
forma adecuada, puede seguir usándola. Si la
herramienta no funciona correctamente,
suspenda su uso de inmediato y haga que un
técnico calificado la repare.
! ADVERTENCIA:
Asegúrese de que no haya sujetadores en
el cargador antes de retirar un sujetador
atascado.
23-Sp
Pernos con nariz (L)
Guía de
disparo (M)
Piso de 1,91cm
La herramienta está diseñada exclusivamente para
no necesitar lubricación diaria. Pero la lubricación
es necesaria para un mejor rendimiento luego de
periodos de uso prolongados. Si se agrega aceite a
la herramienta a través de la conexión de la línea
de aire se lubricarán las piezas internas. No utilices
aceite detergente ni aditivos puesto que estos
lubricantes causarán el desgaste acelerado de los
sellos y amortiguadores de la herramienta, lo que
resultará en el mal funcionamiento de la misma y
elevará la frecuencia del mantenimiento.
⒈ Desconecta la herramienta de la fuente de aire,
a agregue lubricantes para herramientas.
3. Después de agregar el aceite, haga funcionar la
herramienta por un breve periodo. Limpie el
exceso de aceite de la salida de la cubierta.
PRECAUCIÓN:
La lubricación excesiva puede dañar la
superficie de trabajo. Es responsabilidad
del propietario lubricar de forma adecuada.
El incumplimiento de dicha tarea reducirá
significativamente la vida útil de la
herramienta y anulará la garantía.
MANTENIMIENTO
PRECAUCIÓN:
! ADVERTENCIA:
Cada vez que realice una inspección,
mantenimiento o limpieza:
◆ Desconecte la herramienta de la fuente de
aire.
◆ Vacíe el cargador completamente.
ANTIPOLVO CASQUILLO
Todas las herramientas vienen con una tapa
antipolvo para el conector de aire. Revísela
después de desembalarla.Mantenga la tapa
antipolvo puesta sobre el conector de aire cuando
la herramienta no esté en uso para evitar que
entren residuos en la herramienta.
Lubrica la herramienta únicamente con los
lubricantes especificados.
2. Gire la herramienta de forma tal que la entrada
de aire dé hacia arriba. Coloque 2 a 3 gotas
deaceite neumático de la herramienta de la
cerradura en la entrada de aire. No utilices aceite
detergente ni aditivos puesto que estos
Lubricantes causarán el desgaste acelerado de
los sellos y amortiguadores de la herramienta, lo
que resultará en el mal funcionamiento de la
m is m a y e le v ará la f rec ue n ci a d el
mantenimiento.
LIMPIEZA
Evite utilizar solventes para limpiar las piezas de
plástico. La mayoría de los plásticos tienden a
dañarse con los distintos tipos de solventes
comerciales. Utilice paños limpios para eliminar la
suciedad, el polvo, el aceite, la grasa, etc.
! ADVERTENCIA:
No permita nunca que líquidos para frenos,
gasolina, productos a base de petróleo, aceites
penetrantes, etc. entren en contacto con las
piezas plásticas. Los químicos pueden dañar,
debilitar o destruir el plástico, lo que puede
causar lesiones personales graves.
24-Sp
3. Siempre use mangueras de aire comprimido con
una clasificación de presión de trabajo igual o
superior a la presión de la fuente de alimentación
en caso que el regulador falle, o de 10,34 bar, el
que sea mayor. Use mangueras de aire
comprimido de 3/8" para distancias de hasta
15,24 m. Use mangueras de aire comprimido de
½” para distancias de 15,24 m o superiores.
Para obtener un mejor rendimiento, instale un
tapón de conexión rápida de 3/8" (rosca NPT de
¼") con un diámetro interior de 0,315" (8 mm) en
la herramienta y un acoplador de conexión
rápida de 3/8" en la manguera de aire
comprimido.
4. Use un regulador de presión en el compresor
con una presión de trabajo de 0 a 8,62 bar. Se
necesita un regulador de presión que controle la
presión de trabajo de la herramienta entre 4,83
y 7,93 bar.
USO EN CLIMA FRÍO
Si utiliza la herramienta en clima frío con
temperaturas cercanas o inferiores a los cero
grados Celsius, la humedad en la línea de aire
podría congelarse e inutilizar la herramienta.
Recomendamos usar un lubricante para
herramientas neumáticas o un anticongelante
permanente (etilenglicol) como lubricante para
clima frío.
PRECAUCIÓN:
No almacene las herramientas en un
entorno de clima frío para evitar que se
forme escarcha y o hielo en las válvulas y
mecanismos de funcionamiento de las
herramientas, ya que esto podría
inutilizarlas.
PRECAUCIÓN:
La compresora de aire debe ser capaz de
mantener un mínimo de 4,83 bar cuando la
herramienta esté en uso. Un suministro
inadecuado de aire puede causar el corte del
suministro de electricidad y un disparo
ineficaz.
CONEXIÓN RECOMENDADA
1.El compresor de aire debe ser capaz de
mantener un mínimo de 4,83 bar mientras la
herramienta está en uso. Un suministro
inadecuado de aire puede causar una pérdida
de potencia y un clavado desigual.
2.Se puede usar un lubricador para proporcionar
circulación de aceite en toda la herramienta. Se
puede usar un filtro para retirar las impurezas
líquidas y sólidas, las que pueden oxidar piezas
internas de la herramienta o hacer que éstas se
apelmacen.
! ADVERTENCIA:
No conecte a una compresora de aire que
pueda exceder los 13,79 bar. La
herramienta podría quemarse y causar
lesiones.
Conector
Acople rápido
Conector
rápido
24-Sp
Manguera de
aire comprimido rápido
SOLUCIÓN DE PROBLEMAS
! ADVERTENCIA:
Deje de utilizar inmediatamente la herramienta si se presenta alguno de los problemas
descritos a continuación, de lo contrario podrían ocurrir lesiones personales graves.
Cualquier reparación o reemplazo debe llevarse a cabo por un técnico calificado o un centro
de servicio autorizado.
PROBLEMA
CAUSA POSIBLE
ACCIONES CORRECTIVAS
Hay una filtración de
aire en la tapa.
1. Los tornillos están sueltos.
2. Hay juntas tóricas o sellos dañados o
desgastados.
1. Apriete los tornillos.
2. Instale el kit de repuesto.
Falta potencia.
El ciclo es lento.
1.La herramienta está muy seca.
2.La presión de aire es demasiado baja.
3.La salida de aire está bloqueada.
1.Añada 2 ó 3 gotas de lubricante en el
conector de aire.
2. Asegúrese de que la compresora de
aire este ajulstada entre los
4,83-7,93 bar.
3. Limpie la canaleta de la salida de aire.
La herramienta no
dispara los sujetadores.
1. El resorte del disparador está dañado.
2. No está usando sujetadores del
tamaño apropiado.
1.Cambie el resorte.
2.Use grapas de corona de 12,7mm (½") o
sujetadores 38,1mm (1-1/2") a 50,8mm
(2").
Los sujetadores se
1. La canaleta de disparo está desgastada. 1. Repare la canaleta de disparo.
atascan frecuentemente 2. El pistón está roto o desgastado.
2. Cambie el pistón.
en la herramienta.
3. Los sujetadores están torcidos.
3. Retire los sujetadores torcidos y
4. El cargador está sucio.
reemplácelos por grapas de corona de
5. El cargador está suelto.
12,7mm (1/2") o sujetadores de
6. Está utilizando los sujetadores
38,1mm (1-1/2") a 50,8mm (2").
incorrectos.
4. Limpie el cargador.
5. Apriete los tornillos.
6. Verifique que los sujetadores sean del
tamaño apropiado.
Lubricador Filtro
Acople
rápido
Compresor
Regulador
25-Sp