1
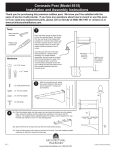
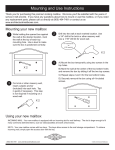
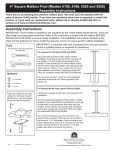
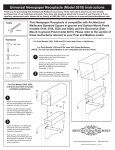
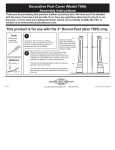
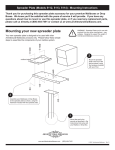
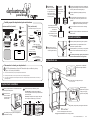
elephantrunk parcel drop 5 TM by R For hardscape: Remove any debris from the hole and insert the lag shield so it is flush with the surface. Screw the mounting bolt into the lag shield. For wood: Screw the mounting bolt directly into the surface. 7 With help, lift the elephantrunk over the installed bolt, aligning the bolt through the hole in the floor. DO NOT secure in place with the mounting knob yet. 8 Level the elephantrunk by adjusting the feet up and down. 9 Place the washer over the bolt and screw on the mounting knob. The knob only needs to be hand tightened. Over tightening with a tool may damage the floor and invalidate your warranty. Carefully unpack the elephantrunk, parts and hardware. Hardware and Parts (included) Tools (not included) x 1, washer Drill suitable for drilling into masonry or wood x 1, mounting bolt x 2, handle screws x 1, lag shield (for hardscape installation only) Hex wrench x 4, placard screws x 1, handle Use the hex portion at the center of the bolt to screw it into the hole. 10 Place the cushion onto the floor over the mounting knob. For both installations, screw it all the way so the hex portion is touching the surface. 11 Open the top door and attach the handle with the two handle screws. placard installation - or - x 4, leveling feet This address is equipped with an elephantrunk parcel drop Phillips head screwdriver TM location: www.architecturalmailboxes.com © Architectural Mailboxes, LLC, 2012. Rev I x 1, placard x 2, keys x 1, mounting knob 6 5/8” masonry drill bit (if installing on hardscape) Carefully screw the four leveling feet into the bottom of each leg about half way. x4 1/4” wood drill bit (if installing on wood deck/porch) x 1, cushion 1 Remove protective plastic coating from the placard. 2 Write the location of your elephantrunk onto the placard with a permanent marker. 3 Attach the placard to your front entry in a conspicuous location so the courier knows where to deliver your items. 4 To activate your warranty, register your product at: www.architecturalmailboxes.com/registration elephantrunk use x 1, outgoing partition Choose where to locate your elephantrunk Swing down the “No Deliveries” indicator to suspend deliveries. NOTE: The elephantrunk parcel drop is NOT intended to replace a mailbox. Its primary purpose is to receive parcel deliveries. The courier must be able to freely access your elephantrunk to make deliveries. Choose a protective location, such as on a porch or under an eave, and away from sprinklers. You can anchor your elephantrunk to a hardscaped or wooden surface. It will require drilling a hole into the surface, so make sure you pick the right location. Incoming drum can accept parcels up to 11.5” x 7.3” x 9.3”. elephantrunk installation 2 Place your elephantrunk at the desired location with the help of another person. 4 For hardscape (for example, stone walkway or concrete pad), drill a hole 2.5” deep at the mark with a 5/8” masonry bit. Open the bottom door and mark the ground through the hole in the floor. For wood (for example, deck or porch), drill a pilot hole 2” deep at the mark using a 1/4” wood bit. After marking the ground, place the elephantrunk aside before continuing. 2.5” for lag shield 5/8” hole 3 Slide the outgoing partition into the grooves to trap your outgoing parcel for future pickup. Drill a hole where you marked the ground: 1/4” hole 2.0” for wood 1 Retrieve your parcels by unlocking the bottom door. We’re all ears! Give us a call at (800) 464-7491 or email [email protected] with any questions. © 2012, Architectural Mailboxes, LLC Rev. A elephantrunk parcel drop 5 Para madera: Para superficies duras: Quita todos los residuos del orificio, e inserta el taquete expansivo para que se alinee con la superficie. Atornilla el tornillo de montaje dentro del taquete expansivo. TM by R Atornilla el tornillo de montaje directamente dentro de la superficie. 7 Con ayuda, levanta el elephantrunk sobre el tornillo instalado alineando el tornillo a través del orificio en el piso. NO lo fijes en el lugar con la manija de montaje aún. 8 Nivela el elephantrunk ajustando las patas hacia arriba y abajo. 9 Coloca la arandela sobre el tornillo y atornilla la manija de montaje. La manija solamente requiere apretarse con la mano. Si la aprietas demasiado con una herramienta puedes dañar el piso e invalidar tu garantía. Desempaca cuidadosamente las partes y el hardware del elephantrunk. Hardware y partes (incluidas) Herramientas (no incluidas) x 1, arandela x 1, tornillo de montaje x 1, taquete expansivo (si vas a instalar sobre superficies duras) taladro adecuado para taladrar concreto o madera 10 Coloque el cojín sobre el piso sobre la manija de montaje. Para ambas instalaciones, atornilla a fondo de manera que la porción hexagonal toque la superficie. x 2, tornillos para la agarradera x 4, tornillos para la placa 11 Abra la puerta superior y adjunte la agarradera con los dos tornillos de la agarradera. llave inglesa x 1, agarradera instalación de la placa -ox 4, patas para nivelar This address is equipped with an elephantrunk parcel drop TM © Architectural Mailboxes, LLC, 2012. desarmador de cruz x 1, manija de montaje location: www.architecturalmailboxes.com Usa la porción hexagonal en el centro del tornillo para atornillarlo en el orificio. Rev I x 1, placa 6 x 2, llaves broca para concreto de 5/8” (si vas a instalar sobre superficies duras) broca de 1/4” para madera (si vas a instalar sobre una cubierta/porche de madera) x 1, cojín Atornilla cuidadosamente las cuatro patas niveladoras dentro de cada pierna pata hasta a medio camino. x4 1 Quita la cubierta protectora de plástico de la placa. 2 Escribe la ubicación de tu elephantrunk sobre la placa con un marcador permanente. 3 Adjunta la placa a tu entrada delantera en una ubicación claramente visible para que el mensajero sepa dónde colocar tus artículos. 4 Para activar tu garantía, registra tu producto en: www.architecturalmailboxes.com/registration uso del elephantrunk x 1, partición saliente Elige dónde colocar tu elephantrunk Gira hacia abajo el indicador de “NO DELIVERIES” para suspender las entregas. NOTA: NO se pretende que el elephantrunk para recibir paquetes sustituya al buzón. Su objetivo principal es recibir entregas de paquetes. El servicio de entregas debe poder tener acceso libre a su elephantrunk para realizar sus entregas. Elige una ubicación protegida, tal como sobre un porche o bajo un alero, y lejos de aspersores. Puedes anclar tu elephantrunk a una superficie dura o de madera. Necesitará que perfores un orificio dentro de la superficie, así que asegúrate de elegir la ubicación correcta. El tambor de entradas puede aceptar paquetes de hasta 11.7” x 7.2” x 9.8” (aprox. 29.72 cms. x 18.29 cms. x 24.89 cms.) instalación del elephantrunk 2 Coloca tu elephantrunk en el lugar deseado, con la ayuda de alguien más. 4 Para superficies duras (por ejemplo, un pasillo de piedra, o un bloque de concreto), taladra un orificio de 2.5” (aprox 6.4 cms.) de profundidad en la marca con una broca de concreto de 5/8”. Abre la puerta inferior y marca el suelo a través del orificio en el piso. Para madera (por ejemplo una cubierta o un porche), taladra un orificio piloto de 2” (aprox 5.1 cms.) de profundidad en la marca, usando una broca de madera de 1/4”. Después que hayas marcado el suelo, haz a un lado el elephantrunk antes de continuar. 2.5” para el taquete expansivo orificio de 5/8” 3 Desliza la partición saliente dentro de los surcos para retener tu paquete saliente para la recolección posterior. Perfora un orificio donde marcaste el suelo: orificio de 1/4” 2.0” para madera 1 ¡Somos todo oídos! Recupera tus paquetes desbloqueando la puerta inferior. Llámanos al (800) 464-7491 o envíanos un correo electrónico a [email protected] con cualquier pregunta. © 2012, Architectural Mailboxes, LLC Rev. A