1
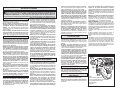
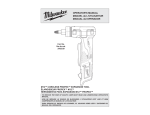
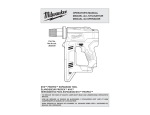
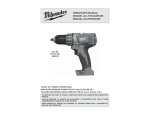
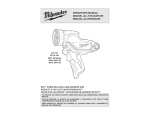
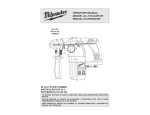
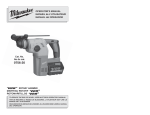
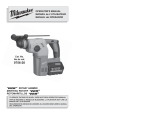
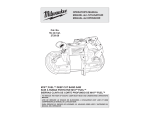
OPERATOR'S MANUAL
MANUEL de L'UTILISATEUR
MANUAL del OPERADOR
Cat. No.
No de cat.
2412-20
SDS
PLUS
M12™ CORDLESS 1/2" SDS PLUS ROTARY HAMMER
PERCEUSE À PERCUSSION SDS PLUS SANS FIL DE 13 mm (1/2") M12™
ROTOMARTILLO SDS PLUS M12™ INALÁMBRICO DE 13 mm (1/2")
TO REDUCE THE RISK OF INJURY, USER MUST READ AND UNDERSTAND OPERATOR'S
MANUAL.
AFIN DE RÉDUIRE LE RISQUE DE BLESSURES, L'UTILISATEUR DOIT LIRE ET BIEN
COMPRENDRE LE MANUEL DE L'UTILISATEUR.
PARA REDUCIR EL RIESGO DE LESIONES, EL USUARIO DEBE LEER Y ENTENDER EL
MANUAL DEL OPERADOR.
GENERAL POWER TOOL SAFETY WARNINGS
WARNING
READ ALL SAFETY WARNINGS AND INSTRUCTIONS.
Failure to follow the warnings and instructions may result in electric shock, fire and/or
serious injury. Save all warnings and instructions for future reference
The term "power tool" in the warnings refers to your mains-operated (corded) power tool or
battery-operated (cordless) power tool.
•Remove any adjusting key or wrench before
WORK AREA SAFETY
turning the power tool on. A wrench or a key left
•Keep work area clean and well lit. Cluttered or
attached to a rotating part of the power tool may
dark areas invite accidents.
result in personal injury.
•Do not operate power tools in explosive atmo- •Do not overreach. Keep proper footing and
spheres, such as in the presence of flammable
balance at all times. This enables better control
liquids, gases or dust. Power tools create sparks
of the power tool in unexpected situations.
which may ignite the dust or fumes.
•Dress properly. Do not wear loose clothing or
•Keep children and bystanders away while
jewellery. Keep your hair, clothing and gloves
operating a power tool. Distractions can cause
away from moving parts. Loose clothes, jewelyou to lose control.
lery or long hair can be caught in moving parts.
•If devices are provided for the connection of
ELECTRICAL SAFETY
dust extraction and collection facilities, ensure
•Power tool plugs must match the outlet. Never
these are connected and properly used. Use of
modify the plug in any way. Do not use any
dust collection can reduce dust-related hazards.
adapter plugs with earthed (grounded) power
tools. Unmodified plugs and matching outlets will
POWER TOOL USE AND CARE
reduce risk of electric shock.
•Do not force the power tool. Use the correct
•Avoid body contact with earthed or grounded
power tool for your application. The correct
surfaces such as pipes, radiators, ranges and
power tool will do the job better and safer at the
refrigerators. There is an increased risk of electric
rate for which it was designed.
shock if your body is earthed or grounded.
•Do not use the power tool if the switch does not
•Do not expose power tools to rain or wet conditurn it on and off. Any power tool that cannot be
tions. Water entering a power tool will increase
controlled with the switch is dangerous and must
the risk of electric shock.
be repaired.
•Do not abuse the cord. Never use the cord for •Disconnect the plug from the power source
carrying, pulling or unplugging the power tool.
and/or the battery pack from the power tool
Keep cord away from heat, oil, sharp edges
before making any adjustments, changing
or moving parts. Damaged or entangled cords
accessories, or storing power tools. Such
increase the risk of electric shock.
preventive safety measures reduce the risk of
•When operating a power tool outdoors, use an
starting the power tool accidentally.
extension cord suitable for outdoor use. Use •Store idle power tools out of the reach of chilof a cord suitable for outdoor use reduces the risk
dren and do not allow persons unfamiliar with
of electric shock.
the power tool or these instructions to operate
•If operating a power tool in a damp location
the power tool. Power tools are dangerous in the
is unavoidable, use a residual current device
hands of untrained users.
(RCD) protected supply. Use of an RCD reduces •Maintain power tools. Check for misalignment
the risk of electric shock.
or binding of moving parts, breakage of parts
and any other condition that may affect the
PERSONAL SAFETY
power tool’s operation. If damaged, have the
•Stay alert, watch what you are doing and use
power tool repaired before use. Many accidents
common sense when operating a power tool. Do
are caused by poorly maintained power tools.
not use a power tool while you are tired or under
the influence of drugs, alcohol or medication. A •Keep cutting tools sharp and clean. Properly
maintained cutting tools with sharp cutting edges
moment of inattention while operating power tools
are less likely to bind and are easier to control.
may result in serious personal injury.
•Use personal protective equipment. Always •Use the power tool, accessories and tool bits
etc., in accordance with these instructions,
wear eye protection. Protective equipment such
taking into account the working conditions and
as dust mask, non-skid safety shoes, hard hat, or
the work to be performed. Use of the power tool
hearing protection used for appropriate conditions
for operations different from those intended could
will reduce personal injuries.
result in a hazardous situation.
•Prevent unintentional starting. Ensure the
switch is in the off-position before connecting
BATTERY TOOL USE AND CARE
to power source and/or battery pack, picking •Recharge only with the charger specified by
up or carrying the tool. Carrying power tools with
the manufacturer. A charger that is suitable for
your finger on the switch or energising power tools
one type of battery pack may create a risk of fire
that have the switch on invites accidents.
when used with another battery pack.
2
3
•Use power tools only with specifically designated battery packs. Use of any other battery
packs may create a risk of injury and fire.
•When battery pack is not in use, keep it away
from other metal objects like paper clips,
coins, keys, nails, screws, or other small metal
objects that can make a connection from one
terminal to another. Shorting the battery terminals together may cause burns or a fire.
•Under abusive conditions, liquid may be ejected
from the battery, avoid contact. If contact accidentally occurs, flush with water. If liquid contacts eyes, additionally seek medical help. Liquid
ejected from the battery may cause irritation or burns.
SYMBOLOGY
Direct Current
Underwriters Laboratories, Inc.
United States and Canada
No Load Revolutions per
Minute (RPM)
BPM
SERVICE
Blows per Minute (BPM)
ASSEMBLY
OPERATION
WARNING Recharge only with the
charger specified for the battery. For specific
charging instructions, read the operator’s
manual supplied with your charger and battery.
WARNING Always remove battery
pack before changing or removing accessories. Only use accessories specifically
recommended for this tool. Others may be
hazardous.
WARNING Always remove battery
pack before changing or removing accessories. Only use accessories specifically
recommended for this tool. Others may be
hazardous.
WARNING To reduce the risk of injury,
keep hands away from the bit and all moving
parts. Always wear safety goggles or glasses
with side shields.
Inserting/Removing the Battery
To remove the battery, push in the release buttons
and pull the battery pack away from the tool.
To insert the battery, slide the pack into the body
of the tool. Make sure it latches securely into place.
•Have your power tool serviced by a qualified
repair person using only identical replacement
parts. This will ensure that the safety of the power
tool is maintained.
SPECIFIC SAFETY RULES
FUNCTIONAL DESCRIPTION
•Wear ear protectors. Exposure to noise can
cause hearing loss.
•Use auxiliary handle(s), if supplied with the
tool. Loss of control can cause personal injury.
•Hold power tools by insulated gripping surfaces, when performing an operation where
the cutting tool may contact hidden wiring.
Cutting accessory contacting a “live” wire may
make exposed metal parts of the power tool “live”
and could give the operator an electric shock.
•Maintain labels and nameplates. These carry
important information. If unreadable or missing,
contact a MILWAUKEE service facility for a free
replacement.
•WARNING Some dust created by power sanding,
sawing, grinding, drilling, and other construction
activities contains chemicals known to cause
cancer, birth defects or other reproductive harm.
Some examples of these chemicals are:
• lead from lead-based paint
• crystalline silica from bricks and cement and other
masonry products, and
•arsenic and chromium from chemically-treated
lumber.
Your risk from these exposures varies, depending
on how often you do this type of work. To reduce
your exposure to these chemicals: work in a well
ventilated area, and work with approved safety
equipment, such as those dust masks that are specially designed to filter out microscopic particles.
2
4
3
5
1
6
1. LED
2. SDS Plus bit holder
3. Release collar
4. Mode selector
5. Control switch
6. Trigger
Fuel Gauge
To determine the amount of charge left in the battery, pull the trigger. The Fuel Gauge will light up
for 2-3 seconds.
To signal the end of charge, 1 light on the fuel
gauge will flash for 2-3 seconds.
Installing Bits
NOTE: Only use accessories with SDS or SDS
Plus shanks.
Be sure that the shank of the bit is clean. Dirt particles may cause the bit to line up improperly. Do not
use bits larger than the maximum recommended
capacity of the drill because gear damage or motor overloading may result. For best performance,
be sure that the bit is properly sharpened and the
shank is lightly greased before use.
1. Insert the bit into the nose of the tool.
2. Rotate bit slowly until it aligns with the locking
mechanism.
3. Push bit into tool until it locks.
4. Check that the bit is locked properly; it should
be possible to pull the bit back and forth slightly
(about 1/4”).
5. To remove bits, pull bit holder release collar
toward the rear of tool and remove bit.
NOTE: Use caution when handling hot bits.
Selecting Action
Always allow the motor to come to a complete stop
before changing the mode selection to avoid damage to the tool.
1. For drilling, turn the mode
selector so the arrow points
to the twist drill symbol.
2. For rotary hammering, turn the
mode selector so the arrow
points to the hammer and twist
drill symbol.
NOTE: To engage the hammering mechanism,
maintain pressure on the bit. When pressure on
the bit is released, the hammering action will stop.
Using the Control Switch
The control switch may be set to three positions:
forward, reverse and lock. Always allow the motor
to come to a complete stop before using the control
switch to avoid damage to the tool.
For forward (clockwise) rotation, push in the control
switch from the right side of the tool. Check the
direction of rotation before use.
For reverse (counterclockwise) rotation, push in the
control switch from the left side of the tool. Check
direction of rotation before use.
To lock the trigger, push the control switch to the
center position. The trigger will not work while the
control switch is in the center locked position. Always
lock the trigger or remove the battery pack before
performing maintenance, changing accessories,
storing the tool and any time the tool is not in use.
SPECIFICATIONS
Cat. No.
2412-20
Volts DC
12
No Load
RPM
0-800
No Load
Blows per
Minute
0-5350
Drill Only
Steel
Wood
3/8"
1/2"
4
Capacities
Rotary Hammer (concrete)
Carbide Tipped Percussion Bit
1/2"
5
Starting, Stopping and Controlling Speed
1. To start the tool, grasp the handle firmly and pull
the trigger.
NOTE: An LED is turned on when the trigger is
pulled.
2. To vary the speed, increase or decrease the
pressure on the trigger. The further the trigger
is pulled, the greater the speed.
3. To stop the tool, release the trigger. Make sure
the tool comes to a complete stop before laying
the tool down.
LIMITED WARRANTY - USA AND CANADA
MAINTENANCE
WARNING To reduce the risk of injury,
always unplug the charger and remove the
battery pack from the charger or tool before
performing any maintenance. Never disassemble the tool, battery pack or charger.
Contact a MILWAUKEE service facility for
ALL repairs.
Maintaining Tool
Keep your tool, battery pack and charger in good
repair by adopting a regular maintenance program.
After six months to one year, depending on use,
return the tool, battery pack and charger to A
MILWAUKEE service facility for:
• Lubrication
• Mechanical inspection and cleaning (gears,
spindles, bearings, housing, etc.)
• Electrical inspection (battery pack, charger,
motor)
• Testing to assure proper mechanical and electrical
operation
If the tool does not start or operate at full power
with a fully charged battery pack, clean the contacts
on the battery pack. If the tool still does not work
properly, return the tool, charger and battery pack,
to a MILWAUKEE service facility for repairs.
Operating
Position the tool, grasp the handle firmly and pull
the trigger. Always hold the tool securely to maintain
control. This tool has been designed to achieve top
performance with only moderate pressure. Let the
tool do the work.
If the speed begins to drop off when drilling large
or deep holes, pull the bit partially out of the hole
while the tool is running to help clear dust. Do not
use water to settle the dust since it will clog the bit
flutes and tend to make the bit bind in the hole. If
the bit should bind, stop the tool, free the bit and
begin again.
APPLICATIONS
Selecting Bits
When selecting a bit, use the right type for your job.
For best performance, always use sharp bits.
WARNING To reduce the risk of personal injury and damage, never immerse your
tool, battery pack or charger in liquid or allow
a liquid to flow inside them.
Drilling
1. Before drilling, be sure the workpiece is clamped
securely. Use backing material to prevent damage to the workpiece during breakthrough.
2. When starting a hole, place the drill bit on the
work surface and apply firm pressure. Begin
drilling at a slow speed, gradually increasing the
speed as you drill.
3. Always apply pressure in line with the bit. Use
enough pressure to keep the drill biting, but do
not push hard enough to stall the motor.
4. Reduce pressure and ease the bit through the
last part of the hole. While the tool is still running,
pull the bit out of the hole to prevent jamming.
Cleaning
Clean dust and debris from charger and tool vents.
Keep tool handles clean, dry and free of oil or
grease. Use only mild soap and a damp cloth to
clean the tool, battery pack and charger since certain
cleaning agents and solvents are harmful to plastics
and other insulated parts. Some of these include
gasoline, turpentine, lacquer thinner, paint thinner,
chlorinated cleaning solvents, ammonia and household detergents containing ammonia. Never use
flammable or combustible solvents around tools.
Repairs
For repairs, return the tool, battery pack and charger to the nearest service center.
Drilling in Wood, Composition Materials and
Plastic
(Use chuck adapter kit Cat. No. 48-66-1370)
When drilling in wood, composition materials and
plastic, start the drill slowly, gradually increasing
speed as you drill. When drilling into wood, use
wood augers or twist drill bits. Always use sharp
bits. When using twist drill bits, pull the bit out of the
hole frequently to clear chips from the bit flutes. To
reduce the chance of splintering, back work with a
piece of scrap wood. Use low speeds for plastics
with a low melting point.
ACCESSORIES
WARNING Always remove battery pack
before changing or removing accessories.
Only use accessories specifically recommended for this tool. Others may be hazardous.
For a complete listing of accessories refer to your
MILWAUKEE Electric Tool catalog or go online
to www.milwaukeetool.com. To obtain a catalog,
contact your local distributor or service center.
Side Handle Assembly (optional)
Cat. No. 14-46-1450
6
Every MILWAUKEE power tool (including cordless product – tool, battery pack(s) - see separate & distinct CORDLESS BATTERY
PACK LIMITED WARRANTY statements & battery charger and Work Lights*) is warranted to the original purchaser only to
be free from defects in material and workmanship. Subject to certain exceptions, MILWAUKEE will repair or replace any part
on an electric power tool which, after examination, is determined by MILWAUKEE to be defective in material or workmanship
for a period of five (5) years* after the date of purchase unless otherwise noted. Return of the power tool to a MILWAUKEE
factory Service Center location or MILWAUKEE Authorized Service Station, freight prepaid and insured, is required. A copy of
the proof of purchase should be included with the return product. This warranty does not apply to damage that MILWAUKEE
determines to be from repairs made or attempted by anyone other than MILWAUKEE authorized personnel, misuse, alterations,
abuse, normal wear and tear, lack of maintenance, or accidents.
*The warranty period for, Job Site Radios, M12™ Power Port and Trade Titan™ Industrial Work Carts is one (1) year from the
date of purchase. The warranty period for a LED Work Light and LED Upgrade Bulb is a limited LIFETIME warranty to the original
purchaser only, if during normal use the LED bulb fails the Work Light or Upgrade Bulb will be replaced free of charge.
*This warranty does not cover Air Nailers & Stapler, Airless Paint Sprayer, Cordless Battery Packs, Gasoline Driven Portable
Power Generators, Hand Tools, Hoist – Electric, Lever & Hand Chain, M12™ Heated Jackets, Reconditioned product and Test
& Measurement products. There are separate and distinct warranties available for these products.
Warranty Registration is not necessary to obtain the applicable warranty on a MILWAUKEE power tool product. The manufacturing date of the product will be used to determine the warranty period if no proof of purchase is provided at the time
warranty service is requested.
ACCEPTANCE OF THE EXCLUSIVE REPAIR AND REPLACEMENT REMEDIES DESCRIBED HEREIN IS A CONDITION OF
THE CONTRACT FOR THE PURCHASE OF EVERY MILWAUKEE PRODUCT. IF YOU DO NOT AGREE TO THIS CONDITION,
YOU SHOULD NOT PURCHASE THE PRODUCT. IN NO EVENT SHALL MILWAUKEE BE LIABLE FOR ANY INCIDENTAL,
SPECIAL, CONSEQUENTIAL OR PUNITIVE DAMAGES, OR FOR ANY COSTS, ATTORNEY FEES, EXPENSES, LOSSES
OR DELAYS ALLEGED TO BE AS A CONSEQUENCE OF ANY DAMAGE TO, FAILURE OF, OR DEFECT IN ANY PRODUCT
INCLUDING, BUT NOT LIMITED TO, ANY CLAIMS FOR LOSS OF PROFITS. SOME STATES DO NOT ALLOW THE EXCLUSION OR LIMITATION OF INCIDENTAL OR CONSEQUENTIAL DAMAGES, SO THE ABOVE LIMITATION OR EXCLUSION
MAY NOT APPLY TO YOU. THIS WARRANTY IS EXCLUSIVE AND IN LIEU OF ALL OTHER EXPRESS WARRANTIES,
WRITTEN OR ORAL. TO THE EXTENT PERMITTED BY LAW, MILWAUKEE DISCLAIMS ANY IMPLIED WARRANTIES,
INCLUDING WITHOUT LIMITATION ANY IMPLIED WARRANTY OF MERCHANTABILITY OR FITNESS FOR A PARTICULAR
USE OR PURPOSE; TO THE EXTENT SUCH DISCLAIMER IS NOT PERMITTED BY LAW, SUCH IMPLIED WARRANTIES
ARE LIMITED TO THE DURATION OF THE APPLICABLE EXPRESS WARRANTY AS DESCRIBED ABOVE. SOME STATES
DO NOT ALLOW LIMITATIONS ON HOW LONG AN IMPLIED WARRANTY LASTS, SO THE ABOVE LIMITATION MAY NOT
APPLY TO YOU, THIS WARRANTY GIVES YOU SPECIFIC LEGAL RIGHTS, AND YOU MAY ALSO HAVE OTHER RIGHTS
WHICH VARY FROM STATE TO STATE.
This warranty applies to product sold in the U.S.A. and Canada only.
Please consult the ‘Service Center Search’ in the Parts & Service section of MILWAUKEE’s website www.milwaukeetool.com
or call 1.800.SAWDUST (1.800.729.3878) to locate your nearest MILWAUKEE factory Service Center location.
LIMITED WARRANTY - MEXICO, CENTRAL AMERICA AND CARIBBEAN
TECHTRONIC INDUSTRIES' warranty is for 5 year since the original purchase date.
This warranty card covers any defect in material and workmanship on this Power Tool.
To make this warranty valid, present this warranty card, sealed/stamped by the distributor or store where you purchased the
product, to the Authorized Service Center (ASC). Or, if this card has not been sealed/stamped, present the original proof of
purchase to the ASC.
Call toll-free 1 800 832 1949 to find the nearest ASC, for service, parts, accessories or components.
Procedure to make this warranty valid
Take the product to the ASC, along with the warranty card sealed/stamped by the distributor or store where you purchased the
product, and there any faulty piece or component will be replaced without cost for you. We will cover all freight costs relative
with this warranty process.
Exceptions
This warranty is not valid in the following situations:
a) When the product is used in a different manners from the end-user guide or instruction manual.
b) When the conditions of use are not normal.
c) When the product was modified or repaired by people not authorized by TECHTRONIC INDUSTRIES.
Note: If cord set is damaged, it should be replaced by an Authorized Service Center to avoid electric risks.
Model:
Date of Purchase:
Distributor or Store Stamp:
SERVICE AND ATTENTION CENTER
Rafael Buelna No.1.
Col. Tezozomoc Mexico, Azcapotzalco D.F.
Ph. 01 800 832 1949
IMPORTED AND COMMERCIALIZED BY:
TECHTRONIC INDUSTRIES MEXICO, .S.A. DE C.V.
Av. Santa Fe 481 piso 6, Col. Curz Manca.
CP 05349, Cuajimalpa, D.F.
7
RÈGLES DE SÉCURITÉ GÉNÉRALES RELATIVES AUX
OUTILS ÉLECTRIQUES
AVERTISSEMENT LIRE TOUTES LES RÈGLES ET INSTRUCTIONS DE SÉCURITÉ.
Ne pas suivre l’ensemble des règles et instructions peut entraîner une électrocution, un
incendie ou des blessures graves. Conserver les règles et les instructions à des fins
de référence ultérieure. Le terme «outil électrique» figurant dans les avertissements cidessous renvoie à l’outil électrique à alimentation par le réseau (à cordon) ou par batterie (sans fil).
•Porter l’équipement de protection requis.
SÉCURITÉ DU LIEU DE TRAVAIL
Toujours porter une protection oculaire.
•Maintenir la zone de travail propre et bien
Selon les conditions, porter aussi un masque antiéclairée. Les zones encombrées ou mal éclairées
poussières, des bottes de sécurité antidérapantes,
sont favorables aux accidents.
un casque protecteur ou une protection auditive
•Ne pas utiliser d’outil électrique dans une atafin de réduire les blessures.
mosphère explosive, telle qu’en en présence •Empêcher les démarrages accidentels.
de liquides, de gaz ou de poussières inflamS’assurer que la gâchette est en position
mables. Les outils électriques génèrent des
d’arrêt avant de brancher l’outil à une source
étincelles qui peuvent enflammer les poussières
de courant, d’insérer la batterie, de le ramasser
ou les fumées.
ou de le transporter. Le fait de transporter
•Tenir les enfants et les personnes non autorisées
l’outil en gardant le doigt sur la gâchette ou de le
à l’écart pendant le fonctionnement d’un outil
brancher lorsque la gâchette est en position de
électrique. Un manque d’attention de l’opérateur
marche favorise les accidents.
risque de lui faire perdre le contrôle de l’outil. •Retirer toute clé de réglage avant de mettre
l’outil sous tension. Une clé laissée attachée sur
SÉCURITÉ ÉLECTRIQUE
une pièce mobile de l’outil électrique peut entraîner
•La fiche de l’outil électrique doit correspondre
des blessures.
à la prise d’alimentation. Ne jamais modifier la
fiche d’une manière quelconque. Ne pas utilis- •Ne pas travailler à bout de bras. Bien garder
un bon équilibre à tout instant. Ceci permet de
er d’adaptateur avec les outils électriques mis
mieux préserver la maîtrise de l’outil électrique
à la terre (à la masse). Des fiches non modifiées
dans des situations imprévues.
et des prises d’alimentation assorties réduisent le
•Porter des vêtements adéquats. Ne pas porter
risque de choc électrique.
de vêtements amples ni de bijoux. Ne pas ap•Éviter tout contact corporel avec des surfaces
procher les cheveux, vêtements et gants des
reliées à la masse ou à la terre telles que tuypièces en mouvement. Les vêtements amples,
aux, radiateurs, cuisinières et réfrigérateurs.
les bijoux ou les cheveux longs risquent d’être
Un risque de choc électrique plus élevé existe si
happés par les pièces en mouvement.
le corps est relié à la masse ou à la terre.
•Ne pas exposer les outils électriques à la pluie •Si des dispositifs sont prévus pour l’extraction
et la récupération des poussières, vérifier
ou à l’humidité. Le risque de choc électrique augqu’ils sont connectés et utilisés correctement.
mente si de l’eau s’infiltre dans un outil électrique.
L’utilisation de ces dispositifs peut réduire les
•Prendre soin du cordon. Ne jamais utiliser le
risques liés aux poussières.
cordon pour transporter, tirer ou débrancher
l’outil électrique. Tenir le cordon à l’écart de la
UTILISATION ET ENTRETIEN
chaleur, des huiles, des arêtes coupantes ou
DE L’OUTIL ÉLECTRIQUE
des pièces en mouvement. Un cordon endom- •Ne pas forcer l’outil électrique. Utiliser l’outil
magé ou emmêlé présente un risque accru de
électrique approprié à l’application considérée.
choc électrique.
L’outil électrique adapté au projet considéré produ•Se procurer un cordon d’alimentation approira de meilleurs résultats, dans des conditions de
prié en cas d’utilisation d’un outil électrique à
sécurité meilleures, à la vitesse pour laquelle il a
l’extérieur. L’utilisation d’un cordon d’alimentation
été conçu.
pour usage extérieur réduit le risque de choc •Ne pas utiliser l’outil électrique si le commutaélectrique.
teur ne le met pas sous ou hors tension. Tout
•S’il est nécessaire d’utiliser l’outil électrique
outil électrique dont le commutateur de marchedans un endroit humide, installer un appareil
arrêt est inopérant est dangereux et doit être
à courant résiduel (RCD). L’utilisation d’un RCD
réparé.
réduit le risque de décharge électrique.
•Débrancher la fiche de la prise d’alimentation
et/ou la batterie de l’outil électrique avant
SÉCURITÉ INDIVIDUELLE
d’effectuer des réglages, de changer
•Être sur ses gardes, être attentif et faire preuve
d’accessoires ou de ranger l’outil. De telles
de bon sens en utilisant un outil électrique. Ne
mesures de sécurité préventive réduisent le risque
pas utiliser un outil électrique en cas de fatigue
de mettre l’outil en marche accidentellement.
ou sous l’influence de drogues, d’alcool ou
de médicaments. Un instant d’inattention lors •Ranger les outils électriques inutilisés hors
de la portée des enfants et ne pas laisser des
de l’utilisation d’un outil électrique peut entraîner
personnes qui connaissent mal les outils élecdes blessures graves.
8
triques ou ces instructions utiliser ces outils.
Les outils électriques sont dangereux dans les
mains d’utilisateurs non formés à leur usage.
•Entretien des outils électriques. S’assurer de
l’absence de tout désalignement ou de grippage des pièces mobiles, de toute rupture de
pièce ou de toute autre condition qui pourrait affecter le bon fonctionnement de l’outil
électrique. En cas de dommages, faire réparer
l’outil avant de l’utiliser de nouveau. Les outils
électriques mal entretenus sont à la source de
nombreux accidents.
•Garder les outils de coupe affûtés et propres.
Les outils de coupe correctement entretenus et
bien affûtés risquent moins de se gripper et sont
plus faciles à manier.
•Utiliser l’outil électrique, les accessoires, les
grains etc. conformément à ces instructions
en tenant compte des conditions de travail
et de la tâche à effectuer. L’utilisation de cet
outil électrique pour effectuer une opération pour
laquelle il n’est pas conçu peut occasionner une
situation dangereuse.
•Tenir l’outil électrique par les surfaces de prise
isolées si, au cours des travaux, l’outil de
coupe risque d’entrer en contact avec des fils
cachés.Le contact avec un fil sous tension met
les parties métalliques exposées de l’outil sous
tension, ce qui inflige une secousse électrique à
l’opérateur.
•Maintenir en l’état les étiquettes et les plaques
d’identification. Des informations importantes y
figurent. Si elles sont illisibles ou manquantes,
contacter un centre de services et d’entretien
MILWAUKEE pour un remplacement gratuit.
•AVERTISSEMENT Certaines poussières générées par les activités de ponçage, de coupe,
de rectification, de perçage et d’autres activités de
construction contiennent des substances considérées être la cause de malformations congénitales
et de troubles de l’appareil reproducteur. Parmi ces
substances figurent:
•le plomb contenu dans les peintures à base de
plomb
•la silice cristalline des briques, du ciment et
d’autres matériaux de maçonnerie, ainsi que
•l’arsenic et le chrome des sciages traités chimiquement.
Les risques encourus par l’opérateur envers ces
expositions varient en fonction de la fréquence
de ce type de travail. Pour réduire l’exposition
à ces substances chimiques, l’opérateur doit :
travailler dans une zone bien ventilée et porter
l’équipement de sécurité approprié, tel qu’un
masque anti-poussière spécialement conçu pour
filtrer les particules microscopiques.
UTILISATION ET ENTRETIEN
DE LA BATTERIE
•Ne recharger la batterie qu’avec le chargeur
spécifié par le fabricant. Un chargeur qui convient à un type de batterie peut créer un risque
d’incendie s’il est utilisé avec un autre type de
batterie.
•N’utiliser les outils électriques qu’avec les
batteries spécialement conçues pour eux.
L’utilisation de batteries d’autres marques peut
créer un risque de blessure et d’incendie.
•Lorsque la batterie est hors service, la ranger
à l’écart d’autres objets métalliques tels que
trombones, pièces de monnaie, clés, clous, vis
et autres petits objets métalliques qui peuvent
établir une connexion d’une borne à l’autre.
Un court-circuit aux bornes de la batterie peut
provoquer des brûlures ou un incendie.
•Du liquide peut être éjecté de la batterie en cas
de manutention abusive ; éviter tout contact.
En cas de contact accidentel avec les projections, rincer à l’eau. En cas de contact avec
les yeux, consulter un médecin. Le liquide
s’échappant de la batterie peut provoquer des
irritations ou des brûlures.
DESCRIPTION FONCTIONNELLE
2
ENTRETIEN
3
4
1
•Faire effectuer l’entretien de l’outil électrique
par un technicien qualifié qui n’utilisera que
des pièces de rechange identiques. La sécurité
d’utilisation de l’outil en sera préservée.
5
6
RÈGLES DE SÉCURITÉ
SPÉCIFIQUES
1. DEL
2. Porte-embout SDS Plus
3. Levier de dégagement du porte-forte
4. Levier sélecteur de mode
5. Commutateur
6. Détente
•Porter des protège-oreilles. Une exposition au
bruit peut provoquer une perte auditive.
•Utiliser les poignées auxiliaires fournies avec
l’outil. Une perte de contrôle peut provoquer des
blessures.
9
SPÉCIFICATIONS
No de Volts Tr/min. à
Cat.
cd
vide
2412-20
12
0-800
Capacités
Rotation seul.
Marteau rotatif (béton)
Acier
Bois
Forets-percussion carburés
10 mm (3/8") 13 mm (1/2")
13 mm (1/2")
Coups/
Min.
à Vide
0-5350
PICTOGRAPHIE
Tension CD seul.
Cycles par minute à vide (RPM)
BPM
Underwriters Laboratories, Inc.,
États-Unis et Canada
T-min. Charge/vide
MONTAGE DE L’OUTIL
MANIEMENT
AVERTISSEMENT Ne recharger la
batterie qu’avec le chargeur spécifié. Pour
les instructions de charge spécifiques, lire le
manuel d’utilisation fourni avec le chargeur
et les batteries.
AVERTISSEMENT Il faut toujours
retirer la batterie et verrouiller la détente de
l’outil avant de changer ou d’enlever les accessoires. L’emploi d’accessoires autres que
ceux qui sont expressément recommandés
pour cet outil peut comporter des risques.
AVERTISSEMENT
Il faut toujours
retirer la batterie et verrouiller la détente de
l’outil avant de changer ou d’enlever les accessoires. L’emploi d’accessoires autres que
ceux qui sont expressément recommandés
pour cet outil peut comporter des risques.
AVERTISSEMENT Pour réduire
le risque de blessures, garder les mains à
l’écart de le forets et des autres pièces en
mouvement. Toujours porter des lunettes à
coques ou des lunettes de protection avec
écrans latéraux.
Insertion/Retrait de la batterie
Pour retirer la batterie, enfoncer les boutons de
déverrouillage et la tirer hors de l’outil.
Pour insérer la batterie, la glisser dans le corps
de l’outil. S’assurer qu’elle est fixée solidement.
Indicateur de charge de la batterie
Pour déterminer l’autonomie de la batterie, appuyer
sur la gâchette.
Pour signaler la fin de la charge, l’indicateur de
charge de la batterie met à feu une lumière pendant
deux à trois secondes.
Insertion des forets
N.B. N’utiliser que des outils pourvus d’une tige
SDS ou SDS Plus.
Assurez-vous que la tige du foret et les mâchoires
du mandrin sont propres pour éviter que des
saletés ne nuisent au parfait alignement du foret.
Pour éviter d’endommager les engrenages et de
provoquer la surchauffe du moteur, n’employez pas
de forets d’un calibre supérieur aux dimensions
maximales recommandées pour cet outil. Pour
obtenir un redement maximal,assurez-vous que le
foret est correctement aiguisé et que sa qeue est
légèrement graisseé avant qu’il soit utilisé.
1. Introduisez le foret ou le ciseau dans la bec de
l’outil.
2. Tournez la pièce lentement jusqu’à ce qu’elle
s’aligne sur le mécanisme d’enclechement.
3. Poussez la pièce dans l’outil pour qu’ell
s’enclenche.
4. Verifiez que le foret correctement verrouillé; il
doit pouvoir être déplacé légèrement (environ
6 mm (1/4")).
5. Pour retire le foret, tirez le collier de dégagement
du porte-foret, du foret lui-même, en le déplaçant
vers l’arrière de l’outil et enlevez la pièce.
N.B. Soyez prudent lorsque vous maniez des
forets brûlants.
Choix du mode de forage
Toujours laisser le moteur s’arrêter complètement
avant d’utiliser le levier sélecteur.
1. Pour le perçage, appuyez sur
le bouton et tournez le levier
sélecteur pour que la flèche
sur le levier pointe vers le
symbole de foret hélicoïdal .
2. Pour une percussion rotative,
appuyez sur le bouton et
tournez le levier sélecteur pour
que la flèche pointe vers le symbole de marteau
et de foret hélicoïdal .
N.B.: Pour engager le mécanisme de percussion,
maintenez la pression sur le foret. Lorsque la pression sur le foret est relâchée, la percussion s’arrête.
10
Utilisation du commutateur
Le commutateur peut être réglé sur trois positions: marche avant, marche arrière et verrouillée.
Toujours laisser le moteur s’arrêter complètement
avant d’utiliser le commutateur.
Pour une rotation en marche avant (dans le sens
horaire), pousser le commutateur sur le côté droit
de l’outil. Vérifier la direction de rotation avant
utilisation.
Pour une rotation en marche arrière (dans le sens
anti-horaire), pousser le commutateur du côté
gauche de l’outil. Vérifier la direction de rotation
avant utilisation.
Pour verrouiller la détente, pousser le commutateur vers la position centrale. La détente ne
fonctionne pas tant que le commutateur est sur la
position verrouillée centrale. Toujours verrouiller
la détente ou retirer la batterie avant d’effectuer
un entretien, de changer d’accessoire, de remiser
l’outil et toutes les fois que l’outil est inutilisé.
APPLICATIONS
Choix des mèches
Lorsque vous choisissez une mèche, employez la
mèche appropriée pour le travail à exécuter. Pour
un meilleur forage, n'employez que des mèches
bien affûtées.
Perçage
1. Avant de driller, assurez-vous que le matériau
est fixé solidement. Appuyez-le sur une pièce
rigide pour éviter de l’endommager en passant
au travers.
2. Pour commencer à percer un trou, placez le foret
sur la surface à travailler et appuyez fermement
sur l’outil. Commencez à driller lentement pour
ensuite augmenter la vitesse de perçage.
3. Appliquez toujours la pression en droite ligne
avec le foret. Appuyez assez fermement pour
qu’il morde dans la pièce sans toutefois causer
l’arrêt du moteur.
4. Réduisez la pression et relâchez la rotation en
arrivant à la phase finale du perçage. Pour éviter
le blocage, retirez le foret du trou tandis que
l’outil tourne encore.
Marche, arrêt et contrôle de la vitesse
1. Pour mettre l’outil en marche, saisir fermement
la poignée et tirer sur la détente.
NOTE : Une DEL s’allume lorsque la gâchette
est tirée.
2. Pour faire varier la vitesse, augmenter ou réduire
la pression sur la détente. La vitesse augmente
en fonction de la pression exercée sur la détente.
3. Pour arrêter l’outil, relâcher la détente. S’assurer
que la mèche s’arrête complètement avant de
poser l’outil.
Perçage dans le bois, les agglomérés et le
plastique
(avec No de cat. 48-66-1370)
Lorsque vous percez dans le bois, les agglomérés
et le plastique, commencez à driller lentement pour
augmenter graduellement la vitesse. Lorsque vous
drillez dans le bois, servez-vous d’une mèche
à bois ou d’un foret hélicoïdal. N'employez que
des pièces bien aiguisées. Si vous employez une
mèche hélicoïdale, sortez fréquemment la mèche
du trou pour en débarrasser les cannelures des
rognures. Pour minimiser les risques d'écaillage,
appuyez le matériau sur un morceau de bois de
rebut. Drillez à basse vitesse dans les plastiques
dont le point de fusion est peu élevé.
Maniement
Placez l’outil et empoignez-le solidement puis appuyez sur la détente. N’exercez que la pression
nécessaire à maintenir l’outil en place et empêcher
la pointe du foret de “patiner” sur la surface. Cet
outil a été conçu de façon à fournir le meilleur
rendement à pression modérée.
Si, au cours du perçage d’un trou profond, la vitesse
de rotation commence à diminuer, retirez partiellement le foret pendant qu’il tourne pour que les
débris de forage soient éjectés. N’utilisez pas d’eau
pour abattre la poussière pour éviter de bloquer les
cannelures du foret et d’en occasionner le grippage.
S’il arrive que le foret reste coincé, l’outil arrêtera
automatiquement la rotation du foret. En tel cas,
relâchez la détente, dégagez le foret et recommencez à percer.
11
ENTRETIEN
ACCESOIRES
AVERTISSEMENT Pour minimiser
les risques de blessures corporelles, débranchez le chargeur et retirez la batterie
du chargeur ou de l’outil avant d’y effectuer
des travaux d’entretien. Ne démontez jamais
l’outil, la batterie ou le chargeur. Pour toute
réparation, consultez un centre de service
MILWAUKEE accrédité.
AVERTISSEMENT Retirez toujours
la batterie avant de changer ou d’enlever les
accessoires. L’utilisation d’autres accessoires que ceux qui sont spécifiquement
recommandés pour cet outil peut comporter
des risques.
Pour une liste complète des accessoires, prière de
se reporter au catalogue MILWAUKEE Electric Tool
ou visiter le site internet www.milwaukeetool.com.
Pour obtenir un catalogue, il suffit de contacter votre
distributeur local ou l'un des centres-service.
Entretien de l’outil
Gardez l’outil, la batterie et le chargeur en bon état
en adoptant un programme d’entretien ponctuel.
Après une période de six mois à un an, selon
l’utilisation, renvoyez l’outil, la batterie et le chargeur à un centre de service MILWAUKEE accrédité
pour les services suivants:
• Lubrification
• Inspection et nettoyage de la mécanique (engrenages, pivots, coussinets, boîtier etc.)
• Inspection électrique (batterie, chargeur, moteur)
• Vérification du fonctionnement électromécanique
Si l’outil ne démarre pas ou ne fonctionne pas à
pleine puissance alors qu’il est branché sur une
batterie complètement chargée, nettoyez les points
de contact entre la batterie et l’outil. Si l’outil ne
fonctionne toujours pas correctement, renvoyez
l’outil, le chargeur et la batterie à un centre de service MILWAUKEE accrédité, afinqu’on en effectue
la réparation (voir “Réparations”).
Poignée latérale (facultatif)
No de Cat. 14-46-1450
AVERTISSEMENT Pour minimiser
les risques de blessures ou de dommages à
l'outil, n'immergez jamais l'outil, la batterie
ou le chargeur et ne laissez pas de liquide
s'y infiltrer.
GARANTIE LIMITÉE - AUX ÉTATS-UNIS ET AU CANADA
Chaque outil électrique MILWAUKEE (y compris les produits sans fil [outils, piles, chargeur de piles, lampe de travail]; consulter les
énoncés de la GARANTIE LIMITÉE DES BLOCS-PILES SANS FIL) est garanti à l’acheteur d’origine être exempt de vice de matériau
et de fabrication. Sous réserve de certaines exceptions, MILWAUKEE réparera ou remplacera toute pièce d’un outil électrique qui,
après examen par MILWAUKEE, s’est avérée être affectée d’un vice de matériau ou de fabrication pendant une période de cinq (5)
ans* après la date d’achat, sauf indication contraire. Retourner l’outil électrique, à un centre de réparations en usine MILWAUKEE ou
à un poste d’entretien agréé MILWAUKEE, en port prépayé et assuré. Une copie de la preuve d’achat doit être présentée au moment
de retourner le produit. Cette garantie ne couvre pas les dommages que MILWAUKEE détermine être causés par des réparations ou
des tentatives de réparation par quiconque autre que le personnel agréé par MILWAUKEE, des utilisations incorrectes, des altérations,
des utilisations abusives, une usure normale, une carence d’entretien ou des accidents.
*La période de garantie applicable pour les radios de chantier, le port d’alimentation M12™ et les chariots de travail industriels Trade
Titan™ est d’une durée d’un (1) an à partir de la date d’achat. La période de la garantie couvrant la lampe de travail à DÉL et l’ampoule
améliorée à DÉL est une garantie À VIE limitée à l’acheteur d’origine seulement; si, lors d’une utilisation normale, l’ampoule à DÉL
présente une défectuosité, la lampe de travail et l’ampoule seront remplacées sans frais.
*Cette garantie ne s’applique pas aux cloueuses-agrafeuses pneumatiques, aux pulvérisateurs à peinture sans air, aux blocs piles
pour outils sans fil, aux génératrices d’alimentation portatives à essence, aux outils à main, aux monte-charge – électrique, à levier et
à chaîne (manuel), aux vestes chauffantes M12™, aux produits réusinés, ni aux produits d’essai et de mesure. Il existe des garanties
distinctes pour ces produits.
L’enregistrement de la garantie n’est pas nécessaire pour bénéficier de la garantie en vigueur sur un outil électrique MILWAUKEE. La
date de fabrication du produit servira à établir la période de garantie si aucune preuve d’achat n’est fournie lorsqu’une demande de
service sous garantie est présentée.
L’ACCEPTATION DES RECOURS EXCLUSIFS DE RÉPARATION ET DE REMPLACEMENT DÉCRITS AUX PRÉSENTES EST UNE
CONDITION DU CONTRAT D’ACHAT DE TOUT PRODUIT MILWAUKEE. SI VOUS N’ACCEPTEZ PAS CETTE CONDITION, VOUS
NE DEVEZ PAS ACHETER LE PRODUIT. EN AUCUN CAS MILWAUKEE NE SAURAIT ÊTRE RESPONSABLE DE TOUT DOMMAGE
ACCESSOIRE, SPÉCIAL OU INDIRECT, DE DOMMAGES-INTÉRÊTS PUNITIFS OU DE TOUTE DÉPENSE, D’HONORAIRES
D’AVOCATS, DE FRAIS, DE PERTE OU DE DÉLAIS ACCESSOIRES À TOUT DOMMAGE, DÉFAILLANCE OU DÉFAUT DE TOUT
PRODUIT, Y COMPRIS NOTAMMENT LES PERTES DE PROFIT. CERTAINS ÉTATS ET PROVINCES NE PERMETTANT PAS
L’EXCLUSION OU LA LIMITATION DES DOMMAGES DIRECTS OU INDIRECTS, LES RESTRICTIONS CI-DESSUS PEUVENT NE
PAS ÊTRE APPLICABLES. CETTE GARANTIE EST EXCLUSIVE ET REMPLACE TOUTE AUTRE GARANTIE EXPRESSE, QU’ELLE
SOIT ORALE OU ÉCRITE. DANS LA MESURE PERMISE PAR LA LOI. MILWAUKEE RENONCE À TOUTE GARANTIE IMPLICITE, Y
COMPRIS, SANS S’Y LIMITER, TOUTE GARANTIE IMPLICITE DE QUALITÉ MARCHANDE OU D’ADAPTATION À UNE UTILISATION
OU À UNE FIN PARTICULIÈRE. DANS LA MESURE OÙ UNE TELLE STIPULATION D’EXONÉRATION N’EST PAS PERMISE PAR
LA LOI, LA DURÉE DE CES GARANTIES IMPLICITES EST LIMITÉE À LA PÉRIODE APPLICABLE DE LA GARANTIE EXPRESSE,
TEL QUE DÉCRIT PRÉCÉDEMMENT. CERTAINS ÉTATS ET PROVINCES NE PERMETTANT PAS DE LIMITATION DE DURÉE DES
GARANTIES IMPLICITES, LES RESTRICTIONS CIDESSUS PEUVENT NE PAS ÊTRE APPLICABLES. LA PRÉSENTE CONFÈRE
À L’UTILISATEUR DES DROITS LÉGAUX PARTICULIERS; IL BÉNÉFICIE ÉGALEMENT D’AUTRES DROITS QUI VARIENT D’UN
ÉTAT À L’AUTRE.
Cette garantie s’applique aux produits vendus aux États-Unis et au Canada uniquement.
Veuillez consulter la rubrique Centre SAV MILWAUKEE, dans la section Pièces & Service du site Web de MILWAUKEE, à l’adresse
www.milwaukeetool.com, ou composer le 1-800-SAWDUST (1-800-729-3878) afin de trouver le centre de réparations en
usine MILWAUKEE le plus près.
GARANTIE LIMITÉE – MEXIQUE, AMÉRIQUE CENTRALE ET CARAÏBES
Nettoyage
Débarrassez les évents du chargeur et de l’outil
des débris et de la poussière. Gardez les poignées
de l’outil propres, à sec et exemptes d’huile ou de
graisse. Le nettoyage de l’outil, du chargeur et de
la batterie doit se faire avec un linge humide et un
savon doux. Certains nettoyants tels l’essence, la
térébenthine, lesdiluants à laque ou à peinture, les
solvants chlorés, l’ammoniaque et les détergents
d’usage domestique qui en contiennent pourraient
détériorer le plastique et l’isolation des pièces. Ne
laissez jamais de solvants inflammables ou combustibles auprès de l’outil.
TECHTRONIC INDUSTRIES' garantit le produit pendant cinq ans à partir de la date d’achat d’origine. Le présent bon de garantie
couvre tous les vices de matériau et de fabrication que peut afficher cet outil électrique. Pour assurer la validité de la présente garantie,
veuillez présenter le bon de commande, estampillé du sceau du distributeur ou du magasin où le produit a été acheté, au centre de
réparations agréé. Si le bon de commande n’a pas été estampillé, veuillez fournir la preuve d’achat d’origine au centre de réparations
agréé. Pour un entretien, des pièces, des accessoires ou d’autres composants, composer sans frais le 1-800-832-1949 afin d’obtenir
les coordonnées du centre de réparations agréé le plus près.
Procédure pour assurer la validité de la garantie
Présenter le produit au centre de réparations agréé, accompagné du bon de commande estampillé du sceau du distributeur ou du
magasin où le produit a été acheté. Toute pièce défectueuse ou tout composant défectueux sera remplacé sans frais. Milwaukee assume tous les frais de transport liés à ce processus de garantie.
Exceptions
La garantie ne s’applique pas dans les situations suivantes :
a) Si le produit a été utilisé pour une fin autre que celle indiquée dans le guide de l’utilisateur final ou le manuel d’instructions.
b) Si les conditions d’utilisations ne sont pas habituelles.
c) Si le produit a été modifié ou réparé par une personne non autorisée par TECHTRONIC INDUSTRIES.
Note : Si le cordon électrique est endommagé, il doit être remplacé par un centre de réparations agréé pour éviter les risques
d’électrocution.
CENTRE DE RÉPARATIONS ET DE SERVICE
Rafael Buelna No.1.
Modèle :
Col. Tezozomoc Mexico, Azcapotzalco D.F.
Date d’achat :
Ph. 01 800 832 1949
Réparations
Pour les réparations, retournez outil, batterie et chargeur en entier au centre-service le plus près.
Sceau du distributeur ou du magasin :
12
IMPORTÉ ET COMMERCIALISÉ PAR :
TECHTRONIC INDUSTRIES MEXICO, .S.A. DE C.V.
Av. Santa Fe 481 piso 6, Col. Curz Manca.
CP 05349, Cuajimalpa, D.F.
13
ADVERTENCIAS DE SEGURIDAD GENERALES PARA LA
HERRAMIENTA ELÉCTRICA
ADVERTENCIA LEA TODAS LAS ADVERTENCIAS E INSTRUCCIONES DE
SEGURIDAD. Si no sigue todas las advertencias e instrucciones, se pueden provocar
una descarga eléctrica, un incendio o lesiones graves.
Guarde todas las advertencias e instrucciones para consultarlas en el futuro.
El término “herramienta eléctrica” en todas las advertencias incluidas más abajo se refiere a su
herramienta operada por conexión (cable) a la red eléctrica o por medio de una batería (inalámbrica).
nas. Despistarse un minuto cuando se utiliza una
SEGURIDAD EN EL ÁREA
herramienta eléctrica puede tener como resultado
DE TRABAJO
lesiones personales graves.
•Mantenga limpia y bien iluminada el área de •Use un equipo de protección personal. Lleve
trabajo. Las áreas desordenadas u oscuras consiempre protección ocular. Llevar un equipo
tribuyen a que se produzcan accidentes.
de protección apropiado para la situación, como
•No utilice herramientas eléctricas en atmósuna máscara antipolvo, zapatos de seguridad
feras explosivas, como en la presencia de
antideslizantes, un casco o protección auditiva,
líquidos, gases o polvo inflamables. Las herreducirá las lesiones personales.
ramientas eléctricas crean chispas que pueden •Evite el encendido accidental. Asegúrese
incendiar el polvo o las emanaciones.
de que el interruptor esté en la posición de
•Mantenga a los niños y otras personas alejadas
apagado antes de conectarlo a la toma de
mientras utiliza una herramienta eléctrica. Las
alimentación o a la batería, al levantar o mover
distracciones pueden hacerle perder el control.
la herramienta. Mover herramientas con el dedo
en el interruptor o enchufarlas con el interruptor
SEGURIDAD ELÉCTRICA
en la posición de encendido contribuye a que se
•Los enchufes de las herramientas eléctricas deproduzcan accidentes.
ben ser del mismo tipo que el tomacorrientes. •Quite todas las llaves de ajuste antes de
Nunca realice ningún tipo de modificación en
encender la herramienta. Una llave que esté
el enchufe. No use enchufes adaptadores con
acoplada a una pieza giratoria de la herramienta
herramientas eléctricas con conexión a tierra.
puede provocar lesiones personales.
Se reducirá el riesgo de descarga eléctrica si no •No se estire demasiado. Mantenga los pies
se modifican los enchufes y los tomacorrientes
bien asentados y el equilibrio en todo moson del mismo tipo.
mento. Esto permite tener mejor control de la her•Evite el contacto corporal con superficies con
ramienta eléctrica en situaciones inesperadas.
conexión a tierra, como tuberías, radiadores, •Vístase de manera apropiada. No lleve ropa
estufas y refrigeradores. El riesgo de descarga
suelta ni joyas. Mantenga el cabello, la ropa y
eléctrica aumenta si su cuerpo está conectado a
los guantes lejos de la piezas en movimiento.
tierra.
La ropa floja, las joyas o el cabello largo pueden
•No exponga la herramientas eléctricas a la
quedar atrapados en las piezas en movimiento.
lluvia o a condiciones de humedad. El agua •Si se proporcionan dispositivos para la conque entra en una herramienta eléctrica aumenta
exión de sistemas de recolección y extracción
el riesgo de descarga eléctrica.
de polvo, asegúrese de que estén conectados
•No abuse del cable. Nunca use el cable para
y se usen apropiadamente. El uso de estos distransportar la herramienta eléctrica, tirar de
positivos puede reducir los peligros relacionados
ella o desenchufarla. Mantenga el cable alejado
con el polvo.
del calor, los bordes afilados o las piezas en
USO Y CUIDADO DE LAS
movimiento. Los cables dañados o enmarañados
aumentan el riesgo de descarga eléctrica.
HERRAMIENTAS ELÉCTRICAS
•Cuando se utiliza una herramienta eléctrica •No fuerce la herramienta eléctrica. Use la heren el exterior, use una extensión que sea
ramienta eléctrica correcta para la aplicación.
apropiada para uso en el exterior. El uso de un
La herramienta eléctrica correcta funcionará mejor
cable apropiado para el exterior reduce el riesgo
y de manera más segura a la velocidad para la
de descarga eléctrica.
que se diseñó.
•Si debe operar una herramienta eléctrica en •No use la herramienta eléctrica si el interrupun lugar húmedo, utilice un suministro protetor no la enciende ni la apaga. Cualquier hergido por un dispositivo de corriente residual
ramienta eléctrica que no se pueda controlar con
(RCD). Usar un RCD reduce el riesgo de que se
el interruptor es peligrosa y se debe reparar.
produzcan descargas eléctricas.
•Desconecte el enchufe de la toma de alimentación y/o la batería de la herramienta eléctrica
SEGURIDAD PERSONAL
antes de realizar cualquier ajuste, cambiar
•Manténgase alerta, ponga cuidado a lo que
accesorios o almacenar las herramientas elécestá haciendo y use el sentido común cuando
tricas. Dichas medidas preventivas de seguridad
utilice una herramienta eléctrica. No use una
reducen el riesgo de que la herramienta se prenda
herramienta eléctrica cuando está cansado o
accidentalmente.
bajo la influencia de drogas, alcohol o medici14
•Almacene las herramientas eléctricas fuera
del alcance de los niños y no permita que
personas no familiarizadas con ellas o estas
instrucciones las utilicen. Las herramientas
eléctricas son peligrosas en las manos de usuarios
no capacitados.
•Mantenimiento de las herramientas eléctricas.
Revise que no haya piezas móviles que estén
desalineadas o que se atasquen, piezas rotas
ni ninguna otra condición que pueda afectar el
funcionamiento de la herramienta eléctrica. Si
se encuentran daños, haga que le reparen la
herramienta antes de usarla. Las herramientas
mal mantenidas son la causa de muchos accidentes.
•Mantenga las herramientas de corte limpias
y afiladas. Es menos probable que se atasquen
las herramientas de corte con filos afilados que
se mantienen de manera apropiada y también son
más fáciles de controlar.
•Use la herramienta eléctrica, los accesorios,
las brocas, etc. siguiendo estas instrucciones,
teniendo en cuenta las condiciones de trabajo
y la tarea que se va a realizar. El uso de la herramienta eléctrica para operaciones diferentes de
aquellas para las que se diseñó podría originar
una situación peligrosa.
MANTENIMIENTO
•Haga que un técnico calificado realice el
mantenimiento de la herramienta eléctrica utilizando solamente piezas de repuesto idénticas.
Esto asegurará que se mantiene la seguridad de
la herramienta eléctrica.
REGLAS ESPECIFICAS
DE SEGURIDAD
•Lleve protectores auditivos. La exposición a
ruido puede producir la pérdida de la audición.
•Use los asideros auxiliares que se suministran
con la herramienta. La pérdida de control puede
provocar lesiones personales.
•Agarre la herramienta por los asideros aislados cuando realice una operación en la que la
herramienta de corte pueda entrar en contacto
con cables ocultos. El contacto con un cable “con
corriente” hará que las partes de metal expuesto
de la herramienta pasen la corriente y produzcan
una descarga al operador.
•Mantenga las etiquetas y las placas identificativas.Tienen información importante. Si no se
pueden leer o si faltan, póngase en contacto con
un centro de servicio MILWAUKEE para obtener
un repuesto gratuito.
•ADVERTENCIA Algunas partículas de polvo
resultantes del lijado mecánico, aserrado, esmerilado, taladrado y otras actividades relacionadas
a la construcción, contienen sustancias químicas
que se saben ocasionan cáncer, defectos congénitos u otros daños al aparato reproductivo. A
continuación se citan algunos ejemplos de tales
sustancias químicas:
•plomo proveniente de pinturas con base de
plomo
•sílice cristalino proveniente de ladrillos, cemento
y otros productos de albañilería y
•arsénico y cromo provenientes de madera químicamente tratada.
El riesgo que usted sufre debido a la exposición
varía dependiendo de la frecuencia con la que
usted realiza estas tareas. Para reducir la exposición a estas sustancias químicas: trabaje
en un área bien ventilada, y utilice equipo de
seguridad aprobado como, por ejemplo, máscaras
contra el polvo que hayan sido específicamente
diseñadas para filtrar partículas microscópicas.
USO Y CUIDADO DE LAS
HERRAMIENTAS CON BATERÍA
•Recárguela solamente con el cargador especificado por el fabricante. Un cargador que sea
apropiado para un tipo de batería puede crear
riesgo de incendio cuando se use con otra batería.
•Use las herramientas eléctricas solamente con
baterías específicamente diseñadas. El uso de
cualquier otro tipo de batería puede crear riesgo
de lesiones o incendio.
•Cuando no se use la batería manténgala
alejada de otros objetos de metal como clips
para papel, monedas, llaves, clavos, tornillos
u otros objetos de metal pequeños que puedan
realizar una conexión entre los bornes. Realizar
un cortacircuito en los terminales de la batería
puede provocar quemaduras o un incendio.
•Bajo condiciones abusivas, puede salir líquido
expulsado de la batería; evitar el contacto. Si
se produce un contacto accidental, lavar con
agua. Si el líquido entra en contacto con los
ojos buscar ayuda médica adicional. El líquido
que sale despedido de la batería puede causar
irritaciones o quemaduras.
ESPECIFICACIONES
Cat. No.
2412-20
Volts
cd
12
rpm sin
carga
0-800
Capacidades
Broca helicoidal
Rotomartillos (concreto)
Golpes por
minuto sin
Broca de percusión con
carga
Acero
Madera
punta de carburo
0-5350
10 mm (3/8") 13 mm (1/2")
13 mm (1/2")
15
ENSAMBLAJE
SIMBOLOGÍA
Volts corriente directa
Underwriters Laboratories, Inc.
Estados Unidos y Canadá
Revoluciones por minuto sin
carga (RPM)
BPM
DESCRIPCION FUNCIONAL
2
3
ADVERTENCIA Para reducir el riesgo
sólo con el cargador especificado para ella.
Para instrucciones específicas sobre cómo
cargar, lea el manual del operador suministrado con su cargador y la batería.
de lesiones, extraiga siempre la batería antes
de acoplar o desacoplar accesorios. Utilice
únicamente accesorios específicamente
recomendados para esta herramienta. El
uso de accesorios no recomendados podría
resultar peligroso.
Como se inserta/quita la batería en la
herramienta
Para retirar la batería, presione los botones de
liberación y jale de la batería para sacarla de la
herramienta.
Para introducir la batería, deslícela en el cuerpo
de la herramienta. Asegúrese de que quede bien
firme en su posición.
4
1
ADVERTENCIA Recargue la batería
ADVERTENCIA Para reducir el riesgo
de lesiones, trabe siempre el gatillo o quite la
batería antes de cambiar o quitar accesorios.
Use solamente accesorios específicamente
recomendados para esta herramienta. El uso
de otros puede resultar peligroso.
Golpes por minuto (BPM)
Colocación de las brocas
NOTA: Sólo use los accesorios con una varilla de
SDS o SDS Plus.
Asegúrese que tanto el zanco de la broca como las
uñas del mandril están limpias. Partículas de suciedad pueden hacer que la broca quede mal alineada.
No use brocas mas grandes que las de la máxima
capacidad recomendada para este taladro porque
se puede generar daño a los engranes o sobrecargar el motor. Para un mejor rendimiento, antes de
usarlos asegúrese de que la broca se encuentre
bien afilada y la varilla ligeramente lubricada.
1. Inserte la broca en la nariz de la herramienta.
2. Gire la broca lentamente, hasta que se alinee
con el mecanismo asegurador.
3. Presione la broca en la herramienta hasta que
se fije.
4. Verifique que la broca se encuentre firmemente
ajustada; debe poder tirarse de la broca levemente hacia atrás y hacia adelante (alrededor
de 6 mm (1/4")).
5. Para retirar las brocas, tire el del collarín de liberación del portabrocas hacia la parte posterior
de la herramienta y retire la broca.
NOTA: Tenga cuidado cuando maneje puntas
calientes.
5
6
1. LED
2. Portador de brocas SDS Plus
3. Palanca de liberación del portabrocas
4. Palanca de selector de modo
5. Interruptor de control
6. Gatillo
16
OPERACION
Para retroceder, (el giro es en el sentido opuesto
a las manecillas del reloj), presione el interruptor de
control colocado al lado izquierdo de la herramienta. Verifique la dirección del giro antes de usarlo.
Para ponerle el seguro al gatillo, el interruptor de
control se coloca en la posición central. El gatillo no
funcionara mientras el interruptor de control se encuentre bajo seguro en la posición central trabada.
Se le debe poner el seguro al gatillo antes de quitar
la batería, cambiar accesorios, dar mantenimiento,
almacenar el taladro y siempre que éste no esté
siendo usado.
ADVERTENCIA Para reducir el
riesgo de lesiones, mantenga ambas manos
alejadas de la segueta y de otras piezas móviles. Lleve siempre lentes de seguridad con
protectores laterales.
Encendido, parada y control de la velocidad
1. Para encender la herramienta, agarre el mango
firmemente y apriete el gatillo.
NOTA: Las vueltas luz LED en cuando el disparador se tira.
2. Para cambiar la velocidad, aumente o disminuya la presión sobre el gatillo. Cuanto más
se apriete el gatillo, mayor será la velocidad.
3. Para parar la herramienta, suelte el gatillo.
Asegúrese de que la broca se detiene por completo antes de soltar la herramienta.
Indicador de carga
Para determinar la cantidad de carga que queda
en la batería, pulse el gatillo. El indicador de carga
se encenderá durante 2-3 segundos.
Para indicar el final de la carga, una luz en el indicador de carga se encenderá durante 2-3 segundos.
Seleccion de funciones
Siempre se debe esperar a que el motor se pare
por completo antes de usar.
1. Para taladrar, presione el
botón y gire la palanca de selector de manera que la flecha
en la palanca apunte hacia el
símbolo de broca helicoidal .
2. Para martilleo rotatorio, presione el botón y gire la palanca
de selector de manera que la
flecha apunte hacia el símbolo del martillo y de
broca helicoidal .
NOTA: Para hacer actuar el mecanismo de martilleo, mantenga la presión en la broca. Cuando se
libera la presión en la broca, la acción de martilleo
se detendrá.
Operación
Coloque la herramienta, agarre el mango firmemente y oprima el gatillo. Siempre sujete la herramienta de manera segura para mantener el control.
Esta herramienta ha sido diseñada para obtener
un rendimiento máximo utilizando únicamente
presión moderada. Permita que la herramienta
realice el trabajo.
Si la velocidad comienza a disminuir cuando se
taladran orificios profundos o de mayor tamaño,
tire de la broca parcialmente hacia fuera del orificio
mientras la herramienta se encuentra funcionando
para ayudar a despejar el polvo. No utilice agua
para asentar el polvo o enfriar la broca porque esto
ocasiona que las estrías de la broca se obstruyan y
que la broca se atore. Si la broca se atora, detenga
la herramienta, libere la broca y comience de nuevo.
Utilización del interruptor de control
El interruptor de control se puede colocar en tres
posiciones diferentes. avance, retroceso y bajo
seguro. Para poder usar el interruptor de control,
siempre se debe esperar a que el motor se pare
por completo.
Para avanzar (el giro es en el sentido de las manecillas del reloj) presione el interruptor de control colocado al lado derecho de la herramienta. Verifique
la dirección del giro antes de usarlo.
17
MANTENIMIENTO
APPLICACIONES
Selección de las brocas
Cuando seleccione una broca, asegúrese que sea
del tipo adecuado para el trabajo. Para un mejor
rendimiento, use siempre brocas afiladas.
ADVERTENCIA Para reducir el
riesgo de una lesión, desconecte siempre la
herramienta antes de darle cualquier mantenimiento. Nunca desarme la herramienta ni
trate de hacer modificaciones en el sistema
eléctrico de la misma. Acuda siempre a un
Centro de Servicio MILWAUKEE para TODAS
las reparaciones.
Taladrando
1. Antes de taladrar, asegúrese que el material
está asegurado firmemente. Utilice un material
de apoyo para prevenir dañar el material una
vez hecha la operación.
2. Cuando vaya a iniciar una perforación, coloque
la broca en la superficie del trabajo y aplique una
presión firme. Inicie el perforado a baja velocidad
y gradualmente auméntela conforme taladra.
3. Aplique siempre presión en linea con la broca.
Use suficiente presión para mantener el taladro
perforando, pero no demasiada que pueda frenar el motor.
4. Reduzca la presión en la parte final de la perforación. Con el taladro aun operando, jale la
broca fuera de la perforación para evitar dañar
el material.
Mantenimiento de la herramienta
Adopte un programa regular de mantenimiento
y mantenga sus baterías y cargador en buenas
condiciones. Despues de 6 meses a un año,
dependiendo del uso dado, envíe su herramienta, batería y cargador, al Centro de Servicio
MILWAUKEE mas cercano para que le hagan:
• Lubricación
• Inspección mecánica y limpieza (engranes,
flechas, baleros, carcaza, etc.)
• Inspección eléctrica (batería, cargador, motor)
• Probarla para asegurar una adecuada operación
mecánicay eléctrica
Si la herramienta no arranca u opera a toda su
potencia con una batería completamente cargada,
limpie, con una goma o borrador, los contactos de
la batería y de la herramienta. Si aun asi la herramienta no trabaja correctamente, regrésela, con
el cargador y la batería, a un centro de servicio
MILWAUKEE para que sea reparada.
Cómo taladrar en madera, materiales compuestos y plásticos
(con Cat. No. 48-66-1370)
Al taladrar en madera, materiales compuestos
o plásticos, comience lentamente, aumentando
gradualmente la velocidad, a medida que taladra.
Cuando taladre en madera, use brocas de de
berbequí o brocas convencionales. Siempre utilice
brocas afiladas. Cuando utilice brocas convencionales, saque frecuentemente la broca desde la
perforación para sacar la virutas desde las ranuras
de la broca. Para reducir la probabilidad de que la
pieza se fragmente refuerce la pieza en que está
trabajando con un pedazo de madera. Cuando
trabaje con plásticos, seleccione una velocidad
baja con un punto de fusión.
ADVERTENCIA Para reducir el
riesgo de una explosión, no queme nunca
una batería, aun si está dañada, “muerta” o
completamente descargada.
Limpieza
Limpie el polvo y suciedad de las ventilas del
cargador y la herramienta. Mantenga los mangos
y empuñaduras limpios, secos y libres de aceite o
grasa. Use solo jabón neutro y un trapo húmedo
para limpiar la herramienta, batería y el cargador,
ya que algunos substancias y solventes limpiadores
son dañinos a los plásticos y partes aislantes. Algunos de estos incluyen: gasolina, turpentina,thíner,
lacas, thíner para pinturas, solventes para limpieza
con cloro, amoníaco y detergentes caseros que
tengan amonia. Nunca usa solventes inflamables
o combustibles cerca de una herramienta.
ACCESORIOS
ADVERTENCIA Para reducir el riesgo
de lesiones, siempre extraiga la batería antes de cambiar o retirar accesorios. Utilice
únicamente accesorios específicamente
recomendados para esta herramienta. El
uso de accesorios no recomendados podría
resultar peligroso.
Reparaciones
Si su herramienta, batería o cargador están dañados, envíela al centro de servicio más cercano.
Para una lista completa de accessorios, refiérase
a su catálogo MILWAUKEE Electric Tool o visite
nuestro sitio en Internet: www.milwaukeetool.com.
Para obtener un catálogo, contacte su distribuidor
local o uno de los centros de servicio.
Mango lateral (opcional)
Cat. No. 14-46-1450
18
GARANTÍA LIMITADA - E.U.A. Y CANADÁ
Se garantiza al comprador original que ninguna de las herramientas eléctricas MILWAUKEE (incluido el producto inalámbrico, la herramienta y
las baterías; consulte las declaraciones distintas y por separado en GARANTÍA LIMITADA DEL PAQUETE DE BATERÍAS INALÁMBRICAS y
de las luces de trabajo y del cargador de baterías*) presentan defectos en material ni en mano de obra. En un plazo de cinco (5) años* a partir
de la fecha de compra y sujeto a ciertas excepciones, MILWAUKEE reparará o reemplazará cualquier parte de una herramienta eléctrica que,
luego de ser examinada, MILWAUKEE compruebe que presenta defectos en material o mano de obra, a menos que se indique lo contrario.
Se requiere la devolución de la herramienta eléctrica a un centro de mantenimiento de la fábrica MILWAUKEE o a un centro de reparaciones
autorizado por MILWAUKEE, con gastos de envío prepagados y asegurados. La devolución del producto debe estar acompañada por un
comprobante de compra. Esta garantía no se aplica a los daños que MILWAUKEE establece que fueron ocasionados por reparaciones o
intentos de reparación por parte de personal no autorizado por MILWAUKEE, uso indebido, alteraciones, abuso, desgaste y deterioro normal,
falta de mantenimiento o accidentes.
*El período de garantía de las radios para obras, del puerto de alimentación M12™ y de las carretillas de trabajo industrial Trade Titan™ es
de un (1) año a partir de la fecha de compra. El período de garantía de la lámpara de trabajo con diodo luminiscente y del foco mejorado
con diodo luminiscente es una garantía VITALICIA limitada para el comprador original únicamente. Si durante el uso normal el foco de diodo
luminiscente no funciona, la lámpara de trabajo o el foco mejorado se reemplazará sin carga.
*Esta garantía no cubre las clavadoras aéreas, las engrapadoras, el rociador de pintura inalámbrico, el paquete de baterías inalámbrico, los
generadores eléctricos portátiles que funcionan con gasolina, herramientas manuales, elevadores (eléctricos, con palanca y con cadenas
manuales), camisas de calefacción M12™, productos reacondicionados y productos de prueba y medición. Se encuentran disponibles
garantías distintas para estos productos.
No se necesita registro de garantía para obtener la garantía correspondiente de un producto eléctrico MILWAUKEE. La fecha de fabricación
del producto se utilizará para determinar el período de garantía si no se presenta un comprobante de compra en el momento en que se
solicita el servicio de garantía.
LA ACEPTACIÓN DE LOS DERECHOS A REPARACIÓN Y REEMPLAZO EXCLUSIVAMENTE DESCRITOS EN EL PRESENTE DOCUMENTO CONSTITUYE UNA CONDICIÓN DEL CONTRATO POR LA COMPRA DE CADA PRODUCTO MILWAUKEE. SI NO ACEPTA
ESTA CONDICIÓN, NO DEBE COMPRAR EL PRODUCTO. MILWAUKEE NO SERÁ EN NINGÚN CASO RESPONSABLE DE DAÑOS
INCIDENTALES, ESPECIALES, CONSECUENTES O PUNITIVOS, NI DE COSTOS, HONORARIOS DE ABOGADOS, GASTOS, PÉRDIDAS
O DEMORAS SUPUESTAMENTE CAUSADOS COMO CONSECUENCIA DE CUALQUIER DAÑO, FALLA O DEFECTO EN CUALQUIER
PRODUCTO, INCLUIDOS, A MODO DE EJEMPLO, RECLAMOS POR PÉRDIDA DE GANANCIAS. ALGUNOS ESTADOS NO PERMITEN
LA EXCLUSIÓN O LA LIMITACIÓN DE DAÑOS INCIDENTALES O CONSECUENTES. POR LO TANTO, LAS LIMITACIONES Y EXCLUSIONES ANTERIORES PUEDEN NO APLICARSE PARA USTED. ESTA GARANTÍA ES EXCLUSIVA Y SUSTITUYE A TODAS LAS OTRAS
GARANTÍAS EXPRESAS, ESCRITAS U ORALES. SEGÚN LO PERMITA LA LEY, MILWAUKEE SE EXIME DE TODA GARANTÍA IMPLÍCITA,
INCLUIDOS, A MODO DE EJEMPLO, TODA GARANTÍA IMPLÍCITA DE COMERCIABILIDAD O IDONEIDAD PARA UN USO O PROPÓSITO
EN PARTICULAR; EN LA MEDIDA EN QUE DICHA RENUNCIA NO ESTÉ PERMITIDA POR LA LEY, DICHAS GARANTÍAS IMPLÍCITAS
ESTÁN LIMITADAS A LA DURACIÓN DE LA GARANTÍA EXPRESA APLICABLE SEGÚN SE DESCRIBE ANTERIORMENTE. ALGUNOS
ESTADOS NO PERMITEN LIMITACIONES EN LA DURACIÓN DE UNA GARANTÍA IMPLÍCITA. POR LO TANTO, LA LIMITACIÓN ANTERIOR
PUEDE NO APLICARSE PARA USTED. ESTA GARANTÍA LE OTORGA DERECHOS LEGALES ESPECÍFICOS Y TAMBIÉN PUEDE TENER
OTROS DERECHOS QUE VARÍAN DE ESTADO EN ESTADO.
Esta garantía se aplica a los productos vendidos en los EE. UU. y Canadá.
Consulte ‘Service Center Search’ (Búsqueda de centro de servicio’ en la sección Parts & Services (Piezas y servicios) del sitio web MILWAUKEE,
www.milwaukeetool.com o llame al 1.800.SAWDUST (1.800.729.3878) para encontrar su Centro de Servicio de la fábrica de MILWAUKEE
más cercano.
PÓLIZA DE GARANTÍA - VALIDA SOLO PARA MÉXICO, AMÉRICA CENTRAL Y EL CARIBE
TECHTRONIC INDUSTRIES., garantiza por 5 años este producto a partir de la fecha original de compra.
Esta garantía cubre cualquier defecto que presenten las piezas, componentes y la mano de obra contenidas en este producto Para
América Central y el Caribe se debe confirmar en el Centro de Servicio Autorizado el plazo de la garantía.
Para hacer efectiva la Garantía deberá presentar al Centro de Servicio Autorizado la Póliza de Garantía sellada por el establecimiento en
donde adquirió el producto. Si no la tienen, podrá presentar el comprobante de compra original.
Usted puede llamar sin costo al teléfono 01 800 832 1949 o por correo electrónico a la dirección "[email protected]", para ubicar
el Centro de Servicio Autorizado más cercano a su domicilio, en el cual además podrá adquirir partes, componentes, consumibles y
accesorios, que usted necesite.
Procedimiento para hacer válida la garantía
Acuda al Centro de Servicio con el producto y la póliza de garantía sellada por el establecimiento donde realizó la compra. Ahí se reemplazará cualquier pieza o componente defectuoso sin cargo alguno para el usuario final. La empresa se hace responsable de los gastos
de transportación razonablemente erogados que se deriven del cumplimiento de la presente garantía.
Excepciones
La garantía perderá validez en los siguientes casos:
a) Cuando el producto se hubiese utilizado en condiciones distintas a las normales.
b) Cuando el producto no hubiese sido operado de acuerdo con el instructivo de uso que le acompaña.
c) Cuando el producto hubiese sido alterado o reparado por personas no autorizadas por TECHTRONIC INDUSTRIES.
Nota: Si el cordón de alimentación es dañado, este debe ser remplazado por el fabricante o por un Centro de Servicio Autorizado para
evitar riesgo.
CENTRO DE SERVICIO Y ATENCIÓN A CLIENTES
Rafael Buelna No.1. Col. Tezozomoc Mexico, D.F.
Modelo:
Tel. 01 800 832 1949
Fecha de Compra:
IMPORTADO Y COMERCIALIZADO POR:
TECHTRONIC INDUSTRIES MEXICO, .S.A. DE C.V.
Sello del Distribuidor:
Av. Santa Fe 481 piso 6, Col. Curz Manca.
CP 05349, Cuajimalpa, D.F.
19
UNITED STATES
MILWAUKEE Service
MILWAUKEE prides itself in producing a premium
quality product that is NOTHING BUT HEAVY DUTY®.
Your satisfaction with our products is very important to us! If you encounter any problems with the
operation of this tool, or you would like to locate the
factory Service/Sales Support Branch or authorized
service station nearest you, please call...
Additionally, we have a nationwide network of
authorized Distributors ready to assist you with
your tool and accessory needs. Check your “Yellow
Pages” phone directory under “Tools-Electric” for
the names & addresses of those nearest you or see
the 'Where To Buy' section of our website.
1-800-SAWDUST
(1.800.729.3878)
Monday-Friday
7:00 AM - 6:30 PM
Central Time
or visit our website at
www.milwaukeetool.com
For service information, use the 'Service Center
Search' icon found in the 'Parts & Service' section.
Contact our Corporate After Sales Service
Technical Support about ...
•Technical Questions
•Service/Repair Questions
•Warranty
call: 1-800-SAWDUST
fax: 1.800.638.9582
email: [email protected]
Register your tool online at
www.milwaukeetool.com and...
• receive important notifications regarding
your purchase
• ensure that your tool is protected under the
warranty
• become a HEAVY DUTY club member
CANADA - Service MILWAUKEE
MILWAUKEE prides itself in producing a premium
quality product that is NOTHING BUT HEAVY DUTY®.
Your satisfaction with our products is very important to us!
If you encounter any problems with the operation
of this tool, or you would like to locate the factory
Service/Sales Support Branch or authorized service station nearest you, please call...
1.800.268.4015
Monday – Friday 7:00 – 4:30 CST
fax: 866.285.9049
Milwaukee Electric Tool (Canada) Ltd
140 Fernstaff Court, Unit 4
Vaughan, ON L4K 3L8
18129 111 Avenue NW
Edmonton, AB T5S 2P2
Additionally, we have a nationwide network of
authorized Distributors ready to assist you with your
tool and accessory needs. Call 1.800.268.4015 to
find the names and addresses of the closest retailers or consult “Where to buy” on our Web site
www.milwaukeetool.com
MILWAUKEE est fier de proposer un produit de
première qualité NOTHING BUT HEAVY DUTY®. Votre
satisfaction est ce qui compte le plus!
En cas de problèmes d’utilisation de l’outil ou pour
localiser le centre de service/ventes ou le centre
d’entretien le plus proche, appelez le...
1.800.268.4015
Lundi – Vendredi 7:00 – 4:30 CST
fax: 866.285.9049
Milwaukee Electric Tool (Canada) Ltd
140 Fernstaff Court, Unit 4
Vaughan, ON L4K 3L8
18129 111 Avenue NW
Edmonton, AB T5S 2P2
Notre réseau national de distributeurs agréés se
tient à votre disposition pour fournir l’aide technique,
l’outillage et les accessoires nécessaires. Composez le 1.800.268.4015 pour obtenir les noms et
adresses des revendeurs les plus proches ou bien
consultez la section «Où acheter» sur notre site
web à l’adresse www.milwaukeetool.com
MEXICO - Soporte de Servicio MILWAUKEE
CENTRO DE ATENCIÓN A CLIENTES
Rafael Buelna No. 1, Col Tezozomoc,
Delegación Azcapotzalco, México, D.F.
Telefono sin costo 01 800 832 1949
e-mail: [email protected]
Adicionalmente, tenemos una red nacional de
distribuidores autorizados listos para ayudarle con
su herramienta y sus accesorios. Por favor, llame
al 01 800 832 1949 para obtener los nombres y
direcciones de los más cercanos a usted, o consulte la sección ‘Where to buy’ (Dónde comprar)
de nuestro sitio web en
Registre su herramienta en línea, en
www.ttigroupmexico.com y...
• reciba importantes avisos sobre su compra
• asegúrese de que su herramienta esté protegida por la garantía
• conviértase en integrante de Heavy Duty
www.ttigroupmexico.com
MILWAUKEE ELECTRIC TOOL CORPORATION
58-14-2412d1
13135 West Lisbon Road • Brookfield, Wisconsin, U.S.A. 53005
05/11
Printed in China
961011008-01( )