1
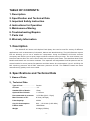
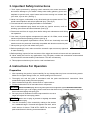
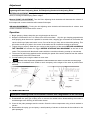
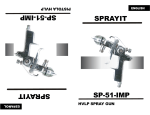
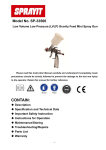
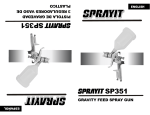
Model No. SP-31000 Low Volume Low Pressure (LVLP) Siphon Feed Spray Gun -1- TABLE OF CONTENTS: 1. Description 2. Specification and Technical Data 3. Important Safety Instruction 4. Instructions for Operation 5. Maintenance/Storing 6. Troubleshooting/Repairs 7. Parts List 8. Warranty Information 1. Description The SPRAYIT SP-31000 LVLP Siphon Feed Spray Gun can be used for variety of different applications such as Automotive, Industrial, Marine and Wood Working. The LVLP features require less air allowing you to use a smaller air compressor. Using the SPRAYIT SP-31000 reduces overspray and allows you to spray larger surfaces without having to stop. The Low Volume Low Pressure feature allow for more control with less overspray and waste. The Stainless Steel Fluid Needle and Nozzle are corrosion resistant. The separate and adjustable fluid fan pattern and air controls make for more precise fan patterns and less waste. Air consumption 3.0 to 3.9 CFM @ 30 PSI. Working pressure 28-45 PSI. Maximum pressure 60 PSI. The SPRAYIT brand has been manufacturing quality tools since 1928. 2. Specifications and Technical Data 1. Name of Parts 2.Technical Data Type of Feed ………………….. Suction Air inlet ……………………… 1/4” Standard Dia of Nozzle: 1.5mm Optional Dia of Nozzle: 1.3-2.5mm Recommended air pressure: 2.0-3.5bar (28.8 – 51psi) Max. Pressure of air: 8.3 bar (120.5psi) Paint Capacity: 1000cc Avg. Air Consumption: 84.2 – 110.4 l/min (3.0-3.9cfm) Pattern width 180-250mm Weight 0.93kgs (2.50 lbs) -2- 3. Important Safety Instructions 1. Toxic vapors produced by spraying certain materials can create intoxication and serious damage to your health. Always wear safety glasses, gloves and respirator to prevent toxic vapor hazard and solvent coming into contact with 1 your noise, eyes or skin. (See fig 1) 2. Never use oxygen, combustible or any other bottle gas as a power source. This 图表 1 would cause explosion and serious personal injury. (See fig 2) 3. Fluid and solvent can be highly flammable or combustible. Use in well-ventilated spray booth and avoid any ignition sources, such as 2 smoking, open flames and decrial hazard. (See fig 3) 4. Disconnect tool from air supply hose before doing tool maintenance and during non-operation. 5. Use clean, dry and regulate compressed air rated at 2.0~3.5bar, never exceed maximum permissive operating pressure (see fig 4) 3 6. Never use homogenate hydrocarbon solvent, which can chemically react with aluminum and zinc parts and chemically compatible with aluminum and zinc pats. 7. Never point gun at you and others at any time. 4 8. Before operating the tool, make sure all the screws & caps are securely tightened in case of leaking; 9. Before painting, inspect for free movement of the trigger and nozzle to insure tool can operate well. 10. Never modify this tool for any applications. Only use parts, nozzles and accessories recommended and accessories recommended by manufacture. This will void warranty. 11. This equipment should only be used in a well ventilated area. 4. Instructions For Operation Preparation 1. After unpacking the product, inspect carefully for any damage that may have occurred during transit. Make sure to tighten fittings, bolts, etc., before putting unit into service. 2. Thoroughly mix and thin paint in accordance with the paint manufacturer’s instructions. Most materials will spray readily if thinned properly. 3. Strain material through filter, cheese cloth or a paint strainer. 4. Fill the canister about ¾ full and start the air compressor. WARNING DO NOT EXCEED Spray Gun or any other parts in the compressor system MAXIMUM PRESSURE. 5. After Connect the gun to air supply, please make sure that the fluid cap, container and air hose have been connected tightly with spray gun. 6. Set up a piece of cardboard or other scrap material to use as a target and adjust for best spray pattern. WARNING Never aim or spray at yourself or anybody else which would cause serious injury. 7. Test the consistency of the material by making a few strokes on a cardboard target. If material still appears too thick, add a small amount of thinner. THIN WITH CARE! Do not exceed paint manufacturer’s thinning recommendations. -3- Adjustment The desired pattern, volume of fluid output and fine atomization can easily be obtained by regulating the Pattern Adjusting Knob, Fluid Adjusting Knob and Air Adjusting Knob. PATTERN ADJUSTMENT: Turning Pattern Adjusting Knob to the right until tight will make spray pattern round, or turning left make spray pattern ellipse. Material (PAINT) ADJUSTMENT: Turn the Paint Adjusting Knob clockwise will decrease the volume of fluid output and counter-clockwise will increase fluid output. AIR Inlet ADJUSTMENT: Turning the Air Adjusting valve clockwise will decrease the air volume. And counter-clockwise will increase the air volume. Operation 1. Begin spraying. Always keep the gun at right angles to the work. 2. Keep the nozzle about 6 to 12 inches from the work surface. Grip the gun keeping perpendicular with spraying area then move it parallel for several times, stopping gun movement in mid-stroke will cause a build up of paint and result in runs. Do not fan the gun from side to side while painting. This will cause a build-up of paint in the center of the stroke and an insufficient coating at each end. 3. Trigger the gun properly. Start the gun moving at the beginning of the stroke BEFORE SQUEEZING THE TRIGGER and release the trigger BEFORE STOPPING GUN MOVEMENT at the end of the stroke. This procedure will blend each stroke with the next without showing overlap or unevenness. 4. The amount of paint being applied can be varied by the speed of the stroke, distance from the surface and adjustment of the fluid control knob. 5. Overlap strokes just enough to obtain an even coat. NOTE: Two thin coats of paint will yield better results and have less chance of runs than one heavy layer. 6. Use a piece of cardboard as a shield to catch overspray at the edges of the work to protect other surfaces. 5. Maintenance Incomplete cleaning could cause function failures and a degradation of the fan form. 1. Remove any remaining paint by pouring it into another container. 2. Disassemble the spray gun making sure to remove the needle before disassembling the nozzle to avoid damage to the housing of the nozzle closure. 3. Clean all the paint passages and the nozzle. Clean the other components using a brush soaked in solvent. 4. Reassemble the spray gun and spray a small quantity of solvent to eliminate all the residues in the paint passages. -4- WARNING: NEVER USE METAL OR OTHER OBJECTS THAT COULD DAMAGE THE HOLES IN THE NOZZLE AND CAP. NEVER IMMERSE THE SPRAY GUN COMPLETELY IN SOLVENT. NEVER USE COMPONENTS OR PARTS THAT ARE NOT MANUFACTURER ORIGINALS. Storing When not using spray gun, turn the fluid adjustment knob counter-clockwise to open which will reduce spring tension on needle fluid tip. Spray gun MUST BE well cleaned and lightly lubricated. -5- 6. Trouble Shooting Symptom Problems Solution Fluttering or spitting 1. 2. 3. 4. 5. Material level too low. Container tipped too far. Loose fluid inlet connection. Loose or damaged fluid tip/seat. Dry or loose fluid needle packing nut. 6. Air vent clogged 1. 2. 3. 4. 5. 6. Pattern is arc. 1. Worn or loose Fluid nozzle. 2. Material builds up on Air cap. 1. Tighten or replace Fluid nozzle. 2. Remove obstructions from holes, But don’t use metal objects to clean it. Pattern is not Evenly spread. 1. Material builds up on Air cap. 2. Fluid nozzle dirty or worn. 1. Clean or replace Air cap. 2. Clean or replace Fluid nozzle. The center of Pattern too narrow. 1. Material too thin or not enough. 2. Atomization air pressure too high. 1. Regulate material viscosity. 2. Reduce air pressure. Add material into container. Hold more upright. Tighten. Adjust or replace. Lubricate and or tighten. Clear vent hole. 1. Regulate material viscosity. Pattern width of 1. Material too thick. fan-sharp is not 2. Atomization air pressure too low. 2. Increase air pressure. enough. 1. Lubricate Air leaking from 1. Sticking air valve stem air cap without 2. Contaminate on air valve or seat 2. Clean 3. Worn or damaged air valve or 3. Replace pulling trigger seat 4. Broken air valve spring 5. Bent valve stem 4. Replace 5. Replace Fluid leaking from 1. Packing nut loose 2. Packing worn or dry packing nut 1. Tighten, but do not restrict needle 2. Replace or lubricate (non-silicone oil) Excessive overspray 1. Too high atomization pressure 2. Too far from work surface 3. Improper stroking (arcing, gun motion too fast) 1. Reduce pressure 2. Adjust to proper distance 3. Move at moderate pace, parallel to surface. Will not spray 1. No pressure at gun 2. Fluid control not open enough 3. Fluid too heavy 1. Check air lines 2. Open fluid control 3. Thin fluid or change to pressure feed system. -6- 7. Parts List Note: No Description No Description No Description 1 Air Adj. Screw 19 Needle Housing 37 Washer 2 Air Adj. Knob 20 Washer 38 Nut 3 O-ring(3.15*1.8) 21 O-ring(4.5*1.2) 39 Air Cap Washer 4 Washer 22 Washer 40 Atomization 5 Air Valve Spring 23 Washer 41 Paint Inlet Nozzle 6 Snap Retainer 24 Spring core 42 Nut 7 Air Inlet Valve pole 25 Switch spring 43 Nut 8 Air Inlet Joint 26 Snap Retainer 44 Hanger 9 washer 27 Fluid Adj. Needle 45 Handle 10 O-ring(4.5*1.8) 28 Snap Retainer 46 Cup Lid 11 O-ring(9*1.8) 29 trigger 47 Washer 12 Fluid Adj. screw 30 Trigger lever 48 Washer 13 Fluid Adj. Needle 31 Washer 49 Paint Tube 14 Fluid Needle Spring 32 Sealing Washer 50 Pin 15 Fluid Adj. Knob 33 Direction Screw 51 Bolt 16 Switch pole 34 Paint Inlet Joint 52 Cup 17 O-ring(8.5*1.2) 35 Gasket 18 O-ring(9*1.8) 36 Nozzle If you need parts of this model, contact us or the distributor where you bought this product. -7- 8. Warranty Disclaimers and Limitations of Remedies This warranty gives you specific legal right, and you may also have other rights which may vary from State to State. Disclaimer of other Warranties To the fullest extent permitted by applicable law, this limited warranty is exclusive and expressly in lieu of any and all other warranties, including, without limitation, any implied warranties of merchantability or fitness for a particular purpose or any other implied warranties that may arise from the course of dealing or usage of the trade. California Air Tools Inc. hereby declaims and excludes all other warranties. To the extent that California Air Tools Inc. products are consumer products under applicable federal and state law with respect to any customer, the duration of any implied warranties (including, but not limited to implied warranties of merchantability or fitness for a particular purpose) are limited to the shortest duration permitted by applicable law or the Limited Warranty period provided herein, whichever is longer. Limitations of Remedies California Air Tools Inc. shall not be liable to customer, or anyone claiming under customer, for any other obligations or liabilities, including, but not limited to, obligations or liabilities airing out of breach of contract or warranty, negligence or other tort or any theory of strict liability, with respect to the spray gun or California Air Tools Inc. acts or omissions or otherwise. To the fullest extent permitted by applicable law California Air Tools Inc. shall not in any event be liable for incidental, compensatory, punitive, consequential, indirect, special or other damages, including but not limited to loss of use, loss of income, loss of time, loss of sales, injury to personal property, or liability customer incurs with respect to any other person, or any other type or form of consequential damage or economic loss. -8-