1
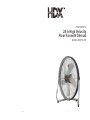
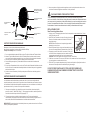
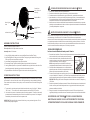
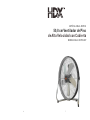
ITEM #856516
20 in High Velocity
Floor Fan with Shroud
MODEL #HDF50-SP
12
1
CUIDADO Y MANTENIMIENTO
SAFETY INFORMATION
Please read and understand this entire manual before attempting to assemble, operate or install
the product.
When using electrical appliances, basic precautions should always be followed to reduce the risk
of fire, electric shock and injury to persons, including the following:
1. Use fan only for intended use, as described in instruction manual.
2. To protect against electric shock, do not immerse unit, plug, or cord in water or spray with
liquids.
3. Close supervision is necessary when any appliance is used by or near children.
4. Unplug from outlet when not in use, when moving fan from one location to another, before
putting on or taking off parts and before cleaning.
5. Never insert fingers, pencils or any other objects through the grille when fan is running.
6. Disconnect fan before cleaning.
7. Make sure fan is on a stable surface when operating to avoid chance of overturning.
8. Do not use fan in a window. Rain may cause an electrical hazard.
9. Do not operate in the presence of explosive and/or flammable fumes.
10. Do not place fan or any parts near an open flame, cooking or other heating appliances.
11. Do not operate any appliance with a damaged cord or plug, after the appliance malfunctions or
has been dropped or damaged in any manner.
12. To disconnect, grip plug and pull from wall outlet. Never yank on cord.
13. Always use on a dry surface.
14. This product is intended for household use only and not for commercial or industrial use.
15. Do not use fan near curtains, plants, window treatments, etc.
16. Do not operate any fan with a damaged cord or plug. Discard fan or return to an authorized
service facility for examination and/or repair.
17. Do not run cord under carpeting. Do not cover cord with throw rugs, runners, or similar
coverings. Do not route cord under furniture or appliances. Arrange cord away from traffic area
and where it will not be tripped over.
18. WARNING: To reduce the risk of electric shock and injury to persons, do not use this fan
near a door or window.
19. WARNING: To reduce the risk of fire or electric shock, do not use this fan with any solid-state
speed control device.
Sigue estas instrucciones para cuidar de tu ventilador de manera correcta y segura. Recuerda:
• Siempre desenchufa el ventilador antes de limpiarlo o desemsamblarlo.
• No permitas que gotee o ingrese agua dentro de la carcasa del ventilador.
• Asegúrate de usar un paño suave humedecido con una solución jabonosa suave.
• No uses ningunos de los siguientes limpiadores: gasolina, disolvente o benceno.
Instrucciones de Limpieza de las Aspas del Ventilador
1. Usa un destornillador Phillips para quitar los tornillos ubicados alrededor de la rejilla frontal
y la cubierta.
2. Quita la rejilla frontal.
3. Limpia las aspas con un paño suave humedecido con una solución jabonosa suave.
4. Vuelve a colocar la rejilla en la cubierta y asegúrala con los tornillos que quitaste en el paso 1.
PLEASE READ AND SAVE THESE IMPORTANT SAFETY INSTRUCTIONS
POLARIZED PLUG
NOTE: This appliance has a polarized plug (one blade is wider
than the other). The polarized plug is not intended to be used in
non-polarized outlets (having both slots the same size). To
reduce the risk of electric shock, this plug is intended to fit in a
polarized outlet only one way. If the plug does not fit fully in the
outlet, reverse the plug. If it still does not fit, contact a qualified
electrician to install the proper outlet. Do not attempt to modify
this plug or defeat this safety feature in any way.
POWER CORD SAFETY TIPS
1.
2.
3.
4.
Never pull or yank on the cord or the appliance.
To insert plug, grasp it firmly and guide it into outlet.
To disconnect appliance, grasp plug and remove it from outlet.
Before each use, inspect the line cord for cuts and/or abrasion marks. If any are found, this
indicates that the appliance should be serviced and the line cord replaced. Please return it
to an authorized service representative.
2
11
Rejilla Frontal y Trasera,
Ensamblaje del Cabezal
del Ventilador
5. Never wrap the cord tightly around the appliance, as this could place undue stress on the
cord where it enters the appliance and cause it to fray and break.
PLUG AND POWER CORD INSTRUCTIONS
Perno del Cabezal del
Ventilador
Perilla Plástica de
Fijación
Perilla Plástica de
Fijación
Tubería de la Base
Izquierda
Tubería de la Base
Derecha
Tornillo de la Base
INSTRUCCIONES DE ENSAMBLAJE
Desempaca el contenido cuidadosamente de la caja.
Herramientas requeridas: Un destornillador de cabeza Phillips.
Tiempo de ensamblaje: De 5 a 10 minutos.
1.
2.
3.
4.
5.
6.
Con un destornillador de cabeza Phillips, quita el Tornillo de la Base del Tubo de la Base.
Alinea el Tubo de la Base Derecho sobre el Tubo de la Base Izquierdo usando la ranura
como guía. Presiona hasta que quede firme y los orificios de los tornillos estén alineados.
Inserta el Tornillo de la Base y aprieta firmemente con el destornillador.
Quita la Perilla para Apretar y la Arandela de Plástico en cada lado de la cabeza del
ventilador.
Sin quitar los Separadores de Hule, coloca los Tornillos de la Cabeza del Ventilador a través
de los orificios en el costado del ensamblaje del tubo de la base. Nota que el logotipo debe
estar horizontal al piso.
Vuelve a colocar la Arandela y la Perilla para Apretar de Plástico en cada lado y aprieta
firmemente
This product employs overload protection (fuse). A blown fuse indicates an overload or
short-circuit situation. If the fuse blows, unplug the product from the outlet. Replace the fuse as
per the user servicing instructions (follow product marking for proper fuse rating) and check the
product. If the replacement fuse blows, a short-circuit may be present and the product should
be discarded or returned to an authorized service facility for examination and/or repair.
REPLACEABLE FUSE
User Servicing Instructions
1. Unplug your fan. Grasp plug and remove from the receptacle or other outlet device. Do not
unplug by pulling on cord.
2. Open fuse cover, located on the top of the plug, by using your
Fuse
thumb or a flat head screwdriver to slide the cover down
toward the prongs.
Fuse cover
NOTE: Ensure that fuse cover is completely open before
attempting to remove fuse.
3. Remove fuse carefully by using a small screwdriver to pry the
fuse out of the compartment by the metal ends of the fuse.
Metal ends
4. Place plug on a solid, flat surface. Insert new 2.5 Amp, 125
volt fuse into fuse compartment and use a small screwdriver
to secure the metal ends of the fuse into the compartment.
CAUTION: Risk of fire. Replace fuse only with 2.5 Amp, 125 volt fuse.
5. Slide fuse cover closed. If fuse cover is difficult to close, make sure fuse is secured in place
by pressing down on metal ends of the fuse.
6. Risk of fire. Do not replace attachment plug. Contains a safety device (fuse) that should not
be removed. Discard product if the attachment plug is damaged.
DO NOT OPERATE APPLIANCE IF THE LINE CORD SHOWS ANY
DAMAGE OR IF APPLIANCE WORKS INTERMITTENTLY OR STOPS
WORKING ENTIRELY.
INSTRUCCIONES DE FUNCIONAMIENTO
Los Ventiladores de Alta Velocidad se pueden usar solos o junto con una unidad de aire
acondicionado para circular el aire frío o para llevarlo a otras habitaciones. Durante el verano,
los Ventiladores de Alta Velocidad portátiles se pueden usar como ventiladores a nivel del piso
para levantar el aire frío y hacerlo circular por toda la habitación.
1.
2.
Para operar el ventilador, gira la perilla de control de velocidad, ubicada en la rejilla
posterior, a Alta "H", Media "M", o Baja "L". Para apagar el ventilador, cambia la perilla de
control de velocidad a la posición de Off (Apagado) "O".
Es normal que el motor esté tibio al tacto durante el uso. El motor está protegido
térmicamente y se apagará de forma automática si se sobrecalienta por algún motivo. Si
esto sucede, desconecta inmediatamente el ventilador del tomacorriente.
IMPORTANTE: Durante los minutos iniciales del primer uso, puedes notar un leve olor. Esto es
normal y se disipará rápidamente.
10
3
Front & Rear
Grille, Fan Head
Assembly
Fan Head Bolt
CONSEJOS DE SEGURIDAD PARA EL CABLE ELÉCTRICO
1.
2.
3.
4.
5.
Plastic Tighten
Knob
Plastic Tighten
Knob
Left Base Tubing
INSTRUCCIONES DEL ENCHUFE Y CABLE ELÉCTRICO
Right Base Tubing
Base Screw
ASSEMBLY INSTRUCTIONS
Carefully unpack contents from carton.
Tools required: One Phillips head screw driver.
Assembly time: 5-10 minutes.
1. Using a Phillips head screwdriver, remove the Base Screw from Base Tubing.
2. Align the Right Base Tubing over the Left Base Tubing using the indented slot as a guide.
Press until firm and screw holes are aligned.
3. Insert Base Screw and tighten firmly with screw driver.
4. Remove the Plastic Tighten Knob and Washer from each side of the fan head.
5. Leaving Rubber Spacers on, place the Fan Head Bolts through the holes on the side of the
base tubing assembly. Note that Logo should be horizontal to the floor.
6. Replace Washer and the Plastic Tighten Knob on each side and tighten firmly.
Este producto está protegido contra las sobrecargas (fusible). Un fusible fundido indica que hay
una sobrecarga o un cortocircuito. Si el fusible se funde, desconecta el producto del
tomacorriente. Cambia el fusible según las instrucciones de mantenimiento (lee las inscripciones
en el producto para saber la clasificación correcta del fusible) y prueba el producto. Si el nuevo
fusible se funde quizá haya un cortocircuito y el producto deberá desecharse o devolverse a un
centro de mantenimiento autorizado para ser revisado y/o reparado.
FUSIBLE DE REEMPLAZO
Instrucciones de Mantenimiento para el Usuario
1.
2.
3.
4.
OPERATION INSTRUCTIONS
High Velocity Fans can be used alone or in conjunction with an air conditioner unit to circulate
the cooled air or to force it into other rooms. During summer days, the portable High Velocity
Fans can be used as a hassock fan to pick up cool air near the floor and circulate it through the
entire room.
1. To operate fan, turn the speed control knob, located on the rear grill, to High “H”, Medium
“M”, or Low “L”. To turn the fan off, switch the speed control knob to Off "O" position.
2. It is normal for the motor to feel warm to the touch during operation. The motor is thermally
protected and will automatically shut off should it overheat for any reason. If this happens,
immediately disconnect the fan from the power outlet.
IMPORTANT: During the first few minutes of initial use, you may notice a slight odor. This is
normal and will quickly disappear.
4
Nunca tires o hales el cable o el electrodoméstico.
Para insertar el enchufe, agárralo firmemente y guíalo al tomacorriente.
Para desconectar el electrodoméstico, agarra el enchufe y quítalo del tomacorriente.
Antes de cada uso, verifica que el cable principal no tenga cortes y/o marcas de abrasión.
Si encuentras alguna, ello indica que el electrodoméstico debe ser reparado y el cable
reemplazado. Devúelvelo a un representante de servicio autorizado.
Nunca amarres el cable con demasiada fuerza alrededor del electrodoméstico ya que esto
podría ejercer demasiada tensión sobre el cable en el punto donde entra al electrodoméstico
y el cable podría pelarse o romperse.
5.
6.
Desenchufa el ventilador. Toma el enchufe y desconéctalo del tomacorriente o de donde
esté enchufado. No tires del cable para desconectarlo.
Fusible
Abre la cubierta del fusible, ubicada arriba del enchufe,
usando tu pulgar o un tornillo de cabeza plana para deslizar
Cubierta del
la cubierta hacia abajo, hacia las espigas.
Fusible
NOTA: Asegúrate de que la cubierta del fusible esté
completamente abierta antes de intentar quitar el fusible.
Quita el fusible cuidadosamente con un destornillador
Extremos
pequeño para sacar el fusible del compartimiento haciendo
de Metal
palanca por los extremos metálicos del fusible.
Coloca el enchufe sobre una superficie plana y firme. Inserta
un nuevo fusible de 2,5 Amperios y 125 Voltios en el compartimiento del fusible y usa un
tornillo pequeño para asegurar los extremos metálicos del fusible en el compartimiento.
PRECAUCIÓN: Riesgo de incendio. Reemplaza el fusible sólo con otro de 2,5 Amperios y
125 Voltios.
Desliza la cubierta del fusible para cerrarla. Si tienes dificultad para cerrar la cubierta del
fusible, verifica que el fusible esté ajustado en su lugar presionando hacia abajo en los
extremos metálicos del fusible.
Riesgo de incendio. No reemplaces el enchufe de conexión. Tiene un dispositivo de
seguridad (fusible) que no debe retirarse. Desecha el producto si el enchufe está dañado.
NO OPERES EL ELECTRODOMÉSTICO SI EL CABLE PRINCIPAL
MUESTRA ALGÚN DAÑO O SI EL ELECTRODOMÉSTICO FUNCIONA
INTERMITENTEMENTE O DEJA DE FUNCIONAR COMPLETAMENTE.
9
INFORMACIÓN DE SEGURIDAD
Lee y entiende este manual por completo antes de intentar ensamblar, operar o instalar el
producto.
Al usar electrodomésticos, siempre debes seguir las precauciones básicas de seguridad para
reducir el riesgo de incendio, descarga eléctrica y lesiones, por ejemplo:
1. Usa el ventilador sólo para su propósito original tal como se describe en el manual de
instrucciones.
2. Para evitar una descarga eléctrica, no sumerjas la unidad, el enchufe o el cable en agua ni
los rocíes con líquidos.
3. Es necesario vigilar atentamente el electrodoméstico si será usado por niños o cerca de
ellos.
4. Desenchúfalo del tomacorriente cuando no esté en uso, al trasladar el ventilador de un
lugar a otro, antes de poner o sacar piezas, y antes de limpiar.
5. Nunca introduzcas los dedos, lápices ni ningún otro objeto a través de la rejilla cuando el
ventilador esté funcionando.
6. Desenchufa el ventilador antes de limpiarlo.
7. Comprueba que el ventilador esté sobre una superficie estable mientras funciona, para
evitar que se voltee.
8. No utilices el ventilador en ventanas. La lluvia podría causar riesgo de descarga eléctrica.
9. No lo enciendas donde haya gases explosivos y/o inflamables.
10. No coloques el ventilador o cualquiera de sus piezas cerca del fuego o cerca de otros
electrodomésticos de cocción o calefacción.
11. No uses ningún electrodoméstico que tenga un cable o enchufe dañados, o si se ha caído,
no funciona o se ha dañado de cualquier manera.
12. Para desconectar, sujeta el enchufe y sácalo del tomacorriente de la pared. Nunca tires
del cable.
13. Siempre úsalo sobre una superficie seca.
14. Este producto esta diseñado sólo para uso en el hogar y no para uso comercial o industrial.
15. No utilices el ventilador cerca de cortinas, plantas, artículos decorativos para ventanas, etc.
16. No uses ventiladores con el cable o el enchufe dañado. Deséchalo o devuélvelo al centro
de mantenimiento autorizado para que sea revisado y/o reparado.
17. No pasar el cable debajo de alfombras. No cubrir el cable con tapetes, alfombras de pasillo
o cubiertas similares. No colocar los cables debajo de muebles o electrodomésticos.
Coloca el cable lejos de las zonas de alto tráfico, donde alguien pueda enredarse con él y
caer.
18. ADVERTENCIA:Para reducir el riesgo de descarga eléctrica o lesiones a personas, no
utilices este ventilador cerca de puertas ni ventanas.
19. ADVERTENCIA:Para reducir el riesgo de incendio o descarga eléctrica, no utilices este
ventilador con ningún dispositivo de control de velocidad de estado sólido.
CARE AND MAINTENANCE
Follow these instructions to correctly and safely care for your fan. Please remember:
• Always unplug the fan before cleaning or disassembling.
• Do not allow water to drip on or enter into fan housing.
• Be sure to use a soft cloth moistened with a mild soap solution.
• Do not use any of the following as a cleaner: gasoline, thinner, or benzene.
Fan Blade Cleaning Instructions
1. Use a Phillips screw driver to remove the screws located around the front grille and shroud.
2. Remove the front grille.
3. Clean blade with a soft cloth moistened with a mild soap solution.
4. Replace front grille onto the shroud and secure with the screws removed in step1.
LEE ESTAS INSTRUCCIONES DE SEGURIDAD IMPORTANTES Y GUÁRDALAS.
ENCHUFE POLARIZADO
NOTA:Este electrodoméstico tiene un enchufe polarizado (una clavija
es más ancha que la otra). Este enchufe polarizado no está diseñado
para usarse en tomacorrientes no polarizados (con ambas ranuras del
mismo tamaño). Para reducir el riesgo de descarga eléctrica, este
enchufe está hecho para encajar en un tomacorriente polarizado sólo
de una forma. Si el enchufe no encaja completamente en el
tomacorriente, dale vuelta. Si aún no entra, contacta a un electricista
certificado para instalar el tomacorriente adecuado. No Intentes
modificar este enchufe o burlar este sistema de seguridad de ningún
modo.
8
5
ARTÍCULO Núm. 856516
50,8 cm Ventilador de Piso
de Alta Velocidad con Cubierta
MODELO Núm. HDF50-SP
6
7


![reply_card [Converted]](http://vs1.manualzilla.com/store/data/006431610_1-a96cdf9e94afe173ba2eb2b834531732-150x150.png)