Transcript
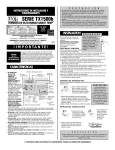
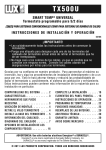
Complete, Easy To Read
INSTALLATION AND
OPERATING INSTRUCTIONS
WIN100 SERIES
®
SMART TEMP ELECTRONIC THERMOSTAT
LUX PRODUCTS CORPORATION
Mt. Laurel, New Jersey 08054, USA
52020
PREPARING THE UNIT
HOLD
1. The WIN100 comes with (2) G13A size 1.5V Alkaline
Button Cell Batteries already installed. These batteries
power the clock only during normal operation. They also
provide backup power to retain the thermostats
programs and settings while it is not plugged into the
wall. In order to "activate" them, you must remove the
black ribbon from between the two batteries prior to
using it. Use a small regular screwdriver to pry open the
battery holder and pull out the black ribbon.
Hold is the simplest method to maintain fixed set
temperatures.
● Press HOLD once to enter the temperature HOLD
while in RUN or OVERRIDE. HOLD will be displayed on
the bottom of the display.
● Pressing this button again will toggle HOLD off and
return the unit to RUN and the programmed set
temperature.
● Changing system mode or rotating the SPEED DIAL®
will also cancel a HOLD.
I M P O R TA N T !
Please read all instructions carefully before
beginning installation.
Save them for future reference.
EXTERNAL
TEMPERATURE
SENSOR
WARNING:
FOR USE ONLY WITH AIR CONDITIONERS AND SPACE
HEATERS THAT AUTOMATICALLY RESTART COOLING OR
HEATING OPERATION AFTER POWER RECONNECTION
Thank you for your confidence in our product. To
obtain the best results from your investment, please
read these instructions and acquaint yourself with your
purchase before installing your new thermostat. Then
follow the installation procedures, one step at a time.
This will save you time and minimize the chance of
damaging the thermostat and the systems it controls.
These instructions may contain information beyond
that required for your particular installation. Please save
for future reference.
COMPATIBILITY
Your WIN100 Programmable Outlet Thermostat is
compatible with 120Volt, 15 Amp Plug, 60 Hz Window
Air Conditioning Units and Portable Space Heaters
only. It cannot be used with typical 24 V systems,
hydronics systems, or heat pumps. Ask your dealer for
other LUX thermostats to control those systems.
FEATURES
5
OVERRIDE allows you to change the current SET
TEMPERATURE in HEAT of COOL until the next program
period without changing your temperature control
programs.
SCREWDRIVER
● Press an arrow key once.
● While the Set Temperature is flashing; press an UP or
DOWN key to adjust the set temperature by one degree
BATTERY PANEL in the associated direction. Holding the key will
automatically advance the setting in the associated
RIBBON
direction.
BACK OF UNIT
● The OVERRIDE will be canceled at the start of the
next program period, and the temperature setting will
return to its programmed value.
2. When you have the black ribbon out, simply push the ● An OVERRIDE may be terminated by rotating the dial,
battery compartment back in while lining up the arrows. switching the mode to OFF, or initiating a Hold.
3. On the back of the
● Adjusting the set temperature to its program value will
EXTERNAL TEMPERATURE
WIN100, there is an
SENSOR
also cancel an OVERRIDE.
External Temperature
Sensor that looks like
an antenna. Pull this
ON/OFF SWITCH
sensor out of its clip
and bend the wire so
that it point straight
EDITING HEAT OR COOL PROGRAMS
up. This is required
The WIN100 provides two separate programs, one for
for accurate
heating and the other for cooling. Each program has
temperature control.
separate settings for weekdays and weekends. Every
day a program cycles through four independent periods.
4. On the upper right
You can use the default programs or alter them to suit
side of the unit, there
your schedule.
is an On/Off switch.
Place this switch in
DEFAULT TEMPERATURE PROGRAM
the OFF position for
As supplied from the factory, the following ENERGY
right now.
STAR® approved program will be used for temperature
control in RUN MODE. This program and all other
software settings may be restored to their default values
MOUNTING
via a SOFTWARE RESET.
If any plugs do not fit into the receptacle that you
are trying to plug into, Stop, the WIN100 is not
designed for this application.
● If the cord you are plugging into the WIN100 only
has 2 prongs, STOP, not having
a ground wire is unsafe. Your
Window Air Conditioner or Spacer
Heater must have a plug with 3
prongs on it.
●
1
3
4
5. Plug the WIN100 straight into a 110 Volt electrical
outlet on the wall nearest your Air Conditioning Unit or
Space Heater.
1. ON/OFF SWITCH
4. HEAT/COOL SWITCH
2. SOFT TOUCH BUTTONS 5. EXTERNAL TEMPERATURE
6. Plug in the electrical cord from your Window Air
3. LUX SPEED DIAL
SENSOR
Conditioner or Space Heater directly into the front of the
● Heating and Cooling
● Separate Programs for
WIN100.
● Electronic
Heating and Cooling
COMPLETING
YOUR INSTALLATION
● Armchair Programming
● Programmable
7. Configure your thermostat at this time. Refer to
● Easy Programming with
● Plugs into normal 110
OPERATING INSTRUCTIONS.
LUX Speed Dial® (Patent # 8. Turn the ON/OFF switch on the upper right side to
Volt 15 Amp Electrical
5,673,850)
Outlet
the ON position.
● Battery Free Nonvolatile
● 5/2 Day Programming
9. Turn on your Air Conditioner or Space Heater and
(Weekdays and Weekends Memory For All Programs turn the thermostat all the way up. (This will allow the
And Settings
can be different)
WIN100 to control the room temperature and maintain a
● ETL Approved
● Energy Star® Compliant
specific temperature)
● User Calibration
● Default Energy Star®
10.Verify that the Window Air Conditioner or Space
● On Screen Low Battery Heater and its fan are operating properly. When set to a
Approved Program
● Positive On/Off Switch
Indicator
high temperature, the heating system should provide
● F/C Temperature
● Easy to Install
warm air after a short time. Likewise, a cooling system
Display
should provide cool air after a short time. Usually sound
● 4 Periods Per Day
● Soft Touch Buttons
can be heard while they are running. The rush of moving
● 120VAC Powered with
air should be heard within a short time after either has
● 2 Minute Short Cycle
Batteries
been started.
Protection
● 2 G13A size 1.5V
● Adjustable Temperature 11.Your installation is now complete.
Alkaline Button Cell
differential/Cycle Rate (#1
Batteries Included (For
thru #9)
Clock Only)
● 1 Year Warranty
● Temporary and
Constant Temperature
RUN MODE
Override
For the thermostat to function, the dial on the face of
the thermostat must be turned to the RUN position. If
ELECTRICAL RATINGS
● 120V/60 Hz
you forget to do this, it will not work and the door will not
● Maximum load is 15 Amps at 120 Volts
close all the way.
● Power Consumption 2 W (maximum)
UP/DOWN CHANGE KEYS
● Plug and Receptacle NEMA 5-15R (normal
● These are the two upper keys, just right of the unit’s
household 15 Amp receptacle)
display. They are used to adjust set temperatures, and
make other setting changes.
W A R N I N G S :
● Pressing these keys once will adjust a setting one step
● Read all instructions before using this thermostat.
in the associated direction.
● To reduce the risk of electric shock, this product
● If there are many choices for a value, usually that
has a grounding type plug that has a third
setting will advance while holding one of these keys.
(grounding) pin. This pin will only fit into a grounding Some settings though, must be changed one press at a
type power outlet. If the plug does not fit into the
time.
outlet, contact a qualified electrician to install the
SET DAY AND TIME
proper outlet. Do not change the plug in any way.
● Do not use Outdoors.
To set the correct time after the unit has lost power or
after reset:
● Do not use in a bathroom. Never locate where it
1. Open the door on the front of the thermostat by lifting
may fall into a bathtub or other water container.
● Do not insert or allow foreign objects to enter any
up the bottom of the door.
openings as this may cause electric shock, fire, or
2. Rotate the dial to SET DAY AND TIME.
damage to the thermostat.
The abbreviation for the day of week will flash.
● Do not use in areas where gasoline, paint,
flammable liquids are used or stored.
WE
● Space Heaters can be dangerous if used
improperly. Be sure to follow all the Warnings and
Cautions that came with the instruction manual
written by the manufacturer of the Space Heater.
● Avoid the use of an extension cord because the
extension cord may overheat and cause risk of fire.
3. Use the UP key to advance to the current day.
However, if you have to use an extension cord, the
cord should be a 3-wire, grounding type, with No. 14 4. Press NEXT to adjust the time. Time will flash.
AWG minimum size and rated not less than 1875
5. Use the UP/DOWN keys to set the time.
Watts.
6. Pressing NEXT again will toggle from Set Time to Set
● Use this thermostat only as described in this
Day, or vice versa.
manual. Any other use not recommended by the
7. Return the dial to its RUN position.
manufacturer may cause fire, electric shock, or injury
TEMPERATURE CONTROL MODES
to persons.
When a unit has first been powered up with the dial in
● Never clean this thermostat while it is plugged in.
the RUN position, your thermostat will begin to control
Turn On/Off switch to Off, pull out of the wall, and
your heating and/or air conditioning system according to
then clean by using a rag only.
it's default ENERGY STAR® approved program. There is
a 2-position slide switch to change temperature control
C A U T I O N S :
modes. Slide the switch to the mode you would like to
● Your thermostat is protected against normal static
use.
electric discharges. To minimize the risk of damaging HEAT
the unit in extremely dry weather, touch a grounded ● Use HEAT mode to warm your home with a Space
metal object before touching your thermostat.
Heater.
● Be careful not to drop the unit or disturb electronic
● In HEAT mode, HEAT is displayed right of the set
parts.
temperature.
COOL
● Use COOL mode to control your Window Air
Conditioner, cooling your home.
● In COOL mode, COOL is displayed right of the set
TOOLS REQUIRED: Small regular screwdriver
temperature.
®
OPERATING BASICS
INSTALLATION
LOCATION:
Do not locate where air circulation is poor, such as in
a corner or an alcove; or behind an open door.
● Do not install it where there are unusual heating
conditions, such as: in direct sunlight; near a lamp,
television, radiator, register, or fireplace; near hot water
pipes in a wall; near a stove on the other side of the
wall.
● Do not locate in unusual cooling conditions, such as:
on a wall separating an unheated room; or in a draft
from a stairwell, door, or window.
● Do not locate in a damp area. This can lead to
corrosion that will shorten thermostat life.
● Do not install the unit until all construction work and
painting has been completed.
●
●
PROGRAMMING
W A R N I N G :
2
TEMPERATURE OVERRIDE
ON/OFF SWITCH
Slide the SLIDE switch to OFF when no heating or
cooling is desired. Heating and cooling will be disabled,
even though the set temperature, room temperature, and
time will still be in the display.
DEFAULT PROGRAM
As supplied from the factory, your thermostat will use
its default ENERGY STAR® approved program for
temperature control. This program and all other settings
may be restored to their default values via a SOFTWARE
RESET. Please refer to DEFAULT TEMPERATURE
PROGRAM for program times and temperatures.
PERIOD
HEAT MODE
COOL MODE
Morning 6:00 AM 70°F (21°C) 6:00 AM 78°F (26°C)
8:00 AM 62°F (17°C) 8:00 AM 85°F (30°C)
Day
Evening 6:00 PM 70°F (21°C) 6:00 PM 78°F (26°C)
10:00 PM 62°F (17°C) 10:00 PM 82°F (28°C)
Night
NOTE: Pressing this button will overwrite your
program and install the default values of all
temperature programs and setup values into the
unit's nonvolatile memory. To ease
reprogramming later, record your thermostat's
programs and settings in the table provided at
the page bottom before using this button.
TEMPERATURE VARIATION / SWING
Your thermostat works by turning your heating or
cooling system on and off whenever the room
temperature varies a certain number of degrees from
the set-point temperature. This variation is the
"swing". Your system should cycle on about 3 to 6
times per hour. A smaller swing number increases the
number of cycles, so room temperature is more
constant. A larger swing number decreases the
number of cycles, saving energy in most cases.
SWING ADJUSTMENT
This setting controls when the heating or cooling
turns on and off.
The Swing setting sets the temperature variation the
system allows above or below the set temperature
before turning on the heating or Cooling. To change
this value:
1. Rotate the SPEED DIAL® to RUN.
2. Press NEXT and HOLD simultaneously. The
Temperature section of the display shows a single digit
number between 1 and 9.
●
3. Select one of the 9 values the UP/DOWN buttons.
4. 1 is the maximum comfort setting (narrow control).
9 is the maximum energy savings setting (wide control).
5. Press NEXT
TEMPERATURE DISPLAY FORMAT
This feature allows you to display temperature in
either degrees C or degrees F.
● To toggle the display mode from Fahrenheit to
Celsius or vice versa press and release [NEXT] and
[HOLD] simultaneously in <SET WEEKDAY
PROGRAMS> position.
●
WEEKDAY PROGRAMMING
To change the HEAT or COOL program:
● Set to HEAT if you are using a Space heater.
● Set to COOL if you are using a Window Air
Conditioner
● Rotate dial to SET WEEKDAY PROGRAMS.
MORN, Mo, Tu, We, Th, Fr will be displayed, with the
Start Time flashing.
Programming is performed in the following order.
1. Weekday Morn Start Time
2. Weekday Morn Set Temperature
3. Weekday Day Start Time
4. Weekday Day Set Temperature
5. Weekday Eve Start Time
6. Weekday Eve Set Temperature
7. Weekday Nite Start Time
8. Weekday Nite Set Temperature
9. . . . and so on until Fri Nite is fully programmed at
which point pressing NEXT again will begin the list at
Mo - Fri Morn Start Time.
● Use the UP/DOWN keys to change the start time for
this period. Press UP/DOWN buttons to change the
time in 15-minute increments. Hold UP/DOWN button
to change the time at a faster rate.
● One period ends at the start time of the next period.
The end of one period may not be any closer to the
beginning of the next period than one 15-minute
increment. Moving a start time too close to the next
start time results in the latter time being pushed ahead
too. Press NEXT to accept the displayed start time and
advance to the SET TEMPERATURE, it will flash to show
that it may be edited.
● The SET TEMPERATURE will be displayed on the right
side of the display with the HEAT or COOL indicator
visible (depending on which mode you have it in)
● Edit the SET TEMPERATURE, then press NEXT to
accept and advance to the next period.
● When all the periods for the weekdays have been set,
the start time for the next weekday Morning period will
be displayed to begin editing the settings for that day.
● Complete programming for all weekdays and rotate
the dial back to RUN to accept all current values and
end the programming session.
WEEKEND PROGRAMMING
Weekend programming is identical to weekday
programming except that you must rotate the dial to
SET WEEKEND PROGRAMS and the days that you
will program are Sa and Su together. This two day
program will repeat.
BATTERIES/MAINTENANCE
The WIN100 comes with (2) G13A size 1.5V Alkaline
Button Cell Batteries. During normal use, these
batteries are used for the clock only. However, they
also serve as backup power to retain your programs
and settings if you unplug it from the wall. These (2)
batteries will need to be changed once every year. The
thermostat will alert you when the batteries are low by
displaying "LO BATT" in the display.
BATTERY INSTALLATION
1. Remove fresh batteries from their carton.
2. Remove the thermostat from the electrical outlet.
3. Use a small regular screwdriver to remove the
battery cartridge from the back of the thermostat. Use
the small regular screwdriver to remove the 2 batteries
from the holder.
4. Remove the used batteries if present and replace
them within 90 seconds to avoid having to reset the
day and time.
5. Install two new G13A size 1.5V Alkaline Button Cell
Batteries batteries. Observe the polarity marking
(pictures) shown on the battery cartridge.
6. Push the battery compartment back into the
WIN100 while lining up the arrows.
7. Plug the thermostat back into the wall.
TECHNICAL ASSISTANCE
If you have any problems installing or using this
thermostat, please carefully and thoroughly review the
instruction manual. If you require assistance, please
contact our Technical Assistance Department at 856CALIBRATION OFFSET
234-8803 during regular business hours between
Your thermostat is accurately calibrated at the factory 8:00AM and 4:30PM Eastern Standard Time, Monday
to within + 1°F. An offset value up to +5°F may be
through Friday. You can also receive technical
added to the temperature value that the thermostat
assistance online anytime day or night at
measures. This may allow you to match this thermostat http://www.luxproducts.com. Our web site offers you
to another. To change this offset from its default value of answers to the most common technical questions, and
0:
also permits you to email your questions to our
1. Open the door on the front of the thermostat.
technical support staff at your convenience.
2. Rotate the dial to SET DAY/TIME.
3. Simultaneously press NEXT and HOLD. The
Temperature Offset value will flash.
ADVANCED FEATURES
WARRANTY
Limited Warranty: If this unit fails because of defects
in materials or workmanship within three years of date
of original purchase, LUX Products Corporation will, at
its option, repair or replace it. This warranty does not
cover damage by accident, misuse, or failure to follow
installation instructions. Implied warranties are limited
in duration to three years from date of original
purchase. Some states do not allow limitations on how
long an implied warranty lasts, so the above limitation
4. The default value is 0 and in most cases should
may not apply to you. Please return malfunctioning or
remain untouched.
defective units to the participating retailer from which
5. Use the UP/DOWN keys to adjust the offset value. purchase was made, along with proof of purchase.
6. Return the dial to its RUN position to accept the new Please refer to "TECHNICAL ASSISTANCE" before
value.
returning thermostat. Purchaser assumes all risks and
liability for incidental and consequential damage
SOFTWARE RESET
resulting from installation and use of this unit. Some
Use this feature to make all settings and programs
return to their default values. Press and release [RESET] states do not allow the exclusion of incidental or
consequential damages, so the above exclusion may
button using a pen or pencil. It will perform a system
not apply to you. This warranty gives you specific legal
check and then returns all settings to their original
rights and you may also have other rights which vary
default values before initiating normal operation.
from state to state. Applicable in the U.S.A. only.
DAY
PERIOD
HEAT
TIME
MON.
THRU
FRI.
SAT.
and
SUN.
MORN
DAY
EVE
NIGHT
MORN
DAY
EVE
NIGHT
© COPYRIGHT 2006 LUX PRODUCTS CORPORATION. ALL RIGHTS RESERVED
COOL
TEMP.
TIME
TEMP.