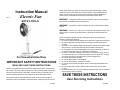
1
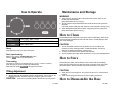
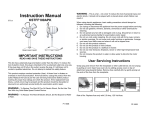
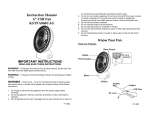
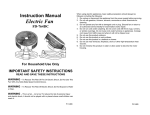
outlet. Replace the fuse as per the user servicing instructions (follow product marking for proper fuse rating) and check the product, If the replacement fuse blows, a short-circuit may be present and the product should be discarded or returned to an authorized service facility for examination and/or repair. Instruction Manual ETLus Electric Fan KSTFA120AG WARNING – To Reduce The Risk Of Fire Or Electric Shock, Do Not Use This Fan With Any Solid-State Speed Control Device. WARNING – To Reduce The Risk Of Electric Shock, Do Not Expose to Water or Rain. WARNING – This is a fan – not a toy! To reduce the risk of personal injury and electric shock, it should not be played with or placed where small children can reach it. For Household Use Only IMPORTANT SAFETY INSTRUCTIONS READ AND SAVE THESE INSTRUCTIONS This fan has a polarized plug (one blade is wider than the other). To reduce the risk of electric shock, this plug is intended to fit in a polarized outlet only one way. If the plug does not fit fully in the outlet, reverse the plug. If it still does not fit, contact a qualified electrician. Do not attempt to defeat this safety feature. This product employs overload protection (fuse). A blown fuse indicates an overload or short-circuit situation. If the fuse blows, unplug the product from the P1-14606 When using electric appliances, basic safety precautions should always be followed, including the following: 1. Do unplug or disconnect the appliance from the power supply before servicing. 2. Do not use gasoline, thinners, solvents, ammonias or other chemicals for cleaning. 3. Do clean your fan regularly. Refer to the Cleaning instructions provided. Never clean the fan in any manner other than as instructed in this manual. 4. Do not operate any fan with a damaged cord or plug. Discard fan or return to an authorized service facility for examination and/or repair. 5. Do not run cord under carpeting. Do not cover cord with throw rugs, runners, or similar coverings. Do not route cord under furniture or appliances. Arrange cord away from traffic area and where it will not be tripped over. 6. Do not use this product outdoors. 7. Do not use this product on wet surfaces. 8. Do not use this product in a bathtub or shower. 9. Do not use near furnaces, fireplaces, stove or other high-temperature heat sources. 10. Do not immerse this product in water or allow water to drip into the motor housing. 11. Do not position this fan too close to draperies because they may be drawn into the rear guard, cutting off airflow. SAVE THESE INSTRUCTIONS User Servicing Instructions P2-14606 Grasp plug and remove from the receptacle or other outlet device. Do not unplug by pulling on cord. Open fuse cover (A.) by sliding access cover on top of attachment plug towards blades. Remove fuse carefully (B.) by gently prying out the ends of the fuse from the receptacle. Parts and Their Function Risk of fire. Replace fuse only with 2.5 Amp, 125 Volt fuse. Install replacement fuse (C.) by first placing the end of the fuse into the fuse receptacle which is opposite of the blades of the plug, then carefully push in the other end. Only push against the metal end of the fuse, not the glass center portion. Close the fuse access cover (D.) by sliding the cover back into the plug until it is completely closed, latches and is flush with the face of the plug. Risk of fire. Do not replace attachment plug. Contains a safety device (fuse , AFCI, LCDI) that should not be removed. Discard product if the attachment plug is damaged. Parts Function ●Height adjust button Use only when higher position required. Pressing the height adjust button, pull the slide pipe upwards. When lower position required, just push the slide pipe downwards. You can adjust the height in 2 steps. Caution: Be careful not to pinch fingers. ●Swivel button Press down…Swivel starts Pull up…Swivel stops How to Assemble Know Your Fan P4-14606 P3-14606 P4-14606 CAUTION: Do not insert the plug into the power point before assembly is complete. (May cause electric shock or injury) Do not press height adjustment button while fan and fan guard are detached. (The motor section (slide pipe) may jump out of stand, causing injury) ●Couple protrusions (three) on the motor section to concaves (three) on the rear guard. ●Fix them firmly by turning the guard fixing ring toward [fasten]. ●Couple the pin on the motor shaft and the concave on the fan blade and insert the fan part into the motor part. Then pressing the fan part towards the motor part and turn the fan blade cap toward [fasten] to fix them firmly. 1. Fix the stand onto the base ●Remove the motor shaft cover. ●Check the stand direction by the indication of front and back of the base and stand, insert the front protusions of stand into the concav -es of the base, then push the whole stand part down onto the base until it is fitted in firmly. ●Placing the motor shaft upward, then fix the stand and base by turning the base fixing ring provided clockwise. Attention: ● If the fan blade cap is not fastened firmly enough, fan blade may come off, causing injury. ● Be careful not to be injured by motor shaft or pin when assembling or disassembling. 3. Fix Front Guard Attention: ● Base fixing ring is temporarily attached on bottom of stand. Unscrew it When you assemble the fan. ● Do not forcibly push the stand down onto the base. May cause damage. ● Do not put the stand onto the base in wrong direction. May cause damage. ● Do not press the height adjust button while assembling. May cause injury, damage to the product or machine failure. ●Hold the rear guard and press the front guard toward the rear guard from the top, making sure that the whole periphery of the front guard clicks into the rear guard. ●Clip the front and rear guard together with the clip on the guard. Attention: ● If the front guard is not clipped together firmly enough, the front guard may come off, causing injury. How to Take off Front Guard Unplug first and stop the ratation of the fan blade. Then undo the clip and pull the grip on the guard ring, pressing the front guard down. Attention: Do not pull by the clip. May damage the clip. 2. Fix Rear Guard and Fan Blade P5-14606 P6-14606 How to Operate Maintenance and Storage WARNING When cleaning, the plug must be removed from the power point. Do not handle plug with wet hands. [May cause electric shock or injury.] Do not press the height adjustment button while the fan and fan guard are detached. [The motor section (slide pipe) may jump out of the stand part, causing injury.] When disassembling the base or stand, unplug plug from the power point. [May cause electric shock or injury.] How to Clean SPEED ON TIMER OFF TIMER STOP/ LOW - MID - HIGH Select TIMER ON (0 -0.5-1.0-1.5-2.0-2.5-3.0 Hour) Select TIMER OFF Disassemble the fan and guard in the inverse order of assembling. Wash off dirt and dust with well squeezed wet soft cloth with water or neutral detergent, then wipe off the detergent. CAUTION: Ready Insert the power plug into a 120V power point. Start (speed setting) Switch on by pushing [LOW - MID - HIGH] button. Pushing [STOP] button to end the operation. How to Store Timer setting Disassemble fan, guard, stand and base in the inverse order of assembling. Clean the motor shaft and oil put the motor shaft cover back to the motor shaft. Store these parts in the box provided at purchase and keep in a dry place. Turn timer on, select at your desired time (0 -0.5-1.0-1.5-2.0-2.5-3.0 Hour). (After the time you set, the fan will stop automatically) When the timer is set [TIMER OFF], will stop timer function. CAUTION: Tilting Adjustment Always switch the fan off before making a tilt adjustment. The air flow can be adjusted upward or downward simply by moving the guard up or down. CAUTION: Do not use volatile solvents such as gasoline, thinner, benzene, wax, kerosene, alcohol, polishing powder, or alkaline detergent. These may discolour or damage the machine, causing injury. If using a chemical dust cloth, follow those instruction. Do not oil plastic parts. May cause discoloration or injury from damaged parts. In the case of no blades installed, Please don't run the product. P7-14606 When the fan is not facing front, do not force the fan to turn. Use the swivel function. Clean the fan and guard referrring to [ How to Clean], then store it. How to Disassemble the Base P8-14606 1. Put the motor shaft upward, then unscrew fixing ring by turning anticlockwise. (Refer to the drawing at below) Holding the base firmly, then pull the base. CAUTION: If the motor shaft is facing downward, the fan will become unstable and may damage the product or floor. When putting the motor shaft down, the fan is unstable. May cause machine failure and damage to floor. 2. Hold the stand firmly and gently lift and remove the base. Technical Specifications Voltage Fan Speed Timer 120V~60Hz Power Consumption ?A or ?W STOP/ LOW - MID - HIGT 0 -0.5-1.0-1.5-2.0-2.5-3.0 Hour P9-14606