1
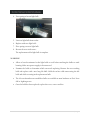
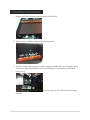
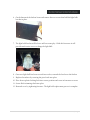
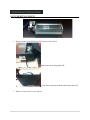
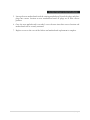
Electric Fireplace
CARE & USE GUIDE
Yosemite Home Décor
1-800-305-9872
www.YosemiteHomeDecor.com
____________________________TABLE OF CONTENTS_______________________________
Page
LIGHT BULB REPLACEMENT ………………………………………………………………………………………………...
3
LIGHT BULB REPLACEMENT (DF-EFP1000) …………………………………………………………………...
5
LIGHT BULB REPLACEMENT (Freestanding) …………………………………………………………………...
8
ROD REPLACEMENT …………………………………………………………………...……………………………………………
9
MOTOR REPLACEMENT ………………………………………………………………………………………………...………
11
BLOWER REPLACEMENT ………………………………………………………………………………………………...……
14
PRINTED CIRCUIT BOARD REPLACEMENT ……………………………………………………………………
16
DF-EFP700 SPEAKER/USB PORT REPLACEMENT …………………………………………………………
18
ELECTRIC FIREPLACE TROUBLESHOOTING GUIDE …………………………………………………
19
2|P a g e
LIGHT BULB REPLACEMENT_____________________________________________________
Yosemite Home Décor’s Electric fireplaces use Incandescent candelabra bulbs, rating voltage 120
volts, 40 Watt, E-12 small socket base light bulbs.
Changing Light Bulbs
Disconnect power supply before beginning any maintenance.
1. Light bulbs need to be replaced when you notice a dark section of the flame or when
clarity and detail of the coal effect disappears.
2. Unscrew the locking nut on the side of the brackets and then remove the face. This is
done by lifting the face up and swinging the face clear of the fire. Care should be taken
not to damage the face. Removal of the face may require two people.
3. On the base of the fire there are screws on both sides. These need to be removed to allow
the cover to slide down.
3|P a g e
4. Turn spring to loosen light bulb
5. Unscrew light bulb from socket
6. Replace with new light bulb
7. Place spring over new light bulb
8. Re-attach cover with screws
The replacement of the light bulb is complete.
WARNING
•
Allow at least five minutes for the light bulbs to cool before touching the bulbs to avoid
burning. Make sure power supply is disconnected.
•
Examine the bulbs to determine which one needs replacing. Remove the non working
bulb and replace with a new long life bulb. Hold the socket while unscrewing the old
bulb and while screwing in the replacement bulb.
•
The 40 watt Incandescent candelabra bulbs are available at most hardware or Do it Your
Self or Lighting stores.
•
Once the bulb has been replaced, replace the cover, screws and face.
4|P a g e
LIGHT BULB REPLACEMENT for DF-EFP1000__________________________________
1. Unscrew top cover from firebox. (Screws must be taken off from side and back of
firebox).
(view of the side of the firebox)
(view from the back of the firebox)
2. Locate screws that hold brown plastic background in place, unscrew and remove
backing.
5|P a g e
3. Remove the black trimming from the inside of the firebox.
4. Remove screws and then slide out the glowing embers
5. With the embers taken out it is possible to change the light bulb by twisting the spring
and unscrewing the light bulb however, the following two instructions will help for
easier access.
(view from the top of the firebox down through
the unit)
6|P a g e
6. On the bottom of the firebox locate and remove the two screws that hold the light bulb
bracket in place.
7. The light bulb bracket will be loose and have some play. With this looseness it will
provide much easier access to change the light bulb.
8. Once new light bulb has been screwed into socket, reattach the bracket to the firebox.
9. Replace the embers by screwing the piece back into place.
10. Place brown plastic backing back into correct position and screw in fasteners to secure.
11. Secure black trimmings back into place.
12. Reattach cover by tightening fasteners. The light bulb replacement process is complete.
7|P a g e
LIGHT BULB REPLACEMENT_____________________________________________________
1. Open the light bulb area:
The light bulb area is at the back of electric fireplace, see “E”. There are 6 screws on it.
Loosen the screw and then you can open it.
2. Examine the bulbs to determine which bulbs require replacement.
3. Remove the old bulb and replace a new one. Hold the socket while unscrewing or
screwing bulbs.
4. Re-place the access cover of the unit.
Bulb Requirement:
Light bulbs are 40 watts, 120 volts Candelabra with an E-12 small socket base.
There are quantity 2 or 3 bulbs required depends on the Electric fireplace you purchased.
Warning:
•
•
Disconnect power before attempting any maintenance or cleaning to reduce the risk of
fire, damage or electric shock to persons.
Allow at least 5 minutes for light bulbs to cool off before touching bulbs to avoid burning
of skin.
8|P a g e
ROD REPLACEMENT______________________________________________________________
Disconnect power supply before beginning any maintenance.
Place the Front glass in safe position.
1. Unscrew top cover from firebox.
2. Unscrew side screws that will allow for glass to slide off.
3. Locate screws that hold brown plastic background in place, unscrew and remove
backing.
9|P a g e
4. Remove the black trimming from the inside of the firebox.
5. Remove screws and then slide out the glowing embers.
6. The rod is secured by a pin along with a bracket on either side of the firebox. Loosen the
bracket that doesn’t contain the motor by unscrewing the fasteners
7. Detach the pin from the unit.
8. Remove rod.
9. With new rod measure to the correct dimension, cut and place where original rod was
located.
10. Place brown plastic backing back into correct position and screw in fasteners to secure.
11. Secure black trimmings back into place.
12. Slide glass back into place.
13. Tighten fasteners and cover back into position. The rod replacement process is complete.
10 | P a g e
MOTOR REPLACEMENT__________________________________________________________
1. Unscrew top cover from firebox.
2. Unscrew side screws that will allow for glass to slide off.
3. Locate screws that hold brown plastic background in place, unscrew and remove
backing.
11 | P a g e
4. Remove the black trimmings from the inside border of the firebox.
5. Remove screws and then slide out the glowing embers.
6. The rod is secured by a bracket on either side of the firebox. Loosen the bracket and
remove the rod.
12 | P a g e
7. With rod removed loosen the bracket which holds the motor into place.
8. The motor has a wire attached to the motherboard.
9. Undo the plastic ties which hold the wires in place. Remove the motor wire which is
attached to the motherboard.
10. Place new motor into correct position and attach the wire to the motherboard.
11. Once motor is in correct position reattach motor to bracket
12. Reattach the bracket to the side of the firebox.
13. Reattach rod to bracket
14. Reattach bracket to the firebox.
15. Place brown plastic backing back into correct position and screw in fasteners to secure.
16. Secure black trimmings on the inside of the firebox.
17. Slide glass back into place.
18. Tighten fasteners and cover back into position. The motor replacement process is
complete.
13 | P a g e
BLOWER REPLACEMENT_________________________________________________________
1. Remove front covers off the top and bottom of the firebox.
(Side view of cover being taken off)
(View from the top of the firebox with cover taken off)
2. Remove fasteners that secure blower.
14 | P a g e
3. Follow the wires from the fan down to the heater. In many of our fireplaces they connect
below the light bulb. If this is the case, turn the spring that holds the light bulb into
place, and then unscrew the light bulb.
4. Unscrew the socket bracket that holds the light bulb in place.
5. Remove the fan wires that are connected to the heater. Replace with new fan and wires.
Run wires and fan to the location of where the fan was originally positioned.
6. Put socket bracket for light bulb back on.
7. Place light bulb back in socket. Close bottom cover of the firebox.
8. Once the new fan is in its proper position, screw the fasteners into their correct location
and fan will be securely stationed.
9. Replace screws to the top cover of the firebox and blower replacement is complete.
15 | P a g e
PRINTED CIRCUIT BOARD (motherboard) REPLACEMENT_________________
1. Remove screws from the top of the firebox and the upper part of the backside of the
firebox.
(view from the top of the firebox)
2. Once motherboard is visible you will notice nuts securing the motherboard and with
plugs attached to the existing motherboard.
3. Remove the nuts from the existing motherboard (unit will be loose and only attached by
the plugs)
(top right corner of firebox with cover removed)
4. The plugs will have some play and will be easily transferred over to the new
motherboard. Cutting the ties that hold the plugs together is not necessary.
16 | P a g e
5. Line up the new motherboard with the existing motherboard, detach the plugs and place
plugs into correct location on new motherboard until all plugs are in their correct
position.
6. Once the new motherboard is attached, screw the nuts into their correct location and
motherboard will be securely stationed.
7. Replace screws to the cover of the firebox and motherboard replacement is complete.
17 | P a g e
SPEAKER/USB PORT on DF-EFP700 REPLACEMENT_________________________
5. Unlatch the cover faceplate from the firebox.
6. Loosen screws that attach the speakers from the firebox.
7. Untie the ties from the faceplate.
8. Unplug wires at the connecting point.
9. Place new speakers into correct location and plug in wires at connecting point.
10. Retie ties to the faceplate.
11. Attach speakers back to firebox with by tightening appropriate screws.
12. Reattach faceplate
18 | P a g e
ELECTRIC FIREPLACE TROUBLESHOOTING
Try the solutions suggested here first in order to avoid the cost of an unnecessary service call.
Problem: No Power
• Check unit is plugged into a standard 120V outlet.
• Check that Main Power Switch is in “ON” position.
Problem: There is a dark spot at the base of the fireplace.
• Check the bulb most likely a bulb needs to be replaced. The Electric
fireplaces take 40 watt candelabra base bulbs and can hold anywhere from
2-6 bulbs in the fireplace.
Problem: Fireplace doesn’t turn on when turned on by remote or switch; you
can hear a click but no image.
• Check the bulbs. It is rare that all of the bulbs will burn out at the same
time, replacing the bulbs should fix the problem, but if all of the bulbs burn
out at the same time again it is possible the fireplace may need a new
control board. The fireplaces take 40 watt candelabra base bulbs and can
hold anywhere from 2-6 bulbs in the fireplace.
Problem: Fireplace makes a grinding/rattling noise when running
• The Rod that spins the flame may need to be greased.
Problem: When the fireplace is turned off by remote and the image freezes.
•
The control board needs to be replaced
19 | P a g e
PROBLEM
POSSIBLE CAUSE
CORRECTIVE ACTION
Power cord was not
plugged properly.
1. Check that unit is plugged into a
standard 120V outlet.
2. Check that Main Power switch is in
“ON” position.
Flame images freezes
Spinner motor does
not work.
1. Open the access panel and check if the
spinner motor is running properly.
2. If problem persists, unplug unit and
contact YHD customer service
Flame not bright or not
visible
Burned out light bulbs
Replace light bulbs
Log set dim or not glowing
Burned out light bulbs
Replace light bulbs
Improper operation
1. Refer to instruction manual
2. If problem persists, unplug unit and
contact YHD customer service.
Normal operation
This odor is normal condition caused by
the initial heating of internal parts and
will not occur again.
Heater does not blow warm
air
Heater or blower does
not work properly.
Try turning On/Off button in the control
panel several times to make sure it is at
ON position and the indicator light
should light up at the same time.
Fireplace makes a
grinding/rattling noise
Loose rod
The rod that spins the flame may need to
be greased.
Fireplace does not turn on
Heater is not turning ON
Heater emits an odor
20 | P a g e