Transcript
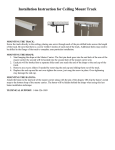
Installation Instruction for Wall/Ceiling Mount Track
Single Track
Double Track
ADDING A TRACK SPLICE: (For use with 12 ft and 16 ft track only)
1. Loosen all 4 clamp screws.
2. Slide track pieces into the track channel of the splice from either side of the
splice, making sure track pieces catch into the front hook of the splice and are under the clamps.
3. Center the cut joint and tighten the 4 clamp screws.
4. If needed, holes are provided in the splice so the splice can be mounted directly to the ceiling. Note:
Screwing the splice unit directly to the ceiling is optional.
LEVEL and SPACED:
Position the mounting brackets level and evenly spaced as needed over the window opening. Note: Take into
consideration either the stud spacing or esthetics of the look after installation is completed, while following the
mounting guidelines and fastener spacing limits in Mounting the Track section.
1. From Floor: Measure up from the floor to a height so that the length of your draperies clear the floor
level, by adding (if any) an additional amount for a desired gap at the bottom.
2. From Window Sill or Window Top: Measure up from the window sill or from the top molding and allow
for the length of the drape to meet or cover the window sill as desired.
MOUNTING THE TRACK:
1. Mount one bracket to the wall or ceiling within 6 inches of each end of the track.
2. Further supports should be spaced no more than 24 inches apart across the track length.
3. Each bracket has a cam lock that is turned to tighten. Place a flat bladed screwdriver into the slot of the
cam and turn it so it locks onto the top bracket mount of the track. The track will lock into the front hook
of the support bracket.
Note: Double brackets can be used as desired for drape/sheer or drape/valance installations.
MOUNTING THE DRAPE:
1. Start hanging the drape at the Master Carrier: The first pin-hook goes into the end hole of the arm of the
master carrier the second will be hooked into the second hole of the master carrier arm.
2. Each pin will be hooked into a separate slider until you reach the end of the drape or the end cap of the
track.
3. Remove any excess sliders if needed by removing the end cap and sliding them out of the track.
4. Replace the end cap and do not over-tighten the screw, just snug the screw in place. Over-tightening
may damage the end cap.
MOUNTING THE BATONS:
Attach the baton to the last hole of the master carrier along with the pin of the drapery OR clip the baton’s metal
snap to the bottom loop of the master carrier. The baton will be hidden behind the drape when using this last
baton installation technique
TECHNICAL SUPPORT: 1-866-326-1989