1
General Electric EZ Light ®
Christmas Trees
Assembly Instructions
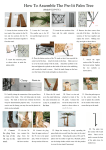
Hint: your assembled tree may be heavy and difficult to
move so place the stand in the desired location before
assembling.
B
C
FOR HINGED TREE
Nicolas Holiday Inc. thanks you for your purchase of this pre-lit
Christmas tree. With proper use and care, your Christmas tree will
provide years of use and memories.
Carefully follow the instructions below on how to assemble and
disassemble your pre-lit Christmas tree.
If you should have any problems with your tree, or if the tree does not
light after assembly, DO NOT return it to the place of purchase. Please
refer to the troubleshooting section of this manual or call our toll free
number: 1-877-398-7337 and a customer support representative will
assist you.
Our customer support center is open Monday through Friday 10AM
to 7PM EST with additional hours throughout the holiday season:
November 14th to December 23rd:
Monday-Friday 8AM to 8PM EST,
Saturday-Sunday: 10AM to 7PM EST
You may also visit us on the web at www.geholidaylighting.com
Enjoy your holiday!
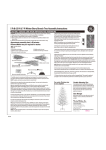
The thumbscrew is to be threaded into the stand.
Insert or back-out accordingly. Look for the bottom
section of the tree, identified by a red-colored plastic
protective cap at the bottom of the
pole. Remove the cap and place the
pole into the tree stand and tighten
the thumbscrew. { Figs.B and C}
Thumbscrew
For some 7 ft to 12 ft trees, after removing
the bubble wrap, look for the tag marked "A" attached
to the outer layer of branches. Remove the cap and
place the pole into the tree stand and tighten the
thumbscrew.
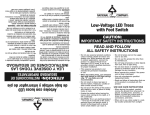
3. Locate and untwist the red metal tie wrap holding
the branches in place.
Hint: if your branches do not fall into place, DO NOT
force down. Gently lift up on the branch panels to
release the branch from its locked position.{Fig. D}
Now, all rows of branches should be in the open position.
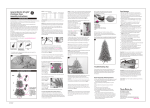
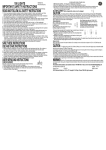
Review Following Terms Carefully
Before adding the next section, follow the shaping
instructions listed below in Step 1.
Plug
Outlet
End Connector
(provided with some trees )
1. Carefully unpack, removing any bubble wrap and inspect the
contents of your tree. {Fig. A}
Step 1: For a natural uniform look, position some
branches outward and some upward. {Fig. E}
Repeat for each branch panel and each tree section.
D
A
B
A
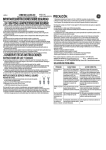
NOTE: No tools required
Approx. Asm Time *
3 ft – 4.5 ft trees
2
Metal
5 – 10 minutes
5 ft – 6.5 ft trees
3
Metal
10 – 15 minutes
7 ft - 9 ft
trees
3 or 4
Metal
10 – 15 minutes
9 ft– 10.5 ft trees
5
Metal
15 – 20 minutes
12 ft
trees
6, or 7
Metal
25 – 30 minutes
* Does not include time for shaping branches, estimated shaping time is 30 minutes/section;
Recommend use of a stepladder for trees over 6 ft ; Recommend two people for 12 ft tree
2. Remove the tree stand from the storage bag and open by pulling
apart two legs on the same side until they are 90 to each other.
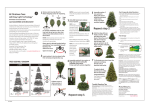
To electrically connect the sections, fully insert the
plug from the extension cord attached to the pole of
the middle section into the extension cord outlet
attached to the pole near the top of the bottom section.
NOTE: due to different metal stand designs, trees are shipped with
the thumbscrew either already threaded into the stand or packaged
separately in a bag. Make certain to check for the thumbscrew
before discarding the storage bag.
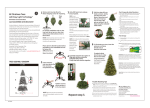
G
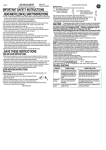
9. Please check your tree for any loose, unlit or
damaged bulbs. They must be replaced promptly in
order to maintain the performance and life expectancy
of your pre-lit tree.
Your Christmas tree is complete and ready to decorate!
H
NOTE: For some 5 ft - 6.5 ft trees fully insert the plug from
the bottom layer of branches from the middle section
into the end connector from the top layer of branches
from the bottom section.
Hint: Shape the top prior to assembly. To shape, gently
press the branches down and away from the center
Insert the top section into the opening at the top of
the last section assembled.(Fig. G) .
NOTE: on some models, the top and bottom sections
are already electrically connected.
Insert the top into the bottom being careful to keep
the cord from entering the opening and damaging
the wires.
1. Remove the tree’s main extension cord plug from
the wall outlet. Do not unplug by pulling on the cord.
2. Starting at the top, untwist the securing cap and
disconnect the male and female connectors between
the top and section B.
3. Carefully lift the treetop straight up* from the lower
section. If tightly seated, then wiggle treetop slightly
to loosen.
* Use of a ladder is suggested to avoid bending of
the treetop. Please exercise care when using a
ladder to maintain balance.
Step A: Gently fold the branches up toward the center.
Care should be taken to avoid damage to the lights.
4. Place the treetop into your original shipping carton
with the top in a corner at one end.
5. Untwist the securing cap and disconnect the male
and female connectors between sections B and A.
6. Remove section B, collapse the hinges, repeat
Step A and set-aside.
7. While holding the tree pole of section A, loosen
the thumbscrew located on the tree stand.
8. Remove section A from the tree stand, collapse
the hinges and repeat Step A.
9. Place section A into the carton with the top of the
section at the opposite end of the treetop, as pole
A lays along side the treetop.
10. To close the tree stand for storage, loosen thumbscrew
sufficiently to then push the legs inward.
11. Place the tree stand vertically along the long side
of the carton or lay it flat on the bottom.
12. Carefully place section B into the carton over the
Treetop with its pole lying along side section A.
13. Seal the carton closed.
A
NOTE: For some 9 ft to 12 ft trees there are two wrapped
extension cords attached to sections marked A and
either B or C.
6.Except for some 7 ft to 12 ft trees, your tree, as
assembled, should now be illuminated. For some
7 ft to 12 ft trees, continue to add the remaining sections,
connecting the plug on the extension cord at the
bottom of the upper section into the extension cord
outlet near the top of the adjoining lower section.
Tree Storage
Important: Store your carton neatly in a cool, dry location
protected from sunlight to prolong the tree life and to
better keep the light
sets in working order.
Do not place a
heavy load on the
carton to avoid
damage to or
crushing the carton
and tree inside.
NOTE: For some 6 ft -7.5 ft trees, the middle section has
one long lead wire. Bring it down the tree and fully
insert the plug into the female end (add-on) of the
plug from the long lead wire from the bottom section
(2 plugs stacked together).
7.Disconnect power to the tree by removing the plug
from the wall outlet. DO NOT remove by pulling on the
cord. The remaining section to assemble is the treetop.
4. If your tree contains only 2 sections, skip to 5.
Locate the middle section, identified by having a green
colored plastic protective cap. Remove the green cap from the
end of the middle section. For some 7 ft to 12 ft trees, look for tags
marked B, then C to F attached to the outer layer of branches.
Starting with “B”, remove the end green cap and proceed.
8. To illuminate the top, fully insert the plug from the top
section into either the end connector or the extension cord
outlet on or near the top layer of branches of previously
assembled pole. Finish Shaping the treetop as necessary
according to the instructions in Step 1. Re-connect power
to the tree. All sections of your tree should now be
illuminated. {Fig. H}
F
Hint: If the tree does not illuminate, try stepping on
the foot pedal as the power may be Off. Also, refer
to the Trouble Shooting Tips section.
NOTE: Before opening stand make certain thumbscrew is loosened/
removed to not interfere with opening legs.
16.7"X11.2"
NOTE: This stabilizes your tree
keeping the middle section
from
F turning and properly
aligning the branch
panels.Untwist
the
F
red metal tie wrap
holding the branches
in place.
Refer to Hint in 3.
Repeat the shaping
instructions in Step 1.
NOTE: For trees without an extension cord, remove the
twist tie from the wrapped lead wire at the bottom of the
tree and fully insert the plug into a working wall outlet.
E
Tree Stand
NOTE: locate the white vertical line at the top of the metal
pole of the bottom section (or the lower section just
assembled). Locate the white mark on the branch holder
frame on the middle section (or the section being assembled).
Align these two visible white marks to assemble the tree
sections together.{Fig. F} NOTE: For white trees, the color
of the distinguishing marks on the pole and branch
holder will be light green.
5.The bottom section of your tree also contains a wrapped
extension cord. Remove the twist tie and straighten
out the cord. At the end of the extension cord is a plug
and on some trees an On/Off FOOT PEDAL. Insert the plug
fully into a working wall outlet. Stepping on the foot
pedal will turn the power to tree On or Off.
TOP
Tree Sections
Find the locating key inside the bottom opening of the
tree pole from the middle section or the section marked “B”.
Find the groove key located at the top of the tree pole from
the bottom section or the section marked “A”. Align the
locating key and groove and insert the middle section
over the opening in the bottom section, sliding the key down
the groove until fully seated.
Trouble Shooting Tips
If the tree does not illuminate, try stepping on the
On/Off FOOT PEDAL and make certain the wall switch
is turned on.
If one section of your tree does not illuminate, check
that section for loose or missing bulbs, all factory
connections are properly made or that you properly
made all the electrical connections between each
tree section, i.e., tree plug to extension cord outlet.
Also, check the fused plug for a missing or burned out
(open) fuse.
Most Frequently Asked Questions
Q. May I add a lighted, decorative tree top to my tree?
A. Yes, There is an outlet on the back of the bladed
plug of the tree top.
Q. May I put blinking or flashing bulbs on my tree?
A. No
Q. May I add extra string sets to my pre-lit tree?
A. No
Q. May I put my pre-lit tree outside?
A. No. Pre-lit trees are for indoor use only.
Q. May I hang glass ornaments on a pre-lit tree?
A. Yes, however, do not hang directly on the wires
of the lights.
Q. May I remove a light string bulb and add a pig
tailed illuminated or animated ornament or motor?
A. No, removing the bulbs and inserting any additional
device into a lamp holder will cause the light set to
cease to operate and may revoke the limited
warranty of this product.
B
TOP
Disclaimer : DO NOT USE OR INSTALL ANY ADDITIONAL
CHRISTMAS LIGHTING OR ORNAMENTATION THAT IS
POWERED BY A LIGHT BULB SOCKET. DOING THIS MAY
RESULT IN DAMAGE TO YOUR CHRISTMAS TREE OR CAUSE
PERSONAL INJURY. DOING THIS, WILL RESULT IN A VOID OF
THE LIMITED WARRANTY OF THIS PRODUCT.
ATTENTION:
Replaceable fused lamps - identified by the
white colored ring at the top of the lamp holder.
Refer to the UL light string instructions when
replacing these lamps.
Spare Parts: Your Tree includes a plastic bag containing
spare bulbs, replaceable fused bulbs, spare 3-amp fuses,
as replacements for the lighting strings and (1) 5-amp fuse.
NOTE: This 5-amp fuse is ONLY to replace an open
fuse in the SHORT extension cord WITHIN a tree section.
The spare 7 amp fuse(s) for the LONG extension cord(s)
at the BOTTOM of your tree are located within the plug
cavity.
Distributed by Nicolas Holiday Inc.,
For indoor use only
©2015 Nicolas Holiday Inc.,
9 F., No. 37, Guangfu North Rd.
Taipei, Taiwan 10560
All rights reserved.
THIS IS NOT A TOY, FOR DECORATIVE USE ONLY.
Printed in China
HG15W
Arboles de Navidad
EZ Light ® de General Electric
B
C
Instrucciones para el ensamblaje
PARA ÁRBOLES CON BISAGRAS
Nicolas Holiday Inc. le agradece por la compra de este árbol de
Navidad preiluminado. Con el uso y el cuidado apropiados, su
árbol de Navidad le brindará años de uso y buenos recuerdos.
Siga con cuidado las instrucciones siguientes para ensamblar
y desarmar su árbol de Navidad preiluminado.
Si tiene cualquier problema con su árbol, o si el árbol no
enciende después de ensamblarlo, NO lo devuelva al lugar de
la compra.
Por favor, consulte la sección de detección de
problemas en este manual o llame a nuestro número
gratuito: 1-877-398-7337 y un representante de atención
al cliente le ayudará.
Nuestro centro de atención al cliente está abierto de lunes
a viernes de 10 AM a 7 PM (hora del este)
con horas adicionales durante la temporada de fiestas.
Del 14 de noviembre al 23 de diciembre:
Lunes a viernes: de 8 AM a 8 PM (hora del este)
Sábados y domingos: de 10 AM a 7 PM (hora del este)
También puede visitarnos por internet en www.geholidaylighting.com
¡Disfrute sus fiestas!
Revise detenidamente los siguientes términos
Enchufe
Conector extremo
Tomacorriente
(se incluyen con algunos árboles )
1. Desempaque con cuidado, retirando cualquier envoltura
protectora, e inspeccione el contenido de su árbol. {Fig. A}
El tornillo manual se debe
enroscar en la base.
Insértelo o desenrósquelo
según sea necesario.
Busque la sección inferior
Tornillo manual
del árbol, identificada por
una tapa protectora de color plástica roja en la
parte inferior del poste. Retire la tapa y coloque el
poste en la base del árbol y apriete el tornillo
manual. {Figs. B y C}
Para algunos árboles de 7 a 12 pies, después de
retirar la envoltura, busque la etiqueta A fija a la
capa exterior de las ramas. Retire la tapa y
coloque el poste en la base del árbol y apriete el
tornillo manual.
3. Busque y desenrosque el fijador metálico rojo
que sostiene las ramas en su lugar.
Consejo: Si las ramas no caen en su lugar, NO
las fuerce hacia abajo. Levante suavemente los
paneles de ramas para liberar las ramas de su
posición trabada. {Fig. D}
Ahora sí se deben abrir todas las hileras de ramas.
Antes de pasar a la próxima sección, siga las
instrucciones para dar forma que aparecen en
el paso 1.
Paso 1: Para una apariencia natural y uniforme,
coloque algunas ramas hacia afuera y otras hacia
arriba. {Fig. E}
Repita esto para cada panel de ramas y cada sección del árbol.
D
A
B
A
TOP
NOTA: No se necesitan herramientas.
Secciones del árbol
Base del árbol
Tiempo de
ensamblaje aproxim.*
Arboles de 3 a 4,5 pies
2
Metal
5-10 minutos
Arboles de 5 a 6,5 pies
3
Metal
10-15 minutos
Arboles de 7 a 9 pies
3ó4
Metal
10-15 minutos
Arboles de 9 a 10,5 pies
5
Metal
15-20 minutos
Arboles de 12 pies
6ó7
Metal
25-30 minutos
* No incluye el tiempo para arreglar las ramas, el tiempo estimado para arreglar
las ramas es de 30 minutos por sección. Se recomienda usar una escalera de
tijera para los árboles de más de 6 pies. Se recomiendan dos personas para
los árboles de 12 pies.
NOTA: Antes de abrir la base, asegúrese de aflojar/retirar el tornillo de
mano para que no interfiera con la apertura de las patas.
2. Retire la base para árboles de la bolsa para almacenamiento y
abra la base extendiendo dos patas del mismo lado hacia afuera
hasta que formen un ángulo recto entre ellas. Para las bases plásticas.
NOTA: Debido a los diferentes diseños de las bases de metal, los árboles
se envían con un tornillo manual ya enroscado en la base o empacado
por separado en una bolsa. Asegúrese de buscar el tornillo manual antes
de desechar la bolsa de embalaje.
Consejo: Su árbol ensamblado puede ser pesado y difícil de
mover, por tanto, coloque la base en el lugar deseado antes de
ensamblar el árbol.
16.7"X11.2"
E
4. Si el árbol sólo tiene 2 secciones, salte al paso 5.
Ubique la sección intermedia, identificada por una
tapa protectora plástica verde. Retire la tapa verde
del extremo de la sección intermedia. Para algunos
árboles de 7 a 12 pies, busque las etiquetas B y
luego C hasta la F fijas a la capa exterior de las
ramas. Comience con la B, retire la tapa verde del
extremo y proceda.
Busque la llave en el interior de la abertura inferior del
poste del árbol en la sección intermedia o la sección
marcada con una B.
Busque la ranura en la parte superior del poste de la
sección inferior o la sección A del árbol. Alinee la llave
con la ranura e inserte la sección intermedia sobre la
abertura de la sección inferior, deslizando la llave en la
ranura hasta que se asiente completamente.
NOTA: Ubique la línea vertical blanca en la parte superior
del poste de metal de la sección inferior (o la sección
recién ensamblada). Ubique la marca blanca de la
estructura de soporte de las ramas en la sección
intermedia (o la sección que está ensamblando). Alinee
estas dos marcas blancas para acoplar ambas secciones
del árbol. {Fig. F} NOTA: En los árboles blancos, el color
de estas marcas en el poste y el soporte de las ramas
será verde claro.
F
NOTA: Esto estabiliza su árbol,
evitando que la sección
intermedia
gire y alineando
F
adecuadamente los paneles
de ramas.
Desenrosque el fijador
metálico rojo que sostiene
las ramas en su lugar.
Refiérase al consejo en la sección 3.
Repita las instrucciones del paso 1 para dar
forma a las ramas.
Para la conexión eléctrica entre las secciones,
inserte el enchufe de la extensión fija al poste de la
sección intermedia en el tomacorriente del poste
cerca de la parte superior de la sección inferior.
NOTA: Para algunos árboles de 5 a 6,5 pies, inserte
el enchufe de la capa inferior de ramas de la sección
intermedia en el conector extremo de la capa superior
de ramas de la sección inferior.
NOTA: Para algunos árboles de 6 a 7,5 pies, la
sección intermedia tiene un cable largo. Bájelo por
el árbol e inserte el enchufe en el conector hembra
del enchufe del cable largo de la sección inferior
(dos enchufes acoplados).
NOTA: Para algunos árboles de 9 a 12 pies, hay dos
extensiones enrolladas acopladas a las secciones
marcadas con la A y la B o C.
5. La sección inferior del árbol también incluye una
extensión eléctrica revestida. Retire el cordón de
amarre y estire el cable. En el extremo de la extensión
eléctrica hay un enchufe y, en algunos árboles, un
PEDAL DE ENCENDIDO Y APAGADO (On/Off).
Inserte bien el enchufe en un tomacorriente de pared
que funcione. Pise el pedal para encender o apagar el árbol.
NOTA: Para los árboles sin extensiones, retire el fijador
del cable enrollado en la parte inferior del árbol e inserte
el enchufe en un tomacorriente de pared.
6. A excepción de algunos árboles de 7 a 12 pies,
su árbol ensamblado debe encender. Para algunos
árboles de 7 a 12 pies, continúe agregando las
secciones restantes, conectando el enchufe de la
extensión en la parte inferior de cada sección en el
tomacorriente de la extensión en la parte superior
de la sección inmediata inferior.
Consejo: Si el árbol no enciende, pruebe a oprimir
el pedal ya que puede estar apagado. Además,
refiérase a la sección de consejos para la detección
de averías.
7. Desconecte la electricidad del árbol retirando el
enchufe del tomacorriente de pared. NO hale el cable
para desenchufarlo. La sección que queda por ensamblar
es la parte superior del árbol.
Consejo: Déle forma a la sección superior antes de
ensamblarla. Para hacer esto, presione suavemente
las ramas hacia abajo y alejándolas del centro.
Inserte la sección superior en la abertura de la parte
superior de la última sección ensamblada.(Fig. G)
NOTA: En algunos modelos, las secciones superior e
inferior ya están conectadas eléctricamente. Inserte
la parte superior en la inferior con cuidado para
evitar que el cable entre en la abertura y se dañen
los alambres.
8. Para encender la sección superior, inserte el enchufe
de la sección superior en el conector extremo o el
tomacorriente de la extensión ubicada cerca de la capa
superior de ramas del poste recién ensamblado.
Termine de darle forma a las ramas si es necesario
según las instrucciones del paso 1. Conecte
nuevamente el árbol. Todas las secciones de su árbol
deben encender. {Fig. H}
G
9. Revise por favor su árbol para detectar cualquier
bombillo suelto, apagado o dañado. Estos se deben
reemplazar inmediatamente para mantener el
rendimiento y la vida útil de su árbol preiluminado.
¡Su árbol de Navidad está completo y listo para decorar!
H
Consejos para la detección de averías
Si el árbol no enciende, trate de pisar el PEDAL de
encendido/apagado y asegúrese de que el interruptor de
pared esté encendido.
Si una sección de su árbol no enciende, revise que
esa sección no tenga bombillos sueltos o faltantes,
que todas las conexiones de fábrica estén hechas
correctamente o que usted haya hecho todas las
conexiones eléctricas de manera correcta entre las
secciónes del árbol, es decir, del enchufe del árbol
al tomacorriente de la extensión y el enchufe al
conector extremo. Verifique también el enchufe con
fusible para detectar si hay algún fusible quemado
(abierto) o faltante.
Preguntas más frecuentes
P. ¿Puedo agregar una punta de árbol decorativa
iluminada a mi árbol?
R. Sí. Hay un tomacorriente en la parte trasera del
enchufe con patas de la sección superior del árbol.
P. ¿Puedo instalar bombillos intermitentes o
centelleantes en mi árbol?
R. No
P. ¿Puedo agregar líneas de luces adicionales a mi
árbol preiluminado?
R. No
P. ¿Puedo colocar mi árbol preiluminado en exteriores?
R. No. Los árboles preiluminados son para uso
interior solamente.
P. ¿Puedo colgar adornos de vidrio de un árbol
preiluminado?
R. Sí, pero no los cuelgue directamente de los alambres
de las luces.
P. ¿Puedo retirar un bombillo y agregar un adorno
iluminado o animado o un motor?
R. No, el quitar un bombillo para insertar cualquier
dispositivo en un portalámpa ocasionará que el juego
de luces deje de funcionar y pudiera revocar la
garantía limitada de este producto.
Almacenaje del árbol:
1. Tome el enchufe del cable principal del árbol y retírelo
del tomacorriente de pared. No hale el cable para desenchufarlo.
2. Comenzando por el tope del árbol, retire el enchufe del
juego de luces de la extensión acoplada al poste cerca
de la parte superior de la sección B.
3. Levante con cuidado el tope del árbol hacia arriba
* para separarlo de la sección inferior. Si estuviera trabado,
mueva ligeramente el árbol para destrabarlo.
* Se recomienda usar una escalera para evitar doblar el
extremo superior del árbol.
Por favor, tenga cuidado cuando use una escalera para
no perder el equilibrio.
Paso A: Doble suavemente las ramas hacia el centro.
Tenga cuidado para no dañar las luces.
4. Coloque el tope del árbol en su caja original con el
extremo en una esquina, a un extremo de la caja.
5. Retire el enchufe del juego de luces de la sección B que
está acoplado al poste cerca de la parte superior de la sección A.
6. Retire la sección B, pliegue las bisagras, repita el paso A
y colóquela a un lado.
7. Mientras sostiene el poste del árbol de la sección A,
afloje el tornillo manual ubicado en la base del árbol.
8. Retire la sección A de la base, pliegue las bisagras y
repita el paso A.
9. Coloque la sección A en la caja con el extremo superior
hacia el lado opuesto del tope del árbol, ya que el
poste A debe quedar al lado del tope del árbol.
10. Para cerrar la base para guardarla, afloje el tornillo
suficientemente y empuje luego las patas hacia adentro.
11. Coloque la base del árbol verticalmente en el lado largo
de la caja o colóquela en posición plana en el fondo.
12. Con cuidado, coloque la sección B en la caja sobre el
tope del árbol con su poste descansando al lado de la
sección A.
13. Cierre y selle la caja.
Importante: Guarde la caja de manera organizada en un
lugar fresco y seco, protegido de la luz solar para prolongar
la vida útil del árbol y el
funcionamiento de los
B
juegos de luces.
No coloque objetos
A
pesados sobre la caja
TOP
para evitar daños y para
no aplastar la caja o el árbol en su interior.
Renuncia de responsabilidad: NO USE NI INSTALE NINGUNA
LUZ O ADORNO DE NAVIDAD QUE RECIBA LA CORRIENTE DE UN
PORTALAMPARA. EL HACER ESTO PUDIERA DAÑAR SU ARBOL DE
NAVIDAD O CAUSAR LESIONES PERSONALES. ESTO CONDUCIRA
ADEMAS A LA ANULACION DE LA GARANTIA LIMITADA DE ESTE PRODUCTO.
ATENCION:
Bombillos con fusible reemplazables - se identifican
por el aro de color blanco en la parte superior del
portalámpara. Refiérase a las instrucciones para juego
de luces de UL cuando reemplace estos bombillos.
Piezas de repuesto: Su árbol incluye una bolsa plástica que
contiene bombillos de repuesto, bombillos con fusible reemplazables,
bombillos con fusible reemplazables fusibles de 3 amperios
como repuestos para el juego de luces y 1 fusible de 5 amperios
NOTA: Este fusible de 5 amperios es SOLAMENTE para el
reemplazo de un fusible abierto en la extensión CORTA
ubicada DENTRO de las secciones del árbol.
El fusible de 7 amperios de repuesto es para la extensión
LARGA de la parte INFERIOR de su árbol y se ubica en la
cavidad del enchufe.
Distributed by Nicolas Holiday Inc.,
Sólo para uso en interiores
©2015 Nicolas Holiday Inc.,
9F., No. 37, Guangfu North Rd.
Taipéi, Taiwán 10560
Todos los derechos reservados
NO ES UN JUGUETE; USE SÓLO PARA FINES DECORATIVOS.
120 voltios Impreso en China
HG15W/SP