1
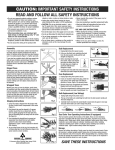
LIMITED WARRANTY FOR ARTIFICIAL CHRISTMAS TREES
Please read this warranty thoroughly and familiarize yourself with its
restrictions and requirements.
National Tree Company warrants its trees against manufacturer-only
defects in material or workmanship for a period of five (5) years
(White trees, one year). The light strings on Pre-Lit trees are warranted
for a period of two (2) years (see below).
PRE-LIT TREES LIMITED WARRANTY
National Tree Company warrants the light sets on its Pre-Lit trees against
manufacturer-only defects in material or workmanship for a period
of two (2) years. Culpability of company is limited to replacement of
defective light set only.
Manufacturer defective parts will be repaired or replaced. Proof of
purchase absolutely required. Keep product away from heat and
moisture. This limited warranty does not cover damage resulting from
accident, misuse, abuse, negligence, or normal wear. In these cases,
parts can be purchased at a reasonable fee plus shipping charges.
Shipping Costs: National Tree Company will pay the cost of shipping (to
our facility and back to customer), under warranty terms, during the first
season of use. After the second season of use, the customer will be
responsible for cost of delivery to our facility. All shipping costs for
warranty service after the third year of use will be the responsibility of
the customer.
WARRANTY SERVICE:
Replacement Tree Terms
If for any uncontrollable reason the
needed parts for repair are not
available, the owner would then
have the option of applying the
below Pro-Rated Schedule toward
the purchase of a new tree.*
PRO-RATED SCHEDULE:
From Date
Owner
of Purchase
Cost is:
During 1st year . . . . . . . . . . . . 0%
During 2nd year . . . . . . . . . . . 25%
During 3rd year . . . . . . . . . . . . 50%
During 4th year . . . . . . . . . . . . 75%
During 5th year . . . . . . . . . . . . 85%
*
Plain and Pre-Lit Tree
ASSEMBLY INSTRUCTIONS
The cost of the new tree will be based on the
suggested retail price in effect at the time of
the claim.
Customers are required to contact National Tree Company for
authorization of return prior to shipping product for warranty service.
For fastest service, email us at [email protected] or call 1-888- RETAIN FOR YOUR RECORDS
494-PART. Or, write National Tree Company, Attn: Customer Service
Dept., 2 Commerce Drive, Cranford, NJ 07016. Include our style number,
UPC code, a copy of dated sales receipt with store name noted Tree Style No.
(mandatory), a detailed description of the problem, and your address
and phone number. Service requests can also be completed online UPC Code
at www.nationaltree.com.
At the discretion of National Tree Company, you may either receive a Store Where Purchased
replacement part or be instructed as to which part(s) to ship prepaid to
National Tree for our inspection and determination and/or possible repair. Date Purchased
Replacement or repair as provided by this limited warranty is our exclusive remedy to the consumer and does not place National Tree Company
Price
liable for any incidental or consequential damages
Dear Valued Customer,
Congratulations on your purchase of this high quality holiday decoration.
Everyone at National Tree Company takes great pride in the manufacture of our
products and proudly stand behind our motto, “Good enough to fool Santa”.®
In order to create the natural appearance of this product, many parts are made
by hand. Every part is assembled with care and inspected before it leaves the
manufacturing facility.
New product registration can only be completed online at www.nationaltree.com.
The packaging of our products are specially designed to be reused, ensuring the
contents remain in good condition. After the holiday season, be sure to replace
the product as it was packed originally and it will look like new for many years.
SAVE YOUR SALES RECEIPT. It will be needed when requesting warranty service.
Merry Christmas!
National Tree Company
2 Commerce Drive, Cranford, New Jersey 07016 USA
SAVE THESE INSTRUCTIONS
www.nationaltree.com
2-12
CAUTION:
IMPORTANT SAFETY INSTRUCTIONS
READ AND FOLLOW
ALL SAFETY INSTRUCTIONS
• Do not use seasonal products outdoors
unless marked suitable for indoor and
outdoor use. When products are used
in outdoor applications, connect the
product to a Ground Fault Circuit
Interrupter (GFCI) outlet. If one is not
provided, contact a qualified electrician
for proper installation.
• This seasonal use product is not
intended for permanent installation
or use.
• When decorating trees, use miniature
light bulb strings or LED light strings
only. “C” size bulbs are not
recommended.
• Do not mount or place near gas or
electric heaters, fireplaces, candles or
other similar sources of heat.
• Do not secure the wiring of the product
with staples or nails, or place on sharp
hooks or nails.
• Unplug the product when leaving the
house, when retiring for the night, or if
left unattended.
• CAUTION: This is an electrical product
– not a toy! To avoid risk of fire, burns,
personal injury and electric shock, it
should not be played with or placed
where small children can reach it.
• Do not let lamps rest on the supply
cord or any wire.
• Do not use this product for other than
its intended use.
• Do not hang ornaments or other objects
from cord, wire or light string.
• Do not close doors or windows on the
product or extension cords as this may
damage the wire insulation.
• Never operate this product if the power
cord or plug is damaged.
• Use only manufacturer specified
replacement bulbs.
• Read and follow all instructions that are
on the product or provided with the
product.
USE AND CARE INSTRUCTIONS
• When storing the product, carefully
remove the product from wherever it is
placed, including trees, branches, or
bushes, to avoid any undue strain or
stress on the product conductors,
connections, and wires.
• When not in use, store neatly in a cool,
dry location protected from sunlight.
2
Bulb Replacement Instructions
(UL Regular and Ready-Lit Lights)
Fig. 1
1. Unplug light string from power source.
2. Pull up on the Bulb Lock unlatching the bulb from the bulb
socket. Gently pull the bulb straight out (Figure 1).
3. Before inserting the new bulb into socket,
make sure that the two wires on either
side of the the bulb base are straight up
and flush with the base (diagram at right).
4. Carefully insert new bulb into socket and
push down Bulb Lock until it snaps into
place (Figure 2).
Fuse Replacement Instructions
(UL Regular and Ready-Lit Lights Only)
1. Unplug light string from power source.
2. Fuses are located in light string plug. Slide the fuse
access cover away from cord side (in direction of arrow,
Figure 3) exposing fuses.
3. Remove fuses from compartment and examine. Replace
burnt out fuse with new one.
4. Close fuse compartment by sliding access cover back in
towards cord side of plug (Figure 4).
Fig. 2
Fig. 3
Fig. 4
Bulb Replacement Instructions (Low Voltage LED Lights)
1. Unplug light string from power source.
2. Pull up on the Bulb Lock unlatching the bulb
from the bulb socket. Gently pull the bulb
straight out.
3. Carefully insert new bulb into socket (bulb is
keyed and only goes in one way) and push
down Bulb Lock until it snaps into place.
Shaping Instructions
Shaping the tree branches is the last step of assembly. The care
and attention given to this final process will result in a genuinely
beautiful and appealing holiday centerpiece.
1. Every tree style is shipped from the factory with the tips of
each branch compressed to the center (Figure 1).
2. Each branch tip must be shaped to it’s proper position to give
the tree a natural look. This is done by gently grasping the left
and right wing tips and spreading them out away from the
center tip (Figure 2).
3. Each individual tip should then be spread out separately. Tips
should then be bent slightly upward to add a more natural
looking appearance. Figure 3 shows a typical tree branch after
shaping.
The branch tips of Hook-On trees should be shaped prior to
attachment to center pole. The tips of Hinged and Wrapped trees
should be shaped after they have been lowered.
Branch tips should be carefully pressed back toward center tip
when tree is disassembled for storage in original carton.
7
Fig. 1
Fig. 2
Fig. 3
Hinged and Wrapped Trees
THIS TREE IS FOR INDOOR USE ONLY
Pre-Lit Hinged and Wrapped Trees
THIS TREE IS FOR INDOOR USE ONLY
Fig. 1
Retain carton for storage purposes.
Retain carton for storage purposes.
Each carton contains one top section, one bottom section (larger
trees include one or more middle sections) and a metal or plastic
tree stand.
1. If your tree has a metal stand, unfold it and insert the eye
bolts. Remove packing material from ends of poles. Put
bottom section pole into tree stand making sure it is seated
properly (Figure 1). Tighten eye bolts.
If your tree has a plastic stand, slide legs upward into slots
at base of bottom section (Figure 2) and tap lightly with a
hammer until secure. WARNING: Using excessive force
to assemble base may cause breakage.
2. Insert the top tree section into the green plastic opening of
the lower tree assembly. This is the “pole cap” which keeps
tree top section securely in place (Figure 3).
For larger trees with middle section, carefully insert middle
section pole(s) into bottom section pole (Figure 4) as
instructed in SPECIAL NOTE ABOUT GIANT TREES below.
Then insert top section into pole cap. Optional: You may
want to lubricate middle section pole ends prior to assembly.
This will make sections easier to separate when disassembling for storage.
3a. HINGED TREES: Working your way up from the bottom,
gently lower all branches from their upright setting (Figure
5). Each branch must be shaped to a natural position by
spreading out the left and right tips away from the center tip
(See Shaping Instructions on page 7). Continue to lower
branches on upper section(s) in the same manner making
sure not to place undue pressure on the brackets.
3b. WRAPPED TREES: Working your way up from the bottom,
gently lower all branches from their upright setting by grasping the branch and pulling it downward (Figure 6). Each
branch must be shaped to a natural position by spreading
out the left and right tips away from the center tip (See
Shaping Instructions on page 7). Continue to lower branches
on upper section(s) in the same manner.
Each carton contains one top section, one bottom section (larger
trees include one or more middle sections) and a tree stand.
1. Unfold the tree stand and insert the eye bolts. Remove
packing material from ends of poles. Put bottom section pole
into tree stand making sure it is seated properly (Figure 1).
Tighten eye bolts until bottom section is held securely.
2. Insert the middle section of the tree into the bottom section.
(If your tree has more than one middle section, please refer to
SPECIAL NOTE ABOUT GIANT TREES on opposite page.)
Make sure that the extension cord on the center pole of the
middle section is hanging straight down towards the floor
with no loose slack that could interfere with branch hinges.
3. The light string extension cords connected to the bottom and
middle section poles have colored-coded tags attached at
the plug end. Depending on the number of sections to your
tree, the light strings plug in as follows: the cords with
PURPLE tags plug into the receptacle on the tree section
below. The cords with a BLACK tag are plugged into an
electrical outlet (Figure 2).
NOTE: Some tree styles will have a single extension cord
that will run from the bottom part of tree and out to the
electrical outlet. All light strings will plug into this single cord.
4. Insert the top section of tree into the upper most part of
middle section. Refer to the colored tag for instructions
where to plug the top section light string extension cord.
5. Plug the BLACK tagged extension cord(s) into a standard
electrical outlet or other power source.
NOTE: Trees with 1350 lights or more will include an additional BLACK tagged light set extension cord. This extension
cord must be plugged into an electrical outlet separately. We
recommend using a multiple socket power strip (not included) to accept added light set extension cords.
6. For best results, shape your tree while lit. For WRAPPED
TREES, see 3b on opposite page.
HINGED TREES: Working your way up from the bottom,
gently lower all branches from their upright setting (Figure
3). See Important Note below. Each branch must be
shaped to a natural position by spreading out the left and
right tips away from the center tip (See Shaping Instructions,
page 7). Continue to lower branches on upper section(s) in
the same manner making sure not to place undue pressure
on the hinge brackets.
Fig. 2
Fig. 3
Fig. 4
SPECIAL NOTE ABOUT GIANT TREES
Some of the larger trees in our product line will include more
than one middle section. If your tree contains more than one
middle section, note that each section will be numbered in
ascending order. The tree bottom section (which inserts into
tree stand) will be number 1. The next section as you build up,
will be number 2. Section 3 will follow until assembly is completed
by inserting tree top section.
Fig. 5
STORAGE
STORAGE
Remove all holiday decorations. Gently press tips back into
center branch. Raise all branches to original upright position
taking care not to place undue pressure on the attached ends of
the branches. When disassembling tree, a twisting motion will
help to separate the sections from each other. All tree parts can
be replaced in carton and should be stored in a cool, dry place.
4
Fig. 6
Remove all holiday decorations. Gently press tips back into
center branch. Raise all branches to original upright position
taking care not to place undue pressure on the attached ends
of the branches. When disassembling tree, a twisting motion will
help to separate the sections from each other. All tree parts can
be replaced in carton and should be stored in a cool, dry place.
5
Fig. 1
Fig. 2
PURPLE
COLOR
PURPLE
COLOR
BLACK
COLOR
Fig. 3
IMPORTANT NOTE: When lowering
branches be extremely careful not
to tangle wire in gap between
branch and bracket.
Hook-On Trees
Pre-Lit Hinged Trees with Low Voltage LEDs
THIS TREE IS FOR INDOOR USE ONLY
Each carton contains one top section, one bottom
section (larger trees include one or more middle
sections) and a tree stand.
1. Unfold the tree stand and insert the eye bolts.
Remove packing material from ends of poles. Put
bottom section pole into tree stand making sure it is
seated properly (Figure 1). Tighten eye bolts until
bottom section is held securely.
2. Insert the middle section of the tree into the bottom
section. (If your tree has more than one middle
section, please refer to SPECIAL NOTE ABOUT
GIANT TREES on page 3.) Make sure that the light
cord(s) hang straight down with no loose slack that
could interfere with branch hinges.
3. Insert the tree top into the plastic pole cap of the
middle section center pole.
4. The male connectors of the light string cords from
the top, center and bottom sections will all connect
to the female connectors of the transformer wire
(Figure 2). Note that the male and female
connectors are keyed and will only connect in one
direction. After connection, twist closed each
connector nut securely.
GIANT TREES that include additional sections will
also have additional light string cord connections.
5. Working your way up from the bottom, gently lower
all branches from their upright setting (Figure 3). See
Important Note. Each branch must be shaped to a
natural position by spreading out the left and right
tips away from the center tip (See Shaping
Instructions, page 7). For best results, shape your
tree while lit. Continue to lower branches on upper
section(s) in the same manner. Shape as desired
making sure not to place undue pressure on the
hinge brackets.
STORAGE
Remove all holiday decorations. Gently press tips back
into center branch. Raise all branches to original upright
position taking care not to place undue pressure on the
attached ends of the branches. When disassembling
tree, a twisting motion will help to separate the sections
from each other. All tree parts can be replaced in
carton and should be stored in a cool, dry place.
6
Fig. 1
THIS TREE IS FOR INDOOR USE ONLY
Fig. 1
Retain carton for storage purposes.
Each carton contains one top section, one center pole with
color-coded branch brackets (larger trees include additional
poles), one tree stand and color-coded branches.
1. Unfold tree stand and insert eye bolts. Remove packing
material from ends of poles. Insert center pole(s)
securely into stand.
Fig. 2
2. BRANCH SHAPING. (Branches should be attached to
tree pole from the bottom up.) Locate the color-coded
branches that match the color code of the bottom bracket
on the center pole (Figure 1). Each branch must be
shaped to a natural position by spreading out the left
and right tips away from the center tip (Figure 2). See
Shaping Instructions on page 7.
Fig. 2
3. After all bottom bracket branches are properly shaped
they can be attached to the center pole brackets. Gently
push each branch down into the bracket slots until they
lock into place (Figure 3).
TRANSFORMER
WIRE
MALE
CONNECTOR
4. Continue to work your way up the pole shaping and
attaching branches as described above.
Fig. 3
5. When all tree branches have been attached, the tree
top section can be shaped and attached. Shape the tree
top as you did the lower branches.
FEMALE
CONNECTOR
TRANSFORMER
6. Push bottom of tree top into green plastic “pole cap” at
top of center pole until it is firmly seated (Figure 4).
Assembly is now complete.
7. You may wish to further shape your finished tree as
desired.
Fig. 4
Fig. 3
IMPORTANT NOTE: When lowering
branches be extremely careful not to
tangle wire in gap between branch
and bracket.
STORAGE
Remove all holiday decorations. Lift tree top from pole.
Remove each branch from center pole brackets by lifting
up and out. Gently press tips back into center branch. All
tree parts can be replaced in carton and should be stored
in a cool, dry place.
3