1
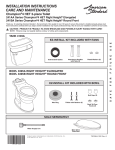
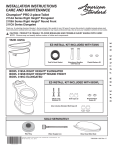
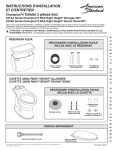
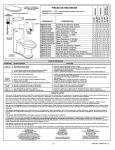
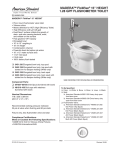
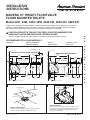
INSTALLATION
INSTRUCTIONS
MADERA 15" HEIGHT FLUSH VALVE
FLOOR MOUNTED TOILETS
Model 3451, 3452, 3453, 3455, 2234.001, 2623.001, 2624.001
NOTE: For proper operation product requires a minimum of 30 psi working line pressure
RECOMMENDED TOOLS AND MATERIALS
Putty Knife
1
Regular Screwdriver
Adjustable Wrench
Sealant
Tape Measure
Carpenters Level
Flush Valve
Pictures may not exactly define contour of china
1" N.P.T. OR 1" C.W.T. SUPPLY
TO FLUSH VALVE
FINISHED WALL
FINISHED WALL
Model 3451, 3452, 2234.001, 2623.001
102mm
(4 " )
718mm
(28-1/4 " )
356mm
(14")
470mm
(18-1/2")
76mm
(3 " )
1 - 1/2
SPUD
C/L OF SEAT POST HOLES
140mm (5-1/2") CENTERS
25mm
(1 " )
Model 3453, 3455, 2624.0001
673mm
(26-1/2")
356mm
(14")
470mm
(18-1/2")
C/L OF SEAT POST HOLES
140mm (5-1/2") CENTERS
F O R
121mm
(4-3/4")
718mm
(28-1/4 " )
400mm
(15-3/4")
381mm
(15")
13mm
(1/2")
254mm
(10")
338mm
(13-5/16")
150mm
(5-7/8 " )
381mm
(15")
FINISHED
FLOOR
238mm
(9-3/8")
13mm
(1/2")
254mm
(10")
C/L OF OUTLET
2
338mm
(13-5/16")
150mm
(5-7/8 " )
FINISHED
FLOOR
238mm
(9-3/8")
C/L OF OUTLET
3
SEALANT
CLOSET FLANGE
WAX RING
10"
254mm
CLOSET BOLTS
INSTALL CLOSET BOLTS
Install closet bolts in flange channel, turn 90°, and slide
into place 6" (152 mm) apart and parallel to wall.
Pro d u c t n a m e s l i s te d h e re i n a re t r a d e m a r k s o f AS A m e r i c a s I n c .
© A S A m e r i c a s I n c . 2 012
F U T U R E
CAUTION: PRODUCT IS FRAGILE. TWO PEOPLE ARE RECOMMENDED FOR
HANDLING TO AVOID BREAKAGE AND POSSIBLE INJURY!
INSTALL WAX SEAL
Invert toilet on floor (cushion to prevent damage), and
install wax ring evenly around waste flange (horn), with
tapered end of ring facing toilet. Apply a thin bead of
sealant around toilet base.
7301114-100 Rev.C
S A V E
!
U S E
Thank you for selecting American Standard – the benchmark of fine quality for over 100 years. To ensure this
product is installed properly, please read these instructions carefully before you begin. (Certain installations
may require professional help.) Also be sure your installation conforms to local codes.
5
4
BOLT CAP
NUT
FLANGE
CLOSET FLANGE
TAPERED
WASHER
CLOSET BOLT
WASHER
NUT
INSTALL TOILET
CLOSET
BOLT
a. Position toilet squarely to wall and, with a rocking
motion, press bowl down fully on wax ring and flange.
Alternately tighten nuts until toilet is firmly seated on
floor.
! CAUTION:
DO NOT OVERTIGHTEN NUTS
OR BASE MAY BE DAMAGED!
POSITION TOILET ON FLANGE
a. Unplug floor waste opening and install toilet on closet flange
so bolts project through mounting holes.
b. Loosely install retainer washers and nuts. Side of washers
marked "THIS SIDE UP" must face up!
b. Install caps on washers. (If necessary, cut bolt height to
size before installing caps.)
c. Smooth off the bead of sealant around base. Remove
excess sealant.
AS AMERICA, INC. ONE YEAR LIMITED WARRANTY
If inspection of this AS America, Inc. (“American Standard”) plumbing product, within one year after its initial purchase, confirms that it is
defective in materials or workmanship, American Standard will repair or, at its option, exchange the product for a similar model.
This limited warranty applies only to the original purchaser and installation of these products. In the event of a limited warranty claim,
proof of purchase will be required—save sales receipt.
This limited warranty does not apply to local building code compliance. Since local building codes vary considerably, the purchaser of
this product should check with a local building or plumbing contractor to insure local code compliance
before installation.
This limited warranty is void if the product has been moved from its initial place of installation; if it has been subjected to faulty maintenance,
abuse, misuse, accident or other damages; if it was not installed in accordance with American Standard's instructions; or if it has been
modified in a manner inconsistent with the product as shipped by American Standard.
American Standard's option to repair or exchange the product under this limited warranty does not cover any labor or other costs of
removal or installation. IN NO EVENT WILL AMERICAN STANDARD BE LIABLE FOR THE COST OF REPAIR OR REPLACEMENT OF
ANY INSTALLATION MATERIALS, INCLUDING BUT NOT LIMITED TO, TILES, MARBLE, ETC. American Standard will not be
responsible for any other incidental or consequential damages attributable to a product defect or to the repair or exchange of a defective
product, all of which are expressly excluded from this limited warranty. This limited warranty does not cover any liability for consequential
or incidental damages, all of which are hereby expressly disclaimed, or the extension beyond the duration of this limited warranty of any
implied limited warranties, including those of merchantability or fitness for an intended purpose. (Some states or provinces do not allow
the exclusion or limitation of implied limited warranties, so this exclusion may not apply to you.)
This limited warranty gives you specific legal rights. You may have other statutory rights that vary from state to state or from province to
province, in which case this limited warranty does not affect such statutory rights.
In Canada:
AS Canada, ULC
5900 Avebury Rd.
Mississauga, Ontario
Canada L5R 3M3
Toll Free: (800) 387-0369
www.americanstandard.ca
In Mexico:
American Standard B&K Mexico
S. de R.L. de C.V.
Via Morelos #330
Col. Santa Clara
Ecatepec 55540 Edo. Mexico
Toll Free: 01-800-839-1200
www.americanstandard.com.mx
THIS WARRANTY IS NOT TRANSFERABLE FROM ORIGINAL CONSUMER PURCHASER.
7301114-100 Rev.C
- 2 -
7301463-100 Rev. A
In the United States:
American Standard Brands
P.O. Box 6820
Piscataway, New Jersey 08855
Attention: Director of Customer Care
For residents of the United States, warranty
information may also be obtained by calling
the following toll free number: (800) 442-1902
www.americanstandard.com