Transcript
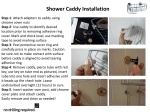
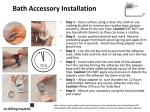
Shower Caddy Installation
CLEAN SURFACE WITH SUPPLIED CLEANING CLOTH. LET FULLY
DRY BEFORE INSTALATION. DO NOT USE HOUSEHOLD
CLEANERS. WIPE ANY RESIDUE WITH CLEAN DRY CLOTH.
Step 1: Attach adapters to caddy using chrome
cover nuts
Step 2: Use caddy to identify desired location
prior to removing adhesive ring cover. Mark and
check level, use masking tape to avoid marking
surface
Step 3: Peel protective cover ring and carefully
press in place on marks. Caution: be sure not to
make contact with surface before caddy is
aligned to avoid tearing adhesive ring
Step 4: Remove caddy, pierce tube with red key,
use key on tube end as pictured, insert tube into
one hole and insert adhesive until it beads up
the check hole. Leave undisturbed overnight (12
hours) to cure.
Step 5: Insert washer over post, add chrome
cover plate and attach caddy.
Easily remove and clean as needed!
Note: For DK240- insert bumper screws
(Included as pictured) into the lower rear
holes in the caddy. These rest against
shower wall