1
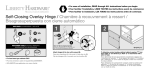
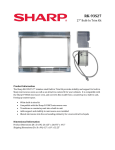
Care & Maintenance
Vanity Top Installation Guide
All Vanity Tops:
• Use coasters under glasses or other objects that may
scratch your vanity top surface.
• Use mild soap and water routinely.
• Clean up spills of acidic liquids such as fruit juices or vinegar
immediately.
• Avoid exposing your vanity top to strong chemicals,
scouring-type cleaners, paint removers, rust removers and
oven cleaners.
• Don’t use bleach or vinegar on your vanity top.
• Don’t use wax or finishes requiring high-speed polishing.
• Don’t place hot items such as pots, pans, plates or curling
irons on your vanity top. Always use a hot pad or trivet
under hot pots and heat-producing appliances.
• Don’t score or cut directly on the vanity top. Always use a
cutting board.
• Don’t stand on your vanity top.
Natural Quartz
• Clean natural quartz surface regularly using mild soap,
water and soft cloth.
• Don’t use wax, sealers, window cleaning solution or other
topical finishes.
• Don’t use Scotch-Brite® pads on your vanity top because
they will dull the surface.
IMPORTANT!
DO NOT UNPACK VANITY TOP
OR PROCEED ANY FURTHER WITHOUT READING
THE FOLLOWING INSTRUCTIONS.
This guide contains important information to help you install and care for your vanity top.
Please read these instructions thoroughly before beginning your installation.
Supplies Required
•
•
•
•
•
•
1 tube of color-matching or clear silicone caulk
Tapered shim material
Clean, white cotton cloth
Masking tape
Denatured alcohol
Safety glasses
Tools Required
•
•
•
•
Caulking gun
Tape measure
Utility knife
Level
Vanity Top Inspection
CUSTOMER SERVICE: 877.765.4783
1.Without lifting the vanity top, visually inspect surface for obvious shipping or
material damage.
2.In the event of damage, immediately report any problems to your place of
purchase before proceeding further with installation.
Cabinet Preparation
Solid Surface
• Don’t use wax, sealers, window cleaning solution or other
topical finishes.
• Scotch-Brite® pads can remove small scratches on the
vanity top. Consult with a Home Center Kitchen & Bath
Associate or the manufacturer of Scotch-Brite® for more
information.
• Run cold water when pouring boiling water into your sink.
• Remove nail polish spills with an acetone-free polish
remover and then flush the area with water.
1.Inspect installation area to make sure cabinetry is properly secured and stable.
2.Cabinet surface must be flat and level prior to installation of vanity top.
Natural Stone
• Clean surfaces regularly with mild soap and water
• Your vanity top was sealed at the time of fabrication but
may need to be resealed in the future. To test if sealing is
required, splash a couple of drops of water on the surface.
If the water is quickly absorbed into the stone, it is time
to reseal your vanity top. If it takes 15-30 minutes to be
absorbed or evaporated, you do not need to reseal your top.
• Don’t use ammonia-based products or other
general‑purpose cleaners.
• Don’t use Scotch-Brite® pads on your vanity top because
they will dull the surface.
1.Trial-fit vanity top to cabinet and wall to make sure it fits properly. Follow the steps
below:
a) Carefully remove vanity top from packaging. Stand vanity top upright, with
back edge facing down
b) Carry the vanity top in vertical position to prevent damage
c) Carefully place the back edge of vanity top about 2 inches from or as close to
the wall as possible. Lower the vanity top into place while carefully supporting
the center of the vanity top. As the vanity top is lowered, carefully slide the
vanity top back until it fits tightly against wall
d) Use a utility knife to carefully cut away interfering drywall as necessary.
Safety Notes:
• Please wear safety glasses to protect your eyes from any possible contact with
debris and chemicals.
• Follow all manufacturers’ instructions and safety information when using silicone
caulk and denatured alcohol. Ensure that area has adequate ventilation before
using these products.
Installation Instructions
Vanity Top Installation
2.If vanity top is not level and stable insert a shim between cabinets and underside
of vanity top until it is steady and level. Remove vanity top and secure shims to
vanity cabinet with masking tape.
© 2012 Masco Cabinetry LLC • Printed in the U.S.A. • R 11.06.12
Installation Instructions (Continued)
Vanity Top Installation
3.Wipe top of cabinet and vanity top with a damp cloth to remove dust and dirt and
let dry. Then apply dime-sized dabs of silicone approximately six inches along all
perimeter edges of the cabinet.
4.Carefully place vanity top on back edge of cabinet. Lower vanity top onto cabinet.
(It is recommend that this be done by two
people.) It is important that the vanity top be
supported evenly on all sides of the cabinet.
If there are voids between top of cabinet and
bottom of vanity top, insert shims as required.
5.Run a thin bead of clear silicone around
perimeter of vanity top to fill any visible voids
between cabinet and vanity top. Remove
excess silicone.
Applying dabs of silicone
Splash Instructions
Backsplash and Side Splash Installation
1.Backsplash should be installed before side splash. The finished sides denote the
top and front edge of the splash and should face toward the bowl.
2.Hold all splashes on their side/edge. DO NOT HOLD A SPLASH FLAT.
3.Clean bottom edge of splash and edge of vanity with denatured alcohol.
4.Apply dime-sized dabs of silicone to bottom edge and backside of splash and set
splash into place. Repeat for other splash.
5.To ensure a clean silicone joint, use masking or painter’s tape to tape along joint
between splash and vanity, leaving approximately 1/16" gap along joints. Apply a
thin bead of silicone along joint between splash and the vanity.
6.Smooth bead with a clean, white rag dampened with denatured alcohol. Then
wipe off any excess silicone. Remove tape when silicone is dry.
Applying dabs of silicone
Applying dabs of silicone
to backsplash.
to side splash.
Caulking Splashes
1.Apply a fine bead of silicone along the joint between the side splashes and the
vanity top.
2.Caulk along the wall and the top edge of the side splashes and along the
backsplash to fill any gaps.
3.Smooth bead with a clean, white rag dampened with denatured alcohol. Carefully
wipe off any excess silicone on the cabinets.
4.Wait 24 hours before using vanity top to allow silicone to fully cure.
Applying caulk to wall
and side splash.
Special Notes:
• Follow all manufacturer’s instructions and safety information.
• Ensure adequate ventilation before applying.
Solieque® Vanity Tops 10 Year Limited Warranty
Solieque Vanity Top Limited Warranty
Masco Cabinetry LLC warrants to the original
consumer purchaser that our Solieque® vanity tops
will be free from defects in material and workmanship
for a period of TEN (10) YEARS from the date of
purchase as described below. This limited warranty is
not transferable. No changes or modifications can be
made to this warranty except by an officer of Masco
Cabinetry LLC.
Solieque® natural granite vanity tops are created
by nature with their own distinctive patterns and
characteristics. Exact color match to store samples
at point of purchase cannot be guaranteed. This
warranty does not cover the natural characteristics
of stone, which include but are not limited to,
color variations, pits, fissures, surface marks and
blemishes.
Warranty Requirements
To be eligible for this warranty, you must:
• purchase the vanity top from an authorized
Solieque® Vanity Tops reseller for your own
personal use;
• have it installed for indoor use as a horizontal
countertop;
• maintain the vanity top in accordance with the
Solieque® Vanity Tops Care & Maintenance Guide;
and
• not remove the countertop after its original
installation.
Additional copies of the Care & Maintenance Guide
may be requested by calling Solieque® vanity tops
Customer Care at 877.765.4783.
How To Get Service
To obtain performance under this warranty, you must
contact the Solieque® vanity tops reseller and report,
in writing, all defects claimed and provide the original
sales receipt or other documentation acceptable to
Masco Cabinetry LLC that demonstrates proof of
purchase showing both the date of purchase and the
date of installation.
If you have difficulty obtaining assistance, write to
Masco Cabinetry LLC Warranty Department:
Masco Cabinetry LLC, P.O. Box 1946,
Adrian, MI 49221
Manufacturer’s Obligation Under
Warranty
Masco Cabinetry LLC may elect to repair or to
replace any defective Solieque® product covered
by our warranty. Our warranty does not cover
defects caused by misuse, abuse, negligence,
alterations, outdoor use, commercial use, or improper
installation, storage and handling, or failure to follow
the Solieque® Vanity Tops Care & Maintenance
Guide. “Commercial use” includes, but is not limited
to, use in an apartment, store, office or other place
of business. The visibility of any seams and seam
failure due to settling or structural issues is not
covered.
TO THE EXTEND PERMITTED BY LAW, THIS
WARRANTY EXCLUDES ANY INCIDENTAL
OR CONSEQUENTIAL DAMAGES SUCH AS
THE COST OF LABOR OR OTHER COSTS OF
REMOVAL OR INSTALLATION. Some provinces and
some states do not allow the exclusion or limitation
of incidental or consequential damages so the above
limitation or exclusion may not apply to you.
From time to time, we may change design,
specifications and materials as conditions require
and improvements are developed, but we have no
obligation to incorporate such changes in products
we previously manufactured.
TO THE EXTENT PERMITTED BY LAW, ANY
IMPLIED WARRANTIES, INCLUDING THE IMPLIED
WARRANTIES OF MERCHANTABILITY AND
FITNESS FOR A PARTICULAR PURPOSE, ARE
LIMITED TO THE DURATION OF THIS EXPRESS
WARRANTY. Some provinces and some states do
not allow limitations on how long an implied warranty
lasts, so the above limitation may not apply to you.
This warranty gives you specific legal rights, and you
may also have other rights which vary from state to
state and from province to province.
08/12