1
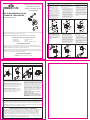
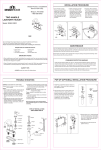
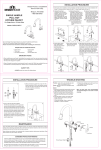
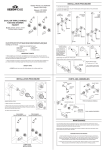
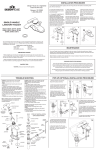
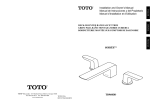
Design House is a registered
brand of DHI Corp.
Mequon, WI 53092
1-800-558-8700
SINGLE HANDLE
TUB & SHOWER FAUCET
Models 525782,525774
INSTALLATION PROCEDURE
1. SHUT OFF WATER SUPPLY.
Verify that the hole sizes and positions
of holes in the wall are correct.
Recommended component
measurements.
A. Shower and / or spout outlet hole:
1-1/4" diameter.
B. Valve access hole: 6" diameter.
C. Recommended valve depth to
finished wall: 2" min. to 2-1/2" max.
Be sure that the black template plate's
surface is flush with the finished
exterior surface of the wall. Be sure to
position the valve body correctly in
wall. "UP" marking up. The 8" Minimum
from the valve body to the tub spout is
required for proper operation.
1
1 1/4" Dia
30"
Shower Only
6" Dia
1 1/4" Dia
2a
2A
2B
48"
Tub&Shower
48"
Shower Only
2a. SUPPLY CONNECTION LAYOUT
Wrap plumber's tape around pipe
threads in a clockwise direction.
Connect water supplies to left (hot)
and right (cold) valve body inlets.
Connect shower outlet pipe (2B)
and tub outlet pipe (2C) to valve
body. Connect Pipe Elbow (2A)
(not included) to the end of the
pipe.
2b. SHOWER ONLY SUPPLY
CONNECTION LAYOUT
Wrap plumber's tape around pipe
threads in a clockwise direction.
Connect water supplies to left (hot)
and right (cold) valve body inlets.
Connect Shower Outlet Pipe (2B)
to valve body. Plug bottom outlet
(2D) with plug (2E). Connect Pipe
Elbow (2A) (not included) to the
end of the pipe
2b
2A
2B
8" Min.
30"
Tub&Shower
2C
2D
2E
Your new Design House faucet will give you years of trouble free performance. Thank you for
choosing a Design House product for your home.
Please read all of these instructions carefully before installing your new faucet.
3. FOR SHOWER ARM INSTALLATION
Insert the long end of the shower
arm (3B) through the flange (3A)
then wrap plumber's tape to both
sides of shower arm. Screw long
end of the shower arm into pipe
elbow inside the wall.
Helpful tools to install this faucet:
•
•
•
•
•
•
basin wrench
Teflon tape
(2) crescent wrenches
silicon sealer
flashlight
faucet supply tubes
IMPORTANT POINTS
3A
• When installing your new faucet, hand tighten the connector nuts, then use one wrench to anchor
the fitting and a second wrench to tighten the nut one additional turn. Connections that are too tight
will reduce the integrity of the system.
3
4. FLUSHING
For Tub and Shower Combinations:
Turn on Hot and Cold water supply
lines allowing water to flow from tub
spout outlet (4B) until all foreign
matter has cleared the line.
For Shower Only Combinations:
Turn on Hot and Cold water supply
lines allowing water to flow from
shower outlet (4A) until all foreign
matter has cleared the line.
Pressure must be approximately
equal on both Hot and Cold sides
for valve to function properly.
4A
3B
• Wrap all threaded connections (except aerator thread in spout) with Teflon tape available from your
local hardware or plumbing supply store. Always wrap in a counter-clockwise direction.
SAFETY TIPS
4B
• ALWAYS protect your eyes with safety glasses.
INSTALLATION PROCEDURE
6
7
8
9
8E
8A
colder
8B
8C
hotter
rotational limit stop
stop on cartridge
8D
6. Before installing escutcheon, remove the plastic cap
from plaster guard by twisting cap in a clockwise
direction. Remove the screw from the inverter.
7. Place handle on valve stem and turn handle to full on
mixed position. Turn on hot and cold water lines to full
open for one minute each. Check for leakage. Shut off
water at faucet. Remove the handle.
8. Install escutcheon (8A) onto valve and then insert screws
(8B) to attach to valve body.
Place handle assembly (8C) onto the valve and secure
with set screw (8D). Attach shower (8E) to shower flange.
9. ADJUSTING WATER TEMPERATURE
Turn on water so that cold water is as cold as it will get
and hot water is as hot as it will get. Remove the
Rotational Limit Stop from the valve by sliding it off the
stem. Place handle back on stem and rotate fully
counterclockwise to the hottest position. Place a
thermometer in a plastic tumbler and hold in the water
stream. If the water temperature is above 120°F, the
Rotational Limit Stop must be rotated counterclockwise
to decrease temperature. Reinstall the stop by sliding it
back on to the stem before reinstalling the handle.
MAKE SURE COLD WATER FLOWS FROM THE VALVE
FIRST.
MAKE SURE WATER (AT THE HOTTEST FLOW) DOES
NOT EXCEED THE TEMPERATURE LIMIT ALLOWED
BY YOUR PLUMBING CODES (120°F OR 110°F).
MAINTENANCE
Your new Design House faucet is designed to give you years of trouble free performance. Keep it
looking new by cleaning it periodically with a soft cloth. Avoid abrasive cleaners, steel wool and harsh
chemicals that will dull the finish and void your warranty.
Brass finishes are polished, then protected with a lacquer coating to help prevent tarnishing. Clean
these surfaces only with a damp, soft cloth.
CONSUMER PROTECTION WARNING
Under the Safe Drinking Water Act, the U.S. Environmental Protection Agency restricts the
amount of lead used in brass and solder. Your new faucet is made in strict compliance with
all government standards. The materials used in the manufacture of this faucet are of industry
standard quality and are similar to other plumbing products having brass fittings.
To reduce the amount of lead in your drinking water, allow the water to run for a moment before
filling your glass and remember to always use cold water for drinking purposes.
4
5. FOR TUB SPOUT INSTALLATION
Install tub spout. Thread spout onto
threaded connection clockwise until
the spout becomes flush with the
finished wall. Thread sealant may
be required depending on your
installation method.
All thread sealants may be found at
your local hardware store.
5
Design House es una marca
registrada de DHI Corp.
Mequon, WI 53092, EE.UU.
1-800-558-8700
GRIFO MONOMANDO PARA
BAÑERA Y REGADERA
Modelos 525782, 525774
PROCEDIMIENTO DE INSTALACIÓN
1. CORTE EL SUMINISTRO DE AGUA.
Compruebe que los orificios en la
pared tengan el tamaño correcto.
Medidas recomendadas de los
componentes.
A. Orificio de salida de la regadera y / o
surtidor: 1-1/4 pulg. de diámetro.
B. Orificio de acceso a la válvula: 6 pulg.
de diámetro.
C. Profundidad recomendada entre la
válvula y la pared terminada: Entre
un mínimo de 2 pulg. y un máximo de
2-1/2 pulg.
Asegúrese de que la superficie de la
placa de la plantilla negra esté a ras con
la superficie terminada de la pared.
Asegúrese de situar el cuerpo de la
válvula correctamente en la pared. La
marca "UP" indica hacia arriba. Se
1
1 1/4 pulg. (D)
30 pulg
Sólo regadera
48 pulg
Bañera y regadera
6 pulg. (D)
48 pulg
Sólo regadera
requiere una distancia mínima de
8 pulg. entre el cuerpo de la válvula y la
espiga de la bañera para que el grifo
funcione correctamente.
2a. ESQUEMA DE CONEXIÓN DE LAS
LÍNEAS DE SUMINISTRO
Enrolle cinta de plomero alrededor
de las roscas de las tuberías en el
sentido de las manecillas del reloj.
Conecte las líneas de suministro de
agua a las entradas izquierda
(caliente) y derecha (frío) en el
cuerpo de la válvula. Conecte la
tubería de salida de la regadera (2B)
y la tubería de salida de la bañera
(2C) al cuerpo de la válvula. Conecte
el codo de tubería (2A) (no se
incluye) al extremo de la tubería.
2a
2A
2B
2b. ESQUEMA DE CONEXIÓN DE
SUMINISTRO SÓLO PARA LA
REGADERA
Enrolle cinta de plomero alrededor
de las roscas de las tuberías en el
sentido de las manecillas del reloj.
Conecte las líneas de suministro de
agua a las entradas izquierda
(caliente) y derecha (frío) en el
cuerpo de la válvula. Conecte la
tubería de salida de la regadera (2B)
al cuerpo de la válvula. Bloquee la
salida inferior (2D) con un tapón
(2E). Conecte el codo de tubería
(2A) (no se incluye) al extremo de la
tubería.
2b
2A
2B
8 pulg. como
mínimo.
1 1/4 pulg. (D)
30 pulg
Bañera y regadera
2C
2D
2E
Su nuevo grifo de Design House le brindará muchos años de funcionamiento sin problemas. Gracias
por escoger un producto de Design House para su hogar.
Lea cuidadosamente todas las instrucciones antes de instalar su nuevo grifo.
Herramientas útiles para instalar este grifo:
•
•
•
•
•
•
llave de lavabo
cinta de teflón
(2) llaves inglesas
sellador de silicona
linterna
tubos de suministro de grifo
3. PARA INSTALACIÓN DEL BRAZO
DE REGADERA
Inserte el extremo largo del brazo de
regadera (3B) a través de la brida
(3A) luego enrolle cinta de plomero en
ambos lados de dicho brazo. Atornille
el extremo largo del brazo de
regadera en el codo de tubería dentro
de la pared.
PUNTOS IMPORTANTES
3A
• Al instalar el grifo nuevo, apriete a mano las tuercas del conector, luego use una llave para
sujetar el accesorio y otra para apretar la tuerca un giro adicional. Las conexiones que queden
demasiado apretadas menoscabarán la integridad del sistema.
3
4. LAVADO
Para combinaciones de bañera y
regadera: Abra las líneas de
suministro de agua caliente y fría
permitiendo que fluya agua por la
salida de la espiga de la bañera (4B)
hasta que se haya eliminado todo
material extraño de la línea. Para
combinaciones sólo de regadera:
Abra las líneas de suministro de agua
caliente y fría permitiendo que fluya
agua por la salida de la regadera (4A)
hasta que se haya eliminado todo
material extraño de la línea. La
presión debe ser aproximadamente
4A
3B
• Enrolle cinta de teflón en todas las conexiones roscadas (excepto en la rosca del aireador en el
surtidor). La cinta de teflón se vende en ferreterías o tiendas de suministros de plomería. Siempre
enrolle en dirección contraria a las manecillas del reloj.
CONSEJOS DE SEGURIDAD
4B
• SIEMPRE use gafas para proteger sus ojos.
PROCEDIMIENTO DE INSTALACIÓN
6
7
8
9
8E
8A
8B
más frío
8C
caliente
retén de límite
de rotación
retén en cartucho
8D
6. Antes de instalar el escudo, quite la tapa plástica de
la protección de yeso girándola en el sentido de las
manecillas del reloj. Quite el tornillo del inversor.
7. Coloque la manilla en el vástago de la válvula y gírela
a la posición mixta totalmente abierta. Abra
totalmente durante un minuto tanto la línea de agua
caliente como la de agua fría. Revise si hay fugas.
Corte el agua en el grifo. Retire la manilla.
8. Instale el escudo (8A) en la válvula y luego inserte
tornillos (8B) para fijarlo en su lugar.
Coloque el conjunto de la manilla (8C) en la válvula y
fíjelo con un tornillo de presión (8D). Conecte la
regadera (8E) a la brida de la regadera.
9. AJUSTE DE LA TEMPERATURA DEL AGUA
Abra el grifo de modo que el agua fría esté lo más
fría posible y el agua caliente lo más caliente posible.
Retire el retén del límite de rotación desde la válvula
deslizándolo fuera del vástago. Coloque la manilla
nuevamente en el vástago y gírela totalmente en
sentido contrario a las manecillas del reloj hasta la
posición más caliente. Coloque un termómetro en un
vaso y colóquelo bajo el chorro de agua. Si la
temperatura es superior a 120°F, el retén del límite
de rotación debe girarse en sentido contrario a las
manecillas del reloj para reducir la temperatura.
Reinstale el retén deslizándolo en el vástago antes
de colocar la manilla.
ASEGÚRESE DE QUE EL AGUA FRÍA FLUYA
PRIMERO DE LA VÁLVULA.
ASEGÚRESE DE QUE EL AGUA (EN EL FLUJO
MÁS CALIENTE) NO EXCEDA EL LÍMITE DE
TEMPERATURA DE SU CÓDIGO DE PLOMERÍA
(120°F O 110°F).
MANTENIMIENTO
Su nuevo grifo de Design House está diseñado para funcionar muchos años sin problemas. Límpielo
periódicamente con un paño húmedo para que luzca como nuevo. Evite usar limpiadores abrasivos,
lana de acero y productos químicos fuertes que opacarán el acabado y anularán la garantía.
Los acabados de latón se pulen y protegen con una capa de laca para evitar que se manchen.
Limpie estas superficies sólo con un paño suave húmedo.
ADVERTENCIA DE PROTECCIÓN AL CONSUMIDOR
En los Estados Unidos, la Agencia de Protección Ambiental aplica la Ley de Agua Potable
Saludable para restringir la cantidad de plomo que se utiliza en el latón y la soldadura.
Su grifo nuevo se fabrica según todas las normas gubernamentales correspondientes.
Los materiales utilizados en la fabricación de este grifo son de calidad estándar de la
industria y son similares a otros productos de plomería que tienen accesorios de latón.
Para reducir la cantidad de plomo en el agua potable, déjela correr un momento antes de
llenar un vaso y recuerde siempre usar agua fría para beber.
4
igual en los lados caliente y frío para
que la válvula funcione
correctamente.
5. PARA LA INSTALACIÓN DEL
SURTIDOR DE BAÑERA
Instale el surtidor de bañera. Rosque
el surtidor en la conexión roscada en
el sentido de las manecillas del reloj
hasta que quede a ras con la pared
terminada. Puede que se requiera
sellador de roscas dependiendo de su
método de instalación.
En su ferretería local podrá encontrar
toda clase de sellador de roscas.
5