1
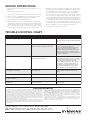
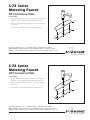
S-72 Series
Metering Faucet
DP Conversion Plate
Installation
1. 8” Deck plate (SPF-102) and conversion plate gasket (LL-116)
replace 4” center deck plate (SPF-28) and gasket (SPF-27).
SPF-102
2. Place the Conversion plate gasket (LL-116) on the underside
of the plate.
3. Continue with enclosed installation instructions ZV-321.
LL-116
Symmons Industries, Inc. ■ 31 Brooks Drive ■ Braintree, MA 02184
(800) 796-6667, (781) 848-2250 ■ Fax (800) 961-9621, (781) 843-3849
Website: www.symmons.com ■ Email: c u s t [email protected]
©2003, 2008 Symmons Industries, Inc. Printed in U.S.A.
■
050508
S-71
and
K-60
Washer
L-42
Coupling nut
S-73
Series
LL-1
Control spindle
LL-1A
EVB-9
LL-1B
Control cartridge
O-ring
Control cartridge for
quick-closing
Washer
Cycle spindle assembly
Coupling
nut
Upper housing
Piston washer screw
Control rod
Cycle spindle guide
SetPiston
screw
cylinder
Piston
Cycle time washers
Shut-off seat
Rubber
Control washer
rod
Handle
set
Spray outletscrew
w/wrench
Cycle time washers
Replacement
Retaining ring Cartridge
Piston spring
Rubber
washer
Thrust washer
Spout
assembly
Shut-off washer
Spindle guide
Bushing
cap large o-ring
Shut-off seat o-ring
Bushing
Control spindle small o-ring
Control
spindle large o-ring
Cap
(plain)
Upper housing o-rings (three)
Cap
(cold)
Piston
o-ring
Spindle
Cap (hot)guide huva cup
Huva cup retainer
Flange
In-line screen
Aerator (vandal
resistant 0.5
Metering
chamber
gpm)
Seat
Aerator (vandal resistant)
Pistonnut
assembly
U-cup
Rubber washer
Metering
Checks pin
Flange
Huvacup
Hex nut
U-cup
Lock washer
Bushing
Compression
spring
Cap
Hex
nut
Cap (cold)
Capwasher
(hot)
Lock
Spout assembly
PinMechanical
cone mixing valve
K-60
LL-2A
L-42
LL-3N
LL-4
LL-24
LL-8
LL-27
LL-11
LL-12
LL-28
LL-16
LL-37
LL-24
LL-27
LL-60B
LL-28
MF-1
LL-31
LL-32
MV-10
LL-35
SPF-1
LL-37
LL-44
SPF-2
LL-45
SPF-3
LL-46
LL-47
SPF-4
LL-48
SPF-4C
LL-49
LL-75
SPF-4H
LL-76
SPF-5
LL-101
LN-100
SPF-6
SPF-7
LN-101
LT-4A
SPF-8
MV-10
SPF-9
MV-107
SPF-5
SPF-14
SPF-26
SPF-16
SPF-38
SPF-103
SPF-18
SPF-104
SPF-26
SPF-104C
SPF-104H
SPF-38
SPF-107
SPF-101
4-10C
TT-47
O-ring
Tools required
for disassembly
Order MF-KIT-W,
consisting of:
4-10C
Mechanical
mixing valve
LL-27W
3/32" hex socket key to remove
handle set screw
Tools
foroutlet
disassembly
LL-60Krequired
Spray
wrench to remove
spray
outlet (included
Order MF-KIT-W,
consisting
of: with
faucet)
LL-27W
3/32” Hex socket key
other standard tools required:
Adjustable or 1"
Toand
remove
handle
set
1/4" open
end wrench,
pliers, 5/32" hex
screw
socket key
LL-60K
outlet
Repair Kit llSpray
consists
of: wrench
LL-4, LL-8, LL-13,
To LL-24,
remove
spray
LL-31,
LL-33,outlet
LL-35,
LL-37, LL-42, LL-43, LL-44, LL-45, LL-46, LL-47,
(included with faucet)
LL-48, LL-49, LL-73, LL-75, LL-76.
Other standard tools required:
Adjustable or 1” and 1/4” open end
wrench, pliers, 5/32” hex socket key
Repair KIT-MF consists of:
EVB-9, LL-24, LL-37, SPF-14, SPF-16,
TT-47(2)
3/32" HEX SOCKET KEY
LL-3N
LL-48
SPF-104
LL-27
LL-35
LL-28
SPF-103
LL-1A
or
LL-1B
LL-1
LL-46
LL-47
SPF-107
LL-2A
LN-100
LN-101
LL-44
LL-8
LL-75
LL-76
LL-1A
or
LL-1B
LL-45
LL-16
LT-4A
LL-101
LL-32
SPF-5
LL-31
K-60
LL-11
SPF-38
SPF-26
LL-4
L-42 (S-71 only)
LL-37
LT-4A
LL-24
LL-49
LL-12
MV-10
4-10C
S-73 ONLY
MV-107
S-72
and
K-60
Washer
L-42
Coupling nut
S-74
Series
LL-1
Control spindle
LL-1A
EVB-9
LL-1B
Control cartridge
O-ring
Control cartridge for quickclosing
Washer
Cycle spindle assembly
Anchor
bar
Upper housing
Piston
washer
screw
Spacer
Cycle spindle guide
Coupling
nut
Piston cylinder
Piston
Control rod
Shut-off seat
Set
screw
Control
rod
Handle
set screw
Cycle time
washers
Cycle time washers
Rubber
washer
Retaining ring
Pistonoutlet
spring w/wrench
Spray
Thrust washer
In-line
checks
Shut-off
washer(two)
Spindle
guide
o-ring
Replacement large
Cartridge
Shut-off seat o-ring
Rubber
Control washer
spindle small o-ring
Control
spindle large o-ring
Spout
assembly
Upper housing o-rings (three)
Bushing
cap
Piston o-ring
Spindle
guide
huva cup
Bushing
Huva cup retainer
Cap
(plain)
In-line
screen
Aerator
resistant
Metering(vandal
chamber
0.5 gpm)
Seat
Aerator (vandal resistant)
Piston nut
assembly
U-cup
Rubber washer
Metering
pin
Checks
Hex nut
Huvacup
Deck plate gasket
U-cup
Deck plate
Lock washer spring
Compression
Bushing
Hex
nut
Cap
Spoutplate
assembly
Deck
gasket
Mounting Kit
Deck
plate
Mechanical mixing valve
K-60
LL-2A
KN-23
LL-3N
LL-4
KN-26
LL-8
L-42
LL-11
LL-12
LL-24
LL-16
LL-27
LL-24
LL-27
LL-28
LL-28
LL-37
LL-31
LL-32
LL-60B
LL-35
LL-71A
LL-37
LL-44
MF-1
LL-45
MV-10
LL-46
LL-47
SPF-1
LL-48
SPF-2
LL-49
LL-75
SPF-3
LL-76
SPF-4
LL-101
LN-100
SPF-6
SPF-7
LN-101
LT-4A
SPF-8
MV-10
SPF-9
MV-107
SPF-26
SPF-14
SPF-27
SPF-16
SPF-28
SPF-38
SPF-18
SPF-103
SPF-26
SPF-104
SPF-107
SPF-27
SPF-KIT
SPF-28
4-10C
SPF-38
Lock washer
Tools required for disassembly
SPF-101
Pinconsisting
cone of:
Order MF-KIT-W,
LL-27W
3/32"
TT-47
O-ring hex socket key to
remove handle set screw
4-10C
Mechanical
mixingtovalve
LL-60K
Spray outlet wrench
LL-3N
LL-48
Other standard tools required:
Adjustable or 1” and 1/4” open end
wrench, pliers, 5/32” hex socket key
Repair KIT-MF consists of:
EVB-9, LL-24, LL-37, SPF-14, SPF-16,
TT-47(2)
SPF-104
LL-27
LL-35
LL-28
SPF-103
LL-1A
or
LL-1B
LL-1
LL-46
LL-47
SPF-107
LL-2A
LN-100
LN-101
LL-44
LL-8
LL-75
LL-76
LL-45
LL-16
LL-1A
or
LL-1B
LL-101
LT-4A
SPF-28
LL-32
LL-31
SPF-27
LL-11
LL-4
KN-23
LL-37
LT-4A
LL-24
LL-49
LL-12
remove spray outlet
(included with faucet)
Tools required for disassembly
other standard tools required:
Order
MF-KIT-W,
of: wrench,
Adjustable
or 1" andconsisting
1/4" open end
pliers,
5/32"
hex
socket
key,
7/16"
LL-27W
3/32” Hex socketopen
key
end wrench
To remove handle set
consists of:
Repair Kit ll screw
LL-4, LL-8, LL-13, LL-24, LL-31, LL-33, LL-35,
LL-60K
Spray outlet wrench
LL-37, LL-42, LL-43, LL-44, LL-45, LL-46, LL-47,
LL-48, LL-49, LL-73,
To remove
spray outlet
LL-75, LL-76.
(included with faucet)
3/32" HEX SOCKET KEY
MV-10
S-74 ONLY
K-60
SPF-KIT
KN-26
SPF-38
SPF-26
L-36
4-10C
MV-107
L-42 (S-72 only)
SERVICE Instructions
1. General maintenance may require the repair or replacement of the cartridge unit.
2. Shut off water supply to the faucet.
3. Remove cap (SPF-4) by loosening allen screw with 3/32” hex socket key.
4. Using a 1” wrench or adjustable wrench, loosen bushing cap (SPF-2).
Remove bushing cap/cartridge assembly from faucet body.
5. Slide bushing cap off of control cartridge (MF-1).
6. Cartridge can either be repaired or replaced at this point. Disassemble
cartridge by unscrewing bushing (SPF-3) from metering chamber (SPF-6).
Use 5/32” hex key inserted in hole in bushing (SPF-3) to hold bushing
secure. Use pliers to grasp bottom of metering chamber (SPF-6), unthread
from bushing. Slide the bushing (SPF-3) off the metering pin (SPF-9).
7. Ordinary service may only require the rebuilding of the cartridge using
the replacement o-rings and washers from KIT-MF. To install parts replace
the o-ring (EVB-9) on the bushing cap (SPF-2). Use pliers to grasp and
hold the narrow section of the metering pin (SPF-9). Use adjustable
wrench to loosen the u-cup nut (SPF-8). Slide seat assembly (LL-37/SPF-7/
SPF-16) off of the metering pin (SPF-9). Replace huva cup (SPF-14) in top
of the bushing (SPF-3) with the tapered end facing down. Replace the
o-ring (TT-47) in the bushing. Insert the metering pin (SPF-9) through the
top of the bushing. Slide the rubber washer (LL-37), the seat (SPF-7) and
the u-cup (SPF-16) onto the metering pin (SPF-9). Replace the control rod
(LL-24) in the u-cup nut (SPF-8) and thread onto the metering pin (SPF-9).
Replace o-ring (TT-47) on top of the metering chamber (SPF-6).
8. Reassemble, reversing the above procedures.
trouble shooting chart
Problem
C ause
Solution (Follow service in struction s)
Faucetruns to long orto short.
Tim ing
Rem ove cap (SPF-4)then add w ashers (LL-28)to
stem to shorten tim e orrem ove w ashers to lengthen
tim e.
Faucetdrips
Seatw asherw orn orforeign m atter(chips,dirt,
solder,etc.)is betw een w asherand seatsurface.
D isassem ble cartridge by unscrew ing bushing (SPF3)from m etering cham ber(SPF-6).U se
5/32” hex socketkey inserted in hole in bushing
(SPF-3)to hold bushing secure.U se pliers to
unthread m etering cham ber(SPF-6)from bushing.
Clean seatw asher(SPF-37)and seating surface of
bottom ofbushing (SPF-3).Check controlrod (LL-24)
forburrthen reassem ble.
Faucetruns constantly.
Seatw ashernotclosing on seatsurface orseat
w asherand/orseatsurface w orn.
D isassem ble cartridge by unscrew ing bushing (SPF-3)
from m etering cham ber(SPF-6).U se 5/32” hex socket
key inserted in hole in bushing (SPF-3)to hold bushing
secure.U se pliers to grasp bottom ofm etering
cham ber(SPF-6),unthread from bushing.Clean seat
w asher(SPF-37)and seating surface ofbottom of
bushing (SPF-3).Check controlrod (LL-24)forburr
then reassem ble.Excessive w earm ay require the
repairorreplacem entofthe cartridge unit(M F-1).
W aterleaks from underhandle.
Stem w ashers w orn.
Rem ove cartridge and replace w ashers using
KIT-M F.
Faucetleaks on orundercounter.
4-10C connections notseated properly.
Check connections on 4-10C.
Faucetbleeding betw een hotand cold,notholding
consistenttem perature.
Integralchecks notoperating properly.
Clean orreplace checks (M V-107).
H andle is loose.
Setscrew has loosened.
Tighten setscrew .
Commercial Limited Warranty
Symmons warrants to the original purchaser that any Symmons product (excluding batteries)
when used in industrial, commercial or business use will be free of defects in material and
workmanship during normal use for a period of 5 years from the date of purchase. At our option,
we will either have you send the defective part or product prepaid to us for inspection, or we
may elect to send you the replacement part or product without investigation. A replacement for
any defective part or product, either new or refurbished (at our option), will be supplied FREE OF
CHARGE for installation by the purchaser. Defect or damage caused by the use of replacement
parts other than Symmons Genuine Replacement Parts will void this warranty. This warranty
excludes product damage due to installation error, product abuse, or product misuse whether
performed by a contractor, service company or yourself.
Damage to the chrome and/or other decorative finishes on Symmons products may be a result of
improper handling or abusive treatment. Finishes should only be cleaned with a soft, damp cloth
or sponge. Use of polish, abrasive cleaners, solvents, or acid cleaners will damage the finish and
void this warranty.
There are no other express warranties on this product and ALL WARRANTIES OF
MERCHANTABILITY AND OTHER IMPLIED WARRANTIES ARE LIMITED IN ACCORDANCE WITH
APPLICABLE LAW. SYMMONS INDUSTRIES, INC., EXPRESSLY DISCLAIMS CONTINGENT LIABILITY
AND CONSEQUENTIAL DAMAGE OF EVERY KIND. Since some states do not allow limitations on
how long an implied warranty lasts or an exclusion or limitation of incidental or consequential
damages the above limitation or exclusion may not be applicable. This warranty gives specific
legal rights. Other rights may vary from state to state.
To obtain warranty service, write to Symmons Industries, Inc., 31 Brooks Drive, Braintree, MA
02184-3804 or call our Customer Service Department at 1-800-SYMMONS. If writing to us, please
include proof of purchase, the model number of the product with a brief description of the
problem, your name, address and phone number.
Symmons Industries, Inc. ■ 31 Brooks Drive ■ Braintree, MA 02184
(800) 796-6667, (781) 848-2250 ■ Fax (800) 961-9621, (781) 843-3849
Website: www.symmons.com ■ Email: c u s t o m e r [email protected]
©2007, 2008 Symmons Industries, Inc. Printed in U.S.A.
■
ZV-321
■
050508