Transcript
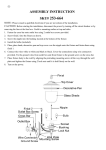
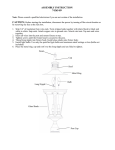
blade levels are unequal. Check this level by
selecting a point on the ceiling above the tip
of one of the blades. Measure from a point
on the center of each blade to the point on
the ceiling. Measure this distance as shown
in Figure 16. Rotate the fan until the next
blade is positioned for measurement. Repeat
for each blade. Measurement deviations
should within 1/8”. Run the fan for 10 minutes.
3. Use the enclosed Blade Balancing Kit if the
blade wobble is still noticeable.
Light Kit Option
Figure 16
CAUTION - To reduce the risk of electrical
shock, disconnect the electrical supply circuit
to the fan before installing light kit.
FAN WITH LIGHT KIT (Figure 17)
1. Remove the three mounting screws on the
black bracket below the motor.
2. Remove the the finial, lower cap, hex nut
and rubber washer from the light fixture.
3. Remove the nut and washer from the top of
the light fixture.
4. Attach the light kit to the switch housing
by first removing the decorative cover on
the bottom of the switch housing. Insert the
wires from the top of the light kit through
the hole in the bottom of the switch housing.
Thread the light kit into the hole on the bottom of the switch housing. Secure with the
nut and washer provided.
5. Connect the wires from the light kit to the
blue and white wires in the switch housing
marked for light kit connection. See page 6
for wiring.
6. Connect the wires exiting the bottom of the
motor with the switch housing by connecting the molded adaptor plugs together.
7. Slide the switch housing and secure it to the
black bracket using the three screws that
were removed in step1.
8. With power off, install candelabra E12 base
bulbs (Max. 60W, included) to the lamp
sockets.
the light fixture, direct the fan pull chain
through the side hole on the glass.
11.Place the finial over the threaded stem and
direct the light pull chain through the hole
of the finial, tighten the finial securely.
12.Attach the pull chain extensions provided to
the light pull chain and the fan pull chain.
Socket
OVER LAMPING THE FAN WILL RESULT IN
THE FAN LIGHTS SHUTTING DOWN UNTIL THE
PROPER WATTAGE OF BULBS ARE INSTALLED.
RESET THE LIGHTS BY TURNING OFF, REPLACE BULBS WITH THE POWER ON.
9. Place the glass bowl over the threaded stem of
the light fixture and up against the upper cap.
10.Place the decorative leaves, rubber washer,
hex nut and cap over the threaded stem of
Figure 17
9.