Transcript
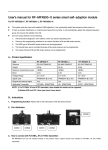
Hanging the fixture
!
INSTALLATION GUIDE
SHL 135
Preventive maintenance
CAUTION: This luminaire must be mounted or supported independently
of an outlet box.
Tools and hardware needed
Big Ass Light-supplied
• (2) Ø1/4” steel zinc-plated S-hooks
Customer-supplied
!
WARNING: Unplug power supply cord before servicing.
!
CAUTION: Do not clean the fixture—especially the lenses—with
scouring pads, alkaline cleaning substances, gasoline, thinner,
benzene, heating oil, glycol, alcohol, or polishing powder.
!
CAUTION: Do not pressure wash or use a water hose to clean the fixture.
Big Ass Light suggests an electrical preventive maintenance program
similar to that described in the National Fire Protection Association
No. 70B: Recommended Practice For Electrical Equipment Maintenance.
• Stud finder
• Tape measure
Clean the fixture periodically with a clean, damp cloth. If necessary, use a mild
soap or a gentle liquid cleaner.
• Drill
• (2) minimum Ø1/4” steel zinc-plated lag eye screws*
*Or equivalent minimum Ø1/4” metallic fasteners with appropriate corrosion protection
To hang the light fixture:
1. Locate the ceiling joists. Mark two drill locations for the mounting holes 16”
(40.6 cm) apart.
2. Drill holes into the marks using an appropriate-sized drill bit for the lag eye
screws.
Occupancy sensor troubleshooting
3. Install the lag eye screws in the ceiling, and then hang the S-hooks from the
lag eye screws.
Light will not turn ON
4. Hang the two eye bolts on the fixture from the S-hooks.
5. Plug in the power supply cord. Note: If the light includes an occupancy
sensor, it may take up to one minute to turn on after installation. The sensor
requires time to warm up.
IMPORTANT SAFETY INSTRUCTIONS
This guide contains important instructions and safety information. Read these
instructions prior to installing and operating your light. Retain this installation
guide for maintenance and troubleshooting information.
6. If necessary, use zip ties or cable ties to secure excess power supply cord
length above the fixture or to the ceiling.
!
CAUTION: Do not overturn the trimpots when adjusting the sensor.
Do not touch the square infrared detector under the lens assembly.
To adjust the settings on fixtures with an occupancy sensor:
1. Carefully unscrew the lens assembly from the bottom of the light. Do not
remove the thumbscrew collar that holds the sensor in place.
2. Set the light level and time delay using the two trimpots.
Pre-installation
!
WARNING: Unplug power supply cord before servicing.
!
WARNING: This product contains high intensity LED devices. To
prevent permanent eye damage, do not stare into the light beam
at close range.
!
The installation of Big Ass Light products must be performed
by qualified person(s) in accordance with all applicable codes.
Code compliance is your responsibility. Failure to comply with
these codes could result in personal injury or property damage.
• Light level–Specify the ambient light level above which the light will turn
off while the space is occupied. When the ambient light level drops below
the set level while the space is occupied, the light will turn on. The light
level can be set from <10 fc to >120 fc. The default setting is 120 fc
(maximum). At this setting, the light will stay on at any ambient light level
below 120 fc while the space is occupied.
• Time delay–Specify how long the light will stay on after occupants
leave the space. The time delay can be set from 30 seconds (fully
counterclockwise) to 30 minutes (fully clockwise). The default setting is
15 minutes.
3. Reattach the lens assembly.
Maximum ambient operating temperature: 55°C (131°F).
15 min
20 min
25 min
10 min
Light Level
5 min
30 min
30 s
Time Delay Trimpot Positions
Conforms to UL Standard 1598, UL Standard 8750,
CSA Standard C22.2 No. 250.0, and
CSA Standard C22.2 No. 250.13
HBL-INST-20-MUL-01
• Check the light level setting. Cover the sensor lens to simulate darkness in
the room. If the light turns on, the light level needs to be adjusted. If set to
the minimum setting, more than 10 fc of ambient light will cause the light to
remain off. See “Configuring the Occupancy Sensor” for details on setting
the light level.
Ensure the time delay is set to the desired delay period and that there is no
movement within the sensor’s view during that time period.
To test the sensor for proper operation, set the time delay to minimum and
move out of the sensor’s view. The light should turn off after 30 seconds. If the
light does not turn off, contact Customer Service.
Light will not turn ON after installation or power outage
The occupancy sensor requires time to warm up during initial power-up. Lights
with occupancy sensors may take up to one minute to turn on after initial
installation or after a long power outage.
Questions?
Customers in the United States
Time Delay
Suitable for damp locations.
The light includes a 6 ft (1.8 m) power supply cord with a plug. Ensure
power is routed to an approved outlet box at the ceiling before beginning
installation. Support the fixture so that it does not fall during installation.
• Check all wire connections and verify the load wire is tightly secured.
Light will not turn OFF
Note: The light includes an occupancy sensor only if ordered.
Model: BAL-SHL1-13-YY-XX-ZZ-@@
Electrical specifications: 120 VAC, 1.0 A, 122 W, 60 Hz
Weight: 16 lb (7.3 kg)
Dimensions: 23.09” × 9.18” × 4.63” (58.6 cm × 23.3 cm × 11.8 cm)
Power supply cord length: 6 ft (1.8 m)
If the LED is flashing:
• If the light still does not turn on, contact Customer Service.
Configuring the occupancy sensor
Specifications
If the LED in the sensor lens is not flashing, check all wire connections.
© 2014 BIG ASS LIGHT, LLC. ALL RIGHTS RESERVED. REV. A NOV 2014 For questions about your product, please contact a customer service
representative at 1-877-BIG-FANS (877-244-3267) or visit
www.bigasslight.com/support
Customers outside the United States
For questions about your product or customer service inquiries, please
contact your local Big Ass Light representative or fill out a contact form at
www.bigasslight.com/support
WWW.BIGASSLIGHT.COM 2425 MERCHANT ST, LEXINGTON, KY 40511