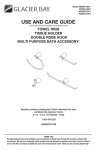
1
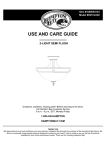
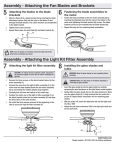
Assembly - Attaching the Light Kit
9
10
Attaching the light kit
CAUTION: To reduce the risk of electric shock, disconnect
the electrical supply circuit to the fan before installing the
light kit.
CAUTION: Make sure the power is off before attaching or
removing the glass shades.
□□ Remove the three screws (QQ) from the black bracket below
□□
□□
WARNING: Allow the glass shade to cool completely before
removing.
the fan motor assembly (D).
Connect the wires exiting the bottom of the motor assembly
(D) by connecting the molded adaptor plugs (SS) together.
Slide the switch cup light kit (E) and secure it to the black
bracket using the three screws (QQ) that were removed in
the first step.
□□ Insert the glass shade (I) into the glass holder by carefully
□□
□□
D
SS
Attaching the glass shades
and bulbs
squeezing the steel tensioners (TT) on the light fixture
together.
Gently slide the glass shade (I) over the steel tensioners
(TT). Make sure the glass shade is fully inserted into the
socket for a secure fit. Repeat for the remaining glass
shades.
With the power off, install the light bulbs (J) (Max. 14W,
provided) into the light bulb sockets.
G
QQ
E
TT
E
I
HH
HH
J
11
HAMPTONBAY.COM
Please contact 1-877-527-0313 for further assistance.
Ensamblaje - Cómo Instalar el Kit de Luces
9
10
Cómo instalar el kit de luces
PRECAUCIÓN: Para disminuir el riesgo de descarga
eléctrica, desconecta el circuito de energía del ventilador
antes de instalar el kit de luces.
PRECAUCIÓN: Asegúrate de que la corriente esté cortada
antes de montar o retirar las pantallas de vidrio.
□□ Quita los tres tornillos (QQ) del soporte negro debajo del
□□
□□
ADVERTENCIA: Espera que la pantalla de vidrio se enfríe
completamente antes de retirarla.
ensamblaje del motor del ventilador (D).
Conecta los cables que salen de la parte inferior del
ensamblaje del motor (D), uniendo los enchufes con
adaptadores moldeados (SS).
Desliza el kit de luces con caja de interruptor (E) y asegúralo
al soporte negro usando los tres tornillos (QQ) que se
quitaron en el paso 1.
□□ Inserta la pantalla de vidrio (I) en el soporte de vidrio
□□
D
SS
Cómo instalar las pantallas de vidrio
y las bombillas
□□
apretando con cuidado los tensores de acero (TT) sobre la
lámpara.
Cuidadosamente, desliza la pantalla de vidrio (I) sobre los
tensores de acero (TT). Asegúrate de que la pantalla de
vidrio esté totalmente insertada en el portabombillas para
una colocación segura. Repite para las pantallas de vidrio
restantes.
Con la electricidad apagada, instala las bombillas
fluorescentes (J) (de 14 W Máximo, incluidas) en los
portabombillas.
G
QQ
E
E
TT
I
HH
HH
J
11
HAMPTONBAY.COM
Para obtener asistencia, llama al 1-877-527-0313.