1
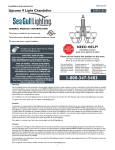
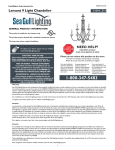
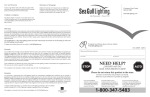
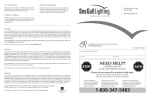
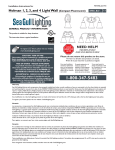
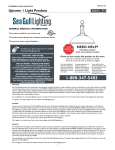
Installation Instructions for
990W41585-ELG
Ellington Wall
41585-_
1.0
Ceiling
GENERAL PRODUCT INFORMATION:
This product is suitable for damp locations.
This product may be dimmed with a standard incandescent dimmer.
This instruction shows a typical installation.
www.SeaGullLighting.com
CAUTION
CAUTION -- RISK
RISK OF
OF FIRE
FIRE
NEED HELP?
?
STOP
ARRÊTER
ALTO
To register your fixture, please visit our website:
NECESITA AYUDA?
AVEZ-VOUS BESOIN D’AIDE?
Please do not return this product to the store.
This
This product
product requires
requires installation
installation by
by a
a qualified
qualified electrician.
electrician.
Before
Before installing
installing be
be sure
sure to
to read
read all
all instructions
instructions and
and
TURN THE
THE POWER
POWER TO
TO THE
THE ELECTRICAL
ELECTRICAL BOX
BOX OFF.
OFF.
TURN
Por favor no devuelva este producto a la tienda.
Prière de ne pas retourner ce produit au magasin.
MISE EN GARDE - RISQUE D'INCENDIE
Ce produit nécessite une installation par un
électricien qualifié.Avant d'installer assurez-vous de
lire toutes les instructions et TOURNER LE
POUVOIR DE LA BOITE ELECTRIQUE OFF.
If you need installation
assistance, replacement
parts, or have questions
regarding our warranty,
please call our customer
care center:
ADVERTENCIA - RIESGO DE INCENDIO
Este producto requiere la instalación por un
electricista calificado.Antes de instalar, asegúrese de
leer todas las instrucciones y APAGUE EL PODER
DE LA CAJA ELÉCTRICA NO.
Si necesita asistencia en la
instalación, piezas de
repuesto, o tiene preguntas
acerca de nuestra garantía,
por favor llame a nuestro
centro de servicio al cliente:
Si vous avez besoin de
pièces de rechange, d 'aide
pur l'installation ou si vous
avez des questions
concernant notre garantie,
veuillez appeler nos
conseillers en produits au :
1-800-347-5483
Warranty
Sea Gull Lighting fixtures and components, when properly installed and under normal conditions of use, are warranted to be free from defects in materials
and workmanship for one year from date of sale. ENERGY STAR® labeled products are warranted for three years. Sea Gull Lighting at its sole option will
repair or replace, F.O.B. Factory, freight prepaid, any Sea Gull Lighting product defective in materials or workmanship. Such replacement is the exclusive
remedy against Sea Gull Lighting should any of the products delivered prove defective. Invoices for labor charges and/or charge backs for labor will be
denied unless prior written approval is given.
Any modification to a Sea Gull Lighting product not made at the factory will void the UL or ETL listing as well as the Sea Gull Lighting warranty policy.
To register your fixture, please visit our website: SeaGullLighting.com
Garantía
Los accesorios y componentes Sea Gull Lighting, cuando son correctamente instalados bajo condiciones de uso normal, se garantizan a estar libres de
defectos en materiales y trabajo manual por un año de la fecha de compra. Los productos etiquetados ENERGY STAR® se garantizan por tres años. Sea
Gull Lighting a su propia opción reparará o reemplazará, F.O.B. Factory, flete pre pagado, cualquier producto de Sea Gull Lighting defectuoso en materiales
o trabajo manual.Tal reemplazo es el remedio exclusivo en contra de Sea Gull Lighting en caso de que cualquiera de sus productos entregados esté
defectuoso. Facturas por cargos de labor y/o cargos al usuario por labor serán negados a menos de que se haya recibido permiso previo por escrito.
Cualquier modificación hecha a un producto de Sea Gull Lighting no llevado a cabo en la fábrica
anulara el listado de UL o ETL al igual que la póliza de garantía de Sea Gull Lighting.
Para registrar su accesorio, por favor visite nuestra página web: SeaGullLighting.com
Garantie
A la condition d'un montage et d'une utilisation dans les normes, les Luminaires et pièces Sea Gull Lighting sont garantis sans défauts des matériaux et
dans leur fabrication pour une durée d'un an à compter de la date d'achat. Les produits labellisés ENERGY STAR® sont garantis pour trois ans.A sa seule
discrétion, Sea Gull Lighting réparera ou remplacera tout produit Sea Gull Lighting défectueux dans ses matériaux ou dans sa fabrication, F.O.B. Usine fret
payé d'avant. Un remplacement selon ces conditions est l'unique recours à l'encontre de Sea Gull Lighting dans le cas où les produits livrés se révèlent
défectueux.Toute facture concernant des frais de main d'oeuvre et/ou toute demande de remboursement de main d'oeuvre sera rejetée à moins qu'un
accord écrit ait été consenti au préalable.
Toute modification non effectuée par l'usine d'un produit Sea Gull Lighting conduira à l'annulation des enregistrements UL ou ETL ainsi que du contrat de
garantie Sea Gull Lighting.
Pour enregistrer votre luminaire, veuillez consulter notre site web : SeaGullLighting.com
1
Install the Fixture
1A
LAMP
7
SPECIAL TOOL
COLLAR NUT
MOUNTING PLATE
SCREW
SPACER
ELECTRICAL BOX
6
MOUNTING PLATE
SHADE
1
5
BALL NUT
SOCKET
2
Use MAX 120 volt 60 Watt
Type A19 Medium Base Lamp.
3
4
MOUNTING PLATE STUD
1
Secure the mounting plate to the electrical box with the two provided mounting plate screws .
2
Connect the fixture ground wire to a suitable ground in accordance to local electrical codes.
3
Connect the white fixture wire to the neutral power line wire with a wire nut.
4
Connect the black fixture wire to the hot power line wire with a wire nut.
5
Align then place the fixture base onto the mounting plate studs and secure it with the two ball nuts.
6
Place a shade onto a socket, then a spacer, and secure them by installing the collar nut and tightening it with the
special tool.
7
Screw the lamp into the socket.
2
Installer le Luminaire
1A
AMPOULE
7
OUTIL SPECIAL
NUT COLLIER
VIS PLAQUE
DE MONTAGE
ENTRETOISE
COFFRET ÉLECTRIQUE
6
PLAQUE DE
MONTAGE
ABAT-JOUR
1
5
ÉCROU À BILLES
PRISE
2
Utilisez MAX 120 volts, 60 Watt
Tapez A19 Ampoule à culot moyen.
3
4
STUD PLAQUE DE MONTAGE
1
Fixez la plaque de montage à la boîte électrique avec les deux vis de la plaque de montage fourni.
2
Connectez le fil de terre du luminaire à un terrain approprié conformément aux codes électriques locaux.
3
Branchez le fil blanc au fil de ligne à neutre avec un écrou de fil.
4
Branchez le fil noir au fil ligne électrique chaud avec un serre-fils.
5
Aligner puis placez l'embase de fixation sur les goujons de la plaque de montage et le fixer avec les deux écrous à
billes.
6
Visser une ampoule dans chaque douille.
7
Placez une ombre sur une prise, puis une entretoise et fixez-les en installant l'écrou à épaulement et serrer avec l'outil
spécial.
e
3
Instale el Accesorio
1A
BOMBILLA
7
HERRAMIENTA ESPECIAL
TUERCA DE COLLAR
PLACA DE MONTAJE
TORNILLO
ESPACIADOR
6
CAJA ELÉCTRICA
PLACA DE MONTAJE
ESPARRAGO
SOMBRA
1
5
BOLA TUERCA
ENCHUFE
2
Utilice MAX 120 voltios, 60 vatios
Escriba A19 Bombilla de Base Mediana
Empresa.
3
4
PLACA DE MONTAJE ESPARRAGO
1
Fije la placa de montaje a la caja eléctrica con los dos tornillos de la placa de montaje proporcionado.
2
Conecte el cable de tierra a una tierra artefacto adecuado de acuerdo a los códigos eléctricos locales.
3
Conecte el cable blanco del portalámparas al cable de energía de la línea neutral con un tapón de alambre.
4
Conecte el cable negro del portalámparas al cable de alimentación de línea caliente con un tapón de alambre.
5
Alinee y coloque la base de fijación en los pernos de la placa de montaje y fíjela con los dos tornillos de bolas.
6
Coloque una sombra sobre un zócalo, luego de un espaciador, y seguro que con la instalación de la tuerca y apretar
con la herramienta especial.
7
Atornille la bombilla en el zócalo.
7400 Linder Ave, Skokie, IL 60077
800.323.3226 - 847.626.6300
www.SeaGullLighting.com
SAVE THESE INSTRUCTIONS!
© 2012 Sea Gull Lighting.All rights reserved.The "Sea Gull Lighting" graphic is a
registered trademark of Sea Gull Lighting. Sea Gull Lighting reserves the right to
change specifications for product improvements without notification.
A Generation Brands Company
4