Transcript
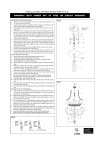
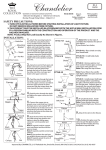
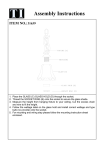
STYLE#
ASSEMBLY INSTRUCTIONS
21236
Careful unpack all lamp parts from the carton.
1.Carefully remove all parts from the carton.
2.Be sure the power to the installation point is OFF.
3.Fasten the Crossbar to the outlet box . Locate the
Nipple and thread into the center of the Crossbar.
4. Locate the Fixture Chain、Ceiling Canopy、
Canopy Chain Loop、and Canopy Lock ring.
Pass the Fixture Supply Wire and Ground Wires through in the following order: 1)Alternate Fixture
Loops in the Fixture Chain; 2)Canopy Lock ring;
3)Canopy Chain Loop; 4)Ceiling Canopy.
Finally,proceed to pass the wires through the Nipple attached to the Crossbar,
5.Thread Center Stem into the Hex Coupling underside
of the Socket Cluster, Hand tighten until snug.
6. Located the following components over the end of the Center Stem in turn Diffuser, Rubber Washer,
Flat Washer. Thread the Hexnut onto the end of the
Center Stem and tighten until snug to secure the
above parts.
7.Threaded Finial onto the end of the Center Stem
and hand tighten until snug.
8.Put the Marble into the Shade.
9.Lift the Shade upward and attached to the end
of Support Arms. Locate the end of Support Arm
onto the Hooks inside of the Marble Shade.
10.Install correct bulbs(not included) referring to fixture markings and /or labels for maximum wattage.
Your installation is completed now. Restore electricity.
Retain this sheet for future reference !