1
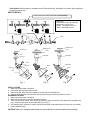
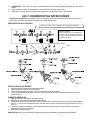
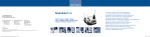
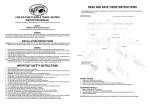
LINE VOLTAGE FLEXIBLE TRACK LIGHTING
INSTRUCTION MANUAL
Please read carefully and save these instructions, as you may need them at a later date.
SAFETY
WARNING: RISK OF ELECTRIC SHOCK
Disconnect the electrical supply circuit before installing light fixture.
GENERAL
All electrical connections must be in accordance with local codes, ordinances or national electrical codes. If you are
unfamiliar with methods of installing electrical wiring, secure the services of a qualified electrician. Before starting installation,
disconnect the power by turning off the circuit breaker or removing the fuse at the fuse box.
INSTALLATION INSTRUCTIONS
CAUTION: MAKE SURE POWER IS TURNED OFF AT THE ELECTRICAL PANEL BOX BEFORE BEGINNING YOUR
INSTALLATION. TURNING POWER OFF AT WALL SWITCH IS NOT SUFFICIENT TO PREVENT ELECTRICAL
SHOCK.
GENERAL
1. Be sure to read these installation instructions and review the diagrams thoroughly before installing the light fixture.
2. All electrical connections must be in accordance with local codes and the National Electrical Code. If you are unfamiliar
with methods of installing electrical wiring, secure the services of a qualified licensed electrician.
3. These fixtures are intended to be mounted to a 4" square x 2 1/8" deep metal octagon outlet box. The box must be
directly supported by the building structure.
4. Before starting the installation, disconnect the power by turning off the circuit breaker or by removing the appropriate
fuse at the fuse box. Turning the power off using the light switch is not sufficient to prevent electrical shock.
Note: The important safeguards and instructions appearing in this manual are not meant to cover all possible conditions and
situations that may occur. It must be understood that common sense, caution and care are factors that cannot be built
into any product. These factors must be supplied by the person(s) caring for, installing and operating the fixture.
IMPORTANT SAFETY INSTRUCTIONS
1. Read all instructions.
2. Do not install this lighting system in a damp or wet location.
3. Before energizing make sure that the lighting system is clear of all material which could cause a direct short and check
all electrical connections to make sure they are tight.
4. CAUTION – Hot surface, keep away from curtains and other combustible materials.
5. Lighted lamp is hot! Do not touch lamp at any time. Use a soft cloth or relamping tools (see diagram), Oil from skin may
damage lamp. Turn off power and allow bulbs to cool before replacing.
6. Lamp gets hot quickly! Contact only switch or plug when turning on. Do not touch hot lamp lens.
7. Do not conceal or extend bus-bar conductors through a building wall.
8. Do not install any part of this system (TRACK) less than 7 feet (2.2mm) above floor.
9. To reduce the risk of fire and burns, do not install this lighting system where non insulated open bus-bar conductors can
be shorted or contact any conductive metals.
10. To reduce the risk of fire and overheating, make sure all connections are tight.
11. Do not install any lamps closer than 6 inches (15.25cm) from any curtain or similar combustible material.
12. Turn off electrical power before modifying the light system in anyway.
13. Use minimum 20” spacing between stanchions when using 4 stanchions.
14. For use with EC series line voltage flexible track system only. Do not cut any track sections.
15. CAUTION – To reduce the risk of a burn during relamping, remove from the track before relamping.
16. This track system is to be supplied by a single branch 120 volt circuit.
17. Disconnect electrical power before adding to or changing the configuration of the track.
READ AND SAVE THESE INSTRUCTIONS
Tools Needed: Slotted screwdriver, Adjustable wrench, Electrical Hand drill, Step ladder, Wire cutters, Wiring supplies as
required by electrical code.
HOW TO INSTALL:
Power canopy, track, ceiling support stems (sold separately)
Please note:
These fixtures are only compatible with
Hampton Bay 120V Flex Track
Systems. The limitation of any one
system is 2400 Watts maximum.
Fixture adapter
Power canopy
Retaining cap
Track
Retaining cap
Retaining cap
Cover
Cover
Track head
Retaining cap
Cover
Track head
Track head
Screw
Lamp holder
Glass
Lamp cap
Socket ring
Glass
Glass
Bulb
Fig. 1
Fig. 2
Fig. 3
INSTALL FIXTURE
1. Make sure that the power is turned off.
2. Remove the retaining caps from the fixtures.
3. Align the two tabs of the track fixture adaptor to the two slots on the flexible track.
4. Close the fixture adapters and replace the retaining caps making sure that the connection is secure.
RELAMPING THE BULB:
1. Make sure that the power is turned off.
2. Make sure that the bulb is cool before relamping the fixture.
3. There are two kinds of sockets as the above Figs: Attach the glass to the socket, fix the glass with screw (refer to the
Fig.1); Attach the glass to the socket (refer to the Fig. 2 & Fig. 3).
4. Use relamping tool if necessary to remove and install bulbs.(Note: Keep relamping tool for future use, not included.)
5. Restore electrical power.
CAUTION: Refer to the relamping label located near the lampholder for recommended maximum wattage.
RIEL FLEXIBLE DE LUCES PARA TENSIÓN DE LÍNEA
MANUAL DE INSTRUCCIONES
Lea cuidadosamente y guarde estas instrucciones, porque puede necesitarlas más adelante.
SEGURIDAD
ADVERTENCIA: RIESGO DE DESCARGA ELÉCTRICA
Antes de instalar el accesorio de iluminación, desconecte el circuito de la red de suministro eléctrico.
INDICACIONES GENERALES
Efectúe todas las conexiones eléctricas de acuerdo con las reglamentaciones municipales y nacionales vigentes. Si usted
no está familiarizado con los métodos de instalación del cableado eléctrico, contrate los servicios de un perito electricista
habilitado. Antes de iniciar la instalación, corte la alimentación eléctrica general con el interruptor principal o quitando los
fusibles de entrada.
INSTRUCCIONES DE INSTALACIÓN
PRECAUCIÓN: ANTES DE COMENZAR LA INSTALACIÓN, ASEGÚRESE DE QUE EL SUMINISTRO ELÉCTRICO ESTÉ
DESCONECTADO EN LA CAJA DEL CIRCUITO ELÉCTRICO. DESCONECTAR LA ENERGÍA EN EL INTERRUPTOR
DE PARED NO ES SUFICIENTE PARA EVITAR DESCARGAS ELÉCTRICAS.
1.
INDICACIONES GENERALES
Asegúrese de leer estas instrucciones y revisar los diagramas con cuidado antes de instalar el accesorio de
iluminación.
2. Todas las instalaciones eléctricas deben observar los códigos locales y el Código de Electricidad Nacional de EE.UU.
Si usted no está familiarizado con los métodos de instalación del cableado eléctrico, contrate los servicios de un perito
electricista habilitado.
3. Estos artefactos están previstos para usar con una caja de empalmes octogonal metálica de 4 x 2 1/8 pulg. (100 x 54
mm) de profundidad. La caja debe ser soportada directamente por la estructura del edificio.
4. Antes de empezar con la instalación, desconecte la alimentación eléctrica con el interruptor general o los fusibles de
entrada. Cortar la alimentación al circuito solamente con la llave de luz, no es suficiente para prevenir una
electrocución.
Nota: Las importantes recomendaciones e instrucciones proporcionadas en este manual no abarcan todas las condiciones
y/o situaciones posibles que pudieran presentarse. Se sobreentiende que el sentido común, la precaución y la atención
al trabajo no son parte de ningún producto. Son factores que debe tener en cuenta quien ejecute la instalación, cuide y
opere el accesorio.
INSTRUCCIONES DE SEGURIDAD IMPORTANTES
1. Lea todas las instrucciones.
2. No instale este sistema de iluminación en lugares húmedos o mojados.
3. Antes de conectar la alimentación, asegúrese de que el sistema de iluminación esté libre de materiales que puedan
causar un cortocircuito directo y verifique todas las conexiones eléctricas para asegurarse de que estén apretadas.
4. PRECAUCIÓN – Superficie caliente, manténgala alejada de cortinas y otros materiales combustibles.
5. ¡La bombilla encendida está caliente! No toque la bombilla en ningún momento. Use un trapo blando o herramientas
especiales (como se ilustra en el diagrama). La grasitud de la piel puede dañar la bombilla.
6. ¡La bombilla se calienta rápidamente! Toque sólo el interruptor o el enchufe al encenderla. No toque el cristal de la
bombilla caliente.
7. No esconda ni extienda los conductores de la barra de distribución a través de una pared de construcción. Desconecte
la energía eléctrica y deje que se enfríe antes de reemplazar la bombilla.
8. No instale ninguna parte de este sistema (RIEL) a menos de 7 pies (2.2 m) sobre el nivel del piso.
9. Para reducir el riesgo de incendio y quemaduras, no instale este sistema de iluminación allí donde puedan producirse
cortocircuitos de los conductores de la barra de distribución abierta sin aislar o donde estos puedan hacer contacto con
materiales conductores.
10. Para reducir el riesgo de incendio o recalentamiento, asegúrese de que todas las conexiones estén apretadas.
11. No instale ninguna bombilla a una distancia menor de 6 pulgadas (15 cm) de cualquier cortina o material combustible
similar.
12. Desconecte la alimentación eléctrica antes de modificar de cualquier manera el sistema de iluminación.
13. Use una separación mínima de 20 pulgadas (50 cm) entre anclajes cuando utilice 4 anclajes.
14. Sólo para instalación con sistemas de riel flexible de tensión de línea serie EC. No corte ninguna sección del riel.
15. PRECAUCIÓN – Para reducir el riesgo de quemaduras durante el cambio de bombillas, retírelo del riel antes del
cambio.
16. Este sistema de riel debe ser alimentado por un circuito de 120 voltios de un solo ramal.
17. Desconecte la energía eléctrica antes de hacer agregados a la configuración del riel o de cambiarla.
LEA Y CONSERVE ESTAS INSTRUCCIONES
Herramientas necesarias: Destornillador Phillips, llave ajustable, Perforadora eléctrica de mano,escalera, pinza para
cortar cables, elementos de cableado requeridos por el código de electricidad.
CÓMO INSTALAR EL ACCESORIO:
Impulse dosel, huella, raíces de soporte de techo (vendidas por separado )
Observe lo siguiente:
Estos accesorios sólo son compatibles con
los sistemas de riel Hampton Bay Flex Track
de 120 V. El límite para cualquier sistema es
2400 W como máximo.
Impulse dosel
Adaptador de cosa fija
Reteniendo capuchón
Huella
Fig. 1
Fig. 2
Fig. 3
INSTALACIÓN DEL ACCESORIO:
1.
2.
3.
4.
Asegúrese de que la alimentación está desconectada.
Retire las tapas de retención de los accesorios.
Alinee las dos lengüetas del accesorio del riel con las dos ranuras del riel flexible.
Cierre los adaptadores del accesorio y vuelva a colocar las tapas de retención, asegurándose de que la conexión
quede bien firme.
CAMBIO DE BOMBILLAS
1. Asegúrese de que la alimentación está desconectada.
2. Asegúrese de que la bombilla esté fría antes de cambiarla.
3. Hay dos tipos de zócalos como los Figura citados: Anexe el vaso al zócalo, repare el vaso con tornillo (haga referencia
al el Fig. 1;) reúna el anillo de zócalo al zócalo, entonces anexe el vaso al anillo de zócalo (haga referencia al el Fig. 2 y
el Fig. 3.)
4. Para retirar e instalar las bombillas, use la herramienta especial si fuera necesario. (Nota: Guarde la herramienta
especial para uso future, no incluidas.)
5. Restablezca la energía eléctrica.
PRECAUCIÓN: Observe el valor máximo de potencia de bombilla recomendado en la etiqueta del portalámpara.